background image

English

31

VCR F

unctions

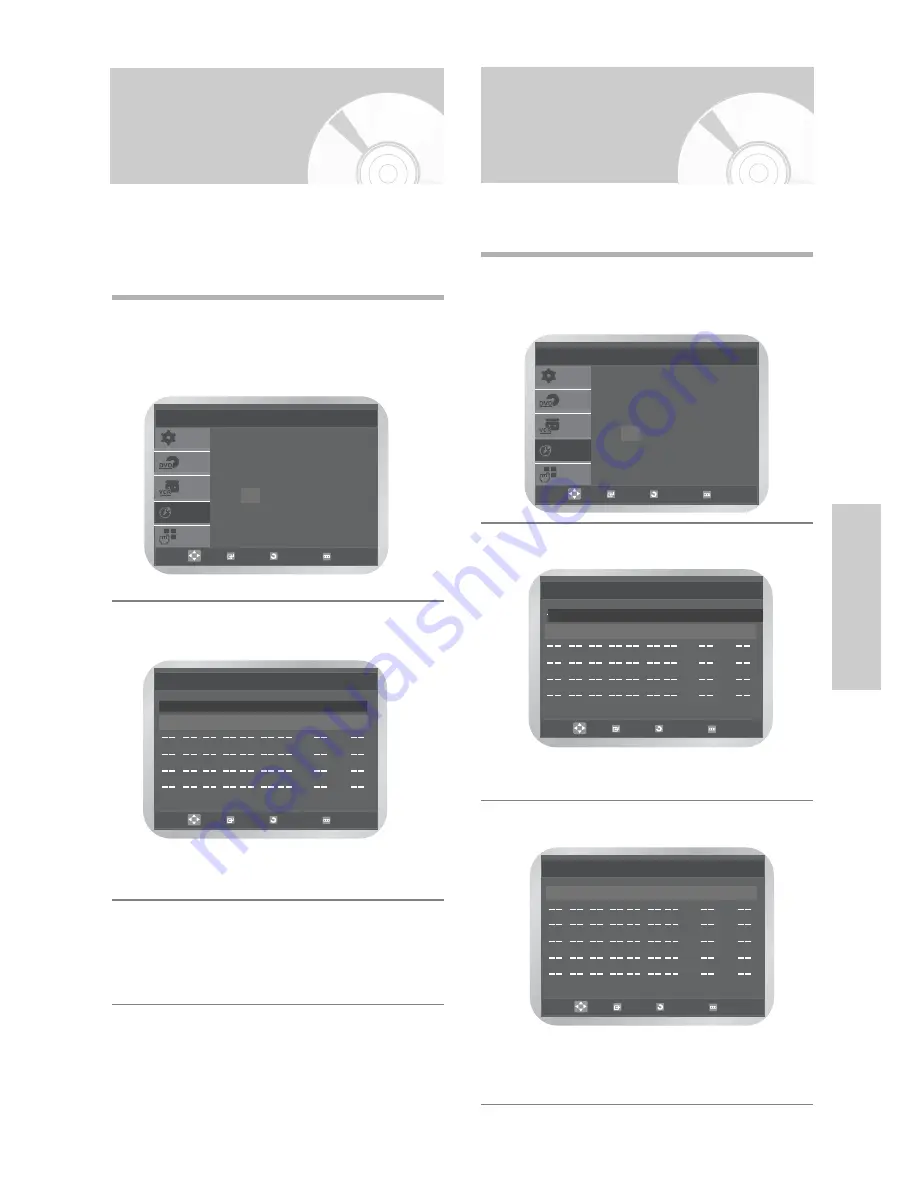
Checking a Preset

Recording

You can check your preset recordings:

• When you have finished presetting the DVD-VCR
• If you have forgotten which programmes will be

recorded

1

Press the 

MENU

button, then press the 

or 

button to select 

PROG

, then press the 

OK

or 

button.
The 

Timer Method

menu is displayed.

2

The list of preset recodings is displayed with the
corresponding information. 

• It can be displayed simply by pressing the 

TIMER

button on the remote control.

3

To change any values, select the required
programme by pressing the 

or 

button, then

change any values as required. For more details
refer to page 29. (Step 2 to 9)
• Press the 

MENU

button to exit the menu.

SETUP

DVD

VCR

PROG

FUNC

Timer Method

If you want to set the

timer program, press

the OK key.

OK

RETURN

MENU

:

:

:

:

:

:

:

:

:

:

:

:

PR Day

Start     Stop

Speed

V/P

OK

RETURN

MENU

01   SA 01   13 : 25

19 : 57       SP

Off 

-- -- -- -- : -- -- : --

--

--

Cancelling a Preset

Recording

You can cancel any programmes that are:
• Incorrect
• No longer required

1

Press the 

MENU

button, then press the 

or 

button to select 

PROG

, then press the 

OK

or 

button.
The 

Timer Method

menu is displayed.

2

The list of preset recodings is displayed with the
corresponding information. 

• It can be displayed simply by pressing the 

TIMER

button on the remote control.

3

Press the 

or 

button to select the programme

to be cancelled, then press the 

CLEAR

button.

• All the recording information is deleted and the 

broadcast will not be recorded.

• Press the 

MENU

button to exit the menu.

:

:

:

:

:

:

:

:

:

:

:

:

PR Day

Start     Stop

Speed

V/P

OK

RETURN

MENU

-- -- -- -- : -- -- : --

--

--

:

:

:

:

:

:

:

:

:

:

:

:

PR Day

Start     Stop

Speed

V/P

-- -- -- -- : -- -- : --

--

--

OK

RETURN

MENU

01   SA 01   13 : 25

19 : 57       SP

Off 

SETUP

DVD

VCR

PROG

FUNC

Timer Method

If you want to set the

timer program, press

the OK key.

OK

RETURN

MENU

Summary of Contents for SD-36VESE

Page 1: ... 2005 Toshiba Corporation DVD VIDEO PLAYER VIDEO CASSETTE RECORDER SD 36VESE User s Manual PAL ...

Page 2: ...ety of your equipment DO be careful with glass panels or doors on equipment DON T remove any fixed cover as this may expose dangerous voltages DON T obstruct the ventilation openings of the equipment with items such as newspapers tablecloths curtains etc Overheating will cause damage and shorten the life of the equipment DON T allow electrical equipment to be exposed to dripping or splashing or ob...

Page 3: ...CD sound VHS quality MPEG 1 compression technology AUDIO CD VIDEO CD DO NOT play CD ROM CD I and DVD ROM in this player CDGs play audio only not graphics It may not play CD R CD RW and DVD R RW DVD R RW in all cases due to the type of disc or condition of the recording The recorded disc may not run as playback depends on the recording speed Do not run the player with two discs loaded at the same t...

Page 4: ... Selecting the Cassette Type 25 Repeat Play 25 Selecting the Recording Speed 26 Protecting a Recorded Cassette 26 Recording a Programme Immediately 27 Recording a Programme with Automatic Stop 27 Recording from Another VCR or Camcorder 28 Using the Assemble Edit Function 28 Using the Timer Programming Feature 29 Checking a Preset Recording 31 Cancelling a Preset Recording 31 Playing Back Playing B...

Page 5: ...JACK 16 AUX AUDIO L R INPUT JACK Rear View of the DVD VCR Display Indicators 1 AUDIO L R OUT JACKS 2 AERIAL IN CONNECTOR 3 AV2 DEC EXT SCART EURO 21 JACK 4 AUDIO L R OUT JACKS DVD ONLY 5 VIDEO OUT JACK 6 OUT TO TV CONNECTOR 7 AV1 EURO AV IN OUT SCART EURO 21 JACK 8 DIGITAL AUDIO OUT JACKS COAXIAL 9 S VIDEO OUT JACK 5 6 7 8 9 1 2 3 4 1 The DVD Deck is active 2 Disc is loaded 3 The time counter posi...

Page 6: ...g correctly 1 Push the tab in the direction of the arrow to release the battery compartment cover on the rear of the remote control 2 Insert two AA R6 or equivalent batteries taking care to respect the polarities on the battery with on the remote control on the battery with on the remote control Do not mix different battery types manganese and alkaline for example 3 Replace the cover by aligning i...

Page 7: ...Used to display the current setting or disc status 19 SHUTTLE Used to play a sequence at variable speeds 20 TIMER Used to activate the timer recording of a programme 21 ANGLE Used to access various camera angles on a DVD IPC Intelligent Picture Control Used to adjust the sharpness of the picture 22 TV VCR Used to select TV or VCR 23 INPUT SEL Used to select an external input signal 24 PROG Used to...

Page 8: ...iver Connections 11 Connecting an Audio Video Input Cable 12 Plug Auto Setup 12 Quick Overview A Quick overview presented in this guide will give you enough information to start using the DVD VCR Connecting DVD VCR to the TV using the RF Cable Connecting DVD VCR to the TV using the SCART Cable Connecting DVD VCR to a Satellite Receiver or Other Equipment Connecting DVD VCR to the TV using the Audi...

Page 9: ...iate input is available on the television You thus Obtain better quality sound and pictures Simplify the setting up procedure of your DVD VCR 1 Connect the Aerial Cable 2 Connect one end of the SCART cable to the AV1 EURO AV jack on the rear of the DVD VCR 3 Plug the other end into the appropriate connector on the television Connecting the Audio Output Cable You can connect your DVD VCR to a Hi Fi...

Page 10: ...other end into the appropriate connector on the television When using the SCART cable set the TV to audio video mode AV 3 By means of RF Cable After making this connection you must preset the station received through the satellite tuner RF output channel of the satellite receiver should be adjusted away from channel 36 which is used by the DVD VCR e g re adjust to channel 33 Connecting DVD VCR to ...

Page 11: ...Audio Input of an A V Receiver with a Dolby MPEG2 DTS Digital Decoder Connecting DVD VCR to the TV using the S Video Cable You will enjoy high quality images S Video seperates the picture element into black and white Y and colour C signals to present clearer images than regular video input mode 1 Connect one end of the S Video cable into the S VIDEO output jack on the rear of the DVD VCR 2 Plug th...

Page 12: ...he AUDIO input jacks on the front of the DVD VCR Take care to respect the colour coding of the left and right channels 4 Plug the other end of the audio cable into the appropriate output connectors on the other system VCR camcorder etc 2 4 3 1 Plug Auto Setup Your DVD VCR will automatically set itself up when it is plugged into the mains for the first time TV stations will be stored in memory The ...

Page 13: ...ime See page 15 Now you only have to switch the DVD VCR on and it is ready for use Function for Plug Auto Set Up is fixed already So if you want to change this fixed one you can change refer to Presetting the Stations Manually page 18 Note SETUP DVD VCR PROG FUNC Clock Set Time Date Year 12 00 01 JAN 2005 SAT Auto Clock On OK RETURN MENU ...

Page 14: ... DVD VCR Check that the DVD VCR starts reading the cassette if not press the II button 5 Start a scan on your television or set the television to UHF channel 36 6 Fine tune the television until the pictures and sound are obtained clearly 7 When the picture and sound are perfectly clear store this channel at the desired programme position on the television That programme is now reserved for use wit...

Page 15: ... OK RETURN MENU Time Date Year 12 00 01 JAN 2005 SAT Auto Clock On Setting the Date and Time Your DVD VCR contains a 24 hour clock and calendar used to Automatically stop programme recording Preset your DVD VCR to record a programme automatically You must set the date and time when You purchase the DVD VCR Do not forget to reset the time when you change clocks from winter to summer time and vice v...

Page 16: ...ions Automatically You do not need to preset the stations if you have already set them automatically refer to Plug Auto Set Up on page 12 Your DVD VCR contains a built in tuner used to receive television broadcasts You must preset the stations received through the tuner This can be done Plug Auto Set up refer to page 12 Automatically Manually refer to page 18 You can store up to 80 stations 1 Pres...

Page 17: ... for the second station and so on When the automatic scanning procedure has finished the DVD VCR switches automatically to programme 1 If you wish to cancel the auto scanning before the end press the MENU button Auto Setup Your data will be lost Press OK to continue MENU to exit OK RETURN MENU Auto Setup RETURN MENU Please Wait 10 The number of stations automatically stored by the DVD VCR depends ...

Page 18: ...anning the channels The frequency band is scanned and the first station found is displayed 6 If necessary press the or button to select MFT then press the œ or button to adjust the picture 7 Press the or button to select DECODER then press the œ or button to select decoder ON or OFF SETUP DVD VCR PROG FUNC Setup Language English Clock Install User Set Auto Power Off Off Screen Messages On OK RETUR...

Page 19: ... TABLE PR CH NAME DEC 1 021 OFF 2 3 4 5 SWAPPING OK DELETE CLEAR RETURN 8 Press the or button to select NAME The station name is set automatically from the broadcast signal To change the programme s name press the button The first letter of the name flashes 9 10 Repeat this procedure from step 4 onwards until all the required stations have been stored 11 Press the MENU button to exit the menu MANU...

Page 20: ... on the television screen 5 Press the OK button to change the programme number assigned to a station 6 Press the or button to select required position then press the OK button to swap the position For example To move a TV station in programme 1 to programme 3 Press the MENU button to exit the menu SETUP DVD VCR PROG FUNC Install Auto Setup Manual Setup TV System G VCR Output CH CH36 OK RETURN MENU...

Page 21: ...e B G D K You can choose the sound mode B G or D K according to the TV set connected to your VCR 1 Press the MENU button then press the OK or button 2 Press the or button to select Install then press the OK or button The Install menu is displayed 3 Press the or button to select TV System then press the OK or button to select G or K Press the MENU button to exit the menu SETUP DVD VCR PROG FUNC Set...

Page 22: ...r button to select required colour system Auto PAL B W Auto When playing back a cassette the system standard is automatically selected by the DVD VCR B W Black and White SETUP DVD VCR PROG FUNC User Set Colour System Auto NICAM On IPC On OK RETURN MENU VCR Functions Selecting the Colour Mode Selecting the Colour Mode 22 NICAM 23 Intelligent Picture Control 23 Auto Power off 24 Screen Messages 24 S...

Page 23: ...English Clock Install User Set Auto Power Off Off Screen Messages On OK RETURN MENU SETUP DVD VCR PROG FUNC User Set Colour System Auto NICAM On IPC On OK RETURN MENU Intelligent Picture Control This feature allows you to adjust the sharpness of the image automatically according to your own preferences 1 During playback press the MENU button then press the OK or button 2 Press the or button to sel...

Page 24: ...ton to exit the menu SETUP DVD VCR PROG FUNC Setup Language English Clock Install User Set Auto Power Off Off Screen Messages On OK RETURN MENU SETUP DVD VCR PROG FUNC Setup Language English Clock Install User Set Auto Power Off Off Screen Messages On OK RETURN MENU Auto Power off This feature automatically turns off your DVD VCR if no signal is received and you do not press any button for the sel...

Page 25: ...ff OK RETURN MENU SETUP DVD VCR PROG FUNC VCR Setup Tape Select E180 Repeat Play Off OK RETURN MENU Repeat Play You can set repeat play to repeat the tape continuously from beginning to end 1 Press the MENU button then press the or button to select VCR 2 Press the OK or button The Tape Select is selected 3 Press the or button to select Repeat Play Press the OK or button to select On or Off On Repe...

Page 26: ... with adhesive tape Selecting the Recording Speed You can record a cassette at two different speeds SP Standard Play LP Long Play In Long Play modes Each cassette lasts twice as long The recording is of a slightly lower quality 1 Press the SPEED button to select SP or LP The selected record speed will appear on the front panel display Type Recording Time in SP E180 180 mins or 3 hours E240 240 min...

Page 27: ...ower off 7 If you wish to cancel the recording before the end press the ON STANDBY button If the end of the tape is reached while recording the recording stops and power off LENGTH 2 30 SET LENGTH PRESS REC Recording a Programme Immediately Before recording a programme you must have preset the corresponding station unless you are recording via an external video source If you have not done so refer...

Page 28: ... on both VCR and DVD VCR If you wish to view the cassette being copied your DVD VCR must be connected as usual to the television refer to page 9 for further details Recording from Another VCR or Camcorder Using the Assemble Edit Function This function allows you to start a new recording at a specific position on the cassette while maintaining a very smooth scene change 1 Insert the cassette to be ...

Page 29: ...ote control SETUP DVD VCR PROG FUNC Timer Method If you want to set the timer program press the OK key OK RETURN MENU 3 Press the OK or button to select PR then press the or button to select the required station Press the INPUT SEL button to select an input source AV1 AV2 or AUX other than the tuner 4 Press the button to select Day then press the or button to select the required day DLY Daily W SU...

Page 30: ...imes by the VPS PDC signals to assure the recording of a whole programme covering any changes in the published broadcast time that is time shift extension or interruption of the programme lf the TV programme is interrupted during the VPS PDC controlled timer recording the recording will be automatically interrupted and resumed when the programme continues Important The VPS PDC function only works ...

Page 31: ... the timer program press the OK key OK RETURN MENU PR Day Start Stop Speed V P OK RETURN MENU 01 SA 01 13 25 19 57 SP Off Cancelling a Preset Recording You can cancel any programmes that are Incorrect No longer required 1 Press the MENU button then press the or button to select PROG then press the OK or button The Timer Method menu is displayed 2 The list of preset recodings is displayed with the ...

Page 32: ...an be played back but cannot be recorded with this DVD VCR 3 Press the stop button to stop the playback Press the eject button to eject the playback This feature allows you to adjust the alignment manually to obtain the best possible picture When noise bars or streaks appear during playback adjust alignment manually by pressing the TRK or button until the picture is clear and stable The tracking b...

Page 33: ...speakers and AV outputs The following options are available Press the AUDIO button on the remote control until the required option is displayed Playing a Cassette in Slow Motion You can play a cassette in slow motion No sound is heard when playing back a cassette in slow motion 1 Press the ll button to start playing the cassette ll button again to make still mode button to start slow mode œœ or bu...

Page 34: ... button then press the or button to select FUNC Press the OK or button The Function menu is displayed etc 2 1 1 2 etc Prev Seq Seq being played Next Seq 2 Press the or button to select VCR Function then press the OK or button The VCR Function menu is displayed with the Go To 0 00 00 selected It can be displayed simply by pressing the SEARCH button 3 Press the OK or button again End Search Use this...

Page 35: ...ifferent programmes on a tape and you have rewound the tape to the beginning by using this feature you can go directly to the start of programme 2 simply by pressing the SEARCH button 1 Press the SEARCH button The VCR Function menu is displayed Press the or button to select Intro Scan 2 Press the OK or button 3 Press the œœ or button twice more 4 These Index searches can be made forwards press the...

Page 36: ...ton twice to display the counter Press the CLEAR button when you want to set the tape counter to zero 2 When you are ready Start playback or Recording Press the button To fast froward or rewind to the sequence at which the counter was set to zero press the œœ or button Some DVD VCR information such as the counter can be displayed on the television screen unless you have deactivated the Screen Mess...

Page 37: ...rental Setup DivX R Registration OK RETURN MENU Language Setup Disc Menu English Audio English Subtitle Automatic OK RETURN MENU DVD Functions Setting Up the Language Features 37 Setting Up the Audio Options 39 Setting Up the Display Options 40 Setting Up the Parental Control 41 DivX R Registration 43 Setting up the DVD function 43 Special Playback Features 44 Using the Display Function 45 Adjusti...

Page 38: ...riginal Others Audio OK RETURN MENU Using the Subtitle Language 1 Press the MENU button in the stop mode Press the or button to select DVD then press the OK or button 2 Press the OK or button again Press the or button to select Subtitle then press the OK or button 3 Press the or button to select the required language Select Automatic if you want the subtitle language to be the same as the language...

Page 39: ...Compression On To select dynamic compression Off To select the standard range PCM Down Sampling On Select this when the amplifier connected to the player is not 96KHz compatible In this case the 96KHz signals will be down converted to 48KHZ Off Select this when the amplifier connected to the player is 96KHz compatible In this case all signals will be output without any changes Be sure to select th...

Page 40: ... bottom of the screen 4 3 Pan Scan Select this for conventional size TVs when you want to see the central portion of the 16 9 screen Extreme left and right side of movie picture will be cut off 16 9 Wide You can view the full 16 9 picture on your widescreen TV Black Level Adjusts the brightness of the screen On Off Black level function works on NTSC system only NTSC Disc Output NTSC if the screen ...

Page 41: ...n if you want to use a password The Enter Password menu is displayed Enter your password by pressing the number buttons The Re enter Password menu is displayed to confirm the password 4 Enter your password again The Use Password is set to Yes and the Parental Setup menu is displayed The DVD VCR is locked Create Password RETURN Enter Passaword Create Password RETURN Re enter Passaword Parental Setu...

Page 42: ...lt Level 7 Level 6 Level 5 Level 4 Level 3 Level 2 Level 1 Kids Safe OK RETURN MENU Changing the Password 5 Press the or button to select Change password then press the OK or button 6 Press the OK or button The Enter New Password is displayed Enter your password by pressing the number buttons The Re enter Password is displayed to confirm the password 7 Enter your password again How to make the DVD...

Page 43: ...TURN MENU Your Registration code is ZD7A8VD5 Please use this code to register this player with the DivX R Video On Demand service This will allow you to rent and purchase videos using the DivX R Video On Demand format To learn more go to www divx com vod Setting up the DVD function 1 During playback press the MENU button Press the corresponding buttons to select FUNC then press the OK or button 2 ...

Page 44: ... beginning of the current chapter track Press the lœœ button again in quick succession to jump to the beginning of the previous chapter track Search Forward Back While a disc is in play mode press and hold the œœ or button to visually search forward backward at 2X 4X 8X 16X 32X 128X speed Press the ll button to resume normal speed CD 2X 4X 8X 16X 32X Note Frame Advance operates only in the forward...

Page 45: ...is more than one movie on a DVD each movie will be identified A DVD may contain several different titles For example if a disc contains four different movies each might be considered a title Most of DVD discs are recorded in chapters so that you can quickly find a specific passage Each Title on a DVD is usually divided into chapters similar to tracks on VCD and audio CD Allows playback of the film...

Page 46: ...o The picture will look horizontally stretched Screen Fit The top and bottom portions of the screen are cut off and the full screen appears The picture will look vertically stretched Zoom Fit The top bottom left and right portions of the screen are cut off and the central portion of the screen is enlarged If you are using a 4 3 TV For 16 9 aspect ratio discs 4 3 Letter Box Displays the content of ...

Page 47: ...w to have the same subtitle language come up whenever you play a DVD Refer to Setting Up the Language Features on page 38 Note Multiple language audio setup options such as Dolby Digital 5 1 Dolby Pro Logic or LPCM 2 Channel audio are available on some DVDs You can use the AUDIO button to quickly view and select the options available on a disc 1 During playback press the AUDIO button Press the œ o...

Page 48: ...ack press the MENU button Press the or button to select FUNC then press the OK or button The Function menu is displayed 2 Press the or button to select DVD Function then press the OK or button 3 Press the or button to select ZOOM then press the OK or button 4 Press the or œ buttons to select the part of the screen you want to zoom in on then press the OK button Press the OK button to zoom in 2X 4X...

Page 49: ...u 1 CLEAR 1 CLEAR You can repeat a single chapter or a complete title 1 Press the REPEAT button while in playback mode to open the repeat menu The current repeat mode is displayed 2 Press the œ or button to select Chapter Title Press the OK button to repeat the current chapter Title The menu will display Track Disc in place of Chapter Title if you are playing a VCD CD Cancel Chapter Title 1 Press ...

Page 50: ... B Off A B Off Track Disc DVD VCD CD Off A Off Chapter Title A B A B Off Chapter Title DVD Off A Off Chapter Title A B A B Off Track Disc VCD CD 3 Press the OK button again at the end of the segment you want to repeat Point B The segment will begin repeating in a continuous loop Cancel A B Repeat 1 Press the REPEAT button to open the repeat menu 2 Press the œ or button to selected Off then press t...

Page 51: ...s Certain securized files are encrypted and code protected to prevent illegal copying These files are of the following types Windows MediaTM registered trade mark of Microsoft Inc and SDMITM registered trade mark of The SDMI Foundation You cannot copy such files Important The above recommendations cannot be taken as a guarantee that the DVD VCR will play MP3 recordings or as an assurance of sound ...

Page 52: ... be played in programmed order Cancel Program play During playback press the CLEAR button 05 06 07 08 09 10 11 12 13 14 15 16 01 02 03 04 OK RETURN PROGRAM RANDOM PROGRAM 01 Track Program Order RETURN CLEAR Random Play 1 Press the MODE button in the stop mode 2 Press the œ or button to select RANDOM Press the OK button The disc will be played in random order Depending on the disc the Program and R...

Page 53: ...e is enlarged up to 4X Normal 2X 4X Normal Album Photo 1 215 OK RETURN OK RETURN Photo 1 215 Photo 1 215 Picture CD Playback If you insert a Picture JPEG CD Disc into the DVD VCR you can see the folder directory 1 Press the or button to select the picture you want to view then press the OK button The selected picture is displayed 2 Press the lœœ or l button to display the previous or next picture ...

Page 54: ...and not all of the recorded files may be played Only CD R discs with JPEG files in ISO 9660 or Joliet format can be played The name of the JPEG file may not be longer than 8 characters and should contain no blank spaces or special characters Only a consecutively written multisession disc can be played If there is a blank segment in the multisession disc the disc can be played only up to the blank ...

Page 55: ...ollowing special playback options To resume normal playback press the ll button 1 Still Press the ll button on the remote control during playback The picture will still and the audio will mute To resume playback press the ll button If the player is left in Still mode for 5 minutes it will stop automatically 2 Frame Advance Step While in playback mode press the F ADV STEP button on the remote contr...

Page 56: ...Function Press the OK or button Press the or button to select ZOOM then press the OK button Auto Scaling CIF 100kbps D1 784kbps resolution If the file resolution is small it scales up to 2 times automatically So you can see the more larger screen SETUP DVD VCR PROG FUNC DVD Function OK RETURN MENU SETUP DVD VCR PROG FUNC Function DVD Function VCR Function OK RETURN MENU Title Menu Disc Menu Info Z...

Page 57: ...English 57 Reference Reference Technical Specifications 58 Troubleshooting Guide VCR 59 Troubleshooting Guide DVD 60 Technical Specifications Troubleshooting Guide VCR Troubleshooting Guide DVD ...

Page 58: ... jack RF out UHF 21 69 Initial CH60 Audio DVD VCR RCA jack Euro Scart socket Output Audio DVD only COAXIAL RCA jack Video DVD VCR RCA jack Euro Scart socket Video DVD only S Video out RGB out Euro Scart socket Tape format VHS type video tape Colour system PAL NTSC4 43 NTSC playback on PAL TV VCR Tuning system B G D K Video S N Above 43dB standard recording Resolution Above 240 lines standard recor...

Page 59: ...problem and unless it appears the heads should not be cleaned When cleaning the video heads read all instructions provided with the head cleaning cassette Incorrect head cleaning can permanently damage the video heads If when tuning in your TV to the DVD VCR TV does not find the Screen or the pattern when found suffers from interference it may be due to the DVD VCR output channel clashing with the...

Page 60: ...s it 2 The DVD s software doesn t support the feature e g angles 3 The feature is not available at the moment 4 You ve requested a title or chapter number or search time that is out of range Some of the functions selected in the Setup menu may not work properly if the disc is not encoded with the corresponding function The screen ratio is fixed on your DVDs Make sure you have selected the correct ...

Page 61: ......

Reviews: