background image

1-11

Before Use (Continued)

Precautions

Handling the unit

When shipping the unit

The original shipping carton and packing materials
come in handy. For maximum protection, re-pack the
unit as it was originally packed at the factory.

When setting the unit

The picture and sound of a nearby TV or radio may be
distorted during playback. In this case, position the unit
away from the TV or radio, or turn off the unit after
removing the disc.

To keep the surface clean

Do not use volatile liquids, such as insecticide spray,
near the unit. Do not leave rubber of plastic products in
contact with the unit for a long period of time. They will
leave marks on the surface.

Cleaning the unit

To clean the cabinet

Use a soft, dry cloth. If the surfaces are extremely dirty,
use a soft cloth lightly moistened with a mild detergent
solution. Do not use strong solvents, such as alcohol,
benzine, or thinner, as these might damage the surface
of the unit.

To obtain a clear picture

The DVD player is a high-tech, precision device. If the
optical pick-up lens and disc drive parts are dirty or
worn down, the picture quality will be poor.
Regular inspection and maintenance are recommended
after every 1,000 hours of use. (This depends on the
operating environment.)
For details, please contact your nearest dealer.

Notes on Discs

Handling discs

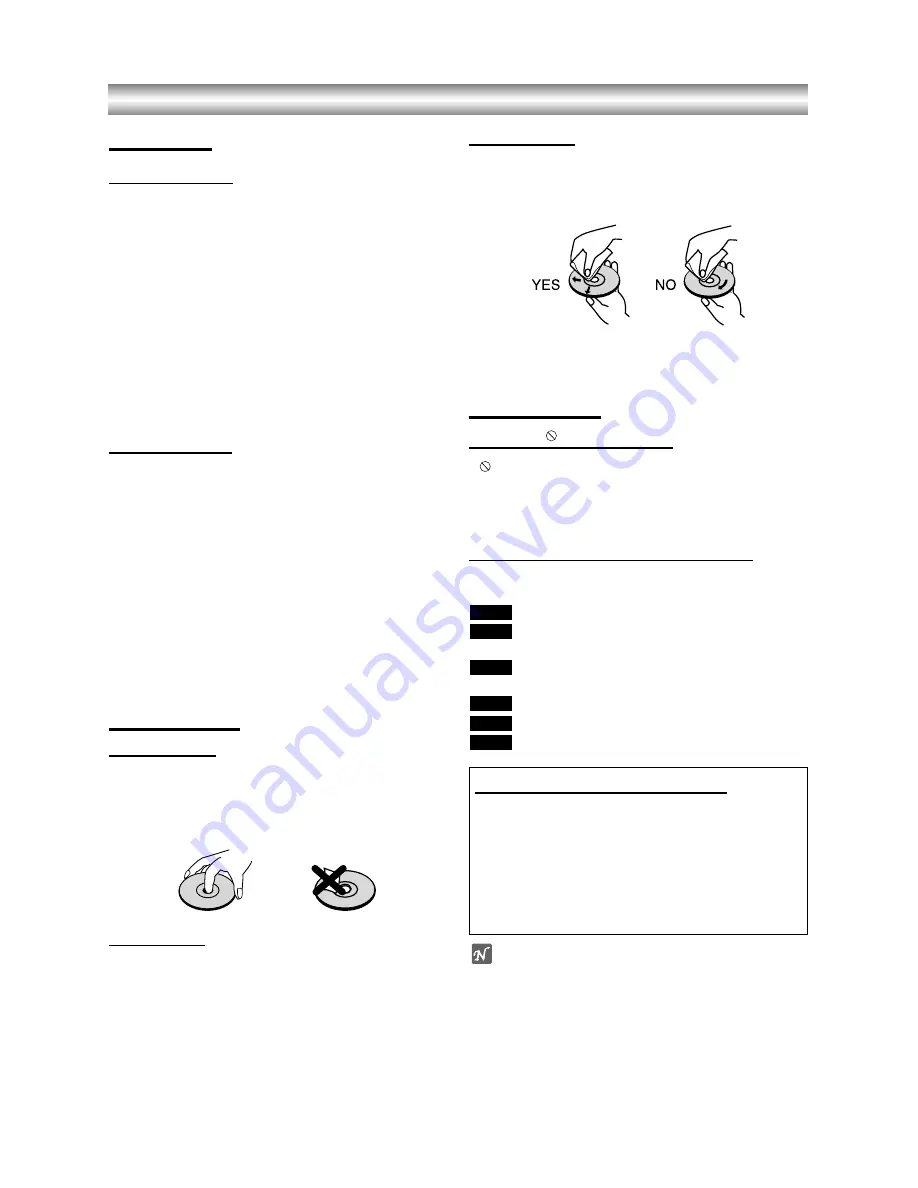
Do not touch the playback side of the disc.
Hold the disc by the edges so that fingerprints will not
get on the surface.
Do not stick paper or tape on the disc.

Storing discs

After playing, store the disc in its case.
Do not expose the disc to direct sunlight or sources of
heat, or leave it in a parked car exposed to direct sun-
light, as there may be a considerable temperature
increase inside the car.

Cleaning discs

Fingerprints and dust on the disc can cause poor pic-
ture quality and sound distortion. Before playing, clean
the disc with a clean cloth. Wipe the disc from the cen-
ter out.

Do not use strong solvents such as alcohol, benzine,
thinner, commercially available cleaners, or anti-static
spray intended for older vinyl records.

About Symbols

About the

symbol display

“ 

” may appear on the TV screen during operation.

This icon means the function explained in this owner’s
manual is not permitted by the DVD+VCR or is not
available on that specific DVD video disc.

About the disc symbols for instructions

A section whose title has one of the following symbol is
applicable only to the disc represented by the symbol.

DVD 
Video CDs with the PBC (playback control)
function.
Video CDs without the PBC (playback control) 
function.
Audio CDs.
MP3 disc.
JPEG disc.

JPEG

MP3

CD

VCD1.1

VCD2.0

DVD

Selecting the Viewing Source

You must select one of your output sources (DVD or
VCR) to view on the TV screen. 

• If you want to view DVD deck output source:

Press DVD until DVD indicator in the display window lights
and output source of DVD deck is viewed on the TV screen.

• If you want to view VCR deck output source:

Press VCR until VCR indicator in the display window lights
and output source of VCR deck is viewed on the TV screen.

Notes

If you insert a disc while the DVD+VCR is in the VCR
mode, the DVD+VCR will switch to DVD mode 
automatically.

If you insert a cassette tape without prevention tab
while the DVD+VCR is in the DVD mode, the
DVD+VCR will switch to VCR mode automatically.

Summary of Contents for SD-24VBSB

Page 1: ...PLAYER VIDEO CASSETTE RECORDER Before connecting operating or adjusting this product please read this instruction booklet carefully and completely 2004 Toshiba Corporation This device does not tape record copy protected DVD Video Discs ...

Page 2: ... OF 625 PROGRESSIVE SCAN PICTURE PROBLEMS IT IS RECOMMENDED THAT THE USER SWITCH THE CONNECTION TO THE STAN DARD DEFINITION OUTPUT IF THERE ARE QUESTIONS REGARDING OUR TV SET COMPATIBILITY WITH THIS MODEL 625p DVD PLAYER PLEASE CONTACT OUR CUS TOMER SERVICE CENTER Features Complete versatility to play DVD VCDs audio CDs or VHS Tapes Watch a DVD while recording a TV show to the VCR Remote controls ...

Page 3: ...be exposed to dripping or splashing or objects filled with liquids such as vases to be placed on the equipment DON T place hot objects or naked flame sources such as lighted candles or nightlights on or close to equipment High temperatures can melt plastic and lead to fires DON T use makeshift stands and NEVER fix legs with wood screws to ensure complete safe ty always fit the manufacturer s appro...

Page 4: ...z Slow Motion 27 z Random 27 z Repeat 27 z Repeat A B 27 z Time Search 27 z 3D Surround 27 z Screen Saver 27 z Zoom 28 z Marker Search 28 z One Touch Replay 28 Special DVD Features 28 z Title Menu 28 z Disc Menu 28 z Camera Angle 28 z Changing the Audio Language 28 z Changing the Audio Channel 28 z Subtitles 28 Operation with Audio CD and MP3 Disc 29 30 Playing an Audio CD and MP3 Disc 29 z Notes ...

Page 5: ...l piece that are smaller than titles A title is composed of one or several chap ters Each chapter is assigned a chapter number enable you to locate the chapter you want Depending on the disc chapters may not be recorded Track Video CD and audio CD only Sections of a picture or a musical piece on a video CD or an audio CD Each track is assigned a track number enabling you to locate the track you wa...

Page 6: ...e the disc to direct sunlight or sources of heat or leave it in a parked car exposed to direct sun light as there may be a considerable temperature increase inside the car Cleaning discs Fingerprints and dust on the disc can cause poor pic ture quality and sound distortion Before playing clean the disc with a clean cloth Wipe the disc from the cen ter out Do not use strong solvents such as alcohol...

Page 7: ... deck DVD VCR indicator Indicates the active deck REC To record normally or to activate One touch Timer Recording by repeated presses FWD Advances the tape during the STOP mode or for fast forward picture search REW Rewinds the tape during the STOP mode or for fast reverse picture search PLAY B B Starts playback of a tape in the VCR deck PLAY B B Starts playback of a disc in the DVD deck STOP x x ...

Page 8: ...k is selected DVD VCR is Recording VCR part only Lights when TV mode is active A disc is in the DVD deck Lights when a disc is in the DVD deck and Flashes when no disc Indicates when the Progressive scan is active Indicates total playing time elapsed time remaining time or current deck status Playback Pause etc The DVD deck is selected Indicates repeat mode ...

Page 9: ...ts an option in the menu PR TRK Selects channel of VCR Adjusts manually the tape s picture onscreen ENTER OK z Acknowledges menu selection Displays functions on the TV screen 1 1 POWER Switches DVD VCR ON and OFF EJECT OPEN CLOSE Opens and closes the disc tray Ejects the tape in the VCR deck TV VCR To view channels selected by the VCR tuner or by the TV tuner COUNTER RESET CLEAR Resets tape counte...

Page 10: ...r TV using this jack AC Power Cord Connect to a power source S VIDEO OUT DVD EXCLUSIVE OUT Connect to a TV With S Video input COMPONENT PROGRESSIVE SCAN VIDEO OUT Y Pb Pr DVD EXCLUSIVE OUT Connect to a TV With Y Pb Pr inputs OPTICAL DVD EXCLUSIVE OUT Digital audio out jack Connect to digital optical audio equipment VIDEO OUTPUT Switch Select either COMPONENT or RGB depending on how you connect thi...

Page 11: ...Input S Video connection 1 1 Connect the S VIDEO OUT jack on this unit to the S Video in jack on the TV using the S Video cable not supplied 2 2 Connect the Left and Right AUDIO OUT DVD EXCLUSIVE OUT jacks of this unit to the audio left right in jacks on the TV using the audio cables Component Color Stream Progressive Scan ColorStream pro Video connection DVD EXCLUSIVE OUT 1 1 Connect the COMPONEN...

Page 12: ...gital multi channel connection provides the best sound quality For this you need a multi channel Audio Video receiver that supports one or more of the audio formats supported by your unit MPEG 2 Dolby Digital and DTS Check the receiver manual and the logos on the front of the receiver Warning Due to the DTS Licensing agreement the digital output will be in DTS digital out when DTS audio stream is ...

Page 13: ...ain clear video playback as described in stages 1 4 Select a TV channel number on which you wish to watch video s Make sure that your DVD VCR is in standby press ing 1 1 on the remote control only the clock will be displayed 6 Press REW m m or FWD M M on the front of your DVD VCR for more than 4 seconds RF36 will appear in the display window The following picture will be displayed on the TV screen...

Page 14: ...r B B and enter the correct details 4 4 Press VCR MENU to return to a TV picture To set the colour system 1 1 Press VCR MENU 2 2 The main menu will appear on the TV screen 3 3 Press 1 or 2 to select the SYSTEM and press ENTER OK 4 4 Press 3 or 4 to select according to the COLOUR system used 5 5 Press VCR MENU to remove the menus from the TV screen To set the RF OUT sound system 1 1 Press VCR MENU ...

Page 15: ...vercome this problem please turn to the MANUAL TUNING section on page 16 1 1 Press 1 1 to turn on your DVD VCR 2 2 Press VCR MENU button The main menu will appear on the TV screen Press 1 or 2 to select the ACMS Press ENTER OK 3 3 Press ENTER OK again to start the automatic tuning process 4 4 The TV STATION TABLE will appear when tuning is completed Press VCR MENU to save your settings Notes O The...

Page 16: ... or E to select a station name from the list Press ENTER OK to select it 7 7 You can change a TV station name manually rather than using the standard names Press G Use 3 or 4 to select letters and numbers for the new station name Use 1 or 2 to move back and forth between characters Press ENTER OK 8 8 Press VCR MENU confirm the station placement Press VCR MENU again Your new TV station has now been...

Page 17: ...ess VCR MENU to remove the menus from the TV screen How to select Stored TV stations Stored TV stations can be selected in either of two ways Use PR TRK or to select different stations that are tuned into your DVD VCR You may also directly select stations using the numbered buttons on the remote control PREPARATION OK i DELETE MOVE PSET R 02 C03 00 PR 02 03 C04 00 PR 03 04 C05 00 PR 04 05 C06 00 P...

Page 18: ... pressed for 10 seconds the on screen display disappears OFF A B ALL TRACK CHAPT TITLE Options Title Number Chapter Number Time search Audio language and Digital Audio Output mode Subtitle language Angle Sound Function Use v V to select desired option Shows the current title number and total number of titles and skips to the desired title number Shows the current chapter number and total number of...

Page 19: ...e COMPONENT PROGRESSIVE SCAN VIDEO OUT jacks but are connecting the DVD VCR to a standard analog television set Progressive Scan to Off If you are using the Component Video jacks for connec tion to a TV or monitor that is compatible with a pro gressive scan signal set Progressive Scan to On This unit can only output 625p progressive scan picture Note Progressive Scan will not be displayed in the s...

Page 20: ...i channel karaoke DVD is playing The karaoke channels on the disc will mix into normal stereo sound PBC Set Playback Control PBC to On or Off On Video CDs with PBC are played according to the PBC Off Video CDs with PBC are played the same way as Audio CDs Auto Play You can set up the DVD Player so a DVD disc automat ically starts playing whenever the DVD is inserted If Auto Play mode is set to On ...

Page 21: ...c The alter native must have the same rating or a lower one If no suitable alternative is found playback will stop You must enter the 4 digit password or change the rating level in order to play the disc 5 5 Press ENTER OK to confirm your rating selec tion then press SETUP to exit the menu Area Code Enter the code of a country area whose standards were used to rate the DVD video disc referring to ...

Page 22: ...s PLAY N to continue playing your tape Picture search During playing back press either REW m or FWD M to this will enable you to rapidly wind the tape 7 times normal playback see where you are on the tape Logic search During fast forwarding or rewinding press and hold REW m or FWD M the picture will be played back at 7 times normal playback speed 5 5 Slow motion playback Shuttle During playing bac...

Page 23: ... for recording from EURO AV2 SCART socket on the rear of your unit AV 3 for recording from VIDEO IN and AUDIO IN Left Right sockets on the front of your unit 5 5 Press SP LP if you wish to record in Long Play or Standard Play SP will produce improved picture and sound quality however LP will provide twice as much recording time as SP 6 6 Press REC OTR on the remote to start recording RECORD will a...

Page 24: ...our unit press INPUT SELECT to select for correct display AV1 AV2 or AV3 5 5 Press the numbered buttons to enter the date of the programme If you press ENTER OK before entering the date you may select one of the following automated recording features Press 1 or 2 to select then press ENTER OK to confirm DLY To record every day except Saturday and Sunday at the same time SU SA To record at the same...

Page 25: ...ete or change Press b to delete the event or Press ENTER OK to change then press b or B to select Station Date Start and End times and LP Press v or V to enter the correct information z If Timer record events Overlap Make sure that the preset times of the timer recording events do not overlap If they do the earlier pro gramme will always be given priority Example Programme 1 is programmed to start...

Page 26: ...Your player will not play discs that have a region code different from your player The region code for this player is 2 two General Features Note Unless stated otherwise all operations described use the remote control Some features may also be available on the Setup menu Moving to another TITLE When a disc has more than one title you can move to another title as follows z z Press DISPLAY then pres...

Page 27: ... page 20 Repeat A B To repeat a sequence in a title 1 Press A B RPT at your chosen starting point A briefly on the TV screen 2 Press A B RPT again at your chosen end point A B appears briefly on the TV screen and the repeat sequence begins 3 To cancel the sequence press A B RPT Time Search The Time Search function allows you to start playing at any chosen time on the disc 1 Press DISPLAY during pl...

Page 28: ...ress SEARCH One Touch Replay Press INSTANT REPLAY during playback and the disc will reverse picture search through 10 seconds of play back And then the playback will start from the point again Special DVD Features Checking the contents of DVD Video discs Menus DVDs may offer menus that allow you to access special features To use the disc menu press MENU Then press the appropriate number button to ...

Page 29: ...imit ed as follows 1 Sampling Frequency only at 44 1kHz 2 Bit rate within 32 320kbps 3 CD R physical format should be ISO 9660 4 If you record MP3 files using the software which cannot create a FILE SYSTEM for example Direct CD etc it is impossible to playback MP3 files We recommend that you use Easy CD Creator which creates an ISO9660 file system 5 A single session disc requires MP3 files in the ...

Page 30: ...cated on the menu screen 3 To exit SEARCH mode press PLAY N Random 1 Press RANDOM during playback or when playback is stopped The unit automatically begins Random Playback and RAND appears on the menu screen 2 To return to normal playback press RANDOM RAND disappears on the menu screen Repeat A B To repeat a sequence 1 During disc playback press A B RPT at your chosen starting point The Repeat ico...

Page 31: ... 1 Press PAUSE STEP X C during slide show The player will now go into PAUSE mode 2 To return to the slide show press PLAY N or press PAUSE STEP X C again To flip the picture Press v V during showing a picture to flip the picture horizontally or a vertically To rotate picture Press b B during showing a picture to rotate the picture clockwise or counter clockwise Notes on JPEG Recordings z z Dependi...

Page 32: ... Program menu 3 3 Follow steps 2 5 of Programmed Playback with Audio CD and MP3 disc on left 4 4 Press PLAY N to start Playback begins in the order in which you programmed the tracks PROGRAM indicator will appear briefly on the TV screen Playback stops after all of the tracks on the Program list have played once 5 5 To resume normal playback from programmed playback press PROGRAM NORMAL indicator ...

Page 33: ...usting the tracking control Hi Fi stereo sound may revert to MONO Note When OFF is selected in NIC only mono sound will be output Blank Search The Blank Search enables you to locate the end of any recording Whenever a recording creates a blank con tent is recorded on the tape Press BLANK SEARCH in the stop mode and it rapidly advanced to find blank content To find next blank content press BLANK SE...

Page 34: ...R Press ENTER OK 2 2 Press D or E to select ON When the decoder is connected to the AV2 socket OFF When another VCR is connected to the AV2 socket Press VCR MENU to return to a TV picture Wide Screen Compatibility 16 9 Your VCR can record and play back wide screen aspect ratio programmes 16 9 To record a wide screen for mat programme successfully the correct type of wide screen signal must be broa...

Page 35: ...rs you may need to press the Play button manually to begin copying 5 5 Stop the Copy Process Press STOP x x Recording from another video recorder With this video recorder you can make recordings from an external source such as copying from another video recorder or a camcorder Note In the following description this video recorder will be one used for recording and will be referred to as VCR B The ...

Page 36: ...n the TV so the picture from the DVD VCR player appears on the TV screen z Connect the video cable into the jacks securely z Set Progressive Scan to Off see page 19 z Select the correct input mode of the audio receiver so you can listen to the sound from the DVD VCR player z Connect the audio cable into the jacks securely z Turn on the equipment connected with the audio cable z Set the Digital Aud...

Page 37: ...te control are exhausted z The remote control is not pointed at the remote sensor of the DVD VCR z The remote control is too far from the DVD VCR z This remote control use the same but tons for VCR and DVD functions ex PLAY z Camcorder is off z DVD VCR SOURCE SELECT is not set to AV1 or AV3 z Clock in DVD VCR is not set to correct time z Timer has been programmed incorrectly z indicator does not a...

Page 38: ...ingua 7165 Irish 7384 Italian 7465 Japanese 7487 Javanese 7578 Kannada 7583 Kashmiri 7575 Kazakh 7589 Kirghiz 7579 Korean 7585 Kurdish 7679 Laothian 7665 Latin 7686 Latvian Lettish Code Language 7678 Lingala 7684 Lithuanian 7775 Macedonian 7771 Malagasy 7783 Malay 7776 Malayalam 7784 Maltese 7773 Maori 7782 Marathi 7779 Moldavian 7778 Mongolian 7865 Nauru 7869 Nepali 7879 Norwegian 7982 Oriya 8065...

Page 39: ...rea KW Kuwait KY Cayman Islands KZ Kazakhstan LA Laos LB Lebanon Code Country Area LC Saint Lucia LI Liechtenstein LK Sri Lanka LR Liberia LS Lesotho LT Lithuania LU Luxembourg LV Latvia LY Libya MA Morocco MC Monaco MD Moldavia MG Madagascar MH Marshall Islands MK Macedonia ML Mali MM Myanmar MN Mongolia MO Macau MP Northern Mariana Islands MQ Martinique French MR Mauritania MS Montserrat MT Malt...

Page 40: ... unbalanced SCART RCA RF IN PAL B G I I SECAM D K Outputs DVD VIDEO OUT 1 0 V p p 75 ohms negative sync COMPONENT VIDEO OUT Y 1 0 V p p 75 ohms negative sync RCA jack x 1 PROGRESSIVE SCAN Pb Pr 0 7 V p p 75 ohms RCA jack x 2 Audio output digital audio 0 5 V p p 75 ohms RCA jack x 1 Audio output optical audio 5 0 V p p 75 ohms Optical connector x 1 Audio output analog audio 2 0 Vrms 1 kHz 0 dB 600 ...

Page 41: ...1 46 P NO 3834RV0004D Printed in Indonesia ...

Reviews: