background image

User’s Manual

4-1

Basic Operations

Chapter 4

Basic Operations

This chapter gives information on basic operations including using the 

TouchPad, optical disc drives, the internal modem, LAN and wireless LAN. 

It also provides tips on caring for your computer and on heat dispersal.

Using the TouchPad

To use the TouchPad, simply move your finger tip across it in the direction 

you want the on-screen pointer to go.

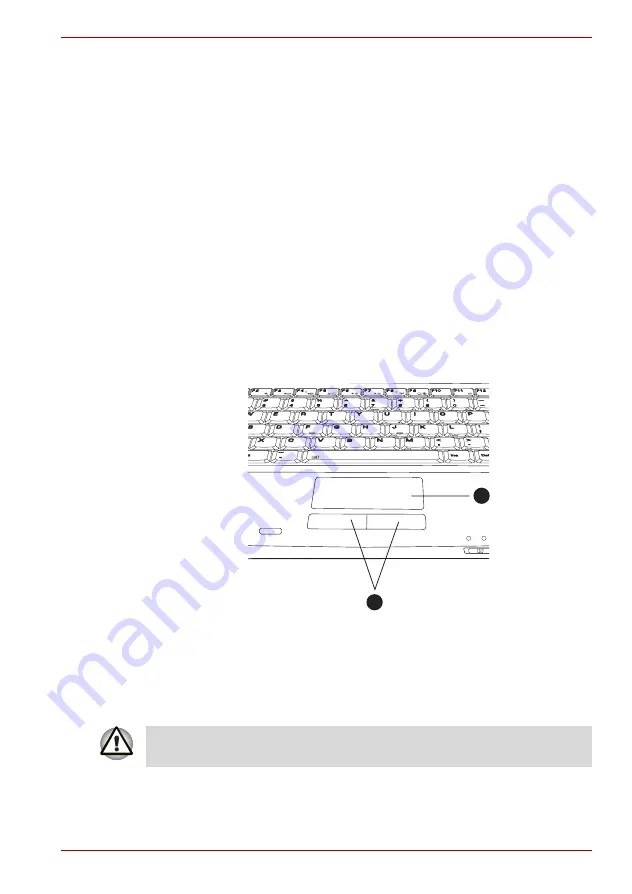
The two buttons below the TouchPad are used like the buttons on a 

standard mouse.
Press the left button to select a menu item or to manipulate text or graphics 

designated by the pointer. Press the right button to display a menu or other 

function depending on the software you are using.

The TouchPad has similar functions to a two-button mouse with a scroll 

wheel. For some functions, you can tap it instead of pressing a button.

1

2

1.

TouchPad Control Buttons

2.

TouchPad

Do not press on the TouchPad too hard or press a sharp object such as a 

ball point pen against it. The TouchPad could be damaged.

Summary of Contents for Satellite L40-ASP4261LM

Page 1: ...computers toshiba europe com User s Manual L40 Series ...

Page 2: ...pyright laws if you use the screen mode switching functions such as Wide mode and Wide Zoom mode of this product to display enlarged images video at coffee shops or hotels for the purposes of profits or providing these to the public Disclaimer This manual has been validated and reviewed for accuracy The instructions and descriptions it contains are accurate for the L40 Series Portable Personal Com...

Page 3: ... is only for EU member states The symbol indicates that this product may not be treated as household waste Ensure this product is properly disposed as inappropriate waste handling of this product may cause potential hazards to the environment and human health For more detailed information about recycling of this product contact your local city office your household waste disposal service or the sh...

Page 4: ...rtified by the manufacturer that the drive complies with the requirement for laser product on the date of manufacturing pursuant to article 21 of Code of Federal Regulations by the United States of America Department of Health Human Services Food and Drug Administration In other countries the drive is certified to comply with the requirement pursuant to IEC 825 and EN60825 on class 1 laser product...

Page 5: ...per use of this product read this instruction manual carefully and retain for future reference Should the unit ever require maintenance contact an authorized service location Use of controls adjustments or procedures other than those specified may result in hazardous radiation exposure To prevent direct exposure to the laser beam do not try to open the enclosure ...

Page 6: ...uct read this instruction manual carefully and retain for future reference Should the unit ever require maintenance contact an authorized service location Use of controls adjustments or procedures other than those specified may result in hazardous radiation exposure To prevent direct exposure to the laser beam do not try to open the enclosure ...

Page 7: ...f this product read this instruction manual carefully and retain for future reference Should the unit ever require maintenance contact an authorized service location Use of controls adjustments or procedures other than those specified may result in hazardous radiation exposure To prevent direct exposure to the laser beam do not try to open the enclosure ...

Page 8: ...uct read this instruction manual carefully and retain for future reference Should the unit ever require maintenance contact an authorized service location Use of controls adjustments or procedures other than those specified may result in hazardous radiation exposure To prevent direct exposure to the laser beam do not try to open the enclosure ...

Page 9: ...duct read this instruction manual carefully and retain for future reference Should the unit ever require maintenance contact an authorized service location Use of controls adjustments or procedures other than those specified may result in hazardous radiation exposure To prevent direct exposure to the laser beam do not try to open the enclosure ...

Page 10: ...ion on every PSTN network termination point In case problems arise you should contact your equipment supplier immediately CAUTION This appliance contains a laser system and is classified as a CLASS 1 LASER PRODUCT To use this model properly read the manual carefully and keep it for your future reference In case of any trouble with this model contact your nearest AUTHORIZED service center To preven...

Page 11: ...ntee of successful operation of that specific function on specific national networks can be given General Precautions TOSHIBA computers are designed to optimize safety minimize strain and withstand the rigors of portability However certain precautions should be observed to further reduce the risk of personal injury or damage to thecomputer Be certain to read the general precautions below and to no...

Page 12: ...pter 3 Getting Started also includes information on work space design posture and lighting that can help reduce physical stress Heat injury Avoid prolonged physical contact with the computer If the computer is used for long periods its surface can become very warm While the temperature will not feel hot to the touch if you maintain physical contact with the computer for a long time for example if ...

Page 13: ...es Please be aware that the use of mobile phones can interfere with the audio system The operation of the computer will not be impaired in any way but it is recommended that a minimum distance of 30 cm is maintained between the computer and a mobile phone that is in use Instruction Manual for Safety and Comfort All important information on the safe and proper use of this computer is described in t...

Page 14: ... side 2 3 Back side 2 4 Underside 2 5 Front with the display open 2 6 Keyboard Indicators 2 7 Optical Disc drive 2 7 Chapter 3 Getting Started Connecting the AC adapter 3 1 Opening the display 3 2 Turning on the power 3 3 Starting up for the first time 3 3 Turning off the power 3 4 Restarting the computer 3 7 System Recovery Options 3 8 Restoring the preinstalled software from the Product Recovery...

Page 15: ...uter 4 23 Moving the computer 4 23 Chapter 5 The Keyboard Typewriter keys 5 1 F1 F12 function keys 5 2 Soft keys Fn key combinations 5 2 Hotkeys 5 3 Windows special keys 5 3 Keypad overlay 5 4 Generating ASCII characters 5 5 Chapter 6 Power and Power Up Modes Power conditions 6 1 Power indicators 6 1 Battery types 6 2 Care and use of the battery pack 6 3 Replacing the battery pack 6 8 Power up mod...

Page 16: ...rs CPU 9 1 Memory Main System 9 2 Battery Life 9 2 HDD Drive Capacity 9 2 LCD 9 2 Graphics Processor Unit GPU 9 3 Wireless LAN 9 3 Non applicable Icons 9 3 Copy Protection 9 3 Images 9 3 LCD Brightness and Eye Strain 9 3 Appendix A Specifications Appendix B Display Modes Appendix C AC Power Cord and Connectors Appendix D If your computer is stolen Glossary ...

Page 17: ... are an experienced computer user continue reading the preface to learn how this manual is organized then become acquainted with this manual by browsing through its pages Be sure to look over the Special features section of the L40 Series Features to learn about features that are unique to the computer Manual contents This manual contains information on various components of the computer and how t...

Page 18: ... are enclosed in parentheses following their definition For example Read Only Memory ROM Acronyms are also defined in the Glossary Icons Icons identify ports dials and other parts of your computer The indicator panel also uses icons to identify the components it is providing information on Keys The keyboard keys are used in the text to describe many computer operations A distinctive typeface ident...

Page 19: ...u have all the following items Hardware L40 Series Portable Personal Computer Universal AC Adapter and Power Cord Modular cable for modem provided with some models ABC Names of windows or icons or text generated by the computer that appears on its display screen is presented in the type face you see to the left WARNING CAUTION Information to prevent injury to yourself or to prevent damage to compo...

Page 20: ...eries Personal Computer User s Manual L40 Series Quickstart Instruction Manual for Safety and Comfort Microsoft Windows Vista Quick Start Guide Warranty Information Product Recovery DVD ROM provided with some models The system may not function properly if you use drivers that are not preinstalled or distributed by TOSHIBA SD Memory Card Format Utility and other SD functions are packaged into TOSHI...

Page 21: ...or the configuration details of the model that you have purchased Disclaimer CPU For more details about the CPU disclaimer refer to the Disclaimers section in Chapter 9 Chipset Basic features are described in a separate pamphlet Some of the features described in this manual may not function properly if you use an operating system that was not preinstalled by TOSHIBA Mobile Intel GL960 Express Chip...

Page 22: ...12MB 1024MB 2048MB Dual channel support 1024KB Flash ROM for system BIOS Suspend to memory or hard disk drive Hardware password protection Various Hotkey functions for system control Complete ACPI 2 0 functionality Battery Pack 6 cell Lithium Ion smart battery pack with 43 2 Wh capacity 10 8V 4000mAH Approximately 12 hours or longer charging time to 100 battery capacity with system switched on App...

Page 23: ... It comes with a detachable power cord A TouchPad and control buttons in the palm rest enable control of the on screen pointer 15 4 WXGA TFT screen with a resolution of 1280 horizontal 800 vertical pixels Graphics controller Mobile Intel GL960 Express Chips Embedded graphics controller The graphics controller maximizes display performance Refer to Display Modes section in Appendix B for more infor...

Page 24: ...DVD ROM module that lets you record data to rewritable CD CD RWs as well as run either 12cm 4 72 or 8cm 3 15 CD DVDs without using an adapter It reads DVD ROMs at maximum 8 speed and CD ROMs at maximum 24 speed It writes CD Rs at up to 24 speed CDRWs at up to 24 speed This drive supports the following formats DVD ROM DVD Video CD R CD RW CD DA CD Text Photo CD single multi session CD ROM Mode1 Mod...

Page 25: ...ed DVD R double layer at maximum 4 speed DVD R dual layer at maximum 4 speed and DVD RAM at maximum 5 speed This drive supports the same formats as the CD RW DVD ROM drive plus the following DVD ROM DVD Video DVD R DVD RW DVD R DVD RW DVD RAM DVD R double layer DVD R dual layer CD R CD RW CD DA CD Text Photo CD single multi session CD ROM Mode1 Mode2 CD ROMXA Mode2 Form1 Form2 Enhanced CD CD EXTRA...

Page 26: ...A standard 3 5mm mini microphone jack enables connection of monaural microphone input Modem Some computers in this series are equipped with Modem functionality The internal modem provides capability for data and fax communication It supports the V 90 or V 92 standards depending on the region and provides a modem jack for connection to a telephone line The speed of data and fax transfer depends on ...

Page 27: ...tic Power Off This feature automatically turns off the hard disk drive when it is not accessed for a specified time Power is restored when the hard disk is accessed You can specify the time in the Power Options System Automatic Sleep Hibernation This feature automatically places the system into either Sleep Mode or Hibernation Mode when there is no input or hardware access for a specified time You...

Page 28: ...ur computer again you can continue working right where you left off Sleep In Sleep Mode the system s power remains on but the processor and all other devices are effectively in sleep mode When the computer is in Sleep Mode the Power LED flashes amber The computer enters Sleep Mode regardless of the Hibernate Mode setting Before entering Sleep mode make sure to save your data Do not install or remo...

Page 29: ...allows you to configure the read speed of optical drive You can either configure Normal Mode which operates the drive at its maximum speed for quick data access or Quiet Mode which runs at single speed for CD audio and which can lessen operational noise It is ineffective in DVD Ulead DVD MovieFactory for TOSHIBA depending on configuration You can edit a digital video and make a Video DVD Windows M...

Page 30: ...our TOSHIBA dealer for details The availability of DDRII depends on the model you purchased Battery Pack An additional battery pack can be purchased from your TOSHIBA dealer Use it as a spare or a replacement AC adapter If you use your computer at more than one site frequently it may be convenient to purchase an additional AC adapter for each site so you will not have to carry the adapter with you...

Page 31: ...tebook chassis are designed to accommodate all possible configurations for an entire product series Your selected model may not have all the features and specifications corresponding to all of the icons or switches shown on the notebook chassis unless you have selected all those features 1 Power LED 2 Battery LED 3 Hard Disk Drive LED 4 Wireless Communication Switch 5 Wireless Communication LED 2 ...

Page 32: ... turns on the wireless networking transceiver The Wireless Communication LED beside it indicates that wireless networking is turned on Wireless Communication LED Indicates whether the wireless LAN is active or not 1 Headphone Jack 2 Microphone Jack 3 USB Port 4 Multiple Digital Media Card Slot Access LED and Multiple Digital Media Card Slot 5 Express Card Slot 1 2 3 4 5 Headphone Jack The headphon...

Page 33: ... media card reader connector flashes when the system accesses the media card Express Card Slot The Express card allows you to install an additional Express Card 1 Optical Disc Drive 2 Optical Disc Drive LED 1 2 Optical Disc Drive The computer is configured with a full size optical disc drive module that lets you run either 12cm 4 72 or 8cm 3 15 discs without using an adapter See the Drives section...

Page 34: ...SB equipped devices such as keyboards mice hard drives scanners and printers to be connected to the computer LAN Jack This jack lets you connect to a LAN The adapter has built in support for Ethernet LAN 10 megabits per second 10BASE T Fast Ethernet LAN 100 megabits per second 100BASE TX Modem Jack In regions where an internal modem is installed as standard equipment this jack lets you use a modul...

Page 35: ...refer to Chapter 6 Power and Power Up Modes Battery Pack Lock When you slide this into its locked position the battery pack cannot be released even if you attempt to slide the battery pack latch into its open position Battery Pack Latch With the Battery Pack Lock in its unlocked position you can slide this latch in order to remove the battery pack Expansion Memory Socket Use this socket to install...

Page 36: ...splay Screen The LCD displays high contrast text and graphics at a resolution up to 1280 800 pixels Refer to Appendix B Display Modes for further information When the computer operates from the AC adapter the display screen s image will be somewhat brighter than when it operates on battery power this is normal and is designed to conserve battery power To prolong the life of your display screen use...

Page 37: ...section in Chapter 4 Basic Operations Left and Right Speakers The computer provides two speakers for stereo sound reproduction TouchPad Control Buttons Control buttons below the TouchPad let you select menu items or manipulate text and graphics designated by the on screen pointer CAPS LOCK MODE NUMERIC MODE SCROLL LOCK MODE Caps Lock Mode The Caps Lock mode icon lights when you press the Caps Lock...

Page 38: ...ons CDs CD R discs can be written only once The recorded data cannot be erased or changed CD RW discs can be recorded more than once Use either 1x 2x or 4x multi speed CD RW discs or high speed 4x to 10x discs The write speed of ultra speed CD RW discs is a maximum of 24x speed DVDs DVD R and DVD R discs can be written only once The recorded data cannot be erased or changed DVD RW DVD RW and DVD R...

Page 39: ...R DVD R with Single Layer and DVD RW 6x speed or faster DVD RW 5x speed DVD RAM and Ultra speed CD RW The read speed is slower at the center of a disc and faster at the other edge DVD read 8 speed maximum CD read 24 speed maximum CD R write 24 speed maximum CD RW write 24 speed maximum ultra speed media The read speed is slower at the centre of a disc and faster at the outer edge DVD read 8 speed ...

Page 40: ...g you to use the computer in almost any country region To recharge the battery simply connect the AC adapter to a power source and the computer For more details see Chapter 6 Power and Power Up Modes Use ONLY the AC Adapter supplied with the computer s package or an AC adapter certified by TOSHIBA Using the wrong adapter could damage your computer TOSHIBA assumes no liability for any damage in suc...

Page 41: ...e fastest way to get started because the battery pack will need to be charged before you can operate from battery power The AC adapter can be connected to any power source supplying from 100 to 240 volts and 50 or 60 hertz For details on using the AC adapter to charge the battery pack refer to Chapter 6 Power and Power Up Modes Before you attempt to use your computer make sure to read the Instruct...

Page 42: ...ould glow Opening the display The display panel can be rotated in a wide range of angles for optimal viewing 1 Slide the display latch on the front of the computer 2 Lift the panel up and adjust it to the best viewing angle for you Use ONLY the AC Adapter supplied with the computer s package or an AC adapter certified by TOSHIBA Using the wrong adapter could damage your computer TOSHIBA assumes no...

Page 43: ...he computer s initial screen is the Windows Vista Startup Screen Logo Follow the on screen directions for each screen During setup you can click the Back button to return to the previous screen Be sure to read the Windows Operating System End User License Agreement carefully Use reasonable care when opening and closing the display panel Opening it vigorously or slamming it shut could damage the co...

Page 44: ...own from the menu 4 Turn off any peripheral devices connected to your computer Sleep Mode Setting the computer in Sleep Mode enables you to turn off the power without exiting from your software In this mode data is maintained in the computer s main memory so that when you turn on the power again you can continue working right where you left off Make sure the Hard Disk Drive indicators is off If yo...

Page 45: ... power button do When you turn the power back on you can continue where you left when you shutdown the computer When the AC adapter is connected the computer will go into Sleep Mode according to the settings in the Power Options To restore the operation from the computer from Sleep Mode press the power button or press any key If the computer enters Sleep Mode while a network application is active ...

Page 46: ...revious working environment immediately when you turn on the computer Saves power by shutting down the system when the computer receives no input or hardware access for the time period set by the System Hibernate feature Allows the use of the panel power off feature When the computer is in Sleep Mode the power indicator will blink orange If you are operating the computer on battery power you can l...

Page 47: ... the current data in memory to the hard disk drive During this time the Hard Disk Drive indicator will glow After you turn off the computer and the content of memory has been saved to the hard disk drive turn off the power to any peripheral devices Restarting the computer You may need to restart your computer in such cases as changes in computer settings and system errors There are three 3 ways to...

Page 48: ...c provided with some models If preinstalled files are damaged use the Product Recovery disc to restore them To restore the operating system and all preinstalled software follow the steps below 1 Load the Product Recovery disc in the drive and turn off the computer s power 2 Switch on the computer and when the In Touch with Tomorrow TOSHIBA prompt appears press the F12 key to display the Boot Menu ...

Page 49: ... to go The two buttons below the TouchPad are used like the buttons on a standard mouse Press the left button to select a menu item or to manipulate text or graphics designated by the pointer Press the right button to display a menu or other function depending on the software you are using The TouchPad has similar functions to a two button mouse with a scroll wheel For some functions you can tap i...

Page 50: ...ontal Move your finger left or right along the bottom edge of the TouchPad The internal modem does not support the voice functions described in the help files All data and fax functions are supported In case of a lightning storm unplug the modem cable from the telephone jack Do not connect the modem to a digital telephone line A digital line will damage the modem When using your telephone equipmen...

Page 51: ...ormation will also be displayed A check will appear next to the currently selected region and telephony location 4 Select a region from the region menu or a telephony location from the submenu When you click a region it becomes the modem s region selection and the New Location for telephony will be set automatically When you select a telephony location the corresponding region is automatically sel...

Page 52: ...ox is displayed if current settings for region code and telephony location are incorrect Modem Selection If the computer cannot recognize the internal modem a dialog box is displayed Select the COM port for your modem to use Dialing Properties Select this item to display the dialling properties Connecting To connect the internal modem cable follow the steps below If you are using the computer in J...

Page 53: ... LAN 100 megabits per second Do not pull on the cable or move the computer while the cable is connected If you use a storage device such as an optical media drive or hard disk drive connected to a 16 bit PC Card you may find that the modem speed is slow or the communication session might be interrupted If you find that the modem speed is low or communication is interrupted when you are using the m...

Page 54: ... To disconnect the LAN cable follow the steps below 1 Pinch the lever on the connector in the computer s LAN jack and pull out the connector 2 Disconnect the cable from the LAN hub in the same manner Check with your LAN administrator before disconnecting from the hub Wireless LAN The wireless LAN is compatible with other LAN systems that comply with the IEEE 802 11 b g 802 11 a b g wireless LAN st...

Page 55: ...hat connection Therefore an unsecured wireless network connected directly to the Internet is an open invitation for outsiders to abuse your ISP account and privileges 2 TOSHIBA is not liable for the eavesdropping on your data due to the use of the wireless LAN connection and any damage that may occur thereof Wireless communication switch You can enable or disable the wireless LAN function with the...

Page 56: ...ion When the computer is accessing a disc an indicator on the drive illuminates If you have a CD RW DVD ROM drive refer also to the Writing CDs on CDRW DVD ROM drive section for precautions on writing to CDs If you have a DVD Super Multi drive refer also to the Writing CD DVDs on DVD Super Multi drive section for precautions on writing to CDs If you have a DVD ROM you cannot write to CDs Loading o...

Page 57: ...the drawer when the computer s power is off If the power is off you can open the drawer by inserting a slender object about 15 mm such as a straightened paper clip into the eject hole just to the right of the eject button 3 Grasp the drawer gently and pull until it is fully open ...

Page 58: ...low the top of the spindle flush with its base 6 Push the center of the drawer to close it Press gently until it locks in place Be careful not to touch the lens or the area around it Doing so could cause the drive to malfunction If the disc is not seated properly when the drawer is closed it might be damaged Also the drawer might not open fully when you press the eject button ...

Page 59: ...tant message Before you write or rewrite to CD R RW media read and follow all setup and operating instructions in this section If you fail to do so the CD RW DVD ROM drive may not function properly and you may fail to write or rewrite lose data or incur other damage Do not press the eject button while the computer is accessing the disc drive Wait for the optical disc indicator to go out before you...

Page 60: ...ou write or rewrite the data We recommend the following manufacturers of CD R and CD RW media Media quality can affect write or rewrite success rates CD R discs can be written only once CD RW discs can be rewritten many times TOSHIBA has confirmed the operation of CD R and CD RW media of the manufacturers above Operation of other media cannot be guaranteed CD RW can generally be rewritten about 1 ...

Page 61: ...s in the Windows Vista operating system Operate the computer for any other function including using a mouse or TouchPad or closing opening the LCD panel Start a communication application such as a modem Apply impact or vibration to the computer Install remove or connect external devices such as PC card USB devices an external display i Link devices or optical digital devices Use the audio video co...

Page 62: ... this product Any change or loss of the recorded contents of CD R RW or DVD R RW R RW RAM media that may be caused by writing or rewriting with this product or for any business profit loss or business interruption that may be caused by the change or loss of the recorded contents Damage that may be caused by using third party equipment or software Given the technological limitations of current opti...

Page 63: ... CD R TAIYOYUDEN CO LTD MITSUBISHI KAGAKU MEDIA CO LTD RICOH Co Ltd Hitachi Maxell Ltd CD RW and High speed CD RW MITSUBISHI KAGAKU MEDIA CO LTD RICOH Co Ltd Ultra speed CD RW MITSUBISHI KAGAKU MEDIA CO LTD DVD R DVD Specifications for Recordable Disc for General Version 2 0 TAIYOYUDEN CO LTD Matsushita Electric Industrial Co Ltd DVD RW DVD Specifications for Re recordable Disc for Version 1 1 or ...

Page 64: ...n a DVD recorder as well as on your computer s DVD ROM drive You cannot use data discs on a DVD recorder DVD RAM formatted by FAT32 cannot be read in Windows 2000 without DVD RAM Driver Software When multiple drives that can write data to discs are connected be careful not to write to the wrong drive Be sure to connect the universal AC adapter before you write or rewrite Before you enter Sleep Hib...

Page 65: ...pleted before going into Sleep hibernation Writing is completed if you can open the drive tray Place the computer on a level surface and avoid places subject to vibration such as airplanes trains or cars Do not use an unstable surface such as a stand Keep mobile phones and other wireless communication devices away from the computer Always copy data from the hard disk drive to the CD Do not use cut...

Page 66: ...D MovieFactory Make sure that your computer is running on AC power when using DVD MovieFactory Operate the computer at Full Power Do not use power saving features While you are editing DVD you can display previews However if another application is running the preview might not display properly DVD MovieFactory cannot edit or play copy protected content Do not enter Sleep Hibernation Mode while usi...

Page 67: ...u 4 About recorded DVDs Some DVD ROM drives for personal computers or other DVD players may not be able to read DVD R R RW RAM discs When playing your recorded disc on your computer please use the TOSHIBA DVD Player software application If you use an over used rewritable disc the full formatting might be locked Use a brand new disc TOSHIBA Disc Creator Note the following limitations when you use T...

Page 68: ... R RW or DVD R RW discs it might not be backed up correctly When you back up a DVD R DVD RW DVD R or DVD RW be sure to use the same type of disc You cannot partially delete any data written to a CD RW DVD RW or DVD RW disc Data Verification To verify that data is written or rewritten correctly follow the steps below before you write or rewrite a Data CD DVD 1 Display the setting dialog box by one ...

Page 69: ...tainer they came in to protect them and keep them clean If a disk is dirty do not use cleaning fluid Clean it with a soft damp cloth 2 Do not slide back the disc s protective metal covering or touch the disc s magnetic surface 3 Data may be lost if the disc is twisted bent or exposed to direct sunlight or extreme heat or cold 4 Do not place heavy objects on your discs 5 Do not eat smoke or use era...

Page 70: ...two displays when they are configured as an extended desktop On the Display Properties window the two displays can be positioned horizontally vertically or in any diagonal configuration you wish as shown below If an external display will not be connected next time you use your computer you should cancel any extended desktop or clone display settings before shutting down your computer Clone display...

Page 71: ...taken when moving the computer will help ensure trouble free operation Make sure all disk activity has ended before moving the computer Check the Built in Hard Disk Drive and optical disc drive indicators on the computer If a disk is in the disk drive remove it If a disc is in the optical disc drive remove it Also make sure the optical disc drive drawer is securely closed Turn off the power to the...

Page 72: ...letters numbers punctuation marks and special symbols that appear on the screen There are some differences however between using a typewriter and using a computer keyboard Letters and numbers produced in computer text vary in width Spaces which are created by a space character may also vary depending on line justification and other factors The lowercase l el and the number 1 one are not interchang...

Page 73: ...n combination with other keys to form soft keys Soft keys are key combinations that enable disable or configure specific features Emulation keys Your software may require you to use keys that the keyboard does not have Pressing the Fn key and one of the following keys simulates the enhanced keyboard s functions Press Fn F11 to access the integrated keypad When activated the gray keys with white nu...

Page 74: ...ve modes and lets you change the power settings Fn F3 Sleep This hot key switches the system to Sleep mode Fn F4 Hibernate This hot key switches the system to Hibernate mode Fn F5 Output Changes displays Default resolution for simultaneous mode is set to WXGA 1280 800 If you connect an RGB Monitor that is not WXGA resolution change it in Display Properties Fn F6 Brightness decreases Fn F7 Brightne...

Page 75: ...ay can be used for numeric data input or cursor and page control Numeric mode To turn on the Numeric mode press Fn F11 Numeric mode indicator lights Now try numeric data entry using the keys below Press Fn F11 again to turn off the overlay Temporarily using Arrow mode If the computer is in Numeric mode you can switch temporarily to Arrow mode by pressing a shift key In the Arrow mode try cursor an...

Page 76: ... Check the keyboard indicators Pressing Fn turns on the most recently used overlay If the Numeric mode indicator lights up you can use the overlay for numeric entry If the Numeric indicator is off you can use it for cursor and page control 3 Release Fn to return to normal keyboard operation Generating ASCII characters Not all ASCII characters can be generated using normal keyboard operation But yo...

Page 77: ...battery is installed and what the charge level is for the battery Power indicators As shown in the above table the Battery DC IN and Power indicators alert you to the computer s operating capability and battery charge status Battery indicator Check the Battery indicator to determine the status of the battery The following indicator lights indicate the battery status Blinking amber The battery capa...

Page 78: ...system configuration If the RTC battery becomes completely discharged the system loses this data and the real time clock and calendar stop working Green The power button will glow green while power is being supplied and the computer is turned on The power indicator on the front of computer will glow green when the computer is switched on Blinking amber Indicates power is being supplied to the comp...

Page 79: ...mper with a battery pack The battery pack will overheat and ignite Leakage of caustic alkaline solution or other electrolytic substances will cause fire or injury possibly resulting in death or serious injury 3 DO NOT short circuit the battery pack by contacting the terminals with a metal object A short circuit can cause fire damage the battery pack and possibly cause injury To avoid accidental sh...

Page 80: ... DO NOT use the computer again until it has been checked by a TOSHIBA service provider It might generate smoke or fire or the battery pack might explode 3 Make sure the battery is securely installed in the computer before attempting to charge the battery pack Improper installation could generate smoke or fire or cause the battery pack to explode 4 Keep the battery pack out of reach of infants and ...

Page 81: ... an extended period or for more than a week the battery might fail to retain a charge It might not function efficiently over the expected life of the battery pack and the Battery indicator might not indicate a low battery condition 3 After the battery pack is charged avoid leaving the AC adapter connected and the computer turned off for more than a few hours at a time Continuing to charge a fully ...

Page 82: ...nstalled in a warm computer In such case follow the steps below 1 Fully discharge the battery by leaving it in the computer with the power on until the power automatically shuts off 2 Plug in the AC adapter 3 Charge the battery until the Battery indicator glows green Repeat these steps two or three times until the battery recovers normal capacity Battery type Power on Power off Battery pack about ...

Page 83: ...hich the battery supplies power Enabling Sleep Mode or Hibernation Mode conserves battery power if you are frequently turning the computer off and on Where you store your programs and data Closing the display when you are not using the keyboard saves power Operating time decreases at low temperatures Leaving the AC adapter connected will shorten battery life At least once a week run the computer o...

Page 84: ...cator flashes amber shortly after the battery has been fully recharged the battery pack needs to be replaced You might also replace a discharged battery pack with a charged spare when you are operating your computer away from an AC power source This section explains how to remove and install the battery pack Removing the battery pack To replace a discharged battery pack follow the steps below 1 Sa...

Page 85: ...User s Manual 6 9 Power and Power Up Modes 5 Unlock the Battery Pack Lock 6 Slide the battery pack latch to the left then pull the battery out of the battery bay 1 3 2 ...

Page 86: ...es data in memory to the hard disk Sleep power remains on maintaining the data in memory but the CPU and all other devices effectively enter a sleep mode Boot does not save data in memory Panel power off on This feature makes the computer to enter Hibernation when the display panel is closed and turns it back on when the display panel is opened The battery pack is a lithium ion battery which can e...

Page 87: ...tem in Sleep or Hibernation mode if the computer is not used for a set duration Refer to Special features in Chapter 1 L40 Series Features for an explanation of how to set the duration If the panel power off function is enabled and you use Shut down Windows do not close the display until the shut down function is completed ...

Page 88: ...ional battery pack Additional AC adapter Peripheral devices External monitor Security lock Express Card Installing an Express Card The Express Card slot is located on the left side of the computer You can install one Express Card in the slot Windows hot install feature lets you install Express Card while the computer s power is on To install an Express Card follow the steps below 1 Insert the Expr...

Page 89: ...riate for your card Removing an Express Card To remove the Express Card follow the steps below 1 In Windows Vista open the Safely Remove Hardware icon on the system tray and disable the Express Card 2 Press the Express Card slightly to make it stretch out 3 Grasp the Express Card and pull it out from the slot ...

Page 90: ... objects out of the memory card slot A pin or similar object can damage the computer s circuitry Do not format a memory card with Windows as this will make the memory card unusable The Logo of SD memory card is The Logo of SDHC memory card is Memory Stick Duo PRO Duo and the Memory Stick adapter are not compatible with the Multiple Digital Media Card Slot Do not insert Memory Stick Duo PRO Duo int...

Page 91: ...button A confirmation dialog may appear depending on how the device is registered with the system if so confirm that you want to remove the device 3 Gently press the memory card inside the socket to eject it Be sure the memory card is oriented properly before you insert it If Windows fails to read the card remove then reinsert it The multiple digital media card slot only accepts one type of card a...

Page 92: ...rs of liquid 7 After using a memory card return it to its case 8 Do not touch the metal part or expose it to liquids or let it get dirty Make sure the memory card indicator is out before you remove the card or turn off the computer s power If you remove the card or turn off the power while the computer is accessing the card you may lose data or damage the card Do not remove the card while the comp...

Page 93: ... adapter at each location reduces the weight and bulk of your load Before you install or remove a memory module turn off the computer with the Shut Down option in the Windows Start menu If you install or remove a memory module while the computer is in Sleep or Hibernation mode data will be lost Some memory modules can be physically installed but are not compatible with the computer In this case th...

Page 94: ...e monitor to the external monitor port 3 Turn the monitor s power on 4 Turn the computer on When you turn on the power the computer automatically recognizes the monitor To change the display settings press Fn F5 If you disconnect the monitor before you turn the computer off be sure to press Fn F5 to switch to the internal display Refer to Chapter 5 The Keyboard for details on using hot keys to cha...

Page 95: ...uestions and procedures offered in this chapter are meant as a guide they are not definitive problem solving techniques Many problems can be solved simply but a few may require help from your dealer or a service center If you find you need to consult your dealer or others be prepared to describe the problem in as much detail as possible Preliminary checklist Consider the simplest solution first Th...

Page 96: ...nd firmly attached Loose cables can cause erroneous or intermittent signals Does any indicators light up Which ones What color are they Do they stay on or blink Write down what you see Do you hear any beeps How many Are they long or short Are they high pitched or low Is the computer making any unusual noises Write down what you hear Record your observations so you can describe them to your dealer ...

Page 97: ...Password Self test When the computer starts up the self test will be run automatically and the following will be displayed This screen image is one of the examples You may see different screen image s depending on your purchased model System start up USB Self test LAN Power Sleep Hibernation Battery Memory expansion Keyboard Modem LCD panel CD RW DVD ROM drive Hard disk drive Disk drive Real Time ...

Page 98: ...her power resources including an intelligent power supply and Real Time Clock battery These resources are interrelated and any one could affect apparent power problems This section provides check lists for AC power and the battery If you cannot resolve a problem after following them the cause could lie with another power resource In such cases you should contact your dealer Overheating power down ...

Page 99: ...low amber If the battery is completely discharged it will not begin charging at once Wait a few minutes If the battery still does not charge make sure the outlet is supplying power Plug in an appliance and see if it works If it does not try another power source Check whether the battery is hot or cold If the battery is too hot or too cold it will not charge properly Let it reach room temperature U...

Page 100: ...HELP for information on running SCANDISK and the defragmenter Contact your dealer if the problems continue Problem Procedure Lines appear broken Check if you are in DOS mode In DOS lines may appear broken because of the LCD screen s higher resolution The Windows display should appear normal No display Press the Hotkey Fn F5 to change the display priority and ensure it is not set for an external mo...

Page 101: ...ternal device and the card is firm Check the card s documentation Problem Procedure Monitor does not turn on Make sure that the external monitor s power switch is on Confirm that the external monitor s power cable is plugged into a working power outlet No display Try adjusting the contrast and brightness controls on the external monitor Press hotkeys Fn F5 to change the display priority and make s...

Page 102: ...ot respond to Pad operation The system might be busy If the pointer is shaped as an hourglass wait for it to resume its normal shape and try again to move it You may also press Fn F9 to enable the TouchPad and then try again to move it Double tapping does not work Try changing the double click speed setting in the mouse control utility 1 Open the Control Panel select the Mouse icon and press Enter...

Page 103: ...s wait for it to resume its normal shape and try again to move it Make sure the mouse is properly connected to the USB port Double clicking does not work Try changing the double click speed setting in the mouse control utility 1 Open the Control Panel select the Mouse icon and press Enter 2 Click the Buttons tab 3 Set the double click speed as instructed and click OK The mouse pointer moves too fa...

Page 104: ...either playing a selection or finished playing a selection Close Windows Media Player before you select Sleep Hibernation Problem Procedure Communication software can t initialize the modem Make sure the computer s internal modem settings are correct Refer to Phone and Modem Options Properties in the Control Panel You can hear a dial tone but can t make a call If the call is going through a PBX ma...

Page 105: ...nd make sure the disc is properly seated It should lie flat with the label facing up A foreign object in the drawer could block laser light from reading the disc Make sure there is no obstruction Remove any foreign object Check whether the disc is dirty If it is wipe it with a clean cloth dipped in water or a neutral cleaner Some discs run correctly but others do not The software or hardware confi...

Page 106: ...omputer during writing Do not connect disconnect external devices or install remove internal cards during writing Problem Procedure You cannot access a disc in the drive Make sure the drive s drawer is securely closed Press gently until it clicks into place Open the drawer and make sure the disc is properly seated It should lie flat with the label facing up A foreign object in the drawer could blo...

Page 107: ...e region code on the DVD It must match that on the DVD Super Multi drive Cannot write correctly If you have trouble writing make sure you are observing the following precautions Use only media recommended by TOSHIBA Do not use the mouse or keyboard during writing Use only the software supplied with the computer for recording Do not run or start other software during writing Do not jar the computer...

Page 108: ...ing suggestions Call the software company s technical support for assistance Consult the dealer you purchased your computer and or software from They are your best sources for current information and support Where to write If you are still unable to solve the problem and suspect that it is hardware related write to TOSHIBA at the location listed in the accompanying warranty booklet or visit http w...

Page 109: ...er at temperatures outside the range of 5 C to 30 C 41 F to 86 F or 25 C 77 F at high altitude All temperature references are approximate and may vary depending on the specific computer model Refer to your PC documentation or visit the Toshiba website at http www pcsupport toshiba com for details CPU performance may also vary from specifications due to design configuration Under some conditions yo...

Page 110: ...arge while computer is consuming full power After going through many charge and discharge cycles the battery will lose its ability to perform at maximum capacity and will need to be replaced This is a normal phenomenon for all batteries To purchase a new battery pack see the accessories information that is shipped with your computer HDD Drive Capacity 1 Gigabyte GB means 109 1 000 000 000 bytes us...

Page 111: ... theoretical maximum speed under the IEEE802 11 a b g standard The actual transmission speed will be lower than the theoretical maximum speed Non applicable Icons Certain notebook chassis are designed to accommodate all possible configurations for an entire product series Hence be aware that your selected model may not have all the features and specifications corresponding to all of the icons or s...

Page 112: ...User s Manual A 1 Specifications Appendix A Specifications This appendix contains the Notebook PC s technical specifications Dimensions 269 5mm 35 3mm 365mm ...

Page 113: ...o 35 C 20 C to 65 C Altitude from sea level 30 to 10 000 feet 30 to 40 000 feet Humidity 20 to 80 Network control unit NCU Type of NCU AA Type of line Telephone line analog only Type of dialling Pulse Tone Control command AT commands EIA 578 commands Monitor function Computer s speaker Communication specifications Communication System Data Fax Full duplex Half duplex Communication Protocol Data IT...

Page 114: ...1600 24000 26400 28800 31200 33600 bps Data reception only with V 90 V 92 28000 29333 30666 32000 33333 34666 36000 37333 38666 40000 41333 42666 44000 45333 46666 48000 49333 50666 52000 53333 54666 56000 bps Fax 2400 4800 7200 9600 12000 14400 bps Error correcting MNP class 4 and ITU T V 42 Data compression MNP class 5 and ITU T V 42bis ...

Page 115: ...on of display lowering it until the screen is displayed properly You could also disable Windows Aero to help correct this situation CRT Display Resolution Color Depth bpp Refresh Rate Hz 800 600 16 bpp 60 75 85 100 32 bpp 60 75 85 100 1024 768 16 bpp 60 75 85 100 32 bpp 60 75 85 100 1280 800 16 bpp 60 32 bpp 60 1280 1024 16 bpp 60 75 85 100 32 bpp 60 75 85 100 1600 1200 16 bpp 60 75 85 100 32 bpp ...

Page 116: ...wo conductors power cord must be VDE type H05VVH2 F or H03VVH2 F and for three conductors power cord must be VDE type H05VV F Length Minimum 1 7 meters Wire size Minimum 0 75 mm2 Current rating Minimum 2 5 amperes Voltage rating 125 or 250 VAC depending on country region s power standards U S and Canada UL listed and CSA certified No 18 AWG Type SVT or SPT 2 Australia AS Europe Austria OVE Italy I...

Page 117: ...1 15P 125V and three pin plug coniguration must be 6 15P 250V or 5 15P 125V as designated in the U S National Electrical code handbook and the Canadian Electrical Code Part II The following illustrations show the plug shapes for the U S A and Canada the United Kingdom Australia and Europe USA United Kingdom Australia Canada Europe ...

Page 118: ...form to the address below To register the theft online please follow these procedures Visit http www toshiba europe com on the Internet In the product area choose Computer Systems In the Computer Systems page open the Support Downloads menu and choose the Stolen Units Database option Your entries are used to track your computer at our service points Always take care of your computer and try to pre...

Page 119: ...hnical Service and Support Leibnizstr 2 93055 Regensburg Germany Fax number 49 0 941 7807 921 Owner s details Country stolen Machine type e g L40 Series Model number e g PSA30 YXT Serial number e g 12345678G Date stolen Year Month Day Last name first name Company Street Postal Code City Country Phone Fax ...

Page 120: ...metal oxide semiconductor CPU central processing unit CRT cathode ray tube DC direct current DDC display data channel DMA direct memory access DOS disk operating system DVD digital versatile disc ECP extended capabilities port FDD floppy disk drive HDD hard disk drive IDE integrated drive electronics I O input output IRQ interrupt request KB kilobyte LCD liquid crystal display LED light emitting d...

Page 121: ...s word processing and games B BIOS Basic Input Output System The firmware that controls data flow within the computer See also firmware bit Derived from binary digit the basic unit of information used by the computer It is either zero or one Eight bits is one byte See also byte boot Short for bootstrap A program that starts or restarts the computer The program reads instructions from a storage dev...

Page 122: ... mark or symbol used by the computer Also synonymous with byte chip A small semiconductor containing computer logic and circuitry for processing memory input output functions and controlling other chips CMOS Complementary Metal Oxide Semiconductor An electronic circuit fabricated on a silicon wafer that requires very little power Integrated circuits implemented in CMOS technology can be tightly pa...

Page 123: ... s memory It also writes data from memory to the disk To accomplish these tasks the unit physically rotates the disk at high speed past a read write head display A CRT LCD or other image producing device used to view computer output DOS Disk Operating System See also operating system driver A software program generally part of the operating system that controls a specific piece of hardware frequen...

Page 124: ...e also hard disk hertz A unit of wave frequency that equals one cycle per second hot key The computer s feature in which certain keys in combination with the extended function key Fn can be used to set system parameters such as speaker volume I input The data or instructions you provide to a computer communication device or other peripheral device from the keyboard or external or internal storage ...

Page 125: ...modulator a device that converts modulates digital data for transmission over telephone lines and then converts modulated data demodulates to digital format where received monitor A device that uses rows and columns of pixels to display alphanumeric characters or graphic images See also CRT MP3 An audio compression standard that enables high quality transmission and real time playback of sound fil...

Page 126: ...es information or an action from you R Random Access Memory RAM High speed memory within the computercircuitry that can be read or written to restart Resetting a computer without turning it off also called warm boot or soft reset See also boot RJ11 A modular telephone jack RJ45 A modular LAN jack ROM Read Only Memory A nonvolatile memory chip manufactured to contain information that controls the c...

Page 127: ... to drive each cell TouchPad A pointing device integrated into the TOSHIBA computer palm rest U Universal Serial Bus This serial interface lets you communicate with several devices connected in a chain to a single port on the computer V VGA Video Graphics Array is an industry standard video adaptor that lets you run any popular software W warm start Restarting or resetting a computer without turni...

Reviews: