14
Using the Controls
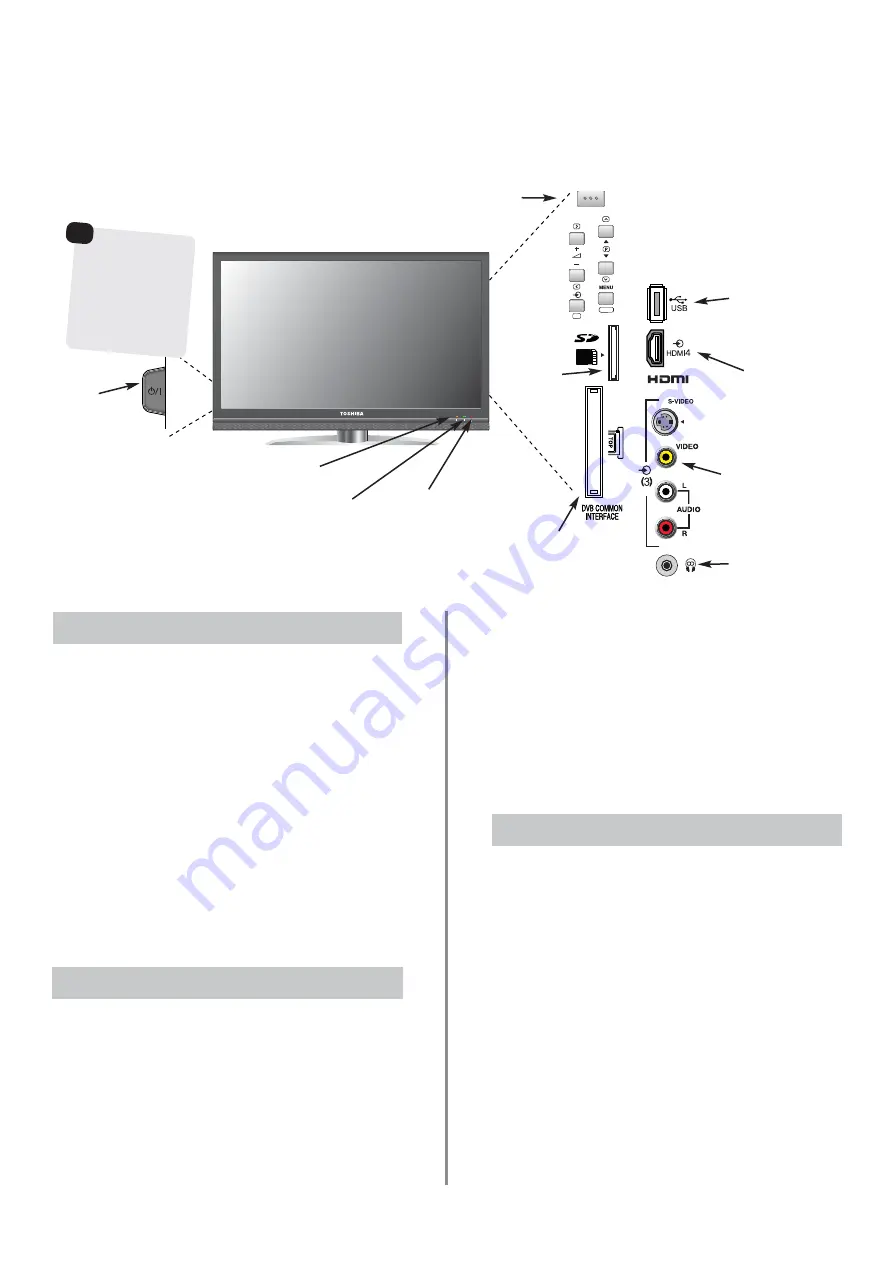
Whilst all the necessary adjustments and controls for the television are made using the remote control, the
buttons on the television may be used for some functions.
To alter the volume press
—
j
+
.
To alter the programme position press
e
e
F
f
f
.
Press
MENU
and
S
,
R
,
Q
or
P
to control the sound and
picture options. Press
MENU
to finish.
When connecting sound equipment to
EXT3
, connect the
audio output of the equipment to the phono sockets on the
television.
To select the external input, press
B
and select the
required input source. See page 50.
Please always refer to the owner’s manual of the
equipment to be connected for full details.
NOTE:
Interactive video games that involve shooting a
‘gun’ type of joystick at an on-screen target may not work
with this television.
Switching On
Using the Controls
Press the
MENU
button on the remote control to see
the menus.
The menu appears as a list of five topics. As each symbol is
selected by pressing
z
or
x
on the navigation ring on the
remote control, its respective options will appear below.
IMPORTANT:
At the bottom of the screen will be a bar
displaying a selection of control functions, i.e. Select,
Watch, Back, Watch TV.
NOTE:
The same menu is displayed in
DTV
(Digital TV)
and
ATV
(Analogue TV) modes, however, where some
items are not available in a mode they will appear
greyed out.
To use the options press the
f
and
e
button on the
remote control to move up and down through them and
OK
,
z
ord
x
to select the required choice. Follow the on
screen instructions. The functions of each menu are
described in detail throughout the manual.
Using the Remote Control
If the
RED
LED is unlit check that the mains plug is
connected to the power supply and press the
i
/
I
POWER
button on the left side of the television. If the picture does
not appear press
i
on the remote control, it may take a
few moments, the
GREEN
LED will be lit.
To put the television into Standby press
i
on the remote
control. To view the television press
i
again. The picture
may take a few seconds to appear.
NOTE:
When the television is put into standby it will
automatically search for updates if
Auto Channel
Update
has been activated.
When the
i
/
I
POWER switch is turned off, the digital
channel position you previously viewed may not be
memorised in the television memory.
RETURN
OK
Standby
GREEN
LED – On Timer Set
(LED 2)
ORANGE
LED – Programme Timer Set (
digital
only)
RED
LED – Programme Timer Active (
digital
only)
(LED 3)
RED
LED – Standby
GREEN
LED – Power on
(LED 1)
Headphone jack
COMMON INTERFACE
The Common Interface is for a Conditional Access
Module (CAM). Contact a service provider.
Input 3
(side) will tak
e
priority over
EXT3 (back) if
both connections
are used at the
same time.
POWER switch
(Full Power
Down Option)
INPUT 3
(EXT3)
USB JPEG VIEWER
This socket has limited
functionality and
Toshiba can take no
responsibility for
damage to other
connected equipment.
SD Card slot
allows access
to photo files
HDMI4 INPUT
(Model dependant)
Summary of Contents for REGZA XV Digital Series
Page 1: ...XV Digital Series TOSHIBA ...


