background image

17

LV47 (E/F) Web 213:276

Chapter 2: Connecting your TV

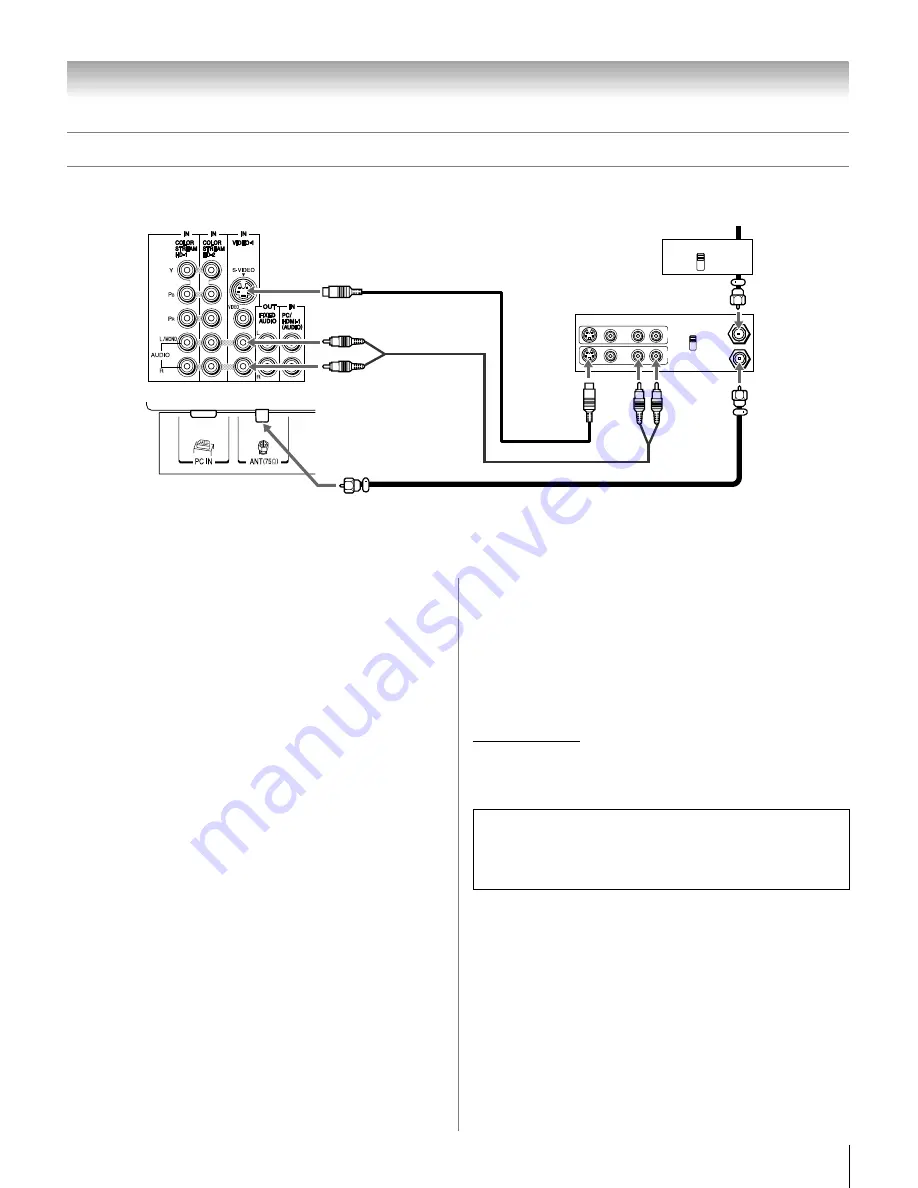
Connecting a VCR with S-video and a cable box

An S-video connection will provide better picture performance than a standard (composite) video cable.

IN from ANT 

VIDEO AUDIO

OUT to TV

L

R

R

L

OUT

IN

CH 3
CH 4

IN

OUT

CH 3
CH 4

Cable box

From Cable TV

TV upper back panel

TV lower back panel

stereo VCR

You will need:

coaxial cables

S-video cable

– Do not connect both types of video cable to 

VIDEO 1

 at 

the same time or the picture performance will be 
unacceptable.

standard audio cables

– If you have a mono VCR, connect 

L/MONO

 on the TV to 

your VCR’s audio out terminal using the white audio cable 
only.

Note: 

When you use a Cable box, you may not be able to use 

the remote control to program or access certain features on the 
TV.

To view basic and premium Cable channels:

Turn OFF the VCR. Select the 

ANT

 video input source on the 

TV.* Tune the TV to channel 3 or 4 (whichever channel the 
Cable box output is set to). Use the Cable box controls to 
change channels.

To view the VCR:

Turn ON the VCR. Select the 

VIDEO 1

 video input source on 

the TV.*

*

To select the video input source, press 

INPUT

 on the remote control 

(

-

page 24). To program the TV remote control to operate other 

devices, see Chapter 3.

The unauthorized recording, use, distribution, or revision of 
television programs, videotapes, DVDs, and other materials is 
prohibited under the Copyright Laws of the United States and 
other countries, and may subject you to civil and criminal 
liability.

26LV47_EN.book  Page 17  Monday, July 9, 2007  11:22 AM

Summary of Contents for REGZA 26LV47

Page 1: ...mmunicate with your Toshiba dealer about this TV Model number 26LV47 Serial number For an overview of steps for setting up your new TV see page 12 Note To display a High Definition picture the TV must be receiving a High Definition signal such as an over the air High Definition TV broadcast a High Definition digital cable program or a High Definition digital satellite program For details please co...

Page 2: ...tem on top of your TV such as a VCR remote control or toy that a curious child may reach for a Remember that children can become excited while watching a program and can potentially push or pull a TV over a Share our safety message about this hidden hazard of the home with your family and friends Thank you Safety Precautions WARNING TO REDUCE THE RISK OF FIRE OR ELECTRIC SHOCK DO NOT EXPOSE THIS A...

Page 3: ...es in contact with your mouth or eyes or your skin is cut by broken glass rinse the affected area thoroughly with water and consult your doctor ALWAYS contact a service technician to inspect the TV any time it has been damaged or dropped 15 CAUTION To reduce the risk of electric shock do not use the polarized plug with an extension cord receptacle or other outlet unless the blades can be inserted ...

Page 4: ...om the TV if you leave the TV unattended or unused for long periods of time 34 During normal use the TV may make occasional snapping or popping sounds This is normal especially when the unit is being turned on or off If these sounds become frequent or continuous unplug the power cord and contact a Toshiba Authorized Service Center 35 WARNING RISK OF SERIOUS PERSONAL INJURY OR EQUIPMENT DAMAGE Neve...

Page 5: ...l stand to avoid damage to the LCD panel 2 Remove the jack pack cover on the back of the TV to expose the pedestal stand screws The jack pack cover can be removed without tools 3 Remove the five screws shown in the diagram below This will allow removal of the pedestal stand 4 Once you have removed all five screws holding the pedestal stand in place remove the pedestal stand from the TV by sliding ...

Page 6: ...vided into titles and the titles are sub divided into chapters Video CDs and Audio CDs are divided into tracks Each title chapter or track is assigned a number the title number chapter number and track number respectively Some discs do not have these numbers Notes on copyright This product incorporates copyright protection technology that is protected by U S patents and other intellectual property...

Page 7: ...ox 4 hours single sided disc Approx 8 hours double sided disc Approx 30 minutes single sided disc Approx 60 minutes double sided disc Approx 74 minutes 12 cm 12 cm 8 cm 8 cm Audio Video moving pictures Audio Video moving pictures Audio CDs Approx 74 minutes Approx 22 minutes 12 cm Audio The following discs may also be compatible DVD R RW discs in DVD video format CD R CD RW discs in CD DA Video CD...

Page 8: ...of LCD Display technology and are not an indication of malfunction therefore Toshiba is not responsible for perceived issues resulting from these symptoms 1 An afterimage ghost may appear on the screen if a fixed non moving image is displayed for a long period of time The afterimage is not permanent and will disappear in a short period of time 2 The LCD panel contained in this TV is manufactured u...

Page 9: ...el 41 Tuning to a specific channel programmed or unprogrammed 41 Switching between two channels using Channel Return 41 Switching between two channels using SurfLock 41 Selecting the picture size 42 Scrolling the TheaterWide picture TheaterWide 2 and 3 only 43 Using the auto aspect ratio feature 44 Selecting the cinema mode 480i and 1080i signals 44 Adjusting the picture 45 Selecting the picture m...

Page 10: ... Chapter 9 Troubleshooting 69 General troubleshooting 69 DVD Troubleshooting 70 LED indications 71 Chapter 10 Appendix 72 Specifications 72 Limited United States Warranty for LCD TV DVD Combinations 26 and Larger 73 Limited Canadian Warranty for Toshiba Brand Flat Panel Televisions 74 Index 77 ...

Page 11: ...ur local cable operator Features of your new TV The following are just a few of the many exciting features of your new Toshiba widescreen integrated HD LCD TV Integrated digital tuning 8VSB ATSC and QAM eliminates the need for a separate digital converter set top box in most cases Three HDMI digital high definition multimedia interfaces 1080p input support page 20 Two sets of ColorStream HD high r...
Page 12: ...nctions of the TV s connections and controls pages 13 14 5 Connect your other electronic device s to the TV pages 15 22 6 Install the batteries in the remote control page 23 7 See Learning about the remote control page 24 for an overview of the buttons on the remote control 8 Program the remote control to operate your other device s pages 25 29 9 AFTER connecting all cables and devices plug in the...

Page 13: ... control panel for 5 or more seconds to reset the TV 5 ARROWS BbC c When a menu is on screen these buttons function as up down left right menu navigation buttons 6 MENU ENTER Press to access the menu system pages 30 31 When a menu is on screen the MENU button on the TV s control panel functions as the ENTER button 7 EXIT Press to instantly close an on screen menu 8 CHANNEL Bb When no menu is on sc...

Page 14: ...C audio input terminals are shared with HDMI 1 analog audio input terminals and their use can be configured in the Audio Setup menu page 55 5 PC IN For use when connecting a personal computer 6 ANT Antenna input that supports analog NTSC and digital ATSC off air antenna signals and analog and digital Cable TV QAM signals 7 Digital Audio OUT Optical audio output in Dolby Digital or PCM pulse code m...

Page 15: ... ColorStream is Toshiba s brand of component video These cables are typically color coded red green and blue Separate audio cables are required for a complete connection Note Component video cables provide better picture performance than a standard composite video or S video cable HDMI cable cable with HDMI Logo HDMI High Definition Multimedia Interface cable is for use with devices with an HDMI o...

Page 16: ...rmance will be unacceptable If you have a mono VCR connect L MONO on the TV to your VCR s audio out terminal using the white audio cable only To view the antenna or Cable signal Select the ANT video input source on the TV To view the VCR Turn ON the VCR Select the VIDEO 1 video input source on the TV To select the video input source press INPUT on the remote control page 24 To program the TV remot...

Page 17: ... Note When you use a Cable box you may not be able to use the remote control to program or access certain features on the TV To view basic and premium Cable channels Turn OFF the VCR Select the ANT video input source on the TV Tune the TV to channel 3 or 4 whichever channel the Cable box output is set to Use the Cable box controls to change channels To view the VCR Turn ON the VCR Select the VIDEO...

Page 18: ...can be used with Progressive 480p 720p and Interlaced 480i 1080i scan systems A 1080i signal will provide the best picture performance 1080p is not supported If your DVD player or satellite receiver does not have component video connect a standard A V cable to VIDEO 2 on the side panel If your DVD player has HDMI video see page 20 To view antenna or Cable channels Select the ANT video input source...

Page 19: ...he audio cables to VIDEO 1 on the TV back instead of the VIDEO 2 on the TV right side panel To view the camcorder video Select the VIDEO 2 video input source on the TV To select the video input source press INPUT on the remote control page 24 To program the TV remote control to operate other devices see Chapter 3 VIDEO AUDIO OUT L R VIDEO 2 inputs on TV right side panel Camcorder ...

Page 20: ...rce on the TV To select the video input source press INPUT on the remote control page 24 To program the TV remote control to operate other devices see Chapter 3 To connect a DVI device you will need one HDMI to DVI adapter cable HDMI type A connector per DVI device For proper operation the length of an HDMI to DVI adapter cable should not exceed 9 8 ft 3m The recommended length is 6 6 ft 2m one pa...

Page 21: ...creating a high noise level that may damage speakers or headphones THIS DAMAGE IS NOT COVERED BY YOUR WARRANTY The DIGITAL AUDIO OUT terminal may not output some digital audio sources because of copy restrictions Manufactured under license from Dolby Laboratories Dolby and the double D symbol are registered trademarks of Dolby Laboratories Connecting an audio system This connection allows you to u...

Page 22: ...skipped or you may not be able to pause during multi angle scenes Signal names for mini D sub 15 pin connector NC Not connected To connect a PC to the HDMI terminal on the TV When connecting a PC to the HDMI terminal on the TV use an HDMI to DVI adapter cable and analog audio cables If connecting a PC with an HDMI terminal use an HDMI cable type A connector Separate analog cables are not necessary...

Page 23: ...he tab snaps Caution Never throw batteries into a fire Note Be sure to use AAA size batteries Dispose of batteries in a designated disposal area Batteries should always be disposed of with the environment in mind Always dispose of batteries in accordance with applicable laws and regulations If the remote control does not operate correctly or if the operating range becomes reduced replace batteries...

Page 24: ...ume level 9 FAV BROWSER accesses the Favorites List in the Channel Brower page 39 10 RECALL displays TV status information page 56 11 CH RTN returns to the last viewed channel or source page 41 12 MUTE reduces or turns off the sound page 47 13 INFO displays TV status information as well as program details when available page 56 14 3 C c While watching TV these buttons open the Channel Browser and ...

Page 25: ...hannel guide in the CABLE SAT mode SET UP Accesses a DVD s setup menu in the AUX mode 7 INFO Displays TV status information on screen 8 BbC c Press to navigate DVD menus may not work on some DVD players 9 ENTER Required by some satellite receivers and DVD players to activate certain functions 10 DVD CLEAR Press to reset the title and chapter number 11 PLAY Begins playback of a tape or DVD 12 PAUSE...

Page 26: ...d mute s TV s TV s TV s TV SET UP GUIDE DVD setup SAT Guide Setup VOL Volume up down s TV s TV s TV s TV CHBb Channel up down Channel up down Channel up down Channel up down RECALL RECALL s TV s TV s TV s TV CH RTN DVD RTN Previous channel DVD previous menu DVD Return INFO Info Info Display ENTER Enter Select Enter Enter Bb Menu up down Menu up down Menu up down C 3 Menu left Channel Browser Menu ...

Page 27: ...evice point the remote control at it and press p See notes below If the correct code was entered the device will turn off If the device does not respond repeat steps 1 4 using another code If the device does not respond to another code you will need to use the remote control that came with the device 5 Remember to set the MODE SELECT switch back to TV to control the TV 6 For future reference write...

Page 28: ...agnavox 060 Optimus 058 Pansat 036 052 Primestar 015 042 Proscan 008 009 013 Radio Shack 022 023 030 RCA 008 009 013 016 Realistic 030 Samsung 059 Sony 014 055 Star Choice 057 106 Star Trak 025 026 037 054 STS 024 Toshiba 000 001 002 003 004 005 006 007 020 031 056 Uniden 021 028 030 032 035 039 043 045 047 058 Zenith 027 TV VCR Combo Action 078 GE 059 062 Goldstar 065 Panasonic 065 Precision 078 ...

Page 29: ...057 062 065 068 072 Panasonic 036 045 046 057 061 072 079 Pentax 012 024 025 035 042 053 063 Pentex Research 014 Philco 026 027 063 Philips 026 031 044 057 Pioneer 006 024 043 055 Portland 012 013 015 Proscan 001 002 048 Proton 061 Quasar 045 Radio Shack 010 031 065 Radio Shack Realistic 007 009 010 016 018 020 021 022 031 049 Radix 010 RCA 001 002 003 009 024 025 029 035 040 042 045 048 055 056 0...

Page 30: ... Audio Settings menu Audio Setup S Opens the Audio Setup menu CC Selector S Launches the temporary CC Selector Base CC Mode S Off CC1 CC2 CC3 CC4 T1 T2 T3 T4 Digital CC Settings S Opens the Digital CC Setup menu Input Labeling S Opens the Input Labeling menu Channel Labeling S Opens the Channel Labeling menu Menu Language S English French Spanish Channel Browser Setup S Opens the Channel Browser S...

Page 31: ...system Press Y to open the menu system When a menu is open use the up down left right arrow buttons BbC c on the remote control or TV control panel to move in the corresponding direction in the menu Press T to save your menu settings or select a highlighted item A highlighted menu item appears in a different color in the menu All menus close automatically if you do not make a selection within 60 s...

Page 32: ...Highlight Installation and press T 3 A new set of Installation menu icons will appear as shown below Open the Terrestrial menu highlight Input Configuration and press T 4 Press C or c to select the input source Cable or Antenna for the ANT input on the TV 5 To save your new settings highlight Done and press T To revert to your original settings highlight Cancel and press T English Français Español...

Page 33: ...eat the programming process again unless your Cable TV service lineup changes significantly To program channels automatically 1 Configure the antenna input source if you have not already done so page 32 2 Press Y and open the Setup menu 3 Highlight Installation and press T 4 A new set of Installation menu icons will appear as shown below Open the Terrestrial menu highlight Channel Program to bring...

Page 34: ...nels A list of common channel labels logos for various channels ABC CBS etc will be programmed into the TV You will be able to view and assign these logos from the Channel Labeling window If the desired channel label is not provided in the list you will be able to manually enter edit labels using the software keyboard To assign channel labels 1 Press Y and open the Preferences menu 2 Highlight Cha...

Page 35: ... window Setting the HDMI audio mode To set the HDMI audio mode 1 Press Y and open the Audio menu 2 Highlight Audio Setup and press T 3 Press B or b to select HDMI 1 Audio and then press C or c to select the HDMI 1 audio mode Auto Digital or Analog Auto is the recommended mode See Connecting an HDMI or DVI device to the HDMI input page 20 Note Because the PC and HDMI 1 inputs share the same set of ...

Page 36: ...n and return to the Terrestrial menu Highlight Done and press T To return to normal viewing Press O Viewing the system status To view the system status 1 Press Y and open the Setup menu 2 Highlight Installation and press T 3 A new set of Installation menu icons will appear as shown below Open the System Status menu highlight System Information and press T 4 Press C c to scroll through the menu bar...

Page 37: ...N code or 0000 if no PIN code has been set 6 Highlight Yes and press T The TV will turn off automatically after a few seconds After the TV turns off unplug the TV power cord and then plug it in again to complete the reset process To cancel the reset Highlight No and press T System Information Done This window provides the ability to reset the TV settings Type in your PIN now or 0000 if no PIN has ...

Page 38: ...ing to the type of device you connected to each source from the following preset list of labels default label Audio Receiver Cable Compact Disc DTV DVD Game Console HD DVD Laser Disk Satellite DSS VCR Video Recorder Hide to hide an unused input in the Input Selection screen Note If you select Built In DVD or PC in the Input Selection screen you can choose only or Hide as the label To label the vid...

Page 39: ...he Channel Browser History List illustrated on the next page Surf via Browse mode to immediately tune channels as you highlight them in the Channel Browser or Select mode to surf over channels in the Channel Browser before you select one to tune Quickly change inputs from the Inputs List Favorites Browser The Favorites Browser allows you to quickly set up a favorite channels inputs list that is in...

Page 40: ... If all lists are turned off pressing 3 C c or n will not display the Channel Browser If Favorites List is turned off n will have no effect PressingnwillbringuptheChannelBrowser Favorites list regardless of the last selected list in the Channel Browser To tune to a channel or input in Browse mode 1 While watching TV press 3 C or c to open the Channel Browser and surf back to a previous item or sur...

Page 41: ...dash on the remote control Switching between two channels using Channel Return The Channel Return feature allows you to switch between two channels without entering an actual channel number each time 1 Select the first channel you want to view 2 Select a second channel using the Channel Number buttons and the dash button if selecting a digital channel 3 Press R on the remote control The previous c...

Page 42: ... bottom edges of the picture including subtitles or captions may be hidden To view the hidden edges either scroll the picture TheaterWide 2 and 3 only or try viewing the program in Full or Natural picture size Natural picture size The image is displayed close to its originally formatted proportion Some program formats will display with sidebars and or bars at the top and bottom TheaterWide 1 pictu...

Page 43: ...080p signals only If the signal being received is other than 1080i 1080p or 720p Native will be grayed out in the Picture Size screen This mode is supported only for HDMI and ColorStream inputs Depending on the input signals the border of the picture may be hidden displayed in black or noisy Scrolling the TheaterWide picture TheaterWide 2 and 3 only You can set separate scroll settings for the The...

Page 44: ...from a DVD player connected to the VIDEO 1 VIDEO 2 ColorStream HD 1 ColorStream HD 2 component video or HDMI inputs on the TV smoother motion can be obtained by setting the Cinema Mode to Film To set the Cinema Mode to Film 1 Press Y and open the Video menu 2 Highlight Theater Settings and press T 3 In the Cinema Mode field select Film 4 To save the new settings highlight Done and press T To rever...

Page 45: ...ess T 3 Press B or b to select the picture quality you want to adjust Contrast Back Light DynaLight Brightness Color Tint or Sharpness and then press C or c to adjust the setting as described in the table above 4 To save the new settings highlight Done and press T You can use any of the picture modes Selecting the picture mode above left as a starting point for adjusting the picture settings To re...

Page 46: ...ls only You cannot set the Caption Text and Background as the same color To customize the closed captions 1 Press Y and open the Preferences menu 2 Highlight Digital CC Settings and press T 3 Press B or b to highlight the characteristic you want to change and then press C or c to select the format for that characteristic see table below 4 To save the new settings highlight Done and press T To reve...

Page 47: ...e closed caption mode is set to Off when you select MUTE mode the closed caption feature is automatically activated To mute the audio without automatically activating the closed caption feature use Z to set the volume to 0 See Using the closed caption mode page 46 for more information on closed caption modes Using the digital audio selector You can use the Digital Audio Selector to conveniently sw...

Page 48: ...t offer it For example a station might broadcast another language as a second audio program If you have SAP on you will see the current program on the screen but hear the other language instead of the program s normal audio If you have SAP on and the station you are watching is not broadcasting a second audio program the station s normal audio will be output However occasionally there is no sound ...

Page 49: ...To save the new settings highlight Done and press T To revert to the factory defaults highlight Reset and press T Note You cannot change the optical audio output format while you are viewing a DVD You must be in FULL STOP mode not RESUME STOP mode Using the Dolby Digital Dynamic Range Control feature This dynamic range control feature causes the ATSC dynamic range to be further compressed allowing...

Page 50: ...menu opens If you cannot remember your PIN code While the PIN code entering screen is displayed press E four times within five seconds The PIN code will be cleared and you can enter a new PIN code Changing your PIN code 1 Press Y and highlight the Locks menu icon 2 Press b to display the PIN code entering screen 3 Enter your four digit PIN code and press T 4 Press b to highlight New PIN Code and p...

Page 51: ...een 3 Enter your four digit PIN code and press T 4 Press b to highlight Enable Rating Blocking 5 Press c and b to select On and press T 6 Press b to highlight Edit Rating Limits and press T The Edit Rating Limits screen appears 7 Highlight Alt RS and press T The Edit Alternate Ratings screen will appear Note The Alt RS button will only be available if an additional rating system is currently avail...

Page 52: ...fically designed to be viewed by adults and therefore may be unsuitable for children under 17 L Crude or indecent language S Explicit sexual activity V Graphic violence TV 14 Parents Strongly Cautioned This program contains some material that many parents would find unsuitable for children under 14 years of age D Intensely suggestive dialog L Strong coarse language S Intense sexual situations V In...

Page 53: ... DVD VIDEO 1 VIDEO 2 ColorStream HD 1 ColorStream HD 2 HDMI 1 HDMI 2 HDMI 3 and PC and channels 3 and 4 You will not be able to view the input sources or channels until you unlock the inputs To lock unlock the video inputs 1 Press Y and highlight the Locks menu icon 2 Press b to display the PIN code entering screen 3 Enter your four digit PIN code and press T 4 Press b to highlight Input Lock and ...

Page 54: ...picture is affected by interference readjust the Clock Phase and Sampling Clock To adjust the PC settings 1 Repeatedly press to select PC input mode Selecting the video input source to view page 38 2 Press Y and open the Setup menu 3 Highlight PC Settings and press T Note If a PC is not connected or there is no pc input signal this feature will be grayed out in the Setup menu 4 Press B or b to hig...

Page 55: ...e maximum of 180 minutes To set the sleep timer using the remote control Press on the remote control to set the length of time until the TV turns off Repeatedly press to increase the time in 10 minute increments or press B or b to increase or decrease the time in 10 minute increments to a maximum of 180 minutes To set the sleep timer using the on screen menus 1 Press Y and open the Setup menu 2 Hi...

Page 56: ...if applicable Title Duration Detailed description Note The location of the banner can be moved to the top or bottom of the screen by pressing B or b while the RECALL or INFO display is on screen The last position will be stored to memory Understanding the auto power off feature The TV will automatically turn itself off after approximately 15 minutes if it is tuned to a vacant channel or a station ...

Page 57: ...ttings and press T 4 In the Static Gamma field press C or c to adjust the static gamma The adjustment range is within 5 from center If the setting is moved in the minus direction the detail of black colors will be decreased If the setting is moved in the plus direction the detail of black colors will be increased 5 To save the new settings highlight Done and press T To revert the factory defaults ...

Page 58: ... allows you to reduce visible interference in your TV picture This may be useful when receiving a broadcast with a weak signal especially a Cable channel or playing a noisy video cassette or disc To change the CableClear settings 1 Press Y and open the Video menu 2 Highlight Noise Reduction and press T 3 In the CableClear field select your desired setting Note If the current input is ANT VIDEO 1 o...

Page 59: ...frame delays when playing a video game requiring split second timing between the on screen display and input from the controller such as music creation and high action games This feature is more effective for 480i and 1080i input signals Note To use the Game Mode feature the current video input must be Video 1 Video 2 ColorStream HD1 ColorStream HD2 HDMI 1 HDMI 2 or HDMI 3 The Game Mode cannot be ...

Page 60: ...ght Advanced Audio Settings and press T 4 Press b or B to highlight the WOW feature you want to adjust and then press C or c to adjust the item WOW SRS 3D To turn the surround sound effect On or Off Note If the broadcast is monaural the SRS 3D effect will not work WOW SRS Focus To turn the vocal emphasis effect On or Off WOW SRS TruBass To select the desired bass expansion level Off Low or High 5 ...

Page 61: ...tion Auto Play feature If you load a disc when the TV is off the TV will power on and playback will commence automatically However loading the disc may take 1 2 seconds About the Parental Lock screen If the Parental Lock YES NO screen appears after loading a disc and you want to temporarily unlock the Parental Lock select YES and then input the PIN CODE following the on screen menu The Parental Lo...

Page 62: ...G will appear on the display for about 30 60 seconds and then BAD DISC will display until you remove the disc Some discs may not resume playing the same scene after stopping Some DVD playback operation may be intentionally fixed by the software producers Since this TV plays DVDs according to the disc contents as designed by the software producers some playback features may not be available Also re...

Page 63: ...viewing a DVD You must be in FULL STOP mode not RESUME STOP mode Playing in fast reverse or fast forward Press H or J during playback H Fast reverse playback DVD VCD 2X 64X CD MP3 2X 16X J Fast forward playback DVD VCD 2X 64X CD MP3 2X 16X Each time you press H or J the playback speed changes To resume normal playback Press S Note The TV mutes sound and subtitles during reverse and forward scan of...

Page 64: ...blem with the TV Changing angles You can change the viewing angle of the scene during playback if the disc is recorded with multi angle facility 1 Press a during playback The current angle will appear 2 Press a repeatedly until the desired angle is selected Note Depending on the DVD you may not be able to change the angles even if multi angles are recorded on the DVD Title selection Two or more ti...

Page 65: ...ard if the disc is played back again If you select DTS in playing DTS encoded disc no sound will be heard from the TV s speakers Subtitles When playing back a disc recorded with subtitles you can select the subtitle language or turn the subtitle off 1 Press b repeatedly during playback until your desired language appears 2 To turn off the subtitle press b until SUBTITLE OFF appears The SUBTITLE OF...

Page 66: ...ayback MP3 JPEG CDs must meet ISO9660 standards Files must have one of the following extensions mp3 or jpg MP3 JPEG CDs cannot be used for the purpose of recording If the CD has both audio tracks and MP3 JPEG files only audio tracks are played It may take more than 1 minute for this TV to read MP3 JPEG files depending on its structure Note Some MP3 JPEG CDs cannot be played back depending on the r...

Page 67: ...in technical standards in order to achieve optimal playback quality There are many different types of recordable disc formats including CD R containing MP3 WMA files Not all recordable discs will operate or produce optimal playback quality The technical criteria set forth in this owner s manual are meant only as a guide Use of CD RW for MP3 files is not recommended You must obtain any required per...

Page 68: ...is on screen you can rotate the picture by 90 using BbC c buttons 5 Press D to end playback The file menu will appear on the screen If you want to view another file repeat steps 3 4 If you press A during the slide show the slide show stops temporarily PAUSE appears on the screen Press S again to resume the slide show To display the next file press G To display the previous file press F When slide ...

Page 69: ...vices connected to VIDEO 1 VIDEO 2 ColorStream HDMI 1 HDMI 2 PC or from channels 3 or 4 make sure the Input Lock is set to Off page 53 Poor color or no color The station may have broadcast difficulties Try another channel Adjust the Tint and or Color page 45 Poor composite or S video picture If the TV is connected to an external A V device e g DVD player video game system set top box etc try using...

Page 70: ...hen the signal reception is weak or c when the signal reception is nonstandard page 46 Rating blocking V Chip problems If you forget your PIN code While the PIN code entering screen is displayed press E four times within 5 seconds The PIN code you previously stored will be cleared page 50 The V Chip feature is available for the U S V Chip system only page 51 DVD Troubleshooting Playback doesn t st...

Page 71: ...Consumer Solutions at 1 800 575 5469 In Canada locate the nearest Toshiba authorized service depot by directing your web browser to www toshiba ca click Home Entertainment and then click Support LED Indication Condition Solution 1 Green is ON solid The TV is operating properly 2 Yellow is ON solid A disc is in the disc slot 3 Yellow blinks three times TV is powering up Wait several seconds until t...

Page 72: ...rted Suggested formats See table below HDMI Audio 2 channel L PCM 32 44 1 48 kHz sampling frequency 16 20 24 bits per sample FIXED AUDIO OUTPUT 150 mv rms 30 modulation equivalent 2 2 k ohm or less DIGITAL AUDIO OUTPUT Optical type PC INPUT 15 Pin D sub Analog RGB DVD CD Player DVD signal system NTSC DVD region number 1 Applicable disc 1 DVD 12cm 8cm with Disc adapter 2 CD 12cm 8cm with Disc adapt...

Page 73: ... the Continental U S A or Puerto Rico 4 Labor service charges for set installation setup adjustment of customer controls and installation or repair of antenna systems are not covered by this warranty Reception problems caused by inadequate antenna systems misaligned satellite dishes cable television distribution VCRs DVD players recorders personal computer level IEEE 1394 devices and any other con...

Page 74: ...red Depending on the type of repair required the service will either be performed on site or the Television will be taken to an ASP for repair and returned at no cost to you ON SITE SERVICE ONLY APPLIES WITHIN 100 KILOMETERS OF AN ASP IF YOU ARE NOT WITHIN 100 KILOMETERS OF AN ASP YOU MUST DELIVER THE ENTIRE TELEVISION TO AN ASP YOU MUST PAY FOR ALL TRANSPORTATION AND INSURANCE CHARGES FOR THE TEL...

Page 75: ...s the Dispute shall be referred to and resolved by final and binding arbitration to the exclusion of the courts To the extent not precluded by law you agree to waive any right that you may have to commence or participate in any representative or class proceeding against the Related Parties relating to any Dispute If and where applicable and to the extent not precluded by law you further agree to o...

Page 76: ...ND ANY EXPRESSED OR IMPLIED WARRANTIES INCLUDING BUT NOT LIMITED TO THE IMPLIED WARRANTIES OF MERCHANTABILITY AND FITNESS FOR A PARTICULAR PURPOSE ARE DISCLAIMED IN NO EVENT SHALL THE OpenSSL PROJECT OR CONTRIBUTORS BE LIABLE FOR ANY DIRECT INDIRECT INCIDENTAL SPECIAL EXEMPLARY OR CONSEQUENTIAL DAMAGES INCLUDING BUT NOT LIMITED TO PROCUREMENT OF SUBSTITUTE GOODS OR SERVICES LOSS OF USE DATA OR PRO...

Page 77: ...are and service 3 Installation setup 12 Integrated digital tuning 11 J JPEG 68 L Labeling video input 38 Language selection 32 Last mode memory feature 56 LED indications 13 71 LOCKS menu Channels blocking 52 Enable rating blocking 51 New PIN code 50 Panel lock 54 Unlocking programs temporarily 53 Video inputs locking 53 Locks menu 50 M MP3 67 MPEG noise reduction 59 MTS feature 48 MUTE button 47 ...

Page 78: ...fLock DynaLight and LCDVD logo are trademarks of Toshiba America Consumer Products L L C REGZA is a resistered trademark of Toshiba Corporation MANUFACTURED BY HEAD OFFICE 191 McNABB STREET MARKHAM ONTARIO L3R 8H2 CANADA TEL 905 470 5400 SERVICE CENTERS TORONTO 191 McNABB STREET MARKHAM ONTARIO L3R 8H2 CANADA TEL 905 470 5400 MONTREAL 18050 TRANS CANADA KIRKLAND QUEBEC H9J 4A1 CANADA TEL 514 390 7...

Reviews: