background image

29

EN

In

tr

od
uct

ion

Con

n

ec
ti

on
s

P

la

yb
ac
k

E

d

it

ing

Ot
he
rs

Fu
nct

ion
 S
e

tu

p

Recor

d

ing

VCR Fun

ct

ions

Basi

c Se

tu
p /
 

TV
Vi

ew

Op
eration

After recording, you must finalise the disc to play it back in other players. (See page 45.)
You cannot finalise discs in other DVD recorders.


HDD is a special device which has high recording density and 
is suited for long-time recording or high-speed cueing but by 
contrast, has many factors which can cause breakage. Use 
HDD on the premise that you should dub the recorded 
programmes to a DVD disc to protect your precious videos.

HDD is a temporary storage location:

HDD is not a permanent storage location of the recorded 
contents. Be sure to use it as a temporary storage location 
until you watch the programmes once, edit them, or dub them 
to a DVD disc.

Be sure to dub (back up) data promptly if you find 
abnormalities in HDD:

If there is mechanical trouble with the HDD, grinding or other 
sounds may be heard or blocky noise may appear on the 
image. If you continue to use as it is, deterioration may 
continue and eventually the HDD may not be used at all. If you 
notice these symptoms of a failing HDD, promptly dub the 
data to a DVD disc.
When an HDD fails, recovery of recorded content (data) may 
be impossible.

About the remaining capacity of HDD recording time:

In recording to HDD, the Remaining Capacity Display may 
differ from the actual recordable time as this unit adopts 
Variable Bit Rate encoding, which varies the recording 
(storage) amount of data in conformity with the amount of 
information in the video signal. Before recording to the HDD, 
ensure there is sufficient space on the HDD by deleting 
unnecessary titles in advance. (Remaining capacity will not 
increase if you only delete Playlists.)

HDD:

600 Original titles
600 Playlists
99 chapters per Original/Playlist title

VR mode DVD:

99 titles per each Playlist and Original
999 chapters per each Playlist and Original

Video mode DVD:

99 titles per disc
99 chapters per title 

+VR mode DVD:

49 titles per discs
254 chapters per disc
99 chapters per title

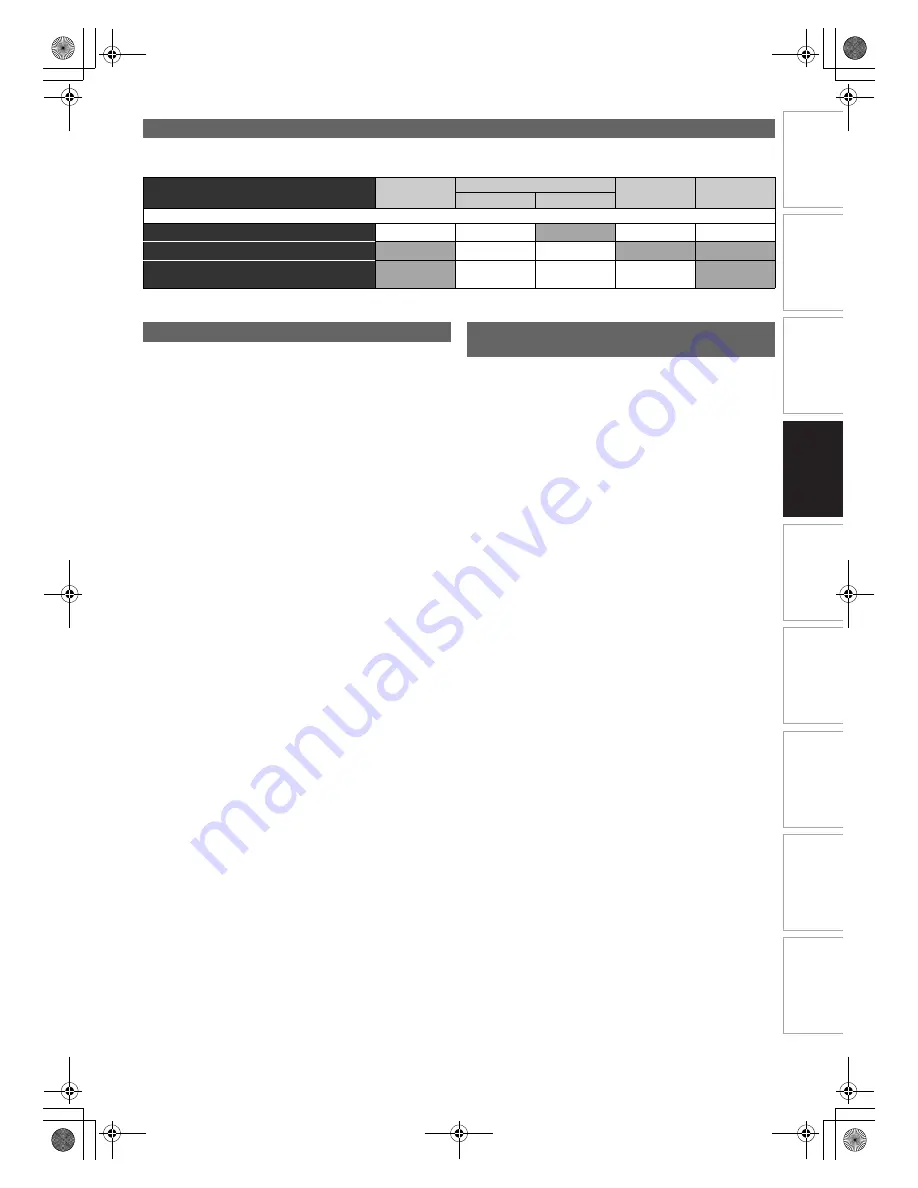
Making Discs Playable in Other DVD Players (Finalise)

Disc Type

DVD-R

DVD-RW

DVD+RW

DVD+R

Video Mode

VR Mode

After finalising

Automatic Title menu making

Undo finalising (See page 45.)

Additional recording or editing (See page 45.)

(undo finalise)

(undo finalise)

: Available

Grey: Not available

About HDD

Maximum Recordable Numbers of Title / 
Chapters

E3TK6BD_EN.book  Page 29  Wednesday, February 17, 2010  10:18 AM

Summary of Contents for RDXV59DTKB

Page 1: ...ing VCR Functions Basic Setup TV View Operation 2010 Toshiba Corporation For Customer Use Carefully read the Model No and Serial No located at the back of the unit and enter the information below Retain this information for future reference Model No __________________________ Serial No __________________________ E3TK6BD_EN book Page 1 Wednesday February 17 2010 10 18 AM ...

Page 2: ...12 Disconnect the mains plug to shut off the unit if you suspect a fault has developed or if it will not be used for an extended period 13 The mains plug shall remain readily operable 14 Read the instruction manual and QSG to ensure correct and safe installation and interconnection of the unit in multimedia systems 15 Keep a distance of 20 cm around the ventilation openings of the apparatus Introd...

Page 3: ...ck the ventilation holes on the sides of the unit Avoid locations subject to strong vibration or strong magnetic fields Avoid the Hazards of Electrical Shock and Fire Do not handle the mains cable with wet hands Do not pull on the mains cable to disconnect it from the AC outlet Grasp it by the plug If by accident water is spilled on the unit unplug the mains cable immediately and take the unit to ...

Page 4: ...t the problem by yourself There are no user serviceable parts inside Turn the unit off unplug the mains cable and consult your dealer or an authorised service centre CLEANING THE DISC LENS If the unit does not perform correctly even though you have referred to Troubleshooting and the relevant sections in the Owner s Manual the laser optical pickup unit may be dirty Consult your dealer or an author...

Page 5: ... Automatic finalising E Page 45 Automatic title menu making E Page 45 High speed dubbing E Page 41 Auto recording mode dubbing E Page 41 DV dubbing Theatre surround sound E Page 19 Quick search E Pages 54 55 Variable skip E Page 51 Variable replay E Page 51 Playback from Original or a Playlist E Page 46 Virtual Surround System E Page 57 Playing back data files recorded in a USB device E Page 48 Ch...

Page 6: ...36 Series Link Timer Recording 37 Satellite Link 37 Settings for External Equipment 38 Information on DV Dubbing 39 DVC to HDD DVD Dubbing 40 Information on Dubbing 40 Setting a Disc to Protect 44 Finalising Discs 45 Playback 46 Basic Playback 46 PBC Function for Video CDs 50 Special Playback 51 Search 54 Repeat Random Programme Playback Slide Show 55 Selecting the Format of Audio and Video 56 Edi...

Page 7: ...deo mode Available to DVD RW discs Available to DVD R discs Available to audio CDs Available to video CDs Available to CD RW R discs and USB device with MP3 files Available to CD RW R discs and USB device with JPEG files Available to DVD RW R DVD RW R CD RW R discs and USB device with DivX files DivX files in USB device are not guaranteed Available to VHS tapes Use only cassettes marked VHS Symbol...

Page 8: ...n recommended Playable on most DVD players Finalisation necessary Title menu will be created Playable on DVD RW compatible players Finalisation recommended Title menu will be created Playable on most DVD players Finalisation recommended Title menu will be created Available Features Recording Features Record TV Programmes Reuse by Deleting the Current Contents Record 16 9 Size Pictures Record Copy ...

Page 9: ...for Playing Type of title MP3 JPEG DivX Icon Media CD RW R USB device CD RW R USB device CD RW R DVD RW R DVD RW R USB device not guaranteed DVD V DVD V DVD V CD CD CD VCD VCD VCD CD CD CD CD CD CD MP3 MP3 MP3 JPEG JPEG JPEG DivX DivX DivX Unplayable Discs CD ROM Compact Disc Interactive CD I Video Single Disc VSD DVD ROM DVD audio Unfinalised disc DVD or CD contains Windows Media Audio files DVD ...

Page 10: ...indicator 1 Mains cable 2 HDMI OUT jack HDD DVD VCR 3 DIGITAL AUDIO OUT COAXIAL jack HDD DVD VCR 4 AUDIO OUT L R jacks HDD DVD VCR 5 COMPONENT VIDEO OUT jacks HDD DVD VCR 6 AV2 DECODER socket HDD DVD VCR 7 AV1 TV socket HDD DVD VCR 8 ANTENNA IN 9 ANTENNA OUT Note Do not touch the inner pins of the jacks on the rear panel Electrostatic discharge may cause permanent damage to the unit After turning ...

Page 11: ... INFO C button 25 CLEAR button 26 GUIDE button 27 VARIABLE SKIP button HDD DVD 28 DISC MENU button HDD DVD 29 ENTER OK button 30 RETURN BACK button 31 FWD D button 32 STOP C button 33 SKIP G button HDD DVD 34 HDD button 35 DVD button 36 REC I button 37 REC MODE button 38 SAT LINK button HDD 39 AUDIO D button Note If you turn off this unit OPEN CLOSE A on the remote control is not available Be sure...

Page 12: ...trol sensor of the unit is being exposed by the strong sunlight or fluorescent light Remote controls for different devices can interfere with each other Be careful when using remote controls for other equipment located close to the unit Replace the batteries when the operating range of the remote control reduces Switching HDD DVD VCR mode You must select which component you want to operate first P...

Page 13: ...component in use HDD DVD USB device Note For some descriptions on this manual only one disc type is indicated as an example Press DISPLAY repeatedly while the display menu is displayed to display the following information 1 Indicates the resolution of the HDMI output image 2 Indicates the HDMI video format 3 Indicates the HDMI audio format will be displayed when it does not have any information DI...

Page 14: ...P3 JPEG is plugged 1 Playback E Page 68 2 Display E Page 70 3 Video E Page 71 4 Recording E Pages 30 32 38 45 5 Clock E Page 71 6 Channel E Pages 20 26 7 DivX E Pages 49 72 8 HDMI E Page 72 9 DVB Setting E Page 73 10 Reset All E Page 73 1 Adult Lock E Page 73 2 Language E Page 73 3 About E Page 73 VCR INFO Menu DVB 0 00 00 STEREO AV2 STEREO 12 00 SP 7 1 1 2 2 3 3 4 4 5 5 7 6 6 This is an example s...

Page 15: ... CD only E Page 51 CD RW R with MP3 JPEG files 4 Music MP3 files E Page 55 5 Photo JPEG files E Pages 55 56 6 Slide Show E Page 56 1 Music MP3 files E Page 55 2 Photo JPEG files E Pages 55 56 B Timer Programming C Title List D DVD Menu E HDD Menu F Dubbing 1 2 3 4 Format Finalise Disc Protect OFF ON Delete All Playlists DVD Menu 3 2 1 HDD Menu Delete All Titles Delete All Unprotected Titles Delete...

Page 16: ...esolution 576p is selected Appears when HDMI video resolution 720p is selected Appears when HDMI video resolution 1080i is selected Appears when HDMI video resolution 1080p is selected DB DTV 4 3 2 1 Appears when the channel is in digital mode Title track number Chapter number F Appears when playback is paused Appears during step by step playback B Appears when playing back an HDD or disc F B Appe...

Page 17: ...rogressive or Component Interlace Refer to Video Out on page 71 Component connection provides the better quality picture Connect the COMPONENT VIDEO OUT jacks of this unit to the component video input jacks of your TV Connect the AUDIO OUT L R jacks of this unit to the analogue audio input jacks of your TV After you have made the connections set the Video Out setting See page 71 Selecting Progress...

Page 18: ...ith an HDMI input may not operate properly with this unit When using an HDCP incompatible display device the image will not be viewed properly Among the devices that support HDMI some devices can control other devices via the HDMI connector however this unit cannot be controlled by another device via the HDMI connector The audio signals from the HDMI connector including the sampling frequency the ...

Page 19: ...ound or no sound at all Connecting multi channel Dolby Digital decoder allows you to enjoy the Multi channel Dolby Digital surround system as well as DTS decoder Multi channel surround system After connecting to a Dolby Digital decoder set Dolby Digital to Stream in Audio Out menu See page 69 After connecting to a DTS decoder set DTS to ON in Audio Out menu See page 69 After connecting to a MPEG d...

Page 20: ...ning ANALOG on page 21 Refer to Auto Tuning DVB on page 22 Refer to Clock on page 71 Also you can customize the memorised channel at General Setting Refer to following pages for details Refer to Manual Tuning ANALOG on page 21 Refer to Manual Tuning DVB on page 22 Refer to Skip a Preset Channel on page 22 Refer to Move on page 22 Use this feature to adjust the aspect ratio of the video source whic...

Page 21: ... on page 22 explain how to move channels You can preset an analogue channel manually and individually 1 In stop mode press SETUP Select General Setting using K L then press ENTER OK 2 Select Channel using K L then press ENTER OK 3 Select ANALOG Channel Setup using K L then press ENTER OK 4 Select Manual Tuning using K L then press ENTER OK 5 Select Position using K L then press 1 6 Select the posi...

Page 22: ...s available in your area The tuner scans and memorises all the active DVB channels TV Radio in your area 5 Press ENTER OK to exit After auto tuning is completed the lowest memorised DVB channels appears on the screen You can use PROG G H to change the DVB channels Note If you press RETURN BACK or SETUP during the scanning auto tuning will be cancelled You can preset a DVB channel manually and indi...

Page 23: ...ted on the TV screen Audio mode during reception of analogue bilingual broadcasts If the programme does not have more than one sound track AUDIO D is not effective With Quick Select menu you can select your favourite DVB channel quickly Refer to Edit Group Lists on page 24 1 Press ENTER OK while watching a DVB channel Quick Select menu will appear 2 Press 0 1 to select your favourite group list Al...

Page 24: ...ite group list using K L then select the number of the favourite group list you want to add using the Number buttons 1 8 The number you selected will appear Press 0 to cancel from the favourite group list 3 Press RETURN BACK to exit You can set the unit to skip the unwanted DVB channels when you use PROG G H 1 Follow steps 1 to 4 in Edit Channels on this page 2 Select the DVB channel you want to s...

Page 25: ...l names as you want 1 Follow steps 1 to 4 in Edit Channels on page 24 2 Select the DVB channel you want to edit the name using K L then press RED Name editing display will appear 3 Edit the name using the Number buttons Press the Number buttons repeatedly until the desired letter appears Press 0 1 to move the cursor left or right Press RED to select alphabet or numbers Press GREEN to select capita...

Page 26: ...channels transmit Multi Audio information along with their DVB channels You can select the desired audio mode and audio language 1 While viewing a DVB programme press AUDIO D 2 Select Stereo Left or Right using 0 1 3 Select your desired audio language using K L The available audio language varies depending on the DVB programmes 4 Press ENTER OK to activate the settings Note If the programme is cha...

Page 27: ... the TV programme using K L 0 1 Refer to Timer Recording EPG on page 36 e g Weekly Mode 1 EPG menu mode 2 Programme you select now 3 Channel name 4 Time Date 5 Programme name 6 Programmes set for the timer recording Press RETURN BACK to exit Press RED to display Daily Mode Press GREEN to display Weekly Mode Press YELLOW to see all series episodes linked to the selected programme For the series lin...

Page 28: ...en You can only record Copy once only video using a DVD RW disc in VR mode with Content Protection for Recordable Media CPRM or internal HDD When recording a TV broadcast or an external input you can display copy control information on the screen CPRM is a scrambling copy protection system for the protection of copy once broadcast programmes This unit is CPRM compatible which means that you can re...

Page 29: ...iling HDD promptly dub the data to a DVD disc When an HDD fails recovery of recorded content data may be impossible About the remaining capacity of HDD recording time In recording to HDD the Remaining Capacity Display may differ from the actual recordable time as this unit adopts Variable Bit Rate encoding which varies the recording storage amount of data in conformity with the amount of informati...

Page 30: ...ETUP Select General Setting using K L then press ENTER OK 2 Select Recording using K L then press ENTER OK 3 Select Make Recording Compatible using K L then press ENTER OK 4 Select ON or OFF using K L then press ENTER OK 5 Press SETUP to exit You can set aspect ratio for video mode recording 1 In stop mode press SETUP Select General Setting using K L then press ENTER OK 2 Select Recording using K ...

Page 31: ...lect Yes using K L then press ENTER OK e g VR mode DVD RW Formatting will start If you want to cancel formatting select No 6 Formatting is complete Note It is not possible to use a disc formatted with another DVD recorder The disc needs to be reformatted with this unit But this unit may not be able to reformat some discs that are not previously formatted by this unit e g DVD disc formatted by PC o...

Page 32: ...HDD press HDD then proceed to step 5 If you want to record to a disc press DVD 2 Press OPEN CLOSE A to open the disc tray 3 Place the disc on the disc tray with its label facing up Be sure to align the disc with the disc tray guide 4 Press OPEN CLOSE A to close the disc tray 5 Select the recording mode using REC MODE See page 28 6 Press INPUT SELECT F to select DVB analogue or external input mode ...

Page 33: ...TV screen The remaining recording time will be displayed on the front panel display during One touch Timer Recording Unlike the timer recording you can perform the following operations during One touch Timer Recording Turn off the power One touch timer recording will be cancelled Use REC I or STOP C on the remote control You cannot use the pause function during One touch Timer Recording The unit w...

Page 34: ...e only for timer recording Not available for one touch timer recording The Programme Delivery Control PDC assures that the TV programmes you have programmed for timer recording are recorded exactly from beginning to end even if the actual broadcasting time differs from the scheduled time due to a delayed start or extension of the programme duration Furthermore if a programme is interrupted the rec...

Page 35: ...s before the programmed starting time If it comes to 2 minutes before the starting time during regular or one touch timer recording the recording in progress will be stopped Playback of DVD CD is prohibited from 2 minutes before the programmed starting time when the recording media is DVD If it comes to 2 minutes before the programmed starting time during DVD CD playback the playback will be stopp...

Page 36: ... Weekly Mode 2 Select a desired programme using K L 0 1 then press ENTER OK or BLUE 3 Set REC To Mode and STTL using K L 0 1 then press ENTER OK Note EPG timer recording will stop if the broadcaster sends the EPG programme end or if you press STOP C on the front panel or press STOP C on the remote control then select Yes using K L then press ENTER OK If you select a programme that is broadcasting ...

Page 37: ...arts With EPG system when you set the first part of the split TV programme for the timer recording whole parts will be set to the timer programme automatically Alternate instance recording If a timer programming you set overlaps this unit will search for same TV programme broadcasted in different time and if this unit finds the programme you will be asked whether to record the programme in differe...

Page 38: ...he screen and recording will be paused Recording will be resumed when a PAL or SECAM signal is detected Before recording from external equipment see page 19 for connection instructions 1 Turn on the TV and be sure to select the input to which the unit is connected If you want to record to the HDD press HDD If you want to record to a disc press DVD and insert a recordable disc If you want to record...

Page 39: ...ghted press ENTER OK to display the available devices to control with the remote control of this unit Select the device you want to operate using K L then press ENTER OK Select HDD DVD to control this unit with the remote control of this unit Select DVC to control your DVC with the remote control of this unit 3 Recording audio mode DV Audio can be changed With DV Audio selected press ENTER OK to d...

Page 40: ... video signal is detected from the DVC during DVC to HDD or DVD dubbing the recording will be paused and I will flash on the TV screen The recording will resume when the unit detects the video signal again When the DVC is in camera mode refer to Guide to DV and On Screen Display on page 39 Date time and cassette memory data will not be recorded Pictures with a copy guard signal cannot be recorded ...

Page 41: ...ture of the title being dubbed the audio cannot be changed During high speed dubbing the playback picture will not appear When you dub an HDD title that has bilingual audio to video mode DVD RW R or DVD RW R disc select an appropriate audio format in the Bilingual Recording Audio menu Refer to Setting Bilingual Recording Audio on page 32 In order to dub a DVD recorded with the NTSC set the TV Syst...

Page 42: ...The dubbing will start from the beginning of the title being played back The unit will dub only the title being played back If the title was in the resume stop mode the dubbing will start from the beginning to the end of the resume stopped title When dubbing from HDD to DVD or VR mode DVD RW to HDD recording mode will automatically be set to High whenever the conditions are met See page 41 If the ...

Page 43: ...The title is now registered in the dubbing list To cancel selected title Select a title using K L 0 1 then press ENTER OK again 6 Repeat step 5 until you register all the titles to be dubbed then press DUBBING e g HDD 1 Go to the dubbing list then select a title using K L Then press ENTER OK 2 Select Delete using K L then press ENTER OK 3 Select Yes using K L then press ENTER OK One Title Dubbing ...

Page 44: ...OK Confirmation message will appear 5 Select Yes using K L then press ENTER OK If dubbing continues when timer recording starts the next display will appear Dubbing will start It may take awhile to prepare for the dubbing To stop the dubbing in progress Press STOP C on the front panel Press STOP C for 2 seconds on the remote control Note Dubbing will start where the tape is stopped After starting ...

Page 45: ...sing is complete Note Finalising a disc in video mode and VR mode automatically creates a Title menu After you finalise the DVD RW disc you can call up the title list by pressing TOP MENU or you can call up the Title menu by pressing DISC MENU Even after DVD RW disc is finalised you can still record or edit After you finalise DVD RW R or DVD R disc you cannot edit or record anything else on that d...

Page 46: ...fore turning off the unit Note For DVD R video mode DVD RW video mode and DVD R discs that are already finalised a Title menu will be displayed instead of thumbnails After you finalise the DVD RW you can call up the Title list by pressing TOP MENU or you can call up the title menu by pressing DISC MENU You can resume playback from where you stopped playing back the disc Resume playback See page 51...

Page 47: ...om the selected track and continue with each one after JPEG files are shown with the icon The unit can recognise up to 255 folders and up to 99 tracks 999 files Letters of a file folder name overflowing the given space will be displayed as Unplayable folders and tracks files may be displayed depending on the recording conditions For MP3 file recorded in Variable Bit Rate VBR the unit may not displ...

Page 48: ...sub SUB ass ASS ssa SSA txt TXT sub SUB and txt TXT files may not be recognised The subtitles that exceed the playback time of the DivX file will not be displayed Playing Back a USB Device with MP3 JPEG DivX Files Note for DivX DivX files recorded in USB device are not guaranteed to play back Note for USB device The unit cannot play back a USB device at the following condition During the operation...

Page 49: ...k the DivX VOD files of which rental period has been expired In such case press TOP MENU and select other files that can be played back Note for DivX DivX is a codec compression decompression that can compress images to a very small amount of data The software can compress video data from almost any sources to the size that can be sent on the Internet without compromising visual quality of the ima...

Page 50: ...ich will vary between discs K L 0 1 buttons Move the cursor from item to item on the screen ENTER OK button Selects the currently highlighted menu option the Number buttons Selects a numbered menu option available on certain discs 3 Press TOP MENU to exit Note TOP MENU will not be available for some DVDs Menus vary among discs Refer to the information accompanying the disc for details For DVD RW d...

Page 51: ...ard reverse speeds are 2x 8x and 16x For DivX files approximate forward speeds are 2x 20x and 40x and approximate reverse speeds are 5x 20x and 40x To return to playback at normal speed press PLAY B Picture quality of DivX files in fast reverse is lower than that in fast forward For some DivX files Fast forward Fast reverse may not function Note Forward reverse speeds are indicated with icons as f...

Page 52: ...ecting a smaller factor than that currently selected the zoom area is not displayed You cannot slide the zoomed picture on some JPEG files You can assign a specific point on a disc to return later 1 During playback press DISPLAY to bring up the display menu If the display menu is already shown skip to step 2 2 Select the icon using 0 1 to display the marker list e g DVD video 3 Select the desired ...

Page 53: ...he second press or the first press when the unit is in HDD recording mode the image will be paused while the recording continues It is as if you have paused the live TV broadcast 2 When you come back press TIME SLIP again The pause will be cancelled and the playback will start from the point where the image is paused in step 1 While viewing the recorded content you can pause and resume the playbac...

Page 54: ...xt The unit moves to the next track one after another To go back to the previous track press SKIP H twice in quick successions The unit moves backward one track at a time Using the DISPLAY button 1 During playback press DISPLAY to bring up the display menu If the display menu is already shown skip to step 2 2 Select the icon using 0 1 then press ENTER OK for the track number is highlighted 3 Enter...

Page 55: ... setting is also cancelled when you stop playback Point B for the repeat A B playback should be set within the same title or track as point B You cannot select Group during the random playback of MP3 and JPEG files Chapter Track repeat will be cancelled whenever a Chapter Track is skipped forward or backward For some DivX files A B Repeat playback may not function For video CDs with PBC function r...

Page 56: ...ng playback 1 During playback press DISPLAY to bring up the display menu Or press SUBTITLE during playback and follow from step 3 2 Select the icon using 0 1 to display the selection menu 3 Select the desired subtitle language using K L then press ENTER OK Subtitles are displayed in the selected language If you select OFF subtitles will disappear Note With some discs it is only possible to change ...

Page 57: ...e angles The disc case is usually marked with an angle icon if the disc has multi angle scenes 1 During playback press DISPLAY to bring up the display menu The angle icon appears when a switching camera angle is available Available only when the angle icon appears in bottom right on the TV screen 2 Select the icon using 0 1 then press ENTER OK The angle will switch each time you press ENTER OK Not...

Page 58: ...he recorded date time channel and the recording mode are displayed here 9 Progress bar Indicating the progress of the playback 10 Preview window Preview of the selected title is displayed here 11 Playback status Indicating the current playback status of the selected title Press RETURN BACK to exit the title list Editing 0 00 59 1 ORG 17 05 10 18 00 22 SP 1 6 ABCDE 11 00 10 00 00 17 05 10 125 SP 1 ...

Page 59: ... for DVD R or video mode DVD RW and DVD RW R discs It is not possible to edit a disc recorded in another video system other than PAL such as NTSC After finalising a DVD RW R or DVD R disc you cannot edit any information that is on that disc You can delete titles you do not want to keep When an Original is deleted from HDD or VR mode DVD RW disc the recordable disc space will increase Even when a P...

Page 60: ...A window for entering the title name will appear 5 To enter the title name refer to Guide to Editing Title Names on this page When you finish entering the title name press ENTER OK 6 Select Yes using K L then press ENTER OK The name you edited becomes the title 7 Press RETURN BACK repeatedly to exit Writing onto the disc starts It may take awhile to write the data on a disc Characters set will be ...

Page 61: ...he disc may decrease when adding chapter marks or increase when clearing chapter marks depending on the recording time or edited contents For titles in video mode DVD RW disc you can set or edit chapter at every selected time interval at once You can also clear all the chapter marks at once You can only specify the interval of chapter marks that last for more than 5 minutes Press DVD first 1 Follo...

Page 62: ...arked with icon 4 Press RETURN BACK repeatedly to exit For DVD writing onto the disc starts It may take awhile to write the data on a disc To protect a whole disc VR mode DVD RW and DVD RW R discs only Select Disc Protect OFF A ON from DVD Menu then select Yes Refer to Setting a Disc to Protect on page 44 You can divide a title into two new titles If you edit the HDD press HDD first If you edit a ...

Page 63: ... awhile to write the data on a disc Note To delete a title from the Playlist refer to Deleting Titles on page 59 When the number of the Playlist reaches its maximum refer to page 29 or when the number of the total chapter marks of the Playlists reaches 999 only for VR mode DVD RW Add To Playlist cannot be selected All Playlists can be deleted if it is no longer needed 1 Press SETUP 2 Select DVD Me...

Page 64: ...ke awhile to write the data on a disc Note For VR mode DVD RW disc you cannot select Scene Delete if the number of chapter marks in the Original or Playlist is 999 Depends on the content there is a case that you cannot select Scene Delete before the number of chapter marks reaches 999 The recordable disc space will not increase after deleting parts of titles on a Playlist When a scene is deleted f...

Page 65: ...Set the language for audio Subtitle Language E Page 69 English Other Set the language for subtitles Angle Icon E Page 69 OFF Set whether or not to display the angle icon Still Mode E Page 70 Field Frame Set the type of still image in pausing playback Variable Skip Replay E Page 70 Variable Skip 5 seconds 15 seconds 1 minute 5 minutes Set the amount of skip time when you press VARIABLE SKIP Variabl...

Page 66: ...une the DVB channels automatically Manual Tuning E Page 22 Tune the DVB channels manually Signal Information E Page 26 Display the detailed information of the current DVB channel ANALOG Channel Setup Auto Tuning E Page 21 Tune the analogue channels automatically Manual Tuning E Page 21 Tune the analogue channels manually Move E Page 22 Move the analogue channels to different position DivX DivX VOD...

Page 67: ...fault Contents RGB ON Normal OFF English English English Common Procedures 1 In stop mode press SETUP 2 Select General Setting using K L then press ENTER OK 3 Select a desired setup using K L then press ENTER OK 4 Select a desired item using K L then press ENTER OK e g Playback setup 5 Select a desired setting using K L then press ENTER OK e g Parental Lock item Your setting is activated 6 When yo...

Page 68: ...you want to clear all settings in Parental Lock enter 4 7 3 7 using the Number buttons at the option window Your password is cleared and parental levels are set to OFF Choose the appropriate audio setting for your external device It will only affect a disc playback Dynamic Range Control Default ON DVD only Set to ON to make the dynamic range narrower Dynamic Range Control function is effective onl...

Page 69: ...nly select the languages supported by the inserted disc Set to ON to show the angle icon during the playback 48kHz If your amplifier decoder is NOT compatible with 96 kHz PCM select 48kHz Sound recorded at 96 kHz is down sampled to 48 kHz 96kHz If your amplifier decoder is compatible with 96 kHz PCM select 96kHz Sound is sampled at 96 kHz PCM Converts the Dolby Digital into PCM 2 channel If your a...

Page 70: ...r Saving mode ECO for standby G Still Mode Default Auto DVD only Auto Automatically select the best resolution setting Frame or Field based on the data characteristics of the pictures Field Select Field when the pictures are still unstable even if Auto is selected Field stabilises the pictures although the picture quality may become coarse due to the limited amount of data Frame Select Frame to di...

Page 71: ...SCART RGB for Scart cable connection Refer to page 17 for more details Only if you select the Component Progressive proceed to step 2 If you select Component Interlace or SCART RGB your setting is activated 2 Select Yes using 0 1 then press ENTER OK Final confirmation window will appear 3 Select Yes using K L then press ENTER OK within 15 seconds Your setting is activated Note When changing Video ...

Page 72: ...also correct the current time automatically at 8 00 and 1 10 if the unit is in standby mode or if you are watching DVB channel Setup A General Setting A DivX Provides DivX VOD registration code and deactivation code Refer to page 49 for details Set the DivX subtitle Setup A General Setting A HDMI Make sure that the HDMI cable is connected and the TV input is set to HDMI You can select the colour s...

Page 73: ... cancel the Pincode Note The Audio and Subtitle setting may not be available for some broadcast To change the audio language refer to Multi Audio on page 26 To display the subtitle or choose the subtitle language refer to Subtitle on page 26 You can check the current DVB system software version of this unit Setup A General Setting A Reset All Select Yes using K L then press ENTER OK Are you sure w...

Page 74: ...uttons or PROG G H on the remote control There is a tape with a record tab in the unit 1 Insert a recordable videotape 2 Select the recording mode using REC MODE The desired recording mode is selected in SP or LP mode by pressing REC MODE 3 Select the desired channel to record using PROG G H or the Number buttons Press REC I to start recording To temporarily stop recording or to resume it press PA...

Page 75: ... on a recorded cassette remove its record tab To record on it later cover the hole with cellophane tape This function helps you to dub the contents in the DVC digital video camcorder to VCR Insert a recordable videotape Make sure your DVC is in video mode 1 Press INPUT SELECT F repeatedly to select the external input channel then press PROG G H repeatedly to select DV AV3 2 Select the recording mo...

Page 76: ...uring playback press PAUSE F then press FWD D If the noise bars appear on the TV screen you can reduce it by pressing PROG G H Slow reverse is not available in VCR mode Note Still Slow Pause mode will be automatically cancelled after 5 minutes to prevent damage to the tape and the video head To return to normal play back from the Picture Search Still Slow mode press PLAY B Hi Fi Stereo Sound Syste...

Page 77: ...and the DVC and make sure that these units have stopped Only a DVC SD signal can be input from the DVC to this unit Other types of signals are not supported Do not connect any device other than the DVC Even if a recorder or PC with another DV terminal is connected the DV function will not operate If the DVC is not recognised after connection turn off the power supply for the unit and re connect th...

Page 78: ...s has exceeded Delete the unnecessary titles to make enough space or insert a new recordable media Check if the connections are made securely and correctly Timer recording cannot be performed The internal clock of the unit may have been stopped due to a power failure that lasted for more than 30 seconds Reset the clock See page 71 DVD Recording is impossible Check if the disc is CPRM compatible Co...

Page 79: ...nit unless it is finalised on the device Even if it is finalised the performance of those discs are not guaranteed on this unit The disc may be dirty or flawed Clean the disc Check if all the connections are made correctly Check Parental Lock setting See page 68 Playback of DVD is prohibited from 2 minutes before the programmed start time of a timer recording when the recording media is DVD There ...

Page 80: ...e is connected Insert a compatible USB device with supported file format If this does not solve the problem use other type of compatible USB device Region Error Please eject the disc Playback is not authorized in your region Playback is not authorised in the region of the DVD video that you inserted in the unit Insert a DVD video with region codes 2 or ALL Parental Lock On The current selected par...

Page 81: ...m 254 Delete unnecessary chapter marks See page 61 Recording Error You cannot record on this disc as Control Information is full This disc has no space to write Control Information when recording or deleting contents When editing has been repeatedly performed the control information area may become full even though the recording area has enough space Delete unnecessary original titles See page 59 ...

Page 82: ...ean 5761 Kurdish 5767 Laothian 5861 Latin 5847 Latvian Lettish 5868 Lingala 5860 Language Code Lithuanian 5866 Macedonian 5957 Malagasy 5953 Malay 5965 Malayalam 5958 Maltese 5966 Maori 5955 Marathi 5964 Moldavian 5961 Mongolian 5960 Nauru 6047 Nepali 6051 Norwegian 6061 Occitan 6149 Oriya 6164 Oromo Afan 6159 Panjabi 6247 Pashto Pushto 6265 Persian 5247 Polish 6258 Portuguese 6266 Quechua 6367 Rh...

Page 83: ...ecording format Sampling frequency Compression format 13 5 MHz MPEG Audio recording format Sampling frequency Compression format 48 kHz Dolby Digital Tuner Receivable channels IRA E69 For analogue channels E21 E69 For DVB T channels Input Output Front Panel DV input DV 4 pin jack IEEE 1394 USB input TYPE A USB 2 0 Bus power current MAX 500 mA Rear Panel VHF UHF antenna input output terminal 75 Ω A...

Page 84: ...Printed in China 1VMN28993 E3TK6BD 1 V M N 2 8 9 9 3 E3TK6BD_EN book Page 84 Wednesday February 17 2010 10 18 AM ...

Reviews: