background image

9

EN

DVD players with 

 are capable of playing DVD-RW recorded in VR mode.

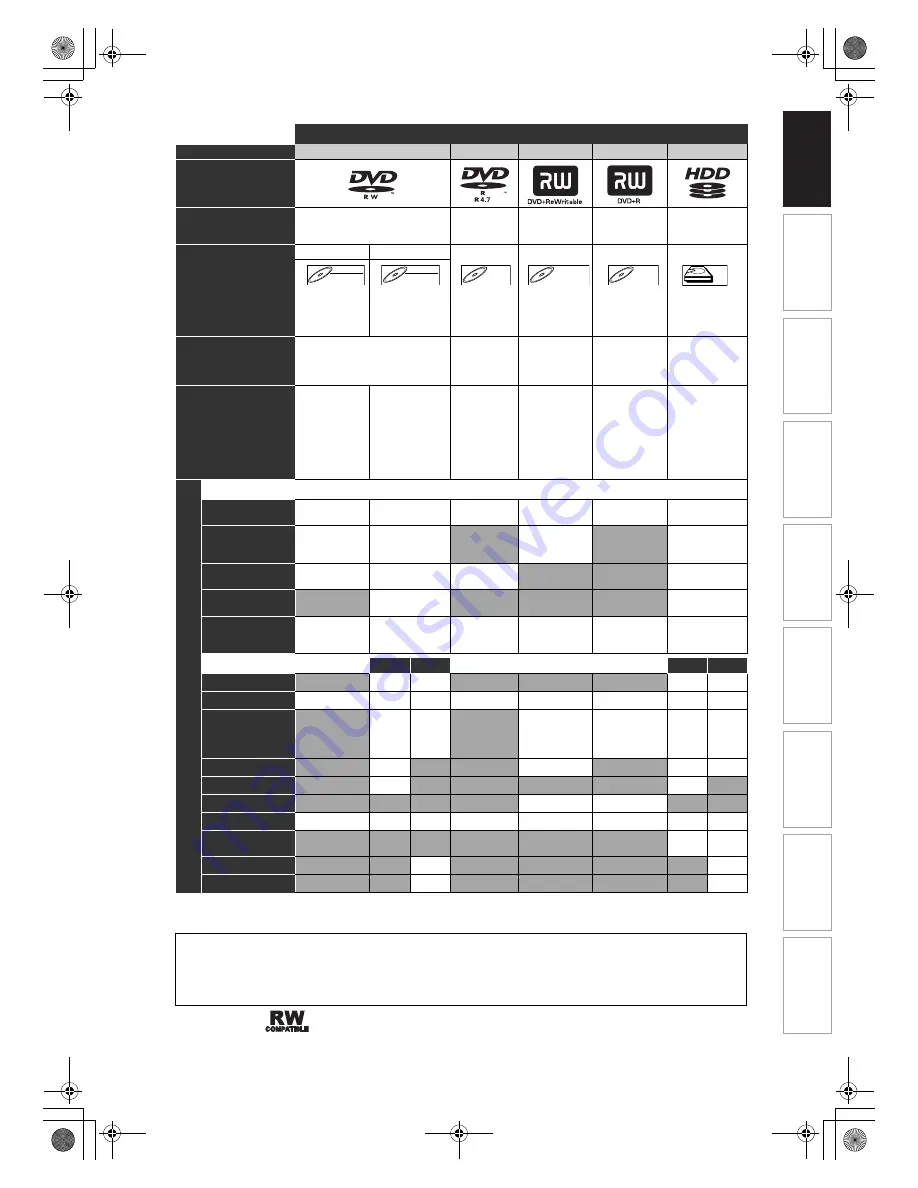
Medias for Recording / Playing

Disc Type

DVD-RW

DVD-R

DVD+RW

DVD+R

HDD

Logo

Format

Can be formatted in VR or Video 
mode

Automatically 
formatted in 
Video mode

Automatically 
formatted in 
+VR mode

Automatically 
formatted in 
+VR mode

Video Mode

VR Mode

Icon

Maximum Record Time

480 min

(12 cm)

144 min

(8 cm)

480 min

(12 cm)

144 min

(8 cm)

480 min

(12 cm)

144 min

(8 cm)

480 min

(12 cm)

144 min

(8 cm)

480 min

(12 cm)

144 min

(8 cm)

267 hrs

(with SLP 

mode)

Recordable/Playable

Versions

Ver. 1.1, 1.2
Ver. 1.1/2× CPRM compatible
Ver. 1.2/4× CPRM compatible

Ver. 2.0
Ver. 2.0/4×
Ver. 2.0/8×
Ver. 2.0/16×

1×-4×

1×-16×

Compatibility

Playable on 
most DVD 
players.
Finalisation 
necessary.
(Title menu will 
be created)

Playable only on 
VR mode 
compatible unit.
Finalisation 
recommended.

Playable on 
most DVD 
players.
Finalisation 
necessary.
(Title menu 
will be 
created)

Playable on 
DVD+RW 
compatible 
players.
Finalisation 
recommended.
(Title menu will 
be created)

Playable on 
most DVD 
players. 
Finalisation 
recommended.
(Title menu will 
be created)

A

v

a

il

a

b

le F

e

atur

es

Recording Features

Record TV 
Programmes

Reuse by Deleting 
the Current 
Contents

Record 16:9 Size 
Pictures

Record Copy-once 
Programmes

*

Create Chapters 
at Fixed Intervals 
(auto chapter)

Editing Features

Playlist

Original

Playlist

Original

Scene Delete

Edit Title Name

Create Chapters 
Wherever You 
Like (chapter 
mark)

Divide a Title

Combine Titles

Hide Chapters

Delete a Title

Deleting Selected 
Titles

Create a Playlist

Protect a Title

: Available

Grey: Not available

* CPRM compatible disc only.

DVD-RW

DVD-RW

Video

DVD-RW

DVD-RW

VR

DVD-R

DVD-R

D

DVD+R

VD+RW

W

DVD+RW

D

DVD+R

VD+R

DVD+R

HDD

HDD

HDD

Because of problems and errors that can occur during the creation of DVD and CD software and/or the 
manufacture of DVD and CD discs, Toshiba cannot guarantee that product will play every feature of every DVD 
bearing the DVD logo and/or every CD bearing the CD logo. As one of the creators of DVD technology, Toshiba 
DVD players are manufactured using the highest standards of quality, and as a result, such incompatibilities are 
rare.

In

tr

od
uc
ti

on

Con

n

ec
ti

on
s

B

asi

c Setup

P

layb

ack

Ed
iti

n

g

O

the

rs

Fu
nct

ion
 S
e

tu

p

Reco

rd
in

g

V

CR Fun

ct

ions

E3NG1BD_EN.book  Page 9  Thursday, April 24, 2008  3:34 PM

Summary of Contents for RD-XV48DTKB

Page 1: ... Video Cassette Recorder RD XV48DTKB 2008 Toshiba Corporation OWNER S MANUAL Printed in China 1VMN25262 E3NG1BD Introduction Connections Basic Setup Playback Editing Others Function Setup Recording VCR Functions COV_E3NG1BD_EN fm Page 1 Wednesday April 23 2008 2 23 PM ...

Page 2: ...VE ANY SCREWS Caution 1 Do not attempt to open the cabinet There are no parts inside you can service Refer all servicing to qualified service personnel 2 Slots and openings in the cabinet at the sides and underneath are provided for ventilation To ensure reliable operation and to protect the unit from overheating these openings must not be blocked or covered Avoid installation in enclosed spaces s...

Page 3: ...s marked with the letter N or coloured black The wire which is coloured brown must be connected to the terminal which is marked with the letter L or coloured red Installation Location For safety and optimum performance of this unit Install the unit in a horizontal and stable position Keep the unit away from electronic equipment Shield the unit from direct sunlight and keep away from sources of int...

Page 4: ...facts to be displayed in the picture In case of picture problems with 480 or 576 progressive scan output it is recommended that the user switch the connection to the standard definition output If there are questions regarding your TV set compatibility with this 480p or 576p product please contact our customer service centre Manufactured under license from Dolby Laboratories Dolby and the double D ...

Page 5: ...he usage of rental or worn tapes can cause this problem If a streaky or snowy picture appears during playback the video heads in the unit may need to be cleaned 1 Please visit your local Audio Video store and purchase a good quality VHS Video Head Cleaner 2 If a Video Head Cleaner does not solve the problem please consult your dealer or an authorised service centre Note Remember to read the instru...

Page 6: ...atellite Link 49 Settings for External Equipment 50 Information on DV Dubbing 51 DVC to HDD DVD Dubbing 52 Information on Dubbing 53 Setting a Disc to Protect 58 Finalising Discs 59 Playback 60 Basic Playback 60 PBC Function for Video CDs 65 Special Playback 66 Search 70 Repeat Random Programme Playback Slide Show 72 Selecting the Format of Audio and Video 73 Editing 75 Guide to a Title List 75 Ed...

Page 7: ...ic Title menu making E Page 59 The unit creates Title menus automatically when finalising discs Dubbing With this unit you can enjoy bi directional dubbing with HDD DVD or VCR High speed dubbing E Page 53 You can dub a title much faster than the normal speed dubbing without changing the quality of the picture and sound Auto recording mode dubbing E Page 53 When dubbing if you set the recording mod...

Page 8: ...commended to finalise in order to stabilise the performance DVD Video Format Video mode is a new format for recording on DVD RW R discs that was approved by the DVD Forum in 2000 Adoption of this format is optional for manufactures of DVD playback devices and there are DVD Video players DVD ROM drives and other DVD playback devices available that cannot play back DVD RW R discs recorded in the DVD...

Page 9: ...nded Title menu will be created Available Features Recording Features Record TV Programmes Reuse by Deleting the Current Contents Record 16 9 Size Pictures Record Copy once Programmes Create Chapters at Fixed Intervals auto chapter Editing Features Playlist Original Playlist Original Scene Delete Edit Title Name Create Chapters Wherever You Like chapter mark Divide a Title Combine Titles Hide Chap...

Page 10: ...nding on the media condition the unit may not read the disc properly Performance of any other discs are not guaranteed Discs for Playing Disc Type DVD VIDEO CD DA Video CD CD RW CD R Logo Icon Files for Playing Type of title MP3 JPEG DivX Icon Media CD RW R CD RW R CD RW R DVD RW R DVD RW R DVD V DVD V CD CD CD VCD VCD VCD CD CD CD CD CD CD MP3 MP3 MP3 JPEG JPEG JPEG DivX DivX DivX CD ROM Compact ...

Page 11: ...ou can control the unit from a distance 19 REC indicator VCR Lights up during VCR recording 20 I REC button VCR Press once to start a recording Press repeatedly to start one touch timer recording Each press increases the recording time by 30 minutes up to 8 hours 21 B PLAY button VCR Press to start playback Press to turn on the unit to start playback 22 D FWD button VCR Press to fast forward or fa...

Page 12: ... jacks on your TV Use a commercially available Component Video cable 6 AV2 DECODER socket HDD DVD VCR Connect to VCR camcorder or other Audio Video equipment Use a commercially available Scart cable 7 AV1 TV socket HDD DVD VCR Connect to the Scart socket on your TV Use a commercially available Scart cable 8 ANTENNA IN Connect to an antenna or a cable 9 ANTENNA OUT Connect to the Aerial jack on you...

Page 13: ... track When playback is paused press to play reverse step by step 14 VCR button Press to select the VCR output mode 15 PAUSE F button Press to pause playback or recording 16 TIME SLIP button HDD Press to virtually pause and resume the live TV broadcast 17 DUBBING button During playback press to start dubbing right away In stop mode press to display Dubbing menu 18 SUBTITLE button During DVD playba...

Page 14: ...u turn off this unit OPEN CLOSE A on the remote control is not available Be sure to use A OPEN CLOSE or A C EJECT STOP on the unit Installing Batteries in the Remote Control Install two R6 AA batteries supplied into the remote control carefully match with the polarity indicated inside the battery compartment Caution Incorrect use of batteries can result in hazards such as leakage and bursting Do n...

Page 15: ...r HDD and VR mode DVD RW disc 3 Indicates a channel number station name analogue channel only or selected external input mode 4 Indicates a media recording mode and possible recording time left 5 Indicates the current title number total number of titles the current chapter number total number of chapters and time lapse of the current title playback total duration of the title 6 Each icon means 7 I...

Page 16: ...nt programme information 4 Next programme information The window will automatically exit after 3 seconds or press INFO C to exit Title File Name Information File name information only when a CD with MP3 JPEG DivX files is in playback Title name information only when DVD RW R VR mode DVD RW R unfinalised Video mode DVD RW R disc or HDD is in playback MP3 Tag Information only when a CD with MP3 file...

Page 17: ...t up the video setting 4 Recording To set up the unit to record to discs as you prefer 5 Clock To set up the clock of the unit as you need 6 Channel To adjust the channel setting of the unit as you prefer 7 DivX To set up the setting for the DivX playback 8 HDMI To set up the HDMI connection setting You cannot select if the HDMI cable is not connected 9 Reset All To reset all settings to the facto...

Page 18: ...Titles Allows you to delete all unprotected titles in the HDD title list 11 Delete All Playlists Allows you to delete all Playlists for HDD 12 HDD A DVD Allows you to dub from HDD to DVD 13 DVD A HDD Allows you to dub from DVD to HDD 14 HDD A VCR Allows you to dub from HDD to VCR 15 VCR A HDD Allows you to dub from VCR to HDD 16 DVD A VCR Allows you to dub from DVD to VCR 17 VCR A DVD Allows you t...

Page 19: ...ed Appears when HDMI output mode 1080i is selected Appears when HDMI output mode 1080p is selected DB 3 2 1 Title track number Chapter number F Appears when disc playback is paused Appears during step by step playback B Appears when playing back a disc F B Appears during slow forward reverse playback Appears when the timer programming or One touch Timer Recording OTR is set and is operating or app...

Page 20: ...omponent Interlace or Component Progressive while the scart cable is connected to the TV a distorted video signal may result Using the COMPONENT VIDEO OUT jacks and the AUDIO OUT L R jacks If your TV has Component Video input jacks use a Component Video cable and an Audio cable to connect the AUDIO OUT L R jacks Component connection provides the better quality picture 3 Connect the COMPONENT VIDEO...

Page 21: ...for connection Connect the HDMI output jack of this unit to the HDMI input jack of TV Selecting HDMI mode Press HDMI to select the HDMI output mode The output mode changes as follows every time HDMI is pressed 576p PAL 480p NTSC J 720p J 1080i J 1080p An HDMI mode that is not supported by the display device will be skipped Actual Output Modes by Media For Audio CD Video CD and MP3 files 2 channel ...

Page 22: ...ment is not compatible with HDMI BITSTREAM DTS sound will not be output When the power failure occurs or when you unplug the unit some problems in the HDMI setting might occur Please check and set the HDMI setting again Connecting to an External Equipment This unit has four input terminals which can be selected using INPUT SELECT F on the remote control AV1 or AV2 on the rear panel and AV3 or AV4 ...

Page 23: ...or DAT deck The audio source recorded in Dolby Digital Multi channel surround format cannot be recorded using an MD or DAT deck as a digital sound If not connected to a Dolby Digital decoder set Dolby Digital to PCM in Audio Out menu Playing back a DVD using incorrect settings may generate noise distortion and damage speakers Set Dolby Digital and MPEG to PCM and set DTS to OFF in Audio Out menu f...

Page 24: ...wing methods Auto Tuning DVB ANALOG Programme the tuner to scan both analogue and DVB channels you can receive in your area 1 In stop mode press SETUP Select General Setting using U D then press ENTER OK General Setting menu will appear 2 Select Channel using U D then press ENTER OK 3 Select Auto Tuning DVB ANALOG using U D then press ENTER OK The unit will start storing channels available in your...

Page 25: ... on page 26 explain how to move channels Manual Tuning ANALOG You can preset an analogue channel manually and individually 1 In stop mode press SETUP Select General Setting using U D then press ENTER OK 2 Select Channel using U D then press ENTER OK 3 Select ANALOG Channel Setup using U D then press ENTER OK 4 Select Manual Tuning using U D then press ENTER OK 5 Select Position using U D then pres...

Page 26: ...r U D then press L 4 Select Skip using U D then press P 5 Select ON using U D then press L To skip another channel repeat steps 2 to 5 6 Press SETUP to exit Move You can replace two channels 1 In stop mode press SETUP Select General Setting using U D then press ENTER OK 2 Select Channel using U D then press ENTER OK 3 Select ANALOG Channel Setup using U D then press ENTER OK 4 Select Move using U ...

Page 27: ...this operation will stop and the lowest memorised DVB channel will appear on the TV screen Manual Tuning DVB You can preset a DVB channel manually and individually 1 Follow steps 1 to 3 in Auto Tuning DVB on this page 2 Select Manual Tuning using U D then press ENTER OK 3 Select your desired position number using U D then press ENTER OK The tuner will begin to search up or down automatically When ...

Page 28: ...channels using the Number buttons when you are in analogue or external input AV1 AV2 AV3 DV AV4 mode You can select any analogue channels using the Number buttons when you are in DVB mode Quick Select With Quick select menu you can select your favourite DVB channel quickly Refer to Edit Group Lists on page 29 1 Press ENTER OK while watching a DVB channel Quick select menu will appear 2 Press L P t...

Page 29: ...using U D then select the number of the favourite group list you want to add to using the Number buttons 1 8 The number you selected will appear Press 0 to cancel from the favourite group list 3 Press SETUP to exit Skip Channels You can set the unit to skip the unwanted DVB channels when you use PROG G H 1 Follow steps 1 to 2 in Edit Channels DVB on this page 2 Select the DVB channel you want to s...

Page 30: ...ositions 4 Press SETUP to exit Edit Channel Names You can edit the DVB channel names as you want 1 Follow steps 1 to 2 in Edit Channels DVB on page 29 2 Select the DVB channel of which you want to edit the name to using U D press RED Name editing display will appear 3 Edit the name using the Number buttons Press the Number buttons repeatedly until the desired letter appears Press L P to move the c...

Reviews: