background image

- 71 -

Getting

 R

ea

dy

Ta

king

Photogra

ph

s

Playing

Ba

ck 

Image

s

Other

Application

s

Addition

al

Inf

ormation

Era
sing

Image

s

Ha

ndy

Function

s

In this mode, photographs are taken with the priority given to shutter speed. The camera automatically sets the

aperture value according to the shutter speed.

A fast shutter speed produces a photograph that looks as if a moving subject is still.

A slow shutter speed produces as photograph that makes you feel that it is flowing.

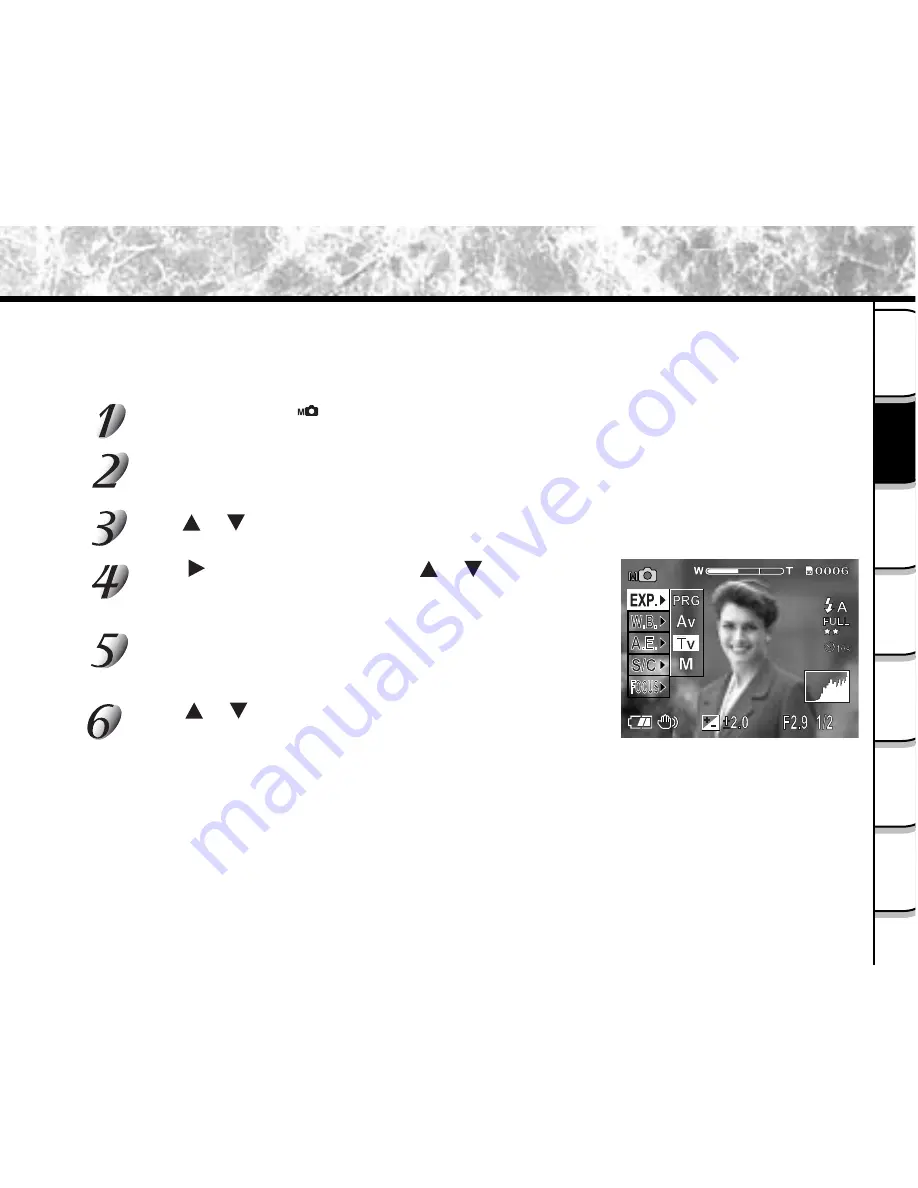
Photography in the Shutter Speed-priority Mode

Set the mode dial to [        ].

The manual setting values are displayed  on the left of the LCD monitor screen.

Press ENTER.

The manual setting items are displayed.

Press      or      to select [ EXP. ].

Press       to display option menu, press      or      to

select [ Tv ] and press ENTER.

Pressing ENTER selects the setting.

Press ENTER.

The camera is ready to take photographs.

Press      or      to adjust the shutter speed.

The setting range is as follows:

1/1000, 1/750, 1/500, 1/350, 1/250, 1/180, 1/125, 1/90,

1/60, 1/45, 1/30, 1/20, 1/15, 1/10, 1/8, 1/6, 1/4, 1/3, 1/2,

0”7, 1”, 1”5, 2”, 3”, 4”, 6”, 8”, 10”, 15”

The shutter speed and the aperture value corresponding to the

shutter speed are displayed on the LCD monitor. If the appropriate

combination cannot be set even if the aperture is adjusted to its

limit, the aperture value is displayed in red. Photography, however,

is possible in this state.

Summary of Contents for PDR-3300 - 3.2MP Digital Camera

Page 1: ...structions may cause harmful interference to radio communications However there is no guarantee that interference will not occur in a particular installation If this equipment does cause harmful interference to radio or television reception which can be determined by turning the equipment off and on the user is encouraged to try to correct the interference by one or more of the following measures ...

Page 2: ...rporation your camera may violate FCC regulations Violation of FCC regulations may cause the FCC to void your right to use the modified camera TOSHIBA AMERICA INFORMATION SYSTEMS INC Imaging Systems Division 9740 Irvine Boulevard Irvine California 92618 1697 Phone Number 800 288 1354 For customers in Canada CAUTION This Class B digital apparatus complies with Canadian ICES 003 Attention continued ...

Page 3: ...is trademark of ACD Systems MS DOS and Windows are registered trademarks of the Microsoft Corporation of the U S registered in the USA and other countries Windows is an abbreviated term referring to the Microsoft Windows Operating System SD is a trademark Other companies or product names are trademarks or registered trademarks of the respective companies Before Reading This Manual Indicates items ...

Page 4: ...r problems Toshiba Corporation bears no responsibility for incidental damages lost profit work interruption corruption or loss of the memory contents etc arising from the use of or the inability to use this unit Toshiba Corporation accepts no liability whatsoever for any damages arising from not having followed the descriptions in this Instruction Manual Toshiba Corporation accepts no liability wh...

Page 5: ...use them to rupture ignite or heat up resulting in fire or major injury Do not strike the batteries with a hammer or step on drop or subject the batteries to strong impact Doing so might cause them to rupture ignite or heat up resulting in fire or major injury Use the batteries only for its originally intended purpose Using the batteries for any other purpose might cause it to rupture ignite or he...

Page 6: ... the store of purchase or please contact the technical support number If the camera has fallen or its case is damaged immediately turn the power OFF and remove the batteries and AC adapter Continued use in this state might cause fire or electric shock For details on repair consult the store of purchase or please contact the technical support number Do not place the camera on inclined or unstable s...

Page 7: ...ight cause you to fall over or result in a traffic accident Use only the specified batteries or the specified AC adapter Use of a battery or AC adapter other than specified might cause fire defects or malfunctions Keep the batteries out of the reach of children If a child swallows a battery this might result in poisoning If a child swallows a battery immediately consult a physician If battery flui...

Page 8: ... or place it in cloth or blankets This might cause heat to build up and deform the case resulting in fire Use the camera in a well ventilated place continued Before you move the camera disconnect cords and cables Failure to do this might damage cords and cables resulting in fire or electric shock Do not drop or subject the camera to strong impact This might cause fire electric shock or malfunction...

Page 9: ...ing from your hand through the shoulder strap the camera might come into contact to other people and cause injury or damage to the camera or other objects Do not look at the sun through the camera viewfinder This may cause injury of the eyes Do not use the flash close to anyone s eyes This might cause damage to the person s eyesight Do not subject the LCD monitor to impact If the LCD monitor is im...

Page 10: ...ors transformers or magnets Places contacting chemicals such as pesticides or next to rubber or vinyl products for long periods l l l l lDo not expose the camera to sand or dust The PDR 3300 is particularly sensitive to sand and dust If the camera comes into contact with sand or dust not only will the camera become damaged it will also no longer be repairable Pay special attention when using the c...

Page 11: ...surface of the LCD monitor or viewfinder from being scratched blow off any dust from these parts with a blower brush and lightly wipe with a soft dry cloth Clean the body of the camera with a soft dry cloth Do not use volatile liquids such as paint thinner benzene or insecticide as these may react with the camera body and cause deformation or remove the coating Using Your Camera Correctly continue...

Page 12: ...s 50 degrees Fahrenheit 10 degrees Celsius or below can also affect the performance of the battery and decrease the number of pictures taken when compared to picture taking in warmer conditions The supplied Alkaline batteries are only for operation check when you buy your camera so the battery life may be short The use of manganese type batteries is not suitable for this product due to the low num...

Page 13: ... rechargeable batteries follow the instructions for the batteries and the charger for safe handling This camera can not charge the rechargeable batteries Do not leave dead or exhausted batteries in the camera Do not use different types of batteries together or mix old and new batteries Do not remove the batteries immediately after a prolonged use of the camera as they may have become heated Neglec...

Page 14: ... plug into other terminals This might cause the camera to malfunction Before you disconnect the connector cable turn the camera OFF and then disconnect the cable holding it by its plug Do not disconnect the connector cable by pulling the actual cable Do not drop the AC adapter or subject it to strong impacts Do not use the AC adapter in very hot and humid locations Do not plug in the AC adapter wh...

Page 15: ...ortrait Shots Taking Landscape Shots Taking Shots of Portraits at Night Taking Continuous Shots of Moving Objects STEP 3 Utilizing the various photography modes Zoom Photography Focus Photography Photography Using the Self timer Photography Using the Flash Making movies STEP 4 Setting the modes in more detail to make your photographs turn out more as you intended Setting Image Size and Quality Tak...

Page 16: ...OFF Turning the Beep OFF Setting the Color of Images Color Black and White Sepia Changing the Power OFF Time Changing the LCD Monitor Display Language You can also do this The PDR 3300 also has lots of other features Protecting Images Changing the size of Images Compressing Images Print Information Displaying Detailed Information of Images Switching LCD Monitor Display Taking and Playing Back Phot...

Page 17: ... 17 Getting Ready Taking Photographs Playing Back Images Other Applications Additional Information Erasing Images Handy Functions ...

Page 18: ... Using the Power Outlet About SD Memory Card Notes on SD Memory Card Loading SD Memory Card Removing SD Memory Card Write Protection Turning the Power On Off Turning the Power On Turning the Power Off LCD Monitor Display In mode In mode In mode In mode How to Hold Your Camera How to Press the Shutter Button Photography Auto Photography Using the Viewfinder Using the LCD Monitor Setting the Image S...

Page 19: ...k Images Displaying a List of Images Thumbnail Display Enlarging Photographed Images Zoom Playback Auto Playback Slideshow Playback of Multi Image Pictures Erasing Images Erasing Images Erase Frame Erasing Folders All Images in a Folder All Folders Formatting the SD Memory Card Handy Functions Reducing the Image Size Resize Compressing Images Quality Print Information Protecting Images Protecting ...

Page 20: ... DISP Button and LCD Monitor Display In Photography Mode Taking and Playing Back Photographs on a TV Transferring Images to a PC Separately Sold Accessories Connecting to Other Devices Definitions of the Color of the Viewfinder LED Self timer LED IR Remote Controller Erasing Images Specifications Warnings and Messages Displayed on LCD Monitor Troubleshooting Glossary 118 119 120 121 122 123 124 12...

Page 21: ...Handy Functions Accessories Make sure that you have all of the items below before you start using your camera Alkaline batteries 4 size AA SD Memory Card 8MB 1 SD Memory Card case 1 Shoulder strap 1 Software application 1 CD ROM Instruction Manual this manual Software Manual Camera case 1 Video cable 1 USB cable 1 ...

Page 22: ...Taking Photographs Playing Back Images Other Applications Additional Information Erasing Images Handy Functions Names of Parts Shutter button Lens Flash POWER switch Lens cover switch Viewfinder Self timer lamp Mode dial ...

Page 23: ... 23 Getting Ready Taking Photographs Playing Back Images Other Applications Additional Information Erasing Images Handy Functions Names of Parts continued ...

Page 24: ...ode Transfers images to a PC For details refer to the Software Manual Playback mode In this mode you can select image playback size change compression protect mode and writing of development printing information Auto Photography mode This mode enables automatic photography in accordance with the photographic conditions In this mode the exposure combination of shutter speed and aperture is automati...

Page 25: ...a from dropping during photography hang the shoulder strap around your neck Pass the end of the shoulder strap through the strap attachment on the camera Pass the shoulder strap through the loop and pull Attaching the Shoulder Strap When the camera is not in use be sure to close the lens by sliding the lens cover switch to close position Turn off the power to retract the lens unit before closing t...

Page 26: ...the direction of the open arrow 2 Load batteries in the battery compartment Make sure they are loaded in their polarity as shown inside the battery compartment Installing the batteries Before you load or remove the batteries be sure to turn the camera off If the battery is loaded or removed with the power on the date setting may return to its default or the camera settings may be reset The camera ...

Page 27: ...Make sure that the battery cover is firmly closed Note If CARD COVER LOCK IS RELEASED message popped out on the LCD monitor please check the battery cover lock switch Make sure it is locked in the direction of the Lock arrow Removing the Batteries When removing the batteries take care not to drop the camera of the batteries by mistake Reverse the procedure for Loading the Batteries and remove the ...

Page 28: ...ncorrect display of remaining battery power Battery power measure is based on amount of power required for camera LCD flash photography and playback About the battery duration time The following shows the number of frames time capable of continuous photographing and playback on condition of using new alkaline batteries The battery duration time may vary depending on environmental temperature image...

Page 29: ...od of time This also prevents failed photographs due to battery wear or failed transfer of data to a PC For details on handling the AC adapter be sure to read page 14 Before you connect or disconnect the AC adapter be sure to turn the camera off If the AC adapter is connected or disconnected with the power ON the camera may malfunction or recorded data may be erased destroyed even if the batteries...

Page 30: ...have been installed the camera lens unit automatically retracts and the power turns off Please turn on the power again to resume operation Batteries can be installed while the AC adapter is connected However if the AC adapter is disconnected after the batteries have been loaded the camera power is automatically turned off but the lens will remain extended If this happens please turn on the power t...

Page 31: ...pying and saving important data onto another storage medium floppy disk harddisk MO disk etc Never remove the SD Memory Card or switch the camera OFF during data recording or during data erasing SD Memory Card formatting These actions might damage the SD Memory Card Use only the SD Memory Card specified for use with the camera The use of other SD Memory Card could damage the camera SD Memory Card ...

Page 32: ...ime This is normal and not a malfunction The SD Memory Card has a limited service life If images can no longer be written or erased buy a new SD Memory Card Use the index labels provided with the camera If you attach a commercially available label it may cause a malfunction when the SD Memory Card is loaded or removed Loading SD Memory Card Slide the POWER switch to OFF position to turn the power ...

Page 33: ...he Lock arrow Before you use the new SD Memory Card for the first time be sure to format the SD Memory Card Removing SD Memory Card Never open the battery cover door or remove the SD Memory Card while data is being recorded to the SD Memory Card viewfinder LED flashes This might damage the SD Memory Card or corrupt the data on the SD Memory Card Slide the POWER switch to OFF position to turn the p...

Page 34: ...e battery door in the direction of the open arrow Push the SD Memory Card in as far as it can go and pull it out with your fingers If you push SD Memory Card once in as far as it can go it will protrude slightly Pull it out with your fingers Close the battery door and move the battery cover lock switch in the direction of the Lock arrow Make sure that the battery cover is firmly closed Battery cov...

Page 35: ...aluable data from being erased move the write protect knob to the lock arrow direction on the SD Memory Card Data can no longer be recorded or erased from SD Memory Card To write or erase data from SD Memory Card unlock the write protect knob to unlock direction The write protection may not function if the write protect lock is malfunction Write protect area ...

Page 36: ... to turn on the power When the camera is turned on set the mode dial to the desired mode In the photography modes or the lens extends from the camera body When the camera is turned ON the Auto Power OFF function starts to work Make sure that the SD Memory Card is correctly loaded Slide the lens cover switch toward open direction Turning the Power OFF Slide the POWER switch to OFF position to turn ...

Page 37: ...play The text numbers and icons that are displayed on the LCD monitor vary according to the current settings The LCD monitor automatically turns ON if necessary even if it is set to OFF In Mode Mode dial setting Photography mode Battery condition AE automatic exposure setting Date Flash state Zoom state Possible number of shots Size Quality Time ...

Page 38: ...of the subject The horizontal axis of the histogram shows the brightness increasing brightness from left to right and the vertical axis shows the number of pixels at each brightness level F2 9 1 2 Mode dial setting Photography mode Battery condition Exposure compensation Aperture Shutter speed Histogram Slow shutter speed warning Flash state Zoom state Possible number of shots Size Quality Self ti...

Page 39: ...mount of detail in the subject image So the number of images that can be photographed after an image is recorded sometimes does not decrease The display is momentarily disrupted after recording an image or the mode is switched This does not affect photography Self timer 1 15 Mode dial setting Photography mode Battery condition Date Flash state Zoom state Possible photographic time Size Quality Tim...

Page 40: ... 40 Getting Ready Taking Photographs Playing Back Images Other Applications Additional Information Erasing Images Handy Functions In Mode 102 0001 Mode dial setting Date Photography number Time ...

Page 41: ... Images Handy Functions How to Hold Your Camera When taking a photograph hold the camera firmly and prevent your finger or shoulder strap from covering the lens flash or flash sensor Right Camera held with both hands with your arms firmly held against the sides of your chest Wrong Fingers held over the lens ...

Page 42: ... the SD Memory Card or damage the SD Memory Card itself The image in the LCD monitor sometimes darkens from the time that the shutter button is pressed down halfway until the image becomes focused To set the focus or exposure for a subject outside the center of the intended image point the camera directly at the subject or desired exposure lighting press and hold the shutter button halfway Now wit...

Page 43: ...car body Extremely low contrast subjects Subjects that have low contrast and merge into the background such as white walls or subjects dressed in the same color as the background If the image cannot be focused the focus is automatically fixed to infinity When the flash is necessary at this time it is simultaneously fixed to illuminate objects 1 5 meters five feet away During macro photography the ...

Page 44: ...ays of taking photographs in this mode using the viewfinder and using the LCD monitor Using the Viewfinder Get ready to take the photograph Load the batteries and the SD Memory Card into the camera Slide the power switch to ON position to turn on the power Slide the lens cover switch to open direction beforehand Set the mode dial to Turn the LCD monitor OFF To reduce the amount of battery wear we ...

Page 45: ...u shoot a picture when preview is set to ON a preview image is displayed on screen for about two seconds The viewfinder LED flashes while image data is being recorded onto the SD Memory Card 1 2 Using the LCD Monitor Get ready to take the photograph Load the batteries and the SD Memory Card into the camera Slide the power switch to ON position to turn on the power Set the mode dial to Look at the ...

Page 46: ...he viewfinder lamp lights If you shoot a picture when preview is set to ON a preview image is displayed on screen for about two seconds The viewfinder LED flashes while image data is being recorded onto the SD Memory Card 1 2 The LCD monitor sometimes displays bright dark or colored spots at all times This is not a malfunction These spots do not appear in the photographed image The image is not di...

Page 47: ...lect the size setting user desired to set and press ENTER button After pressing the button while the QUALITY is highlighted the LCD shows the QUALITY menu Select Quality Menu keep pressing or button until the QUALITY is highlighted Press the Menu button By pressing button during the size item is highlighted the QUALITY item is reversely displayed in white Press or to select the quality setting and...

Page 48: ...TY is highlighted the LCD shows the QUALITY menu Select Quality Menu keep pressing or button until the QUALITY is highlighted SETUP MENU appears By pressing button during the size item is highlighted the QUALITY item is reversely displayed in white Press or to select the quality setting and press ENTER button To select another option press or button while still movie ok cancel is fully highlighted...

Page 49: ...uce image quality After you have taken a photograph you can reduce its size and quality The memory size of the image varies according to the subject The compression ratio is given for reference only In movie mode the size setting cannot be set to SMALL In the movie mode the quality and size setting changes in the following order regardless of the image quality setting Setting the Image Size and Qu...

Page 50: ...nt to photograph Taking Photographs in Mode Auto Select mode In the Auto Select mode there are some settings that cannot be changed as the camera makes the settings automatically These settings vary according to the mode l Focus photography Can be set l Exposure compensation Cannot be specified set automatically l About flash photography Flash can be set as required in this mode Automatically fixe...

Page 51: ...on Erasing Images Handy Functions Taking Photographs in a Variety of Modes Mode Set the appropriate scene mode from automatically adjusts the focus and exposure settings portrait landscape sports night multi photography mode options Set the mode dial to Press ENTER is displayed on the LCD monitor ...

Page 52: ...e focus and exposure settings Portrait Landscape Sports Night 16 frame multi Press ENTER The icon of the selected mode is displayed on the upper left side of the LCD monitor The camera is ready to take photographs Compose the picture press the shutter button down halfway and press it down fully The camera takes the picture Taking Photographs in a Variety of Modes Mode continued Optimum print effec...

Page 53: ...phs in a Variety of Modes Mode continued Automatically adjusts the focus and exposure settings The camera automatically adjusts the focus and exposure settings to take photographs Portrait Select this option to make people stand out with the background out of focus Landscape Select this option to take photographs of distant scenery or landscapes ...

Page 54: ...inst a dusk or night time background When the Night mode is selected the flash mode is fixed to Slow Synchro the flash is fired at a slower shutter speed If you take a photograph with a dark background or at a dark place the shutter speed slows down and the slow shutter speed warning is displayed When the shutter is pressed halfway down the viewfinder LED blinks green and the slow shutter speed ma...

Page 55: ... are saved as one image FULL size 2048 x 1536 pixels This mode is effective for continuously photographing moving subjects Memo Though zoom playback is not possible playback of multi image pictures is possible Digital zoom photography is not possible Photographs cannot be taken at HALF size or SMALL size When HALF size or SMALL size is set before you select multi photography the setting is automat...

Page 56: ...e mode dial to or Compose the picture using the Zoom key Pressing the Zoom key towards the T zooms in on the subject and enlarges the subject on the LCD monitor Pressing the Zoom key towards the W provides a wider angle picture The lens position moves according to the Zoom key setting Digital Zoom Photography To set the digital zoom 1 Press the MENU button 2 Use or to select DIGITAL ZOOM and press...

Page 57: ...graphy is canceled by pressing the DISP button to turn the LCD monitor off On the LCD monitor display off status the digital zoom photography is not possible as well The digital zoom photography is not possible in the 16 frame multi mode The Zoom switch setting is automatically canceled by either turning the camera OFF or by activation of the Auto Power OFF function You can check the zoom status i...

Page 58: ...D monitor Press to display option menu press or to Select Macro focus and press ENTER Set Value AF Normal Focus Macro Focus 1m The camera will focus on subjects in a distance of 1m to take photos 3m The camera will focus on subjects in a distance of 3m to take photos The camera will focus on subjects in a distance of to take photo Look at the image on the LCD monitor to compose the picture Press t...

Page 59: ... seconds When photographs are taken using the LCD monitor the count down is displayed To cancel photography midway press Burst photography is not possible In movie mode press the shutter button down fully to stop recording If this operation is not performed photography is automatically stopped when the SD cardTM runs out of free space or when the size of a single picture has reached the maximum re...

Page 60: ...O setting 2X Set the mode dial to or In the mode flash photography can be set when is selected Press the flash button to set to the desired mode while viewing the LCD monitor When you press the flash button the available flash modes are displayed in the following order The icon for the mode that you selected is displayed in the LCD monitor Auto can be set when is selected in the mode It can not be...

Page 61: ...es twice A picture is taken at the second firing The camera fires pre flash lighting once before the main flash in order to reduce the red eye problem In Portrait mode flash photography is fixed to red eye auto Red eye is reduced mode effectively if the subject looks directly towards the camera Effectiveness is also increase if the distance between the subject and camera is kept as short as possib...

Page 62: ...ings These are called Manual settings which are saved even if the camera is turned off IMPORTANT Do not remove or load the batteries or disconnect or connect the AC adapter while the camera is on This might return the manual settings to their defaults If this happens manually set the conditions again Set the mode dial to The manual setting values are displayed on the left of the LCD monitor screen...

Page 63: ...isplay option menu press or to select options and press ENTER Pressing ENTER selects the setting To cancel press EXP Exposure control W B White balance A E Metering system S C Single continuous or AEB mode Focus Focus mode setting Press ENTER The camera is ready to take photographs Compose the picture press the shutter button down halfway and press it down fully The camera takes the picture Set va...

Page 64: ...v shutter speed priority mode M full manual mode White Balance W B The camera determines the white balance by averaging the various kinds of light that actually enters the lens A user can set in advance the white balance when taking photographs under specific lighting conditions AW Automatic white balance mode default Day light mode Cloudy mode bluish Fluorescent light mode reddish Fluorescent lig...

Page 65: ...AEB photography mode S C 1 shot mode can be set default Burst mode can be set AEB Automatic Exposure Bracketing Multi metering mode The exposure is measured and calculated for the entire area of the screen By dividing the entire area of the screen the exposure level for each unit is calculated A well balanced exposure can be obtained Spot metering mode The exposure is measured in a very small area...

Page 66: ...e overexposure 0 5 and underexposure 0 5 compensation Continuous image capturing Burst In this mode photographs are taken continuously at a maximum speed of 0 8 second intervals The maximum number of photographs that can be taken continuously is 3 photographs Images are not recorded directly to storage media but are stored temporarily within the buffer memory After photography is finished check th...

Page 67: ...in the following order Also the camera makes the macro mode with macro icon is the display monitor Set Value AF Normal Focus Macro Focus 1m The camera will focus on subjects in a distance of 1m to take photos 3m The camera will focus on subjects in a distance of 3m to take photos The camera will focus on subjects in a distance of to take photo Once focus mode is chosen as selected photography mode...

Page 68: ... mode Difference between PRG and PRG and are the same as to combinations of the automatically determined shutter speeds and aperture values However their operation capability is different as shown in the right table Set the mode dial to The manual setting values are displayed on the left of the LCD monitor screen Press ENTER The manual setting items are displayed Press or to select EXP Press to di...

Page 69: ...setting values are displayed on the left of the LCD monitor screen Press ENTER The manual setting items are displayed Press or to select EXP Press to display option menu press or to select Av and press ENTER Pressing ENTER selects the setting Press ENTER The camera is ready to take photographs Press or to adjust the aperture value The setting range is as follows F8 F6 8 F5 6 F4 8 F4 0 F3 4 F2 9 Th...

Page 70: ...tions Compose the picture press the shutter button down halfway and press it down fully The camera takes the picture If the aperture value is set to F2 9 maximum aperture size the increased shutter speed is restricted to 1 750 second The aperture value set differ to the actual value according to the position of the zoom lens ...

Page 71: ... displayed on the left of the LCD monitor screen Press ENTER The manual setting items are displayed Press or to select EXP Press to display option menu press or to select Tv and press ENTER Pressing ENTER selects the setting Press ENTER The camera is ready to take photographs Press or to adjust the shutter speed The setting range is as follows 1 1000 1 750 1 500 1 350 1 250 1 180 1 125 1 90 1 60 1...

Page 72: ...t photography the shutter speed cannot be set to 0 7 second or longer If a mode other than No flash suppressed flash mode is set in flash photography the shutter speed is limited to between 1 2 second and 1 250 second If the shutter speed is set to 1 350 second or less the shutter speed is automatically changed to 1 250 second if the flash setting is changed to the flash forced flash mode or red e...

Page 73: ...ra is ready to take photographs Press or to adjust the shutter speed and pressing or to set the shutter speed value separately are also possible Compose the picture press the shutter button down halfway and press it down fully The camera takes the picture When pressing sort in the full manual mode the shutter speed is adjusted but the exposure compensation setting is not possible However the expos...

Page 74: ... manual setting items are displayed Press or to select EXP Press to display option menu press or to select M or Tv and press ENTER Pressing ENTER selects the setting Press ENTER to set the shutter speed to 0 7 second or longer is displayed on the LCD monitor Compose the picture press the shutter button down halfway and press it down fully The camera takes the picture at the set exposure time Durin...

Page 75: ...ll part of the screen Set the mode dial to Press or to adjust the exposure The setting range is as follows A larger value lightens the exposure and a smaller value darkens the exposure The value that you set is displayed on the LCD monitor Press to increase brighten exposure and to decrease darken exposure to side 2 0 1 5 1 0 0 5 0 default 0 5 1 0 1 5 2 0 Compose the picture press the shutter butt...

Page 76: ...kes the shutter speed setting possible but does not make the exposure compensation possible However the exposure value is displayed on the LCD monitor Copying of printed text black characters on white paper Backlit portraits Very bright scenes such as snowfields and highly reflective subjects Shots made up predominantly of sky Spotlit subjects particularly against dark backgrounds Copying of print...

Page 77: ...NTER The manual setting items are displayed Press or to select S C Press to display option menu press or to select AEB and press ENTER Pressing ENTER selects the setting Press ENTER The camera is ready to take photographs Compose the picture press the shutter button down halfway and press it down fully The camera will automatically take a picture in 0 5 compensation 0 compensation and 0 5 compensa...

Page 78: ...alues are displayed on the left of the LCD monitor screen Press ENTER The manual setting items are displayed Press or to select S C Press to display option menu press or to select and press ENTER Pressing ENTER selects the setting Press ENTER The camera is ready for burst photography If burst photography is set when the shutter speed is set to a speed of 0 7 second or more in the Tv mode the shutt...

Page 79: ...od The camera is set to erase all images immediately after photography 1 This setting is for saving and erasing the selected image Press or to select the image and press ENTER The red mark appears under the selected image To cancel selection of the image press ENTER again 2 This setting is for saving all images Press ENTER All images are selected and all images with turns into a red This item cann...

Page 80: ...9 while verifying the image in step 8 Even if photography is terminated midway before capturing three images by releasing the shutter button images already photographed can be saved and erased by the above method The length of time to capture images varies according to the photographic conditions Self timer photography and flash photography are not possible ...

Page 81: ... seconds appears on the LCD monitor If you do not do this photography is automatically stopped when there is no more free space on the SD Memory Card or when the maximum size that a single movie can be recorded is reached To stop making movies press the shutter button down fully again Shutter button Lightly pressing this button in mode compose the picture Once the button is deeply pressed photogra...

Page 82: ...ond and 2 second in this order cyclically Press the shutter button down fully to stop recording IR Remote Controller In mode the IR Remote Controller is not possible Flash photography is not possible The image size displayed on the LCD monitor becomes FULL 320 x 240 or HALF 160 x 120 The movie made in FULL size is displayed on the entire LCD monitor and that made in HALF size is displayed in the c...

Page 83: ... mode dial to or Press the MENU button The RECORDING MENU is displayed Use or to select the desired item 1 and press The options 2 are displayed Note The image appearing through the lens will be displayed for LCD PREVIEW COLOR ISO SHARPNESS CONTRAST DIGITAL ZOOM LCD QUALITY 2 Options 1 Item The above menu is the RECORDING MENU in the mode Use or to select the desired setting from the tab menu 2 an...

Page 84: ... canceled The three images that you took are displayed for about two seconds each in the AEB photography mode In case of burst photography the LCD monitor automatically turns on and display image after photography is finished In case of 16 multi photography shot 16 photography images are displayed as one image COLOR Set the color of the image to be photographed STANDARD Standard color default VIVI...

Page 85: ...nt to color ISO400 During 2X the ISO will be automatically set between ISO100 and ISO200 During 4X ISO will be automatically set between ISO100 and ISO400 Default is 2X ISO Sets the color mode and photographic sensitivity at which the image is to be recorded Warning Noise increases when the ISO is changed to higher settings NORMAL Equivalent to color ISO100 2X High sensitive photography equivalent...

Page 86: ...t CONTRAST Sets the contrast of the image to be photographed NORMAL Automatic standard setting default STRONG Strong contrast SOFT Soft contrast DIGITAL ZOOM Enlarges the center of the screen and takes photographs with the focal distance increased by factor of 2 2 ON Enables digital zoom photography default OFF Disables digital zoom photography LCD Adjusts the brightness of the LCD monitor This ad...

Page 87: ...sing or button until the QUALITY is highlighted Press the Menu button By pressing button during the size item is highlighted the QUALITY item is reversely displayed in white Press or to select the quality setting and press ENTER button To select another option press or button while still movie ok cancel is fully highlighted After pressing ENTER button while OK is highlighted these combinations are...

Page 88: ...ce to next frame to go back one frame Holding down or moves forward or reverse continuously Press ENTER nine images are displayed simultaneously It is possible to play back any images in any folders by pressing or during playback Pressing at the last image displays the first image and pressing at the first image displays the last image Images can be rotated by pressing or during playback Pressing ...

Page 89: ...FULL size are displayed on the entire LCD monitor and those made in HALF size are displayed in the center of the screen Set the mode dial to The last recorded image appears on the LCD monitor Press or to select the movie to play back Press Playback of the selected movie begins The user can control playback as shown on the table of the next page by pressing various buttons during playback a pause o...

Page 90: ...omes 2x speed reverse playback for the duration that is held down 1 frame feed Each press of feeds the image by one frame 1 frame feed is continued for the duration that is held down Reverse 1 frame feed Each press of feeds the image in reverse by one frame 1 frame feed is continued for the duration that is held down Stop Playback returns to the start of the movie ENTER The image size displayed on...

Page 91: ...ou can select the desired image and display it in the regular display Set the mode dial to The last image frame appears on the LCD monitor Press ENTER Nine images are displayed simultaneously Use or to move the cursor to select the image to be displayed at regular size The cursor selected image is displayed with green frame Pressing the buttons continuously moves the cursor continuously Press ENTE...

Page 92: ...image frame appears on the LCD monitor Use or to select the frame you want to enlarge You can also select the image by the same operation as for thumbnail playback Adjust the zoom ratio by the Zoom switch Pressing the Zoom switch to the T will enlarge the image To return to normal magnification press the Zoom key towards W The image is displayed enlarged and a white frame and green frame are displ...

Page 93: ...tor Press the MENU button The PLAYBACK MENU is displayed Use or to select SLIDE SHOW and press The slideshow begins and is displayed on the LCD monitor The next image is displayed every three seconds To quit the slideshow press ENTER The LCD monitor displays the image when ENTER is pressed The slideshow is repeated until ENTER is pressed Memo The Auto Power OFF function does not operate during aut...

Page 94: ... plays back the 16 images photographed in the multi photography mode in quick succession Set the mode dial to The last image frame appears on the LCD monitor Use or to select the images photographed in the multi photography mode You can also select the image by the same operation as for thumbnail display Press the Zoom key towards T to begin playback Automatic playback begins ...

Page 95: ...de dial to or When is selected the last image frame or the thumbnail display appears on the LCD monitor When is selected use or to select the image to be erased When or is selected only the last recorded image can be erased Press the erase button The erase icon is displayed at the left of the screen Use or to select and press ENTER This erases the image and returns to the previous mode To cancel e...

Page 96: ...tep 2 When PROTECTED is displayed on the LCD monitor cancel the protection or remove DPOF write protection If you take a photograph after erasing an image a number continuing from the last photographed image is assigned as the image number Images can also be erased in the thumbnail mode In this case the camera enters the single frame playback frame playback mode and enters the thumbnail playback m...

Page 97: ...y are protected or when the SD Memory Card is write protected The folder to be erased differs according to the position of the mode dial Folder of images currently being played back or Folder of images currently being photographed Set the mode dial to or Set the mode dial to the type of folder you want to erase When is selected the last image frame or the thumbnail display appears on the LCD monit...

Page 98: ...ages in the currently selected folder and folders Erases all folders recorded on the SD Memory Card The images or folders are erased and the camera returns to the respective mode To cancel erasing of image data select and press ENTER When is selected NO IMAGE is displayed after all folders have been erased unless the SD Memory Card contains protected images Memo When all images in a folder are era...

Page 99: ...lected the last image frame or the thumbnail display appears on the LCD monitor Hold down the erase button for two seconds The erase icon is displayed at the left of the screen Use or to select and press ENTER To cancel formatting select and press ENTER To reset the image number use or to select EXECUTE and press ENTER To cancel resetting of image numbers select CANCEL SD Memory Card must be forma...

Page 100: ...e space during photography increases space on SD Memory Card so that you can continue taking photographs The following images cannot be resized SMALL size images Images taken with another camera Images taken in the multi photography mode Protected images Movies Images cannot be resized when the SD Memory Card is write protected Set the mode dial to The last image frame appears on the LCD monitor P...

Page 101: ...e image is displayed to fit the entire screen To redisplay the original image move the Zoom key towards the W Use or to select the image and press ENTER to set image size Use or to select EXECUTE and press ENTER The screen indicating that the image is being resized appears To quit resizing select CANCEL and press ENTER When resizing ends the screen returns to the PLAYBACK MENU To quit the PLAYBACK...

Page 102: ...ce during photography increases space on SD Memory Card so that you can continue taking photographs The following images cannot be compressed BASIC image quality images Images taken with another camera Protected images Movies Set the mode dial to The last image frame appears on the LCD monitor Press the MENU button The PLAYBACK MENU is displayed Use or to select QUALITY and press The SET UP menu i...

Page 103: ...ed toward T during image selection the image is displayed to fit the entire screen To redisplay the original image move the Zoom switch towards the W Use or to select EXECUTE and press ENTER The screen indicating that the image is being compressed appears To quit compression select CANCEL and press ENTER When compression ends the screen returns to the PLAYBACK MENU To quit the PLAYBACK MENU press ...

Page 104: ... set in a DPOF Digital Print Order Format file for images to be printed developed This feature applies to still images only Printing can be done easily if you just take the SD Memory Card containing the images and DPOF file to the photo lab Set the mode dial to Press the MENU button The PLAYBACK MENU is displayed Press or to select DPOF and press Press or to select SELECT IMAGE and press ENTER ...

Page 105: ...creen To redisplay the original image move the Zoom key towards the W 2 When you have finished this setting press ENTER The DATE screen is displayed The date of the image can be printed in the lower right corner of the picture 3 Press or to select YES or NO and press ENTER If you want to print the date select YES and press ENTER If you do not want to print the date select NO and press ENTER The me...

Page 106: ...s ENTER The DPOF information file is created and the screen returns to the initial display when the operation ends To continue setting select CHANGE SETTINGS To quit setting without creating a DPOF file select CANCEL and press ENTER To end setting press or to select END and press ENTER To cancel confirmation of settings proceed to step 9 Print Information continued ...

Page 107: ...tically protected Write protection cannot be removed by regular methods You can specify up to 99 prints or up to 999 frames in a single SD Memory Card The maximum number of prints you can specify in a single SD Memory Card is limited to 10000 Print Information continued Select the desired operation CONFIRM Press this to confirm the settings 1 Press or to select CONFIRM and press ENTER 2 After conf...

Page 108: ...Formatting erases all the images on a SD Memory Card regardless of whether they are protected or not To protect the entire SD Memory Card see Write Protection page 35 Protecting an Image Set the mode dial to The last image frame or the thumbnail display appears on the LCD monitor Press the MENU button The PLAYBACK MENU is displayed Use or to select PROTECT and press The PROTECT menu is displayed ...

Page 109: ... key is pressed toward T during image selection the image is displayed to fit the entire screen To redisplay the original image move the Zoom key towards the W It is possible to play back any images in any folders by pressing or during playback Use or to select EXECUTE and press ENTER To quit write protection select CANCEL and press ENTER When write protection ends the screen returns to the PLAYBA...

Page 110: ...r the image changes to To unprotect an image press ENTER again To remove the protection from two or more images repeat this procedure for the necessary number of images It is possible to play back any images in all folders by pressing or during playback Carry out step 5 in Protecting An Image To write protect another image write protection can be simultaneously carried out if set at step 2 is disp...

Page 111: ... TIME DATE OSD LANGUAGE VIDEO OUT QUALITY FRAME NUMBER SYSTEM INFO The details set here are held in memory even if the camera is turned OFF Set the mode dial to The SETUP MENU appears Use or to select the item you want to set AUTO POWER OFF TIME DATE OSD LANGUAGE VIDEO OUT QUALITY FRAME NUMBER SYSTEM INFO Basic Settings mode Selects the time for automatic power off Setting the Time and Date Select...

Page 112: ...s To quit the SETUP MENU change the mode dial setting AUTO POWER OFF If no operation is carried out for a fixed amount of time default about one minute power consumption is set to its minimum state power almost turned off to prevent battery wear This is called the Auto Power OFF This setting allows you to set the time when the camera turns off automatically This function is not activated during au...

Page 113: ...ing or button to select the item to set and use or button to set the value for each item Pressing advances the selection in the following order Afterward pressing ENTER button when OK is highlighted date time data is updated and return to the previous main menu To quit setting select the CANCEL button and press ENTER YEAR MONTH DAY Hour Minute OK CANCEL Basic Settings mode continued OSD LANGUAGE S...

Page 114: ...mode continued By pressing button user can select size The size item is reversely display in white Press or to select the size setting user desired to set and press ENTER button After pressing the button while the QUALITY is highlighted the LCD shows the QUALITY menu Select Quality Menu keep pressing or button until the QUALITY is highlighted SETUP MENU appears By pressing button during the size i...

Page 115: ...ported only for the still image mode To reset movie images numbers you must delete the entire folder CANCEL Does not reset the image number RESET Reset the image number SYSTEM INFO Sets whether or not to return the settings in the SETUP MENU to the original factory settings TIME DATE and OSD LANGUAGE will not be reset After pressing the button while the SYSTEM INFO is highlighted the SYSTEM INFO m...

Page 116: ...rded image Set the mode dial to or Press the MENU button The RECORDING MENU or PLAYBACK MENU is displayed You can set the LCD monitor brightness in either of these menus Use or to select LCD and press The image and the LCD menu are displayed Use or to adjust the brightness Press to darken the LCD monitor or to lighten the LCD monitor The LCD monitor can be adjusted within the range 5 to 5 Default ...

Page 117: ...es You can switch the display to show a list of detailed information size compression ratio shutter speed aperture etc or you can display histograms etc Set the mode dial to Press or to select the image Press the DISP button Each press of the DISP button switches the display format as follows When playing back movie images switching is between standard and image only Standard Detailed information ...

Page 118: ...CD monitor is off the digital zoom function is forcibly canceled In the movie mode or macro photography mode the LCD monitor can not be turned off When the LCD monitor is off any setting for manual exposure compensation aperture value shutter speed value or focus is not possible OSD full display LCD monitor off OSD display off This item switches the display on the LCD monitor when taking photograp...

Page 119: ...Connect the plug of the AV cable provided to the PC VIDEO terminal on the camera Connect the plug of the VIDEO cable to the video input terminal on the TV Take photographs or play them back Details of operation are the same as taking photographs and playing them back on the LCD monitor The image before the photograph is taken is slightly less clear than playback images This is because television d...

Page 120: ... PC card adapter sold separately To transfer images to a PC software must be installed and special cables connected For details refer to the User s Guides for your PC and the Software Manual Using SD Memory Card on a PC When you use SD Memory Card do not change or erase folders or file names image data on the SD Memory Card Doing so might prevent the SD Memory Card from being used on the camera Fo...

Page 121: ...s Separately Sold Accessories The following items are also available as separately sold items l SD Memory Card 3 3 V 32MB SD M3201M 64MB SD M6401M 128M SD M1280M l AC Adapter For the US Canada PDR AC20A For Europe PDR AC20E For the UK PDR AC20U PDR ACM1E for European Continent PDR ACM1U for the UK PDR ACM1A for the US and Canada ...

Page 122: ...s Additional Information Erasing Images Handy Functions Connecting to Other Devices SD Memory Card PC card adapter PC Printer Software application CD ROM provided USB cable provided PC AV VIDEO cable provided DC IN 5V AC adapter sold separately Plug socket TV monitor PDR 3300 ...

Page 123: ... State Meaning Photography mode Setup mode PC mode Green On On On AE orAF is locked with the shutter button held half down In standby mode Flashing Flashing Flashing Red Orange Self timer in operation at a handshake alarm Writing to SD Memory Card in progress When the image is not in focus Processing image Charging of flash in progress Hardware malfunction SD Memory Card is not in In connecting to...

Page 124: ...ontroller signal Shot after 3seconds Getting IR controller signal IR Remote Controller The camera provides IR Remote Controller which works as the function of shutter release button in Capture mode In case of self timer is active the picture taken will be delayed 2 seconds after getting IR Remote controller signal It will remain the same mode until you manually press Self Timer button once again t...

Page 125: ... 125 Getting Ready Taking Photographs Playing Back Images Other Applications Additional Information Erasing Images Handy Functions Specifications Camera body ...

Page 126: ... 126 Getting Ready Taking Photographs Playing Back Images Other Applications Additional Information Erasing Images Handy Functions Specifications continued ...

Page 127: ...ications Additional Information Erasing Images Handy Functions The LCD monitor on your digital camera is manufactured using advanced high precision technology Though fine spots may appear on the LCD monitor this is not a malfunction The LCD monitor can be used as it is ...

Page 128: ...upply AC230V 50Hz Rated Input Capacity 120 mA Rated Output DC5 0V 1 5A Operating temperature 0 C 40 C Storage temperature 10 C 70 C Dimensions 49 5 mm 1 9 W x 66 5 mm 2 6 H x 76 mm 3 0 D Weight Approx 130 g 4 5 oz Connector Cable Length Approx 2 m 6 6 ft AC adapter PDR AC20E Power supply AC120V 50 60Hz Rated Input Capacity 18VA Rated Output DC5V 1 5A Operating temperature 0 C 32 F 40 C 104 F Stora...

Page 129: ...OPEN The battery cover not on the lock position CARD FULL No more space on the SD Memory Card Recording is not possible NO CARD No SD Memory Card is loaded SD Memory Card is loaded incorrectly CARD ISNíT FORMATTED The SD Memory Card is not initialized The SD Memory Card format is incorrect FORMAT CARD The SD Memory Card is not formatted initialized The SD Memory Card format is incorrect FRAME NUMB...

Page 130: ...ges 999 frames that can be set is exceeded when setting DPOF setting files NO IMAGE AVAILABLE No images are recorded to the SD Memory Card DPOF ERROR There is a parameter that is not supported in the DPOF setting file DPOF PROTECT OFF This is a confirmation for checking whether or not to remove DPOF write protection when clearing DPOF settings You tried to play back an image not supported on this ...

Page 131: ...mode dial to the correct setting The flash is set to Suppressed Flash mode Set the flash to Auto Red eye reduction or Forced flash mode I cannot use the flash to take pictures You pressed the shutter button while the flash was charging Wait until charging is completed before pressing the shutter button The camera is set to Suppressed Flash mode Set the flash to Auto Red eye Reduction or Forced Fla...

Page 132: ... standard defines the hierarchy and file names used when storing image files on memory cards or other recording medium lExif File Format Exchangeable Image File Format A color still image format for digital still cameras approved by the JEIDA Japan Electronic Industry Development Association JPEG compliant this format is compatible with TIFF and JPEG and can be used in image processing software fo...

Page 133: ...mory storage device designed by the consortium of Matsushita Electronic Panasonic SanDisk and Toshiba to meet the security capacity performance and environmental requirements inherent in emerging audio and video consumer electronics devices This recording medium can be used over and over again lFormatting Transforming the contents of the SD Memory Card to a recordable state This is sometimes calle...

Page 134: ...8 28 50 consommateur toshiba tsf com www toshiba fr produits video index htm Germany Toshiba Europe Gmbh 02131 158 01 consumer toshiba teg com www toshiba de consumer Italy Toshiba Consumer Products Italia 039 6099342 toshiba italia toshiba tuk com www toshiba it Singapore Toshiba Singapore Pte 270 7776 NA www cp toshiba com sg Switzerland Toshiba Europe Gmbh Swiss Branch 01 946 07 77 info toshiba...

Page 135: ...rley Surret GU15 3DT U K For customers in the U S A and Canada Register your product on line at www toshiba com taisisd Technical support is available on line or by calling 800 829 8318 8 00 a m to 5 00 p m EST Monday to Friday except holidays or e mail us at dsc support tais toshiba com Toshiba America Information Systems Inc Imaging Systems Division 9740 Irvine Boulevard Irvine California 92618 ...

Reviews: