17
2
CA
LL
PR
OG
RA
M
SP
EE
D
SL
EE
P
CA
NC
EL
MU
TE
PO
W
ER
CL
O
SE
D
CA
PT
IO
N
IN
PU
T
SE
LE
CT
CH
AN
NE
L
RE
TU
RN
ZE
RO
RE
TU
RN
TIM
ER
RE
C
0
8
7
9
6
5
4
3
2
1
ME
NU
EN
TE
R
DIG
ITA
L
TR
AC
KIN
G
PA
US
E
/ST
ILL
TR
AC
KIN
G
IN
DE
X
ST
OP
PL
AY
FF
RE
W
CO
UN
TE
R
RE
SE
T
TV
M
ON
ITO
R
SK
IP
SE
AR
CH
EJE
CT
VO
L+
+
+
–
–
VO
L–
CH
–
CH
+
RE
C
4
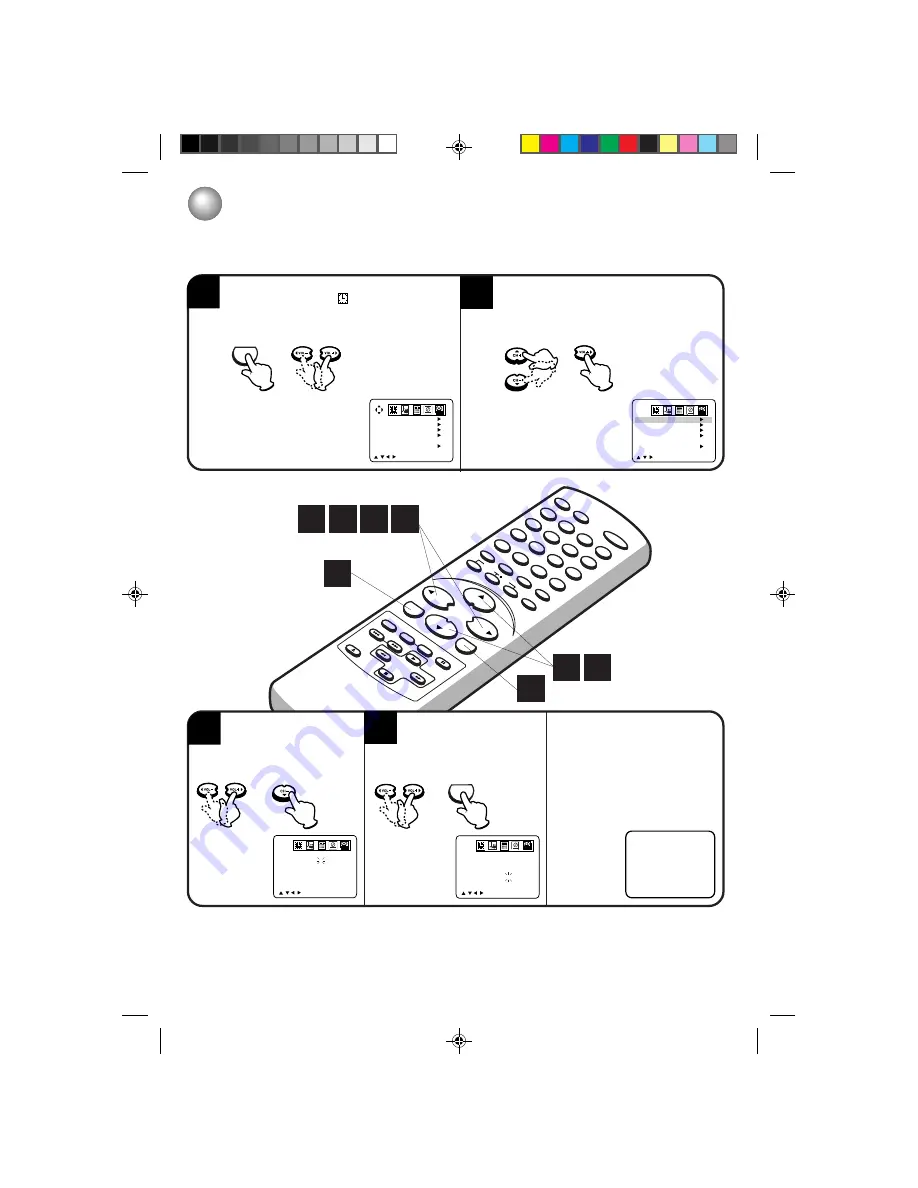
MANUAL CLOCK SETTING
You must set the date and time manually for timer recordings, ON/OFF timer and daylight saving time if
the auto clock process did not set them correctly.
Press MENU.
Press
B
or
A
to select
option.
Press
▲
or
▼
to select “CLOCK SET”, then
press
A
.
NOTES:
•
After a power failure or disconnection of the power plug, the time display will be lost. In this case, set the
present time again if the auto clock did not set correctly.
•
To move cursor backward, press
▲
.
3
8
:
30 AM SAT
EXAMPLE: Setting the clock to “8:30 AM”, 27th (SAT) March, 2004.
4
Press
B
or
A
to set the
month, then press
▼
.
Set the day, year and time
as in step 3, then press
ENTER.
After setting the clock, date and time
starts functioning automatically.
1
MENU
CLOCK SET
ON/OFF TIMER
AUTO CLOCK
STANDARD TIME
DAYLIGHT
SAVING TIME
/
/
/
/ MENU
ON
CLOCK SET
ON/OFF TIMER
AUTO CLOCK
STANDARD TIME
DAYLIGHT
SAVING TIME
/
/
/ MENU
ON
CLOCK SET
MONTH
DAY
YEAR
TIME
ENTER/MENU
3
1(MON)
2004
12:00AM
/
/
/
/
CLOCK SET
MONTH
DAY
YEAR
TIME
ENTER/MENU
3
27(SAT)
2004
8:30AM
/
/
/
/
4
3
2
2
1
3
1
ENTER
5L90101C P10-19
20/4/04, 16:32
17


