background image

19

Notes:

If the unit does not operate properly, or No key operation
(by the unit and/or the remote control):

  Static electricity,

etc., may affect the player's operation. Disconnect the AC
power cord once, then connect it again.

• The TV section has its own menu and also DVD section has

its own menu 

38

.

/

/

/

ENTER

MENU

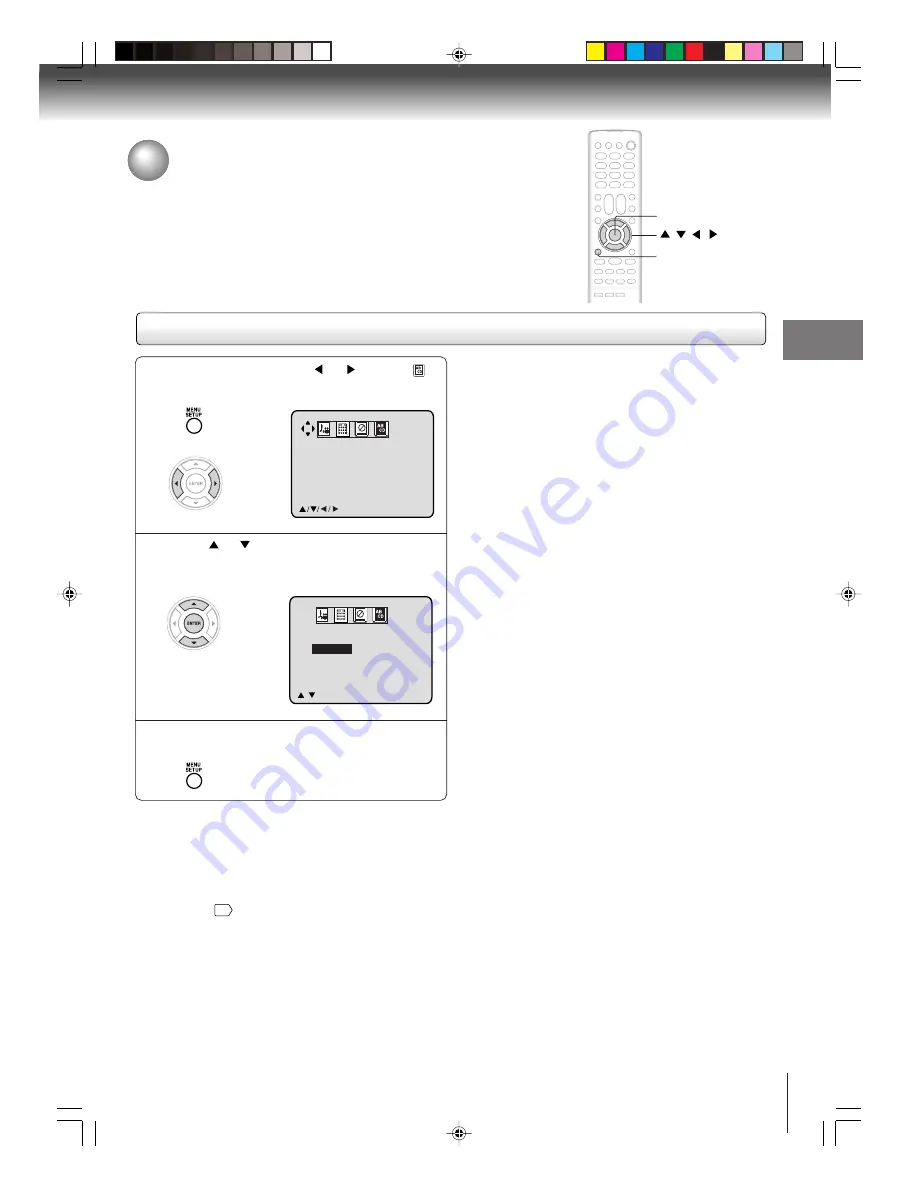
Press 

 or 

 to select the desired language:

English (ENGLISH), Spanish (ESPAÑOL) or
French (FRANCAIS), then press ENTER.

2

Press MENU, then press 

 or 

 to select 

option.

1

Press MENU repeatedly until the menu screen
is cleared.

3

LANGUAGE/IDIOMA/LANGUE

ENGLISH

ESPAÑOL
FRANCAIS

/

/ ENTER/MENU

LANGUAGE/IDIOMA/LANGUE

ENGLISH
ESPAÑOL
FRANCAIS

/MENU

Setting the language

This TV/DVD can display the on screen language in English, Spanish or French.
Select the language you prefer first, then proceed with the other menu
options.

Setting the language

Basic setup

 5W30201A [E] (P13-23)

7/1/06, 3:57 PM

19

Summary of Contents for MD14F12

Page 1: ...8 Introduction Connections Basic setup Basic playback Advanced playback Function setup DIGITAL VIDEO 2006 Toshiba Corporation 44 Others Before operating the unit please read this manual thoroughly 20 TV operation MD14F12 MD20F12 Illustration of MD20F12 5W30201A E Cover 7 1 06 3 56 PM 1 ...

Page 2: ...Y See item 33 on page 4 for details ChildSafety It Makes A Difference Where Your TV Stands Congratulations on your purchase As you enjoy your new TV keep these safety tips in mind The Issue If you are like most consumers you have a TV in your home Many homes in fact have more than one TV The home theater entertainment experience is a growing trend and larger TVs are popular purchases however they ...

Page 3: ...n or moisture does not operate normally or has been dropped 15 CAUTION To reduce the risk of electric shock do not use the polarized plug with an extension cord receptacle or other outlet unless the blades can be inserted completely to prevent blade exposure Installation Care and Service Installation Follow these recommendations and precautions and heed all warnings when installing your TV 16 Neve...

Page 4: ...ation to evaporate 31 For added protection of your TV from lightning and power surges always unplug the power cord and disconnect the antenna from the TV if you leave the TV unattended or unused for long periods of time 32 During normal use the TV may make occasional snapping or popping sounds This is normal especially when the unit is being turned on or off If these sounds become frequent or cont...

Page 5: ...easures Reorient or relocate the receiving antenna Increase the distance between the equipment and receiver Connect the equipment into an outlet on a circuit different from that to which the receiver is connected Consult the dealer or an experienced radio TV technician for help CAUTION Changes or modifications not expressly approved by the party responsible for compliance with the FCC Federal Comm...

Page 6: ...sation will seldom occur Precautions Notes on handling 3 When shipping the unit the original shipping carton and packing materials come in handy For fully protection repack the unit as it was originally packed at the factory 3 Do not use volatile liquids such as insect spray near the unit Do not leave rubber or plastic products to contact the unit for prolonged period They will leave marks on the ...

Page 7: ... Macrovision and is intended for home and other limited viewing uses only unless otherwise authorized by Macrovision Reverse engineering or disassembly is prohibited On handling discs Do not touch the playback side of the disc Do not attach paper or tape to discs On cleaning discs Fingerprints and dust on the disc cause picture and sound deterioration Wipe the disc from the center outwards with a ...

Page 8: ...c when the STOP 3 button is pressed Alternatively the may also indicate that the feature is not available for the disc Notes on region numbers The region number of this unit is 1 If region numbers which stand for their playable area are printed on your DVD video disc and you do not find 1 or ALL disc playback will not be allowed by the player In this case the unit will display a message on screen ...

Page 9: ...ference 26 Sound control adjustment MD20F12 only 27 Stereo and Second Audio Program SAP 27 Basic playback Playing a disc 28 Advanced playback Zooming 31 Locating desired scene 31 Marking desired scenes 32 Repeat playback 33 A B Repeat playback 33 Program playback 34 Random playback 34 Changing angles 35 Title selection 35 DVD menu 35 Changing soundtrack language 36 Subtitles 36 Disc status 37 To t...

Page 10: ...emote sensor 12 PHONES jack 21 POWER indicator Disc tray 20 28 28 28 AUDIO L R VIDEO IN jacks LINE IN 2 15 STOP button 28 OPEN CLOSE button 20 VOLUME buttons PLAY button 28 CHANNEL buttons 21 SKIP buttons 30 Front Rear Illustration of MD20F12 Illustration of MD20F12 AC power cord AUDIO L R VIDEO IN jacks are equipped only with MD20F12 5W30201A E P08 12 7 1 06 3 56 PM 10 ...

Page 11: ...n MARKER button GAME button REPEAT A B button RETURN button button SKIP 31 27 36 20 21 35 18 18 29 CLOSED CAPTION button 22 30 30 30 32 15 33 38 SKIP button Direct channel Selection buttons 0 9 Number buttons 0 9 33 38 MENU button 19 19 29 21 PAUSE button 29 30 35 30 35 Direction buttons 18 37 Remote control The instructions in this manual describe the function on the remote control See the page i...

Page 12: ...lways be disposed of with the environment in mind Always dispose of batteries in accord ance with applicable laws and regulations If the remote control does not operate correctly or if the operating range becomes reduced replace batteries with new ones When necessary to replace batteries in the remote control always replace both batteries with new ones Never mix battery types or use new and used b...

Page 13: ...n lead wire to the combiner not supplied Connect the VHF 300 ohm twin lead wire to the 300 75 ohm matching transformer Attachthetransformertothecombiner then attach the combiner to the antenna jack Connect the VHF 75 ohm cable and UHF 300 ohm twin lead wire to the combiner not supplied Attach the combiner to the antenna jack Combination VHF UHF antenna Separate VHF and UHF 300 ohm twin lead wires ...

Page 14: ... service which requires the use of a converter descrambler box connect the incoming 75 ohm coaxial cable to the converter descrambler box Using another 75 ohm coaxial cable connect the output jack of the converter descrambler box to the antenna jack on the TV DVD Follow the connections shown below Set the TV DVD to the output channel of the converter descrambler box usually channel 3 or 4 and use ...

Page 15: ...reen for 4 seconds LINE TV Channel LINE TV Channel LINE 1 Back LINE 2 Front MD20F12 LINE1 LINE2 or TV channel will display on the screen for 4 seconds To Audio Video OUT VIDEO IN AUDIO IN L AUDIO IN R Notes You can also change the TV screen to the external input by pressing the CH buttons The TV DVD can also be used as a display device for many video games However due to the wide variety of differ...

Page 16: ...cribed in Connecting to an amplifier equipped with a Dolby Digital decoder Refer to that amplifier s owner s manual and set the amplifier so you can enjoy Dolby Surround Pro Logic sound 3 With an amplifier not equipped with Dolby Digital Connect the equipment as follows This connection is only suitable for Video CDs and Audio CDs Connect one or two rear speak ers The output sound from the rear spe...

Page 17: ...XIAL DIGITAL AUDIO OUT jack of the TV DVD to the COAXIAL input of a Receiver or Processor Refer to the owner s manual of the connected equipment as well When you connect the TV DVD to other equipment be sure to turn off the power and unplug all of the equipment from the wall outlet before making any connections The output sound of the TV DVD has a wide dynamic range Be sure to adjust the receiver ...

Page 18: ...ow the AUTO CH MEMORY starts After the starting setup is completed the TV channel appears on the screen Note If you press CANCEL in the process of AUTO CH MEMORY you can do starting set up function again 4 Note The starting setup function will work only when you press POWER for the first time Press POWER The starting setup function begins and the Language setup menu appears on the screen Press or ...

Page 19: ...language English ENGLISH Spanish ESPAÑOL or French FRANCAIS then press ENTER 2 Press MENU then press or to select option 1 Press MENU repeatedly until the menu screen is cleared 3 LANGUAGE IDIOMA LANGUE ENGLISH ESPAÑOL FRANCAIS ENTER MENU LANGUAGE IDIOMA LANGUE ENGLISH ESPAÑOL FRANCAIS MENU Setting the language This TV DVD can display the on screen language in English Spanish or French Select the ...

Page 20: ...ing viewed stops broadcasting the TV will auto matically shut itself off after 15 minutes To turn on the TV DVD press POWER The Power indicator will light POWER VOL 0 9 VOLUME 32 TV VHF UHF channels CABLE Cable TV channels CH 012 CABLE mode direct channel selection When the TV CABLE selection is in the CABLE position channels can be selected as follows TO SELECT CABLE TV CHANNELS 1 9 Press 0 twice...

Page 21: ...ess SLEEP on the remote control The clock will count down 10 minutes for each press of SLEEP 120 110 10 0 After the sleep time is programmed the display will appear briefly every ten minutes to remind you that the sleep timer is operating To confirm the sleep timer setting press SLEEP and the remain ing time will be displayed for a few seconds To cancel the sleep timer press SLEEP repeatedly until...

Page 22: ...or hearing impaired viewers Closed captions WHAT IS CLOSED CAPTIONING This television has the capability to decode and display closed captioned television programs Closed captioning will display text on the screen for hearing impaired viewers or it will translate and display text in another language Notes When selecting closed captions the captioning will be delayed approximately 10 seconds If no ...

Page 23: ...annel set into memory skipping over unwanted channels Before selecting channels they must be programmed into the TV DVD s memory In addition to normal VHF and UHF channels this TV DVD can receive up to 113 Cable TV channels To use this TV DVD with an antenna set the TV CABLE selection to the TV position When shipped from the factory this selection is in the CABLE position 0 9 ADD 0 9 CH 001 MENU T...

Page 24: ...T NEW PASSWORD MENU V CHIP SET NEW PASSWORD 0 9 ENTER CANCEL MENU V CHIP SET NEW PASSWORD V CHIP SET CONFIRM PASSWORD 0 9 ENTER CANCEL MENU Setting the V Chip An age limitation can be set to forbid children to watch programs according to TV RATING and MOVIE RATING level set To use the V Chip function you must register a password To change password In the V CHIP menu press or to select CHANGE PASSW...

Page 25: ...PG Parental guidance PG 13 Parental guidance less than 13 years old R Under 17 years old Parental guidance suggested NC 17 17 years old and above X Adult only V CHIP V CHIP SET CHANGE PASSWORD ON MENU Press or to display ON Now your settings were set into the memory 6 Press MENU repeatedly until the menu screen is cleared 7 To use after the TV is protected When the program applied to the V Chip se...

Page 26: ...HTNESS CONTRAST COLOR TINT SHARPNESS 0 32 0 0 0 3 3 3 3 3 To return all adjustments to the factory preset levels Press CANCEL while making picture adjustments Picture control adjustment Adjusting the picture preference Press or to select PICTURE PREFERENCE then press 1 2 Press MENU and then press or to select option Note You cannot select PICTURE PREFERENCE in the Game mode ENTER Mode Picture qual...

Page 27: ...th speakers 3 3 3 3 3 To return BASS TREBLE BALANCE control adjustments to the factory preset levels Press CANCEL while making sound adjustments MENU PICTURE AUDIO PICTURE PREFERENCE PICTURE AUDIO PICTURE PREFERENCE MENU BASS 0 TREBLE 0 BALANCE 0 CANCEL MENU When the TV is turned on or a channel selection is made the STEREO will appear on the screen This means that Stereo broadcasting is available...

Page 28: ...een will appear on the screen Reading display will change to No Disc If DVD disc has already loaded playback will start automati cally 3 Press OPEN CLOSE The disc tray opens 4 Place a disc on the disc tray Basic playback There are two different disc sizes Place the disc in the correct guide on the disc tray If the disc is out of the guide it may damage the disc and cause the unit to malfunction Do...

Page 29: ... unit during playback Doing so may damage the disc Use OPEN CLOSE to open and close the disc tray Do not push the disc tray while it is moving Doing so may cause the unit to malfunction Do not push up on the disc tray or put any objects other than discs on the disc tray Doing so may cause the unit to malfunction In many instances a menu screen will appear after playback of a movie is completed Pro...

Page 30: ...cted chapter or track To locate succeeding chapters or tracks Playback starts from the beginning of the current chapter or track When you press twice in quick successions playback starts from the beginning of the preceding chapter or track A prohibition symbol may appear at the upper left of the screen This symbol means either the feature you tried is not available on the disc or the TV DVD cannot...

Page 31: ... title chapter and time recorded on the DVD disc to locate the desired point to playback In the case of VCD CD discs time and track are used to locate the desired point to playback To check the title chapter and time press DISPLAY Locating desired scene Press JUMP during playback or stop mode PressNumberbuttons 0 9 toinputthenumber If you input a wrong number press CANCEL Refer to the package supp...

Page 32: ... around the marker may fail to appear In case of Video CD with PBC the MARKER is prohibited To cancel the Marker Follow the above steps 1 2 then press CANCEL ENTER CANCEL MARKER Press MARKER during playback Press MARKER to clear this display Press ENTER Playback starts from the marked scene Press or to select the Marker 1 3 DVD VCD DVD VCD Select the blank Marker using or then press ENTER at the d...

Page 33: ...an interactive DVD A B Repeat is prohibited when PBC is on To resume normal playback Press REPEAT A B again Off appears on the screen DVD VCD CD A A B DVD VCD CD Repeat playback A B Repeat playback PLAY MODE REPEAT A B Repeat playback A B Repeat playback 1PressPLAYMODEduringplaybackorstopmode Press PLAY MODE again to clear the screen 3 2 Notes Some discs may not work with the repeat operation In c...

Page 34: ...rogram Playback Play Mode Program Repeat Off Enter 0 9 Cancel Play Mode 4 T Note The program is canceled when you open the disc tray or turn the power off To change the program 1 In the program mode press to select the track number 2 Press Number buttons 0 9 to select the track number to be replaced To clear the program one by one In the program mode press to select the track number Then press CAN...

Page 35: ...ER or PLAY The playback of the selected title will start 3 Note Depending on the DVD you may not be able to select the title Depending on the DVD a title menu may simply be called a menu or title in the instructions supplied with the disc 2 Press to select the desired title DVD menu Some DVDs allow you to select the disc contents using the menu When you playback these DVDs you can select the subti...

Page 36: ...k language is canceled when you open the disc tray The initial default language or available language will be heard if the disc is played back again If you select DTS in playing DTS encoded disc no sound will be heard from the TV DVD s speakers In case of Video CD playback Audio type changes as follows each time you press AUDIO SELECT LR L R 1 8 Eng D 2 8 Fra D To turn off the subtitle press SUBTI...

Page 37: ...the PBC by pressing number button 1 and ENTER in the stop mode To turn on the PBC 34 56 71 33 11 99 T Audio CD When you play a CD disc the status display will appear and remain on the screen Play status Track number Track total time Track elapsed playing time 05 28 PBC 45 03 05 28 45 03 1 1 T 00 03 13 01 30 32 1 1 00 03 13 01 30 32 1 2 1 1 Eng 1 2 Fra D 1 2 C T Play status Subtitle language Chapte...

Page 38: ...ettings to customize performance to your preference ENTER Repeat steps 3 and 4 to change other settings To select another operation go back to step 2 by pressing repeatedly Press or to select the desired section then press or ENTER Press or to select the desired option 4 Change the selection using or by referring to the corresponding pages SETUP DVD VCD CD Enter Setup Return RETURN 5W30201A E P38 ...

Page 39: ... To select a picture size according to the aspect ratio of your TV To turn On or Off the operational status display on the screen To select a preferred picture mode from Video Film or Auto To select On or Off for DRC Dynamic Range Con trol Input 4 digit password to set the parental level To select a preferred parental level for the parental setting Page 40 41 42 Setting details 5W30201A E P38 43 7...

Page 40: ...reen sizes to choose from 4 3 Letter box Select this mode when connecting to a conventional TV When playing back a wide screen DVD disc it displays the wide picture with black bands at the top and bottom of screen 4 3 Pan scan It displays the wide picture on the whole screen with left and right edges automatically cut off Press OPEN CLOSE to view in the selected screen size Note If the DVD disc is...

Page 41: ...nt pictures The progressive output feature will be most effective under this selection Video The DVD player filters video signal and converts it in the progressive output format appropriately Suitable for playback of video content pictures Note Depending on the disc pictures may be cut off or doubled In this case select Video DRC Setup Return On On Loud sound such as explosion is toned down slight...

Page 42: ...ecific rating level information though its disc jacket says adult For those discs the age restriction will not work Note If each setup has completed the unit can always work under the same condition especially with DVD discs Each setup will be retained in the memory even if you turn the power off To change the parental level 1 Press or to select Password 2 Press Number buttons 0 9 to enter the pas...

Page 43: ...n t know or have forgotten the password select Cancel Picture The setting screen will disappear Press OPEN CLOSE to remove the disc ENTER RETURN 0 9 PLAY OPEN CLOSE Temporary cancel the rating level by DVD disc Depending on the DVD disc the disc may try to temporarily cancel the rating level that you have set It is up to you to decide whether to cancel the rating level or not Note This temporary c...

Page 44: ...425 Thai 3018 Bihari 1218 Hungarian 1831 Oriya 2528 Tibetan 1225 Breton 1228 Icelandic 1929 Panjabi 2611 Tigrinya 3019 Bulgarian 1217 Indonesian 1924 Pashto Pushto 2629 Tonga 3025 Burmese 2335 Interlingua 1911 Persian 1611 Turkish 3028 Byelorussian 1215 Irish 1711 Polish 2622 Turkmen 3021 Cambodian 2123 Italian 1930 Portuguese 2630 Twi 3033 Catalan 1311 Japanese 2011 Quechua 2731 Ukrainian 3121 Ch...

Page 45: ...for sources of possible interference Picture wobbles or drifts Station or Cable TV experiencing problems tune to another station Make sure channels are set into memory Cable TV company is scrambling signal Check antenna or Cable TV connections reorient antenna No CATV reception Check all Cable TV connections Set TV CABLE selection to the CABLE position Station or Cable TV system problems try anoth...

Page 46: ...topping playback search slow motion play repeat play or program play etc cannot be performed Some discs may not do some of the functions No on screen display Select Display to On No surround sound The setup does not match your stereo system The remote control does not function Aim at the remote control at the remote sensor Operate within approx 5 meters or reduce the light in the room Clear the pa...

Page 47: ...nces such as drills or hair dryers SNOW If the TV DVD is located far from the TV station in a fringe reception area where the signal is weak small dots may appear in the picture If the signal is extremely weak the installation of a larger external antenna may be necessary RADIO FREQUENCY INTERFERENCE RFI Caused by two way radios this type of interference produces moving ripples or diagonal streaks...

Page 48: ... 1 Screen size is approximate This model complies with the above specifications Designs and specifications are subject to change without notice This model may not be compatible with features and or specifications that may be added in the future AC 120 V 60 Hz Operation 90 W Stand by 3 W 14 Inch 357 0 mm diagonal 1 1 2 x 2 11 16 inches 38 1 x 68 6 mm 8 ohm x 2 2 5 W 2 5 W 29 8 lbs 13 5 kg Width 17 ...

Page 49: ...CHARGES IN CONNECTION WITH THE REPAIR OR REPLACEMENT THEREOF Limited Two 2 Year Warranty on Picture Tube TACP further warrants the picture tube in this TV Combination against defects in materials or workmanship for a period of two 2 years after the date of original retail purchase DURING THIS PERIOD TACP WILL AT TACP S OPTION REPAIR OR REPLACE A DEFECTIVE PICTURE TUBE WITH A NEW OR REFURBISHED PIC...

Page 50: ...chase to the TACP Authorized Service Station You must deliver the entire TV Combination to a TACP Authorized Service Station You must pay for all transportation and insurance charges for the TV Combination to and from the TACP Authorized Service Station ALL WARRANTIES IMPLIED BY THE LAW OF ANY STATE OF THE U S A INCLUDING THE IMPLIED WARRANTIES OF MERCHANTABILITY AND FITNESS FOR A PARTICULAR PURPO...

Page 51: ...51 Others Memo 5W30201A E P49 Back 7 1 06 3 59 PM 51 ...

Page 52: ...Printed in Thailand J5W30201BSH06 02 N 5W30201B E P49 Back 06 1 13 0 32 PM 52 ...

Reviews: