background image

58

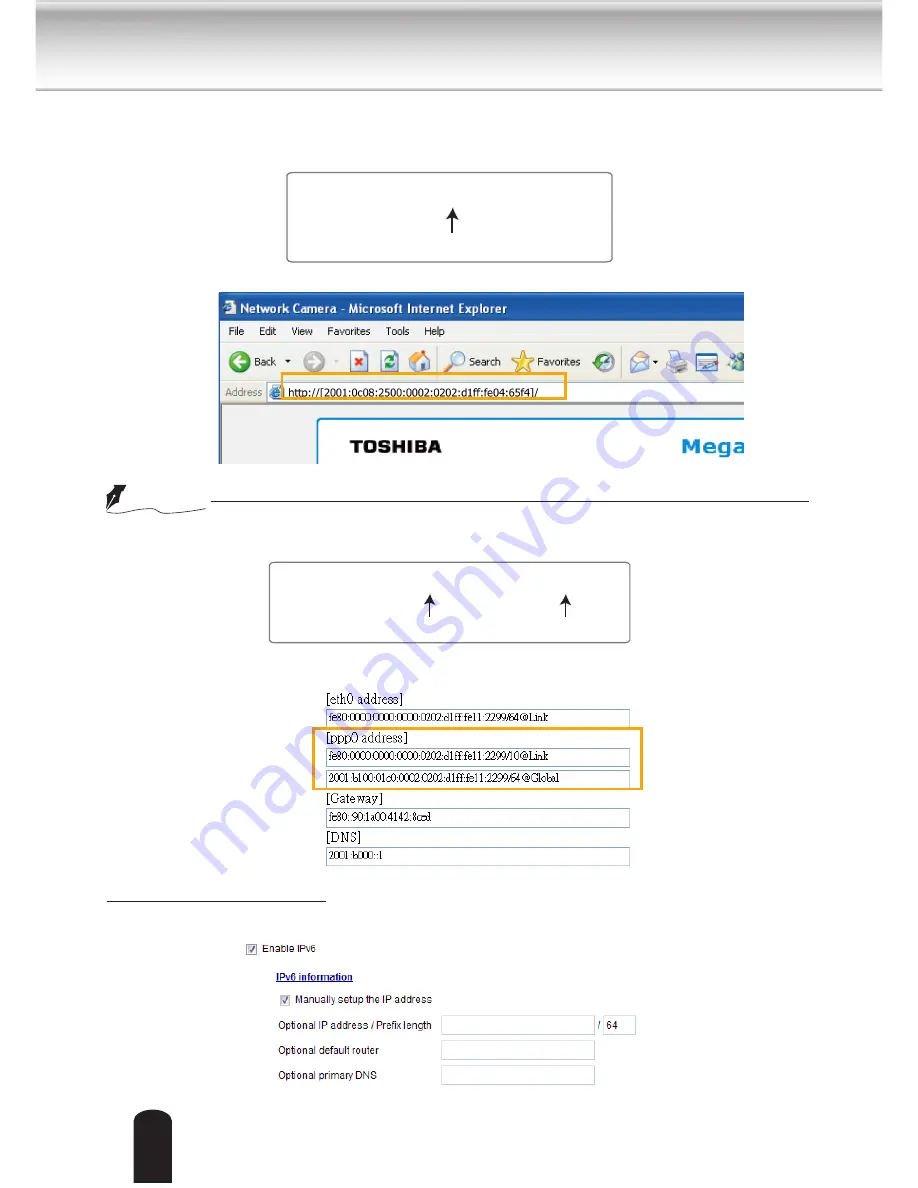
Please follow the steps below to link to an IPv6 address:

1. Open your web browser.

2. Enter the link-global or link-local IPv6 address in the address bar of your web browser.

3. The format should be:


4. Press 

Enter

 on the keyboard or click 

Refresh

 button to refresh the webpage.

    For example: 

 If you have a Secondary HTTP port (the default value is 8080), you can also link to the webpage in 

     the following address format: (Please refer to 

HTTP

 streaming on page 60 for detailed information.)

 If you choose PPPoE as the Network Type, the [

PPP0

 address] will be displayed in the IPv6 

information column as shown below.

Manually setup the IP address: Select this option to manually set up IPv6 settings if your network 

environment does not have DHCPv6 server and router advertisements-enabled routers. 

If you check this item, the following blanks will be displayed for you to enter the corresponding 

information:

http://

[

2001:0c08:2500:0002:0202:d1ff:fe04:65f4

]

/

IPv6 address

http://

[

2001:0c08:2500:0002:0202:d1ff:fe04:65f4

]

/

:8080

IPv6 address

Secondary HTTP port

NOTE

Summary of Contents for IK-WD04A

Page 1: ...odel IK WD04A User s Manual If the URL changes refer to the Toshiba website http www toshiba com For information on our latest products and peripheral devices refer to the following Website http www toshibasecurity com ...

Page 2: ...Page 24 System General settings 31 System Homepage layout 33 System Logs 36 System Parameters 37 System Maintenance 38 Security User Account 42 Security HTTPS Hypertext Transfer Protocol over SSL 43 Security Access List 48 Network General settings 53 Network Streaming protocols 60 Network QoS Quality of Service 64 Network DDNS 66 Network SNMP Simple Network Management Protocol 67 Video Image 68 Vi...

Page 3: ...3 Troubleshooting 107 Specifications 108 Appearance Diagram 110 Technology License Notice 111 End user License Agreement on Free Software Components Used in the TOSHIBA Network Camera 112 Trademarks 117 ...

Page 4: ...llation If this equipment does cause harmful interference to radio or television reception which can be determined by turning the equipment off and on the user is encouraged to try to correct the interference by one or more of the following measures Reorient or relocate the receiving antenna Increase the separation between the equipment and receiver Connect the equipment into an outlet on a circui...

Page 5: ...ubject to change without prior notice Terms l The term OS is used in this manual to indicate operating systems compatible with this product Microsoft Windows XP xxxx Edition Microsoft Windows Vista Business Edition Microsoft Windows 7 Professional Edition NOTE The performance of the network camera may vary depending on the network environment When using multiple network cameras the appropriate net...

Page 6: ...d tripod bracket or table recommended by the manufacturer or sold with the camera Any mounting of the product should follow the manufacturer s instructions and should use a mounting accessory recommended by the manufacturer 9 Ventilation This camera should never be placed near or over a radiator or heat register If this product is placed in a built in installation verify that there is proper venti...

Page 7: ...his camera from the power supply and refer servicing to qualified service personnel under the following conditions a When the power supply cord or plug is damaged b If liquid has been spilled or objects have fallen into the camera c If the camera has been submerged in water d If the camera does not operate normally by following the operating instructions in the user s manual Adjust only those cont...

Page 8: ...risk of electric shock to persons The exclamation point within an equilateral triangle is intended to alert the user to the presence of important operating and maintenance servicing instructions in the literature accompanying the appliance WARNING TO REDUCE THE RISK OF FIRE OR ELECTRIC SHOCK DO NOT EXPOSE THIS APPLIANCE TO RAIN OR MOISTURE FIELD INSTALLATION MARKING WORDED THIS INSTALLATION SHOULD...

Page 9: ...ouch internal parts Do not touch the internal parts of the camera other than the parts specified l Keep the camera installation away from video noise If cables are wired near electric lighting wires or a TV set noise may appear in images In this event relocate cables or reinstall equipment l Check the ambient temperature and humidity Avoid using the camera where the temperature is hotter or colder...

Page 10: ...ght Law and other laws when a customer uses displays distributes or exhibits an image picked up by the camera without permission from the copyright holder Please also note that transfer of an image or file covered by copyright is restricted to use within the scope permitted by the Copyright Law Protection of Personal Information Images taken by the camera that reveal the likeness of an individual ...

Page 11: ... Contents l IK WD04A l Clamp Filter l Video Out Cable l Warranty Card l Quick Start Guide and Important Safeguards l Screws and Anchors RJ45 Female Female Coupler l CD ROM l Alignment Sticker IK WD04A Ver WD04 01 ...

Page 12: ...ome cover Flip the black retention tabs in the counter clockwise direction to release the dome cover clockwise if you look from the bottom up Lens Black Cover Status LED Reset Button General Input Terminal Block 10 100BaseT Ethernet RJ45 Plug Power Cord Socket MicroSD SDHC Card Slot Video Out ...

Page 13: ...Camera provides a general input terminal block which is used to connect external input devices The diagrams below apply when Digital Input is used for an alarm input NOTE Internal Circut Digital Input Signal Condition Pin Name Digital Input GND ...

Page 14: ...tore Press and hold the recessed reset button until the status LED rapidly blinks It takes about 10 seconds Note that all settings will be restored to factory default Upon successful restore the status LED will blink during normal operation Restoring the factory defaults will erase any previous settings Item LED status Description 1 Red LED steady ON Red LED OFF Power on and system booting Power o...

Page 15: ...read the User s guide precautions on use and any other information supplied with a purchased memory card An SD memory card can be used for repeated storage The lifespan number of rewrites possible of an SD memory card is greatly affected by the capacity of the SD memory card Do not use a memory card containing the data recorded by another device with the camera as this may result in the camera not...

Page 16: ...r the Internet environment is illustrated below Regarding how to obtain your IP address please refer to Software Installation on page 18 for details Hardware Installation Please verify that your product package contains all the accessories listed in the Package Con tents listed on page 11 Depending on the user s application an Ethernet cable may be needed The Ethernet cable should meet the specs o...

Page 17: ...ase refer to your router s user s manual 3 Determine the public IP address of your router provided by your ISP Internet Service Provider Use the public IP and the secondary HTTP port to access the Network Camera from the Internet Please refer to Network Type on page 53 for details Internet connection with static IP Choose this connection type if you are required to use a static IP for the Network ...

Page 18: ...unch the program 2 The program will analyze your network environment After your network environment is analyzed please click Next to continue the program 3 The program will search for Network Cameras on the same LAN 4 After searching the main installer window will pop up Click on the MAC and model name which matches the MAC of the camera This Software is proprietary client software for TOSHIBA Net...

Page 19: ...19 Ready to Use 1 Access the Network Camera on the LAN 2 Retrieve live video through a web browser 2012 10 12 08 36 55 ...

Page 20: ...address of the Network Camera in the address field Press Enter 3 The live video will be displayed in your web browser 4 If it is the first time installing the network camera an information bar will pop up as shown below Follow the instructions to install the required plug in on your computer By default the Network Camera is not password protected To prevent unauthorized access it is highly recomme...

Page 21: ...net Options Security Custom Level 2 Look for Download signed ActiveX controls select Enable or Prompt Click OK 3 Refresh your web browser then install the Active X control Follow the instructions to complete installation Currently the Network Camera utilizes 32 bit Active X plugin You CAN NOT open a Configuration view session with the camera using a 64 bit IE browser NOTE ...

Page 22: ...ease refer to RTSP Streaming on page 61 For example 4 The live video will be displayed in your player For more information on how to configure the RTSP access name please refer to RTSP Streaming on page 61 for details rtsp xxx xxx xxx xxx 554 live3 sdp Video 16 38 01 2010 01 15 1 Launch the RTSP player 2 Choose File Open URL A URL dialog box will pop up 3 The address format is rtsp ip address rtsp...

Page 23: ...reaming on page 61 2 As the bandwidth on 3G networks is limited you will not be able to use a large video size Please set the video streaming parameters as listed below For more information please refer to Viewing Window on page 75 Video Mode MPEG 4 Frame size 176 x 144 Maximum frame rate 5 fps Intra frame period 1S Video quality Constant bit rate 40kbps 3 As most ISPs and players only allow RTSP ...

Page 24: ...ple streams please refer to page 75 for detailed information Manual Trigger Click to enable disable an event trigger manually Please configure an event setting before enabling this function A total of 3 or 4 event settings can be configured For more information about event setting please refer to page 82 If you want to hide this item on the homepage please go to the System Homepage Layout General ...

Page 25: ...size Click 25 is to resize the homepage to 25 of its original size Live Video Window The following window is displayed when the video mode is set to H 264 MPEG 4 Video Title The video title can be configured For more information please refer to Video settings on page 68 Global View Click on this item to display the Global View window The Global View window contains a full view image the largest fr...

Page 26: ...save it in JPEG jpg or BMP bmp format Digital Zoom Click and uncheck Disable digital zoom to enable the zoom operation The navigation screen indicates the part of the image being magnified To control the zoom level drag the slider bar To move to a different area you want to magnify drag the navigation screen Pause Pause the transmission of the streaming media The button becomes the Resume button a...

Page 27: ... to save it in JPEG jpg or BMP bmp format Digital Zoom Click and uncheck Disable digital zoom to enable the zoom operation The navigation screen indicates the part of the image being magnified To control the zoom level drag the slider bar To move to a different area you want to magnify drag the navigation screen Start MP4 Recording Click this button to record video clips in MP4 file format to your...

Page 28: ...llows up to ten simultaneous accesses UDP multicast This protocol allows multicast enabled routers to forward network packets to all clients requesting streaming media This helps to reduce the network transmission load of the Network Camera while serving multiple clients at the same time Note that to utilize this feature the Network Camera must be configured to enable multicast streaming at the sa...

Page 29: ... date and time suffix to the file name Select this option to append the date and time to the end of the file name Local Streaming Buffer Time Due to unsteady bandwidth flow live streaming may lag If you enable this option the live streaming will be cached on the camera s buffer memory before being played on the live viewing window This helps produce smoother live streaming If you enter a value of ...

Page 30: ...d in Basic Mode If you want to set up advanced functions please click on Advanced Mode at the bottom of the configuration list to switch to Advanced Mode In order to simplify the user interface detailed information will be hidden unless you click on the function item When you click on the first sub item the detailed information for the first sub item will be displayed when you click on the second ...

Page 31: ...ews from the Home page for live viewing and Configuration page System General settings This section explains how to configure the basic settings for the Network Camera such as the host name and system time It is composed of the following two columns System and System Time System Host name Enter a desired name for the Network Camera The name will be displayed at the top center of the main page Turn...

Page 32: ...ime format are yyyy mm dd and hh mm ss Automatic The Network Time Protocol is a protocol which synchronizes computer clocks by periodically querying an NTP Server NTP server Assign the IP address or domain name of the time server Leaving the text box blank connects the Network Camera to the default time servers Update interval Select to update the time using the NTP server on an hourly daily weekl...

Page 33: ...his Preview field The following shows the homepage using the default settings Logo graph Here you can change the logo at the top of your homepage Follow the steps below to upload a new logo 1 Click Custom and the Browse field will appear 2 Select a logo from your files 3 Click Upload to replace the existing logo with a new one 4 Enter a website link if necessary 5 Click Save to enable the settings...

Page 34: ...oose from The new layout will simultaneously appear in the Preview filed Click Save to enable the settings Font Color of the Video Title Background Color of the Video Area Font Color Frame Color Background Color of the Control Area Background Color of the Configuration Area Font Color of the Configuration Area Preset patterns ...

Page 35: ... on on the right column 3 The palette window will pop up as shown below 4 Drag the slider bar and click on the left square to select a desired color 5 The selected color will be displayed in the corresponding fields and in the Preview column 6 Click Save to enable the settings 1 2 3 4 Color Selector Custom Pattern ...

Page 36: ...lick Save to enable the setting You can configure the Network Camera to send the system log file to a remote server as a log message When using this feature the appropriate syslog server is required for receiving the system log message from the Network Camera System log This column displays the system log in chronological order The system log is stored in the Network Camera s buffer and dated even...

Page 37: ...and older events will be overwritten when the number of events reaches a limit The access log messages stored in the Network Camera will be all cleared after reboot or power down the Network Camera System Parameters Advanced Mode The View Parameters page lists the entire system s parameters in an alphabetical order If you need technical assistance please provide the information listed on this page...

Page 38: ...oot system now This connection will close After that re access the Network Camera The following message is displayed when the upgrade has succeeded The following message is displayed when you have selected an incorrect firmware file General settings Reboot This feature allows you to reboot the Network Camera which takes about one minute to complete When completed the live video page will be displa...

Page 39: ...restored to factory default The following message is displayed during the restoring process Import Export files Advanced Mode This feature allows you to Export Update daylight saving time rules custom language file and configuration file Export daylight saving time configuration file Click to set the start and end time of DST Follow the steps below to export 1 In the Export files column click Expo...

Page 40: ...mple below DST begins each year at 2 00 a m on the second Sunday in March and ends at 2 00 a m on the first Sunday in November Update daylight saving time rules Click Browse and specify the XML file to update If incorrect date and time are assigned you will see the following warning message when uploading the file to the Network Camera ...

Page 41: ...onfiguration file Please note that the model and firmware version of the device should be the same as the configuration file If you have set up a fixed IP or other special settings for your device it is not suggested to update a configuration file Export server staus report Click to export the current server status report such as time logs parameters process status memory status file system status...

Page 42: ...e main page Please refer to Configuration on page 30 Allow anonymous viewing for 3GPP compatible mobile devices If you check this item 3GPP clients can access the live stream without entering a User ID and Password Note Select RTSP Streaming Authentication to disable This function will not work with Internet Explorer Manage User Administrators can create up to 20 user accounts 1 Input the new user...

Page 43: ...unication with the Network Camera a Certificate must be created first There are three ways to create and install a certificate Create self signed certificate automatically 1 Select the first option 2 Check Enable HTTPS secure connection then select a connection option HTTP HTTPS or HTTPS only 3 Click Save to generate a certificate 4 The Certificate Information will automatically be displayed in th...

Page 44: ...ddress bar and press Enter on your keyboard Some Security Alert dialogs will pop up Click OK or Yes to enable HTTPS Create self signed certificate manually 1 Select the second option 2 Click Create to open the Create Certificate page https 192 168 5 151 index html https 2012 10 12 08 36 55 ...

Page 45: ...an click Property to see detailed information about the certificate 5 Check Enable HTTPS secure connection then select a connection option HTTP HTTPS or HTTPS only Click Save to enable the settings Create certificate and install Select this option if you want to create a certificate from a certificate authority 1 Select the third option 2 Click Create to open the Create Certificate page then click...

Page 46: ...request 5 Look for a trusted certificate authority that issues digital certificates Enroll the Network Camera Wait for the certificate authority to issue a SSL certificate click Browse to search for the issued certificate then click Upload in the column 6 Check Enable HTTPS secure connection then select a connection option HTTP HTTPS or HTTPS only Click Save to enable the settings ...

Page 47: ...secure connection in the second column and click Save a warning dialog will pop up 1 2 Click OK to disable HTTPS 1 3 The webpage will redirect to a non HTTPS page automatically 2 If you want to create and install other certificates please remove the existing one NOTE ...

Page 48: ...nk to the webpage without a user name and password the User ID column will be empty There are some situations which allow clients access to the live video without a user name and password 1 The administrator does not set up a root password For more information about how to set up a root password and manage user accounts please refer to Security User account on page 42 2 The administrator has set u...

Page 49: ... on the Access List below can access the Network Camera and the others cannot access On the contrary if you choose Deny Type those clients whose IP addresses are on the Access List below will not be allowed to access the Network Camera and the others can access Then you can Add a rule to the following Access List Please note that the IPv6 access list column will not be displayed unless you enable ...

Page 50: ...olumn make a selection and click Delete Administrator IP address Always allow the IP address to access this device You can check this item and add the Administrator s IP address in this field to make sure the Administrator can always connect to the device accesses from IP address 192 168 2 x will be bolcked For example when the range of IP addresses on the allowed list is set from 1 1 1 0 to 192 2...

Page 51: ... authentication 2 Authenticator an access point or a switch A go between which restricts unauthorized end users from communicating with the authentication server 3 Authentication server usually a RADIUS server Checks the client certificate and decides whether to accept the end user s access request Network Cameras support two types of EAP methods to perform authentication EAP PEAP and EAP TLS Plea...

Page 52: ...2 1X via a switch the authenticator The client offers its identity and client certificate which is then forwarded by the switch to the RADIUS Server which uses an algorithm to authenticate the Network Camera and returns an acceptance or rejection back to the switch 3 The switch also forwards the RADIUS Server s certificate to the Network Camera 4 Assuming all certificates are validated the switch ...

Page 53: ...rver each time the camera is connected to the LAN Use fixed IP address Select this option to manually assign a static IP address to the Network Camera 1 You can use Installation Wizard on the software CD to easily set up the Network Camera on LAN Please refer to Software Installation on page 18 for details 2 Enter the Static IP Subnet mask Default router and Primary DNS provided by your ISP Subnet...

Page 54: ...rom a LAN To utilize of this feature make sure that your router supports UPnPTM and it is activated PPPoE Point to point over Ethernet Select this option to configure your Network Camera to make it accessible from anywhere as long as there is an Internet connection Note that to utilize this feature it requires an account provided by your ISP service provider Follow the steps below to acquire your ...

Page 55: ...s not support UPnP port forwarding Below are steps to enable the UPnPTM user interface on your computer Note that you must log on to the computer as a system administrator to install the UPnPTM components 1 Go to Start click Control Panel then click Add or Remove Programs 2 In the Add or Remove Programs dialog box click Add Remove Windows Components 3 In the Windows Components Wizard dialog box se...

Page 56: ...g UPnP port forwarding allows the Network Camera to open a secondary HTTP port on the router not HTTP port meaning that you have to add the secondary HTTP port number to the Network Camera s public address in order to access the Network Camera from the Internet For example when the HTTP port is set to 80 and the secondary HTTP port is set to 8080 refer to the list below for the Network Camera s IP...

Page 57: ...nabled by default the network camera will listen to router advertisements and be assigned with a link local IPv6 address accordingly IPv6 Information Click this button to obtain the IPv6 information as shown below If your IPv6 settings are successful the IPv6 address list will be listed in the pop up window The IPv6 address will be displayed as follows Link global IPv6 address network mask Link lo...

Page 58: ...e refer to HTTP streaming on page 60 for detailed information If you choose PPPoE as the Network Type the PPP0 address will be displayed in the IPv6 information column as shown below Manually setup the IP address Select this option to manually set up IPv6 settings if your network environment does not have DHCPv6 server and router advertisements enabled routers If you check this item the following ...

Page 59: ...ort number between 1025 and 65535 FTP port The FTP server allows the user to save recorded video clips You can use TOSHIBA Installation Wizard software to upgrade the firmware via FTP server By default the FTP port is set to 21 It also can be assigned to another port number between 1025 and 65535 ...

Page 60: ...80 and the secondary HTTP port is set to 8080 They can also be assigned to another port number between 1025 and 65535 If the ports are incorrectly assigned the following warning messages will be displayed To access the Network Camera on the LAN both the HTTP port and secondary HTTP port can be used to access the Network Camera For example when the HTTP port is set to 80 and the secondary HTTP port...

Page 61: ...61 RTSP Streaming To utilize RTSP streaming authentication make sure that you have set a password for the Network Camera first please refer to Security User account on page 42 for details ...

Page 62: ...le when the access name for stream 1 is set to live sdp 1 Launch an RTSP player 2 Choose File Open URL A URL dialog box will pop up 3 Type the above URL command in the address field 4 The live video will be displayed in your player RTSP port RTP port for video RTCP port for video RTSP Real Time Streaming Protocol controls the delivery of streaming media By default the port number is set to 554 The...

Page 63: ... from the multicast group address Therefore enabling multicast can effectively save Internet bandwith The ports can be changed to values between 1025 and 65535 The multicast RTP port must be an even number and the multicast RTCP port number is the multicast RTP port number plus one and thus is always odd When the multicast RTP port changes the multicast RTCP port will change accordingly If the mul...

Page 64: ...oS The network video devices used in the network must be QoS enabled QoS models CoS the VLAN 802 1p model IEEE802 1p defines a QoS model at OSI Layer 2 Data Link Layer which is called CoS Class of Service It adds a 3 bit value to the VLAN MAC header which indicates the frame priority level from 0 lowest to 7 highest The priority is set up on the network switches which then use different queuing di...

Page 65: ...different class IDs It gives an indication of how a given packet is to be forwarded known as the Per Hop Behavior PHB The PHB describes a particular service level in terms of bandwidth queueing theory and dropping discarding the packet decisions Routers at each network node classify packets according to their DSCP value and give them a particular forwarding treatment for example how much bandwidth...

Page 66: ...vice provider s web site to review the service charges and sign up for the service if you want to use DDNS ChangeIP com http www changeip com toshiba No IP com http www no ip com ext toshiba php Host Name If the User wants to use a DDNS service enter the camera name that is registered at the DDNS server User Name The User Name field is necessary for logging into the DDNS server or to notify the Us...

Page 67: ...ed device A network node on a managed network For example routers switches bridges hubs computer hosts printers IP telephones network cameras web server and database Before configuring SNMP settings on the this page please enable your NMS first SNMP Configuration Enable SNMPv1 SNMPv2c Select this option and enter the names of Read Write community and Read Only community according to your NMS setti...

Page 68: ...ewing window Video 17 08 56 2011 10 15 Video TCP V 2012 10 12 09 05 25 Title and Time Video Title Video orientation Flip vertically reflect the display of the live video Mirror horizontally reflect the display of the live video Select both options if the Network Camera is installed upside down ex on the ceiling to correct the image orientation Please note that the preset locations will be cleared ...

Page 69: ...Black and White display consistently Synchronize with digital input The Network Camera automatically switch to the Black White display when DI triggers Schedule mode The Network Camera switches between day mode and night mode based on a specified schedule Enter the start and end time for day mode Note that the time format is hh mm and is expressed in 24 hour clock time By default the start and end...

Page 70: ...mperature 1 Set the White balance to Auto 2 Place a sheet of white paper in front of the lens then allow the Network Camera to adjust the color temperature automatically 3 Check Fix current value to confirm the setting while the white balance is being measured Manual This item allows users to manually input the R gain B gain ratios Image Adjustment Brightness Adjust the image brightness level whic...

Page 71: ...round e g the entrance into a building You may select the Enable WDR enhanced checkbox and then adjust the sensitivity low high and the strength low medium high to reach the best image quality You can click Preview to fine tune the image or click Restore to recall the original settings without incorporating the changes When completed with the settings on this page click Save to enable the setting ...

Page 72: ...ituations such as day night schedule mode Measurement Window This function allows users to set measurement window s for low light compesation Full view Calculate the full range of view and offer appropriate light compesation Custom This option allows you to manually add customized windows as inclusive or exclusive regions A total of 10 windows can be set Please refer to the next page for detailed ...

Page 73: ...he pointers on the Exposure time and Gain control slide bars to specify a range of shutter time and Gain control values within which the camera can automatically tune to a better imaging result For example you may prefer a shorter shutter time to better capture moving objects while a faster shutter reduces light and needs to be compensated by electrical brightness gains You can click Preview to fi...

Page 74: ...dow 2 Use the mouse to size and drag drop the window which is recommended to be at least twice the size of the object height and width you want to cover 3 Enter a Window Name and click Save to enable the setting 4 Check Enable privacy mask to enable this function Up to 5 privacy mask windows can be configured on the same screen If you want to delete a configured mask window click on the X button a...

Page 75: ...e Region of Interest viewing region and the Output Frame Rate size of the live view window Stream 4 Global view stream This stream captures the full view of the video and users can also define the Output Frame Rate size of the live view window Click Viewing Window to open the viewing region settings page On this page you can set the Region of Interest and the Output Frame Size for streams 1 3 Plea...

Page 76: ...ideo stream Then you can go back to the home page to test the e PTZ function For more information about the e PTZ function please refer to page 79 Region of Interest Output frame size Stream 1 1280 X 800 176 x 144 Selectable 1280 X 800 176 x 144 Selectable Stream 2 1280 X 800 176 x 144 Selectable 1280 X 800 176 x 144 Selectable Stream 3 1280 X 800 176 x 144 Selectable 1280 X 800 176 x 144 Selectab...

Page 77: ...r frame size and lower bit rate for remote viewing on mobile phones and a larger video size and a higher bit rate for live viewing on web browsers Note that a larger frame size takes up more bandwidth Maximum frame rate This limits the maximum refresh frame rate per second Set the frame rate higher for smoother video quality If the power line frequency is set to 50Hz the frame rates are selectable...

Page 78: ...ariable bandwidth usage Because the media contents are a combination of JPEG images There are three parameters provided in MJPEG mode to control the video performance Frame size You can set up different video resolution for different viewing devices For example set a smaller frame size and lower bit rate for remote viewing on mobile phones and a larger video size and a higher bit rate for live vie...

Page 79: ...Select one of the stream 1 3 to set up the e PTZ control Please note that each stream can be set up with its own preset and patrol settings Refer to the following page for details about how to set up preset and patrol settings Auto pan patrol speed Select the speed from 1 5 slow fast to set up the Auto pan patrol speed control When completed with the settings of e PTZ click Save to enable the sett...

Page 80: ...dition to using the e PTZ control panel you can also use the mouse to drag or resize the floating frame to pan tilt zoom the viewing region The live view window will also move to the viewing region accordingly Moving Instantly If you check this item the live view window will switch to the new viewing region instantly after you move the floating frame Click on Image The e PTZ function also supports...

Page 81: ...t 3 Set the Dwelling time for the streaming view to stay at the preset location during auto patrol 4 If you want to delete a preset location from the Patrol locations list select it and click Remove 5 Select a location and click to rearrange the patrol order 6 Select patrol locations you want to save in the list and click Save to enable the patrol settings 7 To perform a pre configured patrol retu...

Page 82: ... server or e mail address as notifications Click on Help there is an illustration shown in the pop up window explaining that an event can be triggered by many sources such as motion detection or external digital input devices When an event is triggered you can specify what type of action that will be performed Event An event is an action initiated by a user defined trigger source In the Event colu...

Page 83: ... or external digital inputs There are several choices of trigger sources as shown on next page Select each item to display its related options Video motion detection This option makes use of the built in motion detection mechanism as a trigger source To enable this function you need to configure a Motion Detection Window first For more information please refer to Motion Detection on page 95 for de...

Page 84: ...vents before using this function 3 Action Define the actions to be performed by the Network Camera when a trigger is activated Trigger digital output for seconds Select this option to turn on the external digital output device when a trigger is activated Specify the length of the trigger interval in the text box Backup media if the network is disconnected Select this option to backup media file on...

Page 85: ...led configuration options You can configure either one or all of them Server type Email Select to send the media files via email when a trigger is activated Server name Enter a name for the server setting Sender email address Enter a valid email address as the sender address Recipient email address Enter a valid email address as the recipient address Server address Enter the domain name or IP addr...

Page 86: ... options click Add server Server type FTP Select to send the media files to an FTP server when a trigger is activated Server name Enter a name for the server setting Server address Enter the domain name or IP address of the FTP server Server port By default the FTP server port is set to 21 It can also be assigned to another port number between 1025 and 65535 User name Enter the login name of the F...

Page 87: ...server Click Save server to enable the settings then click Close to exit the Add server page Server type HTTP Select to send the media files to an HTTP server when a trigger is activated Server name Enter a name for the server setting URL Enter the URL of the HTTP server User name Enter the user name if necessary Password Enter the password if necessary To verify if the HTTP settings are correctly...

Page 88: ...on page 101 for details Click Save server to enable the settings then click Close to exit the Add server page SD Test Click to test your SD card The system will display a message indicating success or failure If you want to use your SD card for local storage please format it before use Please refer to page 104 for detailed information ...

Page 89: ... from streams 1 4 Send pre event images The Network Camera has a buffer area it temporarily holds data up to a certain limit Enter a number to decide how many images to capture before a trigger is activated Up to 7 images can be generated Send post event images Enter a number to decide how many images to capture after a trigger is activated Up to 7 images can be generated For example if both the S...

Page 90: ...wish to add more media options click Add media Media type Video clip Select to send video clips when a trigger is activated Media name Enter a name for the media setting Source Select the source of video clip Pre event recording The Network Camera has a buffer area it temporarily holds data up to a certain limit Enter a number to decide the duration of recording before a trigger is activated Up to...

Page 91: ...maximum file size allowed File name prefix Enter the text that will be appended to the front of the file name For example Click Save media to enable the settings then click Close to exit the Add media page Media type System log Select to send a system log when a trigger is activated Click Save media to enable the settings then click Close to exit the Add media page 1 sec 2 sec 3 sec 4 sec 5 sec 6 ...

Page 92: ...this item the system will generate folders automatically by date The following is an example of a file destination with video clips Click 20111015 to open the directory Video Clip_59 mp4 Video Clip_58 mp4 2011 10 15 2011 10 15 Click to delete selected items Click to delete all recorded data Click to go back to the previous level of the directory The format is HH 24r Click to open the file list for...

Page 93: ...ent setting When completed the settings with steps 1 3 to arrange Schedule Trigger and Action of an event click Save event to enable the settings and click Close to exit the page The following is an example of the Event setting page ...

Page 94: ...atus or click Delete to remove a previously configured event setting To remove a server setting from the list select a server name and click Delete Note that only when the server setting is not being applied to an event setting can it be deleted To remove a media setting from the list select a media name and click Delete Note that only when the media setting is not being applied to an event settin...

Page 95: ... pixels by moving the Sensitivity and Percentage slide bar 4 Click Save to enable the settings 5 Select Enable motion detection to enable this function For example The Percentage Indicator will rise or fall depending on the variation between sequential images When motions are detected by the Network Camera and are considered to have exceeded the defined threshold the red bar rises Meanwhile the mo...

Page 96: ...al of three motion detection windows can be configured on this page as well Please follow the steps beolw to set up a profile 1 Create a new motion detection window 2 Check Enable this profile 3 Enter a range of time during which the configuration will take effect 4 Click Save to enable the settings and click Close to exit the page This motion detection window will also be displayed on the Event s...

Page 97: ...nts while smaller sensitivity settings will neglect them When the sensitivity is set to 70 the Network Camera defines the pixels in the purple areas as alerted pixels frame D Percentage is a value that expresses the proportion of alerted pixels to all pixels in the motion detection window In this case 50 of pixels are identified as alerted pixels When the percentage is set to 30 the motions are ju...

Page 98: ...mper detection the camera is capable of detecting incidents such as redirection blocking or defocusing or even spray paint Please follow the steps below to set up the camera tamper detection function 1 Check Enable camera tampering detection 2 Enter the tamper trigger duration 10 sec 10 min The tamper alarm will be triggered only when the tampering factor the difference between current frame and p...

Page 99: ...rding name Enter a name for the recording setting Enable this recording Select this option to enable video recording With adaptive recording Select this option will activate the frame rate control according to alarm trigger The frame control means that when there is a triggered alarm event the frame rate will raise up to the value you ve set on the Stream setting page Please refer to page 75 for m...

Page 100: ... caching stream and select a caching stream on Video Stream settings Please refer to page 75 for detailed instruction To enable recording notification please configure Event settings first Please refer to page 82 Please follow steps 1 2 below to set up the recording 1 Trigger Select a trigger source Schedule The server will start to record files on the local storage or network attached storage NAS...

Page 101: ...erver setting window and follow the steps below to set up 1 Fill in the information for the access to the shared networked storage For example 2 Click Test to check the setting The result will be shown in the pop up window 1 2 4 Network storage path server name or IP address folder name User name and password for your server 3 1 2 3 4 TSB ABC ...

Page 102: ...orage space is full and the incoming streaming data is about to overwrite the previously saved videos File name prefix Enter the text that will be appended to the front of the file name Enable cyclic recording If you check this item when the maximum capacity is reached the oldest file will be overwritten by the latest one If you want to enable recording notification please click Event to set up Pl...

Page 103: ...click to select it and click Delete Video Name Click to open the Recording settings page to modify ON Status Click to manually adjust the Status ON start recording OFF stop recording NAS or SD Destination Click to open the file list of recordings as shown below For more information about folder naming rules please refer to page 92 for details ...

Page 104: ...en using for the first time SD card control Enable cyclic storage Check this item if you want to enable cyclic recording When recording uses up all capacity the oldest file will be overwritten by the latest file Enable automatic disk cleanup Check this item and enter the number of days you wish to retain a file For example if you enter 7 days the recorded files will be stored on the SD card for 7 ...

Page 105: ...l be listed in the Search Results cloumn File attributes Select one or more items as your search criteria Trigger time Manually enter the time range you want to search Click Search and the recorded data corresponding to the search criteria will be listed in Search Results window Search Results The following is an example of search results There are four columns Trigger time Media type Trigger type...

Page 106: ... save the file JPEGs to AVI This function only applies to JPEG format files such as snapshots You can select several snapshots from the list then click this button Those snapshots will be converted into an AVI file Lock Unlock Select the desired search results then click this button The selected items will become Locked which will not be deleted during cyclic recoroding You can click again to unlo...

Page 107: ...lue It may be too early but it isn t malfunction Recommended system requirements Windows XP Windows Vista Business Windows 7 Professional Internet Explorer Ver 8 0 CPU Intel CoreTM 2 Duo 2GHz and more Memory 1GB RAM and more Focus Due to the influence of temperature environmental changes the camera focus may require adjustment If this occurs readjust the focus referring QSG page 20 Restoring the f...

Page 108: ...0 fps at 1280 x 800 Maximum frame rate at MPEG 4 1 30 fps at 1280 x 800 Maximum frame rate at H 264 1 30 fps at 1280 x 800 Digital zoom Maximum 4 times I O terminal Input 1 Network interface 10Base T 100Base TX RJ45 connector IEEE 802 3af PoE compatible Protocols IPv4 IPv6 TCP IP HTTP HTTPS UPnP RTSP RTP RTCP IGMP SMTP FTP DHCP NTP DNS DDNS PPPoE CoS QoS SNMP and 802 1X OS Windows XP Windows Vista...

Page 109: ...al ones 1 Varies in accordance with the object image quality network environment and performance of the personal computer used 2 When the camera is installed and operated in low temperatures below 0 C 32 F normal images may not be obtained immediately after startup In such a case wait until the camera warms up taking more than 1 hour and start adjustment after turning on the power again 109 ...

Page 110: ...Φ 110 4 3 91 3 6 50 1 9 Dimensions mm inch 110 Appearance Diagram ...

Page 111: ...125 6424938 6058359 NOKIA CORPORATION US PAT 5946651 6199035 VOICEAGE CORPORATION AT PAT 0516621 BE PAT 0516621 CA PAT 2010830 CH PAT 0516621 DE PAT 0516621 DK PAT 0516621 ES PAT 0516621 FR PAT 0516621 GB PAT 0516621 GR PAT 0516621 IT PAT 0516621 LI PAT 0516621 LU PAT 0516621 NL PAT 0516621 SE PAT 0516621 US PAT 5444816 AT PAT 819303 AT E 198805T1 AU PAT 697256 BE PAT 819303 BR PAT 9604838 7 CA PA...

Page 112: ...two steps 1 copyright the software and 2 offer you this license which gives you legal permission to copy distribute and or modify the software Also for each author s protection and ours we want to make certain that everyone understands that there is no warranty for this free software If the software is modified by someone else and passed on we want its recipients to know that what they have is not...

Page 113: ...ive but does not normally print such an announcement your work based on the Program is not required to print an announcement These requirements apply to the modified work as a whole If identifiable sections of that work are not derived from the Program and can be reasonably considered independent and separate works in themselves then this License and its terms do not apply to those sections when y...

Page 114: ...rk based on the Program you indicate your acceptance of this License to do so and all its terms and conditions for copying distributing or modifying the Program or works based on it 6 Each time you redistribute the Program or any work based on the Program the recipient automatically receives a license from the original licensor to copy distribute or modify the Program subject to these terms and co...

Page 115: ...ibution conditions are different write to the author to ask for permission For software which is copyrighted by the Free Software Foundation write to the Free Software Foundation we sometimes make exceptions for this Our decision will be guided by the two goals of preserving the free status of all derivatives of our free software and of promoting the sharing and reuse of software generally NO WARR...

Page 116: ...ation Inc 51 Franklin Street Fifth Floor Boston MA 02110 1301 USA Also add information on how to contact you by electronic and paper mail If the program is interactive make it output a short notice like this when it starts in an interactive mode Gnomovision version 69 Copyright C year name of author Gnomovision comes with ABSOLUTELY NO WARRANTY for details type show w This is free software and you...

Page 117: ...he United States and other countries l Adobe and Reader are either registered trademarks or trademarks of Adobe Systems Incorporated in the United States and or other countries l Intel and Intel Core are trademarks or registered trademarks of Intel Corporation or its subsidiaries in the United States and other countries l ONVIF and are trademarks of ONVIF Inc l Other product names appearing in thi...

Page 118: ...TOSHIBA AMERICA INFORMATION SYSTEMS INC Surveillance IP Video Products 9740 Irvine Boulevard Irvine CA 92618 1697 Phone Number 877 855 1349 ...

Reviews: