background image

Quick Reference

Using the 2.4-inch display printer
model

Learning about the printer

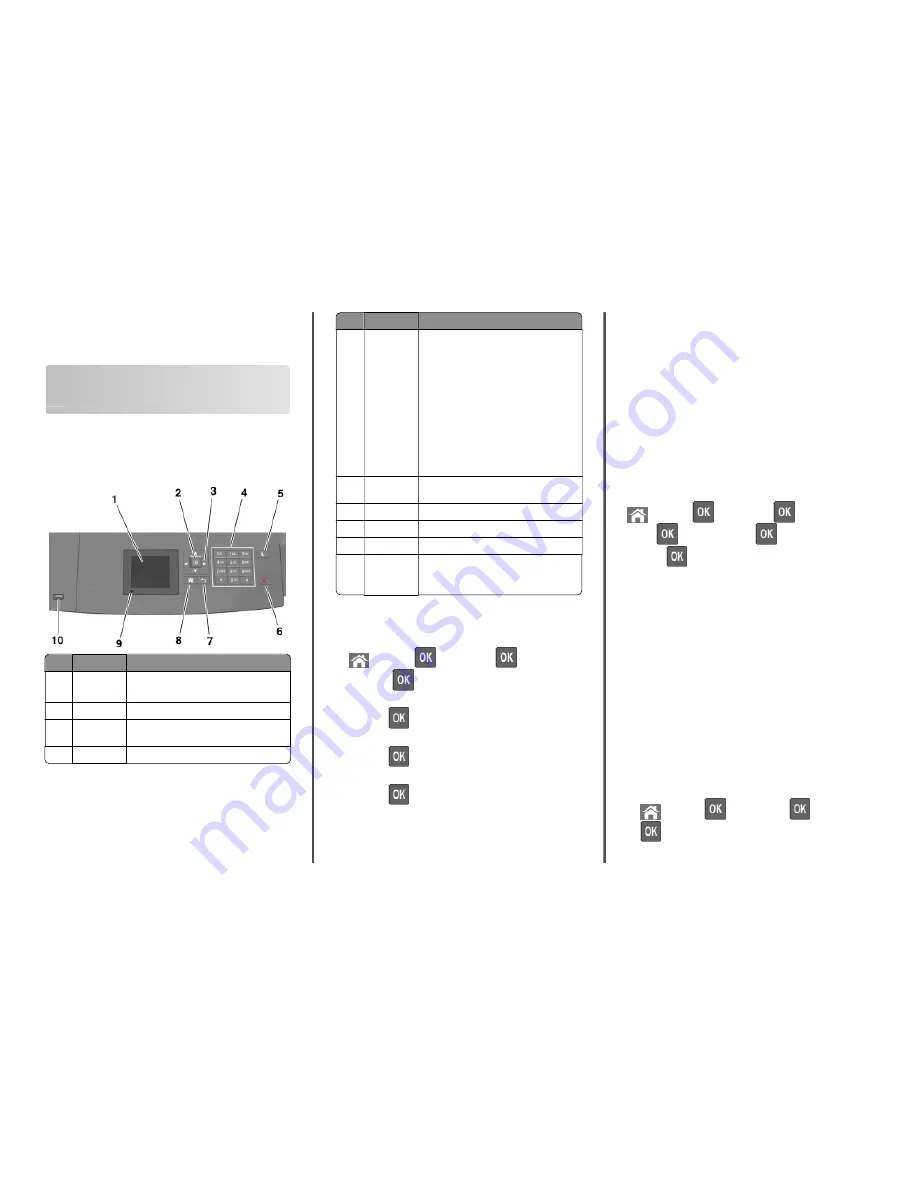
Using the printer control panel

Use the

To

1

Display

View the printer status.

Set up and operate the printer.

2

Select button

Submit changes made in the printer settings.

3

Arrow
buttons

Scroll up and down or left and right.

4

Keypad

Enter numbers, letters, or symbols.

Use the

To

5

Sleep button

Enable Sleep mode or Hibernate mode.

Do the following to wake the printer from Sleep
mode:

Press any hard button.

Pull out Tray 1 or load paper in the
multipurpose feeder.

Open a door or cover.

Send a print job from the computer.

Perform a power

on reset with the main

power switch.

Attach a device to the USB port on the
printer.

6

Stop or
Cancel button

Stop all printer activity.

7

Back button

Return to the previous screen.

8

Home button

Go to the home screen.

9

Indicator light Check the status of the printer.

10

USB port

Connect a flash drive to the printer.

Note: 

Only the front USB port supports flash

drives.

Setting the paper size and type

1

From the printer control panel, navigate to:

 > 

Settings

 > 

 > 

Paper Menu

 > 

 > 

Paper

Size/Type

 > 

2

Press the up or down arrow button to select the tray or feeder, and

then press 

.

3

Press the up or down arrow button to select the paper size, and

then press 

.

4

Press the up or down arrow button to select the paper type, and

then press 

 to change the settings.

Configuring Universal paper settings

The Universal paper size is a user

defined setting that lets you print on

paper sizes that are not preset in the printer menus.

Notes:

The smallest supported Universal size is
70 x 127 mm (2.76 x 5 inches) for one

sided printing and

105 x 148 mm (4.13 x 5.83 inches) for two

sided (duplex)

printing.

The largest supported Universal size is 216 x
356 mm (8.5 x 14 inches) for one

sided and two

sided printing.

When printing on paper less than 210 mm (8.3 inches) wide, the
printer may print at a reduced speed after a period of time to
ensure the best print performance.

From the printer control panel, navigate to:

 > 

Settings

 > 

 > 

Paper Menu

 > 

 > 

Universal

Setup

 > 

 > 

Units of Measure

 > 

 > select unit of

measure > 

Adjusting toner darkness

Using the Embedded Web Server

1

Open a Web browser, and then type the IP address of the printer
in the address field.

Notes:

View the printer IP address in the TCP/IP section in the
Network/Ports menu. The IP address appears as four sets of
numbers separated by periods, such as 123.123.123.123.

If you are using a proxy server, then temporarily disable it to
load the Web page correctly.

2

Click 

Settings

 > 

Print Settings

 > 

Quality Menu

 > 

Toner Darkness

.

3

Adjust the toner darkness, and then click 

Submit

.

Using the printer control panel

1

From the printer control panel, navigate to:

 > 

Settings

 > 

 > 

Print Settings

 > 

 > 

Quality Menu

 >

 > 

Toner Darkness


1

Summary of Contents for es525p

Page 1: ...ess the up or down arrow button to select the paper type and then press to change the settings Configuring Universal paper settings The Universal paper size is a user defined setting that lets you print on paper sizes that are not preset in the printer menus Notes The smallest supported Universal size is 70 x 127 mm 2 76 x 5 inches for one sided printing and 105 x 148 mm 4 13 x 5 83 inches for two...

Page 2: ...equires attention such as when a jam has occurred then the printer ignores the flash drive If you insert the flash drive while the printer is processing other print jobs then Busy appears After these print jobs are processed you may need to view the held jobs list to print documents from the flash drive Warning Potential Damage Do not touch the printer or the flash drive in the area shown while ac...

Page 3: ... Display View the printer status Set up and operate the printer 2 Home button Go to the home screen 3 Sleep button Enable Sleep mode or Hibernate mode Do the following to wake the printer from Sleep Mode Press any hard button Pull out Tray 1 or load paper in the multipurpose feeder Open a door or cover Send a print job from the computer Perform a power on reset with the main power switch Attach a ...

Page 4: ...e top left corner of the home screen You can use the IP address when accessing the Embedded Web Server to view and remotely configure printer settings Using the touch screen buttons Note Your home screen may vary depending on your home screen customization settings administrative setup and active embedded solutions Touch the To 1 Radio button Select or clear an item 2 Up arrow Scroll up 3 Down arr...

Page 5: ...purchased the printer Documents pdf xps Images dcx gif jpeg or jpg bmp pcx tiff or tif png fls Printing from a flash drive Notes Before printing an encrypted PDF file you will be prompted to type the file password from the printer control panel You cannot print files for which you do not have printing permissions 1 Insert a flash drive into the USB port Notes A flash drive icon appears on the prin...

Page 6: ...specified paper type Printing issues may occur if settings are not properly configured Using the 7 inch touch screen printer model Learning about the printer Using the printer control panel Use the To 1 Display View the status of the printer Set up and operate the printer 2 Home button Go to the home screen 3 Sleep button Enable Sleep mode or Hibernate mode Do the following to wake the printer fro...

Page 7: ...ddress Example 123 123 123 12 3 The IP address of your network printer is located at the top left corner of the home screen and appears as four sets of numbers separated by periods You can use the IP address when accessing the Embedded Web Server so you can view and remotely configure printer settings even when you are not physically near the printer Using the touch screen buttons Note Your home s...

Page 8: ...Select the width or height and then touch Submit Adjusting toner darkness 1 Open a Web browser and then type the printer IP address in the address field Notes View the printer IP address on the printer home screen The IP address appears as four sets of numbers separated by periods such as 123 123 123 123 If you are using a proxy server then temporarily disable it to load the Web page correctly 2 C...

Page 9: ...link trays make sure the paper size or type for the tray does not match that of the other tray 4 Click Submit Note You can also change the paper size and type settings using the printer control panel For more information see Setting the paper size and type on page 8 Warning Potential Damage Paper loaded in the tray should match the paper type name assigned in the printer The temperature of the fus...

Page 10: ...For help see the documentation that came with your operating system 1 Open a Web browser and then type the printer IP address in the address field Note View the printer IP address on the printer home screen The IP address appears as four sets of numbers separated by periods such as 123 123 123 123 2 Click Settings Apps Apps Management Forms and Favorites 3 Click Add and then customize the settings...

Page 11: ...e Choose File and then browse to the saved configuration file that was exported from a previously configured printer 2 Click Submit Printing Printing a document 1 Fromtheprintercontrolpanel set thepapertypeandsizetomatch the paper loaded 2 Send the print job For Windows users a With a document open click File Print b Click Properties Preferences Options or Setup c Adjust the settings if necessary ...

Page 12: ...e paper size indicators at the bottom of the tray to help position the guides 3 Unlock the length guide and then squeeze and slide the guide to the correct position for the size of the paper being loaded Notes Lock the length guide for all paper sizes Use the paper size indicators at the bottom of the tray to help position the guides 12 ...

Page 13: ...ith an optional staple finisher One sided printing One sided printing Two sided printing Two sided printing If you are loading prepunched paper for use with the staple finisher thenmakesuretheholesonthelongedgeofthepaper are on the right side of the tray One sided printing Two sided printing Note If the holes on the long edge of the paper are on the left side of the tray then a jam may occur Do no...

Page 14: ...t the paper guides to lightly touch the sides of the stack and then lock the length guide 7 Insert the tray 8 From the printer control panel set the paper size and paper type in the Paper menu to match the paper loaded in the tray Note Set the correct paper size and type to avoid paper jams and print quality problems Loading the 2100 sheet tray CAUTION POTENTIAL INJURY To reduce the risk of equipm...

Page 15: ...A5 until it clicks into place c Remove the A5 length guide from its holder d Insert the A5 length guide into its designated slot Note Press the A5 length guide until it clicks into place Loading A4 letter legal oficio and folio size paper a Pull up and slide the width guide to the correct position for the size of the paper being loaded 15 ...

Page 16: ... fan them Do not fold or crease the paper Straighten the edges on a level surface 4 Load the paper stack with the printable side facedown Note Make sure the paper is loaded properly There are different ways of loading letterhead depending on whether an optional staple finisher is installed or not Withoutanoptionalstaplefinisher With an optional staple finisher One sided printing One sided printing...

Page 17: ... tray can cause paper jams 5 Insert the tray Note Press the paper stack down while inserting the tray 6 From the printer control panel set the paper size and type in the Paper menu to match the paper loaded Note Set the correct paper size and type to avoid paper jams and print quality problems Loading the multipurpose feeder 1 Pull down the multipurpose feeder door Note Do not load or close the mu...

Page 18: ...Hold transparencies by the edges and then fan them Straighten the edges on a level surface Note Avoid touching the printable side of the transparencies Be careful not to scratch them Flex the stack of envelopes back and forth to loosen them and then fan them Straighten the edges on a level surface 5 Load the paper or specialty media Note Slide the stack gently into the multipurpose feeder until it...

Page 19: ...wn and on the left of the multipurpose feeder Warning Potential Damage Never use envelopes with stamps clasps snaps windows coated linings or self stick adhesives These envelopes may severely damage the printer Make sure the paper or specialty media is below the maximum paper fill indicator Warning Potential Damage Overfilling the feeder can cause paper jams 6 For custom or Universal size paper ad...

Page 20: ... imaging unit out of the printer 5 Place the imaging unit aside on a flat smooth surface Warning Potential Damage Do not expose the imaging unit to direct light for more than 10 minutes Extended exposure to light may cause print quality problems 6 Pull the jammed paper gently to the right and then remove it from the printer Note Make sure all paper fragments are removed Warning Potential Damage Th...

Page 21: ...surface to cool before touching 1 Pull down the rear door 2 Firmly grasp the jammed paper on each side and then gently pull it out Note Make sure all paper fragments are removed 3 Close the rear door 4 Do either of the following to clear the message and continue printing For touch screen printer models touch or Done For non touch screen printer models select Next Clear the jam press OK x page jam ...

Page 22: ...ve standard bin jam 203 1 Firmly grasp the jammed paper on each side and then gently pull it out Note Make sure all paper fragments are removed 2 Do either of the following to clear the message and continue printing For touch screen printer models touch or Done For non touch screen printer models select Next Clear the jam press OK x page jam remove tray 1 to clear duplex 235 239 1 Pull out the tra...

Page 23: ...2 Firmly grasp the jammed paper on each side and then gently pull it out Note Make sure all paper fragments are removed 3 Insert the tray 4 Do either of the following to clear the message and continue printing For touch screen printer models touch or Done For non touch screen printer models select Next Clear the jam press OK x page jam clear manual feeder 250 1 From the multipurpose feeder firmly ...

Page 24: ...ar the message and continue printing For touch screen printer models touch or Done For non touch screen printer models select Next Clear the jam press OK x page jam remove paper open stapler door Leave paper in bin 455 457 1 From the stapler bin firmly grasp the jammed paper on each side and then gently pull it out Note Make sure all paper fragments are removed 2 Open the stapler door 3 Pull down ...

Page 25: ... of the cartridge then shake the cartridge downward to bring the staples near the metal bracket 7 Push the cartridge holder firmly back into the stapler unit until the cartridge holder clicks into place 8 Close the stapler door 9 Do either of the following to clear the message and continue printing For touch screen printer models touch or Done For non touch screen printer models select Next Clear ...

Page 26: ...staple finisher door 4 Do either of the following to clear the message and continue printing For touch screen printer models touch or Done For non touch screen printer models select Next Clear the jam press OK x page jam remove paper open expander rear door Leave paper in bin 41y xx 1 Open the rear output expander door 2 Firmly grasp the jammed paper on each side and then gently pull it out Note M...

Page 27: ...ear door Leave paper in bin 43y xx 1 Open the rear mailbox door 2 Firmly grasp the jammed paper on each side and then gently pull it out Note Make sure all paper fragments are removed 3 Close the rear mailbox door 4 Ifthejamisinthemailboxbin thenfirmlygraspthejammedpaper and then gently pull it out Note Make sure all paper fragments are removed 5 Do either of the following to clear the message and...

Page 28: ... For non touch screen printer models select Next Clear the jam press OK 28 ...

Reviews: