Toshiba e-STUDIO 170F Operation Manual Download Page 232

230

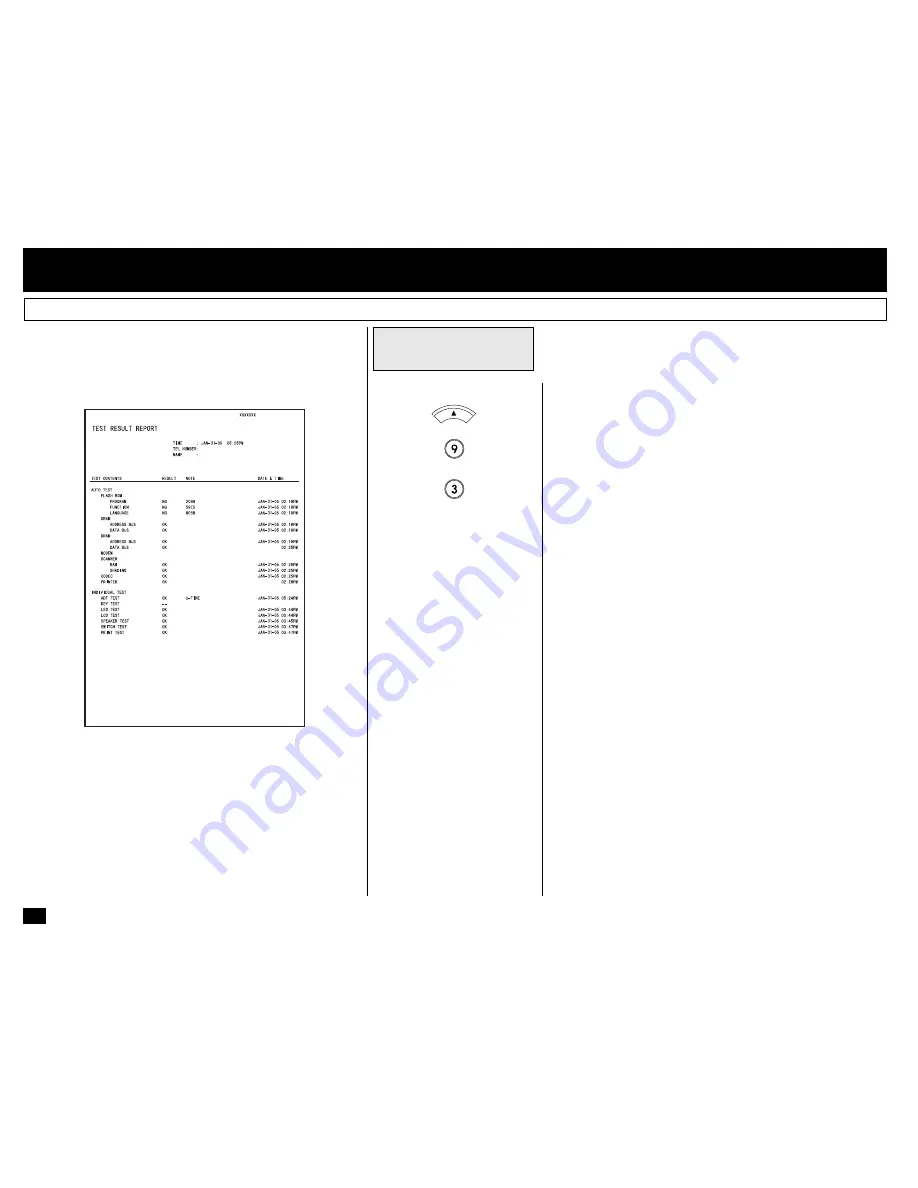
This test result list prints out the results of the individual tests as
a self test report.

PRINTING a TEST RESULT

Select the TEST
RESULT Menu

1

Press:

+

+

Print Sample

 - TEST RESULT

After completion of the list out-
put, the display returns to the
standby mode screen.

MENU

Summary of Contents for e-STUDIO 170F

Page 1: ......

Page 2: ...GY STARPartner ToshibahasdeterminedthatthisfacsimilemodelmeetstheENERGYSTARguidelinesforenergy efficiency ENERGYSTAR guidelines require that all ENERGYSTAR facsimiles maintain very low power consumption during idle state or have a Power Saver feature that will automatically stand down to an idle state afteraperiodofinactivity For more information on theENERGYSTAR Program please contact ENERGYSTARP...

Page 3: ...nnecting the cables of peripheral equipment 2 Before opening any covers or removing any parts from the copier discharge the static electricity from your body by touching a metal part of the copier This product is carrying the CE Mark in accordance with the related European Directives Responsible for CE marking is TOSHIBA TEC GERMANY IMAGING SYSTEMS GmbH Carl Schurz Str 7 41460 Neuss Germany E mail...

Page 4: ...ely confine the laser light emitted inside the facsimile The laser beam cannot escape from the machine during any phase of user operation Regulations implemented on August 2 1976 by the Bureau of Radiological Health BRH of the U S Food and Drug Administration apply to laser products manufac tured from August 1 1976 Laser products marketed in the United States must com ply with these regulations Ca...

Page 5: ...ent 29 Drum Unit Replacement 31 QUICK START 34 Terminal ID 34 Transmitting 34 Receiving 34 USER INTERFACE OPERATION 35 Menu Operation 35 Character Entry 36 INITIAL SETUP 38 Initial Setting Summary 38 Language Selection 39 Date and Time Setting 40 Terminal ID Setting 42 Dial Type Setting 44 DEVICE CONFIGURATION 45 Configuration Summary 45 RingerVolume Adjustment 46 AlarmToneVolume Adjustment 47 Key...

Page 6: ...8 MULTI ADDRESS TRANSMISSION BROADCASTING 108 Group BroadcastTransmission 108 Multi Key Quick Broadcast Transmission 109 RELAY TRANSMISSION 111 RelayTransmission Relay RelayTransmission Overview 111 RelayTransmission Originating Procedure 112 POLLING MAILBOX COMMUNICATIONS 114 Polling Mailbox Overview 114 Polling Reservation 114 Polling Reception 114 Open Mailbox ITU T Compatible 115 Simple Securi...

Page 7: ... Multi Polling Report Setting 183 Relay Originator Report Setting 184 Reception List Settings 185 LIST AND REPORT PRINT FORMAT AND PRINTING PROCEDURE 186 Transmission Reception Journal Communication Journal 186 Transmission Report 187 Memory Transmission Report 188 Reservation List 189 Multi AddressTransmission Report 190 Multi Polling Report 191 Relay Send Originator Report 192 Mailbox Reception ...

Page 8: ...RINTTEST 228 TONER IC TEST 229 TEST RESULT 230 PRINTING a TEST RESULT 230 REMOTE SERVICE 231 AUTOMATIC SUPPLIES ORDER 231 Automatic Supplies Order Setting 231 SPECIFICATIONS 232 SUPPLIES 233 HARDWARE OPTIONS 233 INDEX 235 ...

Page 9: ... remote units with one operation sequence Locations may be selected using the autodialer or in frequently dialed locations that have not been preregistered Multi Memory Access Operation Allows up to 4 operations such as transmission or reception printing scanning and programming to be performed at the same time Super Energy Saver Mode Reduces power consumption to approx 2W by turning all unnecessa...

Page 10: ... modify the facsimile unit This may result in electric shock hazard or machine malfunction Keep fire sources away from the facsimile unit This may create a fire hazard Keep paper clips and staples away from the unit If metal objects fall in the unit they may damage the machine Avoid opening the unit while it is scanning or printing The operation will stop and it may cause a malfunction and or dama...

Page 11: ...o the document scanner area for periodical cleaning or clearing jammed originals Grasp the center of the Control Panel and pull forward to open See page 210 Document Guides Adjust the guides to the edges of the document to help ensure proper document alignment and smooth feeding See page 82 Operation Panel Used to perform programming and operation of the facsimile machine See page 12 INTRODUCTION ...

Page 12: ...d from wall or PSTN system See page 17 External Telephone Connector Connection for an External Telephone set See page 17 AC Inlet USB Interface This interface is used for connection to personal computers for Scanning Printing and programming various settings from PC ...

Page 13: ...11 When the Optional Recording Paper Tray is Installed With the Optional Recording Paper Tray Installed Lower Recording Paper Tray Optional Upper Recording Paper Tray ...

Page 14: ...y machine status and configuration information for operator viewing and interaction 6 INSERT Key This key is used to insert characters in CHARACTER ENTRY mode see page 36 7 DELETE Key This key is used to delete characters in CHARACTER ENTRY mode see page 36 8 MULTI CHARGE CODE Key Performs Multi address Transmissions Broadcast or a Multi polling receptions see page 109 This key also used to input ...

Page 15: ...d FINE U FINE HALFTONE Lamps Select the desired resolution for transmission or copying When Standard mode is selected none of the MODE lamps will be illuminated see page 83 18 JOB CANCEL Key Used to cancel a job reserved or being performed see page 106 19 Dial Keypad Use these 12 keys just like a telephone keypad to dial telephone facsimile num bers see page 35 The dial keys are also used to enter...

Page 16: ...or your current transmission job CHAIN DIAL Used to dial a remote party using Chain Dialing see page 141 JOURNAL Used to print communication journals see page 178 AUTO Used to select the reception mode auto receive Fax Tad Tel Fax or manual Function Keys Frequently used functions are pre assigned to five keys on the right side of One Touch key panel DIRECT SEND TX REPORT CHAIN DIAL JOURNAL AUTO ...

Page 17: ...g contact your dealer im mediately Packing List 1 Facsimile 1 2 Document Support 1 3 Recording Paper Exit Tray 1 4 Document Exit Tray 1 5 Recording Paper Tray with Bypass Tray 1 6 Toner Cartridge 1 7 Drum Unit 1 Make Sure All Items are Enclosed 2 Unpack the Carton 1 8 AC Power Cord 1 9 Phone Line Cord Modular Cord 1 10 Quick Reference Guide 1 11 Warranty Card 1 12 Quick Start Guide 1 13 Overlay 2 ...

Page 18: ...ear and sides of the unit need to be clear to allow proper air flow to the unit s power supply WARNING After a suitable place has been selected for the installation of the e STUDIO please do not change it Avoid excessive heat dust vibration and direct sunlight Also provide proper ventilation as the copier emits a small amount of ozone The socket outlet should be installed near the equipment and be...

Page 19: ... has been disconnected at the network interface Use caution when installing or modifying the telephone lines Avoid using a telephone other than a cordless type during an electric storm There may be a remote risk of electric shock from lightning Do not use the telephone to report a gas leak in the vicinity of the leak FACSIMILE MACHINE INSTALLATION Connect the telephone line cord modular cord to th...

Page 20: ...Cover too strongly when opening it Open the Front Cover Fit the tabs of the Recording Paper Exit Tray onto the posts on the back side of the unit Do not place heavy objects on the Recording Paper Exit Tray or apply strong force Recording Paper ExitTray Recording Paper Exit Tray Installation Document Exit Tray Fit the tabs of the Document Exit Tray into the slots on the front side of the unit Do no...

Page 21: ...pass Tray or apply strong force Place the hooks of the Record ing Paper Tray into the guides on the front side of the unit and press into position Do not place heavy objects on the Recording Paper Tray or apply strong force Recording Paper Tray Installation Bypass Tray Installation Recording PaperTray ...

Page 22: ...me uneven and voiding may occur Replace the paper should this condition exist Do not add paper on top of the paper already in the machine If you wish to add paper first remove the existing paper Then stack the existing paper with the new paper before inserting into the machine INITIAL PRINTING SUPPLIES INSTALLATION Open the Paper Guides 2 Remove the Bypass Tray 1 Recording Paper Installation Recor...

Page 23: ...e Press MENU The menu below displays Display the Paper Size Menu 7 Recording Paper Installation Recording Paper Tray continued NOTE If you install legal size pa per but fail to select 3 LG at this point the machine will think letter size paper is installed False Paper Jam failures will occur when the legal size paper is fed into the printer Adjust the Paper Guides 5 Replace the Bypass Tray 6 Selec...

Page 24: ...22 Return to the Standby Mode 9 Press STOP to return to the Standby Mode Recording Paper Installation Recording Paper Tray continued ...

Page 25: ...It will cause a paper jam Adjust the Paper Guides 3 Insert the Recording Paper 2 Adjust the Paper Guides so that both sides of the paper are secure NOTE The single sheet of paper in the Bypass Tray will be fed in stead of the paper in the Recording Paper Tray If the machine is equipped with the optional Lower Paper Tray the single sheet in the Bypass Tray will feed only when the Upper Paper Tray i...

Page 26: ...e two types of the Optional Recording Paper Tray one for A4 size paper and another for letter size paper Use the Tray meet ing your paper size Prepare Recording Paper Sheets 4 Press the Paper Pressure Plate down until it clicks Place the recording paper stack into the tray NOTES Do not exceed the upper stack limit line as this may cause paper misfeeds Make sure that the paper is seated under the t...

Page 27: ...Press MENU The menu below displays Display the Paper Size Menu 8 Select the paper size of the Recording Paper Tray To select letter size press To select A4 size press To select legal size press Displayed for 2 seconds Returns to display the SETUP menu screen Select the Paper Size of the Recording Paper Tray 9 Select the paper size of the Optional Recording Paper Tray To select the letter size pres...

Page 28: ...26 Return to the Standby Mode 11 Press STOP to return to the Standby Mode Recording Paper Installation Optional Recording Paper Tray continued ...

Page 29: ...rence Attach the Toner Cartridge to the Drum Unit 4 IMPORTANT When you use a toner cartridge of our recommendation the facsimile machine can detect whether or not the cartridge is inserted in the machine and alert the user when the amount of toner is low or needs replac ing As the facsimile machine does not start printing when the toner is not inserted or when the amount of toner is insuffi cient ...

Page 30: ...curely Close the Front Cover 6 Install the Process Unit along the Guide in the machine Make sure the Process Unit is inserted inside the machine as far as it will go NOTE Pressing in the Process Unit forcibly could damage the machine CAUTION Hold the Process Unit by the green handle Install the Process Unit 5 ...

Page 31: ...machine may not be able to detect whether the toner cartridge has been inserted or if the toner amount is sufficient and printing is not pos sible using the default setting If you want to use a toner cartridge other than that of our recom mendation please inform our service center The service center will change the machine setting to cancel the detection function Please note however that when the ...

Page 32: ...e Toner by shaking the new Toner Cartridge back and forth NOTE Avoid touching the toner to your clothing since toner cannot be removed easily If the toner sticks to your clothing immediately rinse out the toner with cold wa ter Prepare a New Toner Cartridge 4 NOTE Do not touch the Develop ment Roller of the Toner Cartridge The image quality could be degraded NOTE Match the colored parts in the low...

Page 33: ...part of this facsimile Handle it with care as shown below Keep the Drum Unit within a temperature range of 0 35 C 32 95 F and a humidity range of 20 80 RH without condensation Do not store or use the Drum Unit in an environment where the temperature changes ex cessively Do not touch the light sensi tive drum because its sur face will be easily damaged Do not place the light sensi tive drum in a lo...

Page 34: ...ress up the Front Cover until it clicks to attach securely Close the Front Cover 6 Perform the following procedure to reset the Drum Unit counter after you replace the Drum Unit Press MENU Reset the Drum Counter 7 Drum Unit Replacement continued NOTE Keep in mind that the drum warning does not disappear unless this operation is per formed Install the Toner Cartridge and New Drum Unit 5 Press Press...

Page 35: ...33 Drum Unit Replacement continued Return to the Standby Mode 9 Press STOP to return to the Standby Mode ...

Page 36: ... select Enter your facsimile s tele phone number press Displayed for 2 seconds Press STOP Terminal ID Setting the Terminal ID Page 42 1 Your TOSHIBA facsimile has been preset from the factory to receive facsimile messages No special setup is required to receive facsimile messages Load your document face down into the Document Support Dial the remote facsimile using the Dial Keypad located on the O...

Page 37: ...selections Key Press this key to scroll down the menu selections Key Press this key to display the preceding menu screen or to move the cursor to the left Key Press this key to display the sub menu screen or to move the cursor to the right ENTER Key or START Key When the displayed item has sub items pressing this key operates the same as the Key When the displayed item is the end item press this k...

Page 38: ...ed for your convenience above each key By pressing the Numeric Key multiple times you can scroll through all characters assigned to a particular key see table below Entry Procedure An example to enter NEW YORK Press twice to display N Note that M was dis played on the first press followed by N on the second NOTE If the next character is located on the same key as the preceding character press the ...

Page 39: ...the character by pressing DELETE Press to save your change Inserting Characters Using position the cursor under the point of insertion and press INSERT The message I is displayed on the right end of the second row Enter the desired character s O in this example The character s will be inserted without deleting other characters in the line Press to save your change NAME 20 MAX NEW YOPK NAME 20 MAX ...

Page 40: ...initial setting 1 LANGUAGE Page 39 Selects ENGLISH FRANCAIS DEUTSCH ITALIANO NEDERLANDS SVENSKA SUOMI NORSK DANSK ESPANOL or PORTUGUES display and printing 2 DATE TIME Page 40 Sets the Month Day Year Time for your machine You may se lect to use the 24 hour or the 12 hour format for the time 3 TERMINAL ID FCC MANDATORY Page 42 Sets the Terminal ID Company Name Fac simile Number for your machine 4 D...

Page 41: ...esired language for ENGLISH for FRANCAIS for DEUTSCH for ITALIANO for NEDERLANDS for SVENSKA for SUOMI for NORSK for DANSK for ESPANOL Display Display the LANGUAGE Menu 1 Returns to display the Standby menu screen Using or MENU and press or for PORTUGUES Select the Desired Language 2 02 FRANCAIS 03 DEUTSCH 04 ITALIANO 05 NEDERLANDS 06 SVENSKA 07 SUOMI 08 NORSK 09 DANSK 10 ESPANOL 11 PORTUGUES INIT...

Page 42: ...nter the date When the correct date is en tered press Select the date format for dis play and print for Month Day Year 4 digit for Day Month Year 4 digit for Year 4 digit Month Day Enter the Date Data 2 Select the Date Format 3 Display Select the month format for NUMERIC such as 01 02 03 for NAME such as JAN FEB MAR Select the Month Format 4 Using or MENU and press or INITIAL SETUP 2 DATE TIME INI...

Page 43: ...to the Standby Mode Select Another SETUP Item or 7 Select the time format for 24 hour format Select the Time Format 5 Move the cursor to the desired position using the following keys or Enter the time Change the AM PM designa tion by pressing the following keys For 12 hour format MENU or When the correct time is en tered press Enter the Time Data 6 Returns to display the SETUP menu screen for 12 h...

Page 44: ...tional Code If you send or receive docu ments to and from overseas press If all of your documents are sent domestically press The is displayed when Inter national Code is selected If you selected YES in Step 3 enter the International Code for your country region before entering your area code and telephone number Example United States 1 Then enter the telephone number that has been con nected to t...

Page 45: ...ing you may con tinue to select other settings referring to their associated pages for instructions or press STOP to exit the Configuration Set ting mode and return to the Standby Mode Select Another SETUP Item or 5 Terminal ID Setting continued ...

Page 46: ...he correct Access Digit is displayed press Display After completing this Configu ration Setting you may con tinue to select other settings referring to their associated pages for instructions or press STOP to exit the Configuration Set ting mode and return to the Standby Mode Display the DIAL TYPE Menu 1 Select Your Dial Type 2 Enter the Access Digits 3 Select Another SETUP Item or 4 Access digits...

Page 47: ...ccount Code entry 05 LINE MONITOR Page 57 Enables or Disables a Line Monitor function 06 RECEIVE INTERVAL Page 58 Sets an interval for the machine to wait 0 14 min after making four consecutive dialings 07 ECM Page 59 Enables or Disables an ECM function 08 SORT COPY Page 60 Enables or Disables a Sort Copy function 09 REDIAL MODE Page 61 Sets the number of redials 0 14 5 and redial interval 1min 15...

Page 48: ...or press STOP to exit the Configuration Setting mode and return to the Standby Mode Enter the desired volume value 1 to 8 1 for maximum 7 for minimum 8 for off or Select the desired volume value using the following keys MENU or When the desired value is dis played press Displayed for 2 seconds Ringer Volume Adjustment Display the RINGER VOLUME Menu 1 Enter the Desired Volume Value 2 Select Another...

Page 49: ...or press STOP to exit the Configuration Setting mode and return to the Standby Mode Enter the desired volume value 1 to 8 1 for maximum 7 for minimum 8 for off or Select the desired volume value using the following keys MENU or When the desired value is dis played press Displayed for 2 seconds Alarm Tone Volume Adjustment Display the ALARM VOLUME Menu 1 Enter the Desired Volume Value 2 Select Anot...

Page 50: ...ss STOP to exit the Configuration Setting mode and return to the Standby Mode Enter the desired volume value 1 to 8 1 for maximum 7 for minimum 8 for off or Select the desired volume value using the following keys MENU or When the desired value is dis played press Displayed for 2 seconds Key Touch Tone Volume Adjustment Display the KEY TOUCH VOLUME Menu 1 Enter the Desired Volume Value 2 Select An...

Page 51: ...or press STOP to exit the Configuration Setting mode and return to the Standby Mode Enter the desired volume value 1 to 8 1 for maximum 7 for minimum 8 for off or Select the desired volume value using the following keys MENU or When the desired value is dis played press Displayed for 2 seconds Monitor Volume Adjustment Returns to display the SETUP menu screen Display the MONITOR VOLUME Menu 1 Ente...

Page 52: ...machine Switching to the Super En ergy Saver Mode is not available in the following cases Select the desired Super En ergy Saver Option to select Automatic mode Press MENU Power Saver Operation Go to Step 4 to select Manual mode In manual mode you can acti vate Super Energy Saver using a key on the Operation Panel Go to Step 7 to select OFF Go to Step 7 NOTE If you select OFF pressing the SUPER EN...

Page 53: ...played as shown at the bot tom in Step 6 Returns to SET UP menu screen Select the Printer Power Saver Function 5 Move the cursor to the desired position using the following keys or Enter the time period Change the AM PM designa tion if selected by pressing the following keys or MENU When the correct time period is displayed press Displayed for 2 seconds Enter the Start Time and End Time 6 Example ...

Page 54: ...e used to gain an access to basic ma chine functions and operations These Department Codes can be used to print Journals which only show the activity under that code Enable or Disable the Depart ment Code function for YES Enable for NO Disable If YES is selected the follow ing Master Code Name Entry screen is displayed Department Code NBR 01 is fixed as the Master Depart ment Code Enter the Master...

Page 55: ...heir associated pages for instructions or press STOP to exit the Configuration Setting mode and return to the Standby Mode Department Codes NBR 02 through 50 are used as Indi vidual Department Codes En ter the Individual Department Code name using the Dial key pad See page 36 if you need help selecting characters When the name is correctly displayed on the LCD display press Enter a 5 digit Departm...

Page 56: ... delete the previously dis played Department Code and return to the Department Code Address Entry menu in Step 4 of Department Code Setting See page 53 To change the previously dis played Department Code and return to Step 5 of Department Code Setting See page 53 To retain the previously dis played Department Code with out modification and return to the Department Code Address Entry menu in Step 4...

Page 57: ... Configu ration Setting you may con tinue to select other settings referring to their associated pages for instructions or press STOP to exit the Configuration Set ting mode and return to the Standby Mode Select Another SETUP Item or 5 Department Code Maintenance continued ...

Page 58: ...n a facsimile is transmit ted the account code number will be recorded on the Trans mission Journal Press MENU After completing this Configu ration Setting you may con tinue to select other settings referring to their associated pages for instructions or press STOP to exit the Configuration Set ting mode and return to the Standby Mode Displayed for 2 seconds Returns to display the SETUP menu scree...

Page 59: ...tor speaker press To turn OFF the monitor speaker press Select the Line Monitor Option 2 After completing this Configu ration Setting you may con tinue to select other settings referring to their associated pages for instructions or press STOP to exit the Configuration Set ting mode and return to the Standby Mode Select Another SETUP Item or 3 Displayed for 2 seconds Returns to display the SETUP m...

Page 60: ...ges for instructions or press STOP to exit the Configuration Set ting mode and return to the Standby Mode Select Another SETUP Item or 3 This function insures there will be a period of time set aside for receiving incoming facsimi les during periods of heavy out going transmission activity Af ter every fourth consecutive transmission this machine will wait 0 to 14 minutes to allow incoming facsimi...

Page 61: ...ged if a document is stored in memory Re sidual memory must be 100 Press MENU Display the SET ECM Menu 1 ECM Default Setting Select the desired ECM option To turn ECM to ON press To turn ECM to OFF press Select the ECM Option 2 After completing this Configu ration Setting you may con tinue to select other settings referring to their associated pages for instructions or press STOP to exit the Confi...

Page 62: ...n because the entire document must be scanned into memory first then printing can occur NOTES Sorting is the responsibil ity of the operator Memory requirements are limited to one page at a time Select the desired option To set SORT COPY to ON press To set SORT COPY to OFF press Select the Desired Option 2 After completing this Configu ration Setting you may con tinue to select other settings refe...

Page 63: ...n terval is 1 minute You may change the interval from 1 to 15 minutes Redial Counter The Redial Counter sets the number of redial attempts The default setting is 5 You may change the number of redials from 0 to 14 attempts Setting Redial Interval and Counter Display the REDIAL MODE Menu 1 Enter the Redial Interval 2 Enter the Redial Counter 3 After completing this Configu ration Setting you may co...

Page 64: ...the following will be dis played for 2 seconds continue to Step 6 Select the Desired Reception Mode 2 TEL FAX This mode is used when the line is used for both facsimile and telephone functions The facsimile automatically de termines whether an incoming call is for facsimile or tele phone When the call is for telephone the ringer will ring according to the value set for the call time When the call ...

Page 65: ...tem or 6 Enter the desired Fax Monitor Time 00 to 99 seconds Dur ing this period the facsimile will monitor for the automatic fax CNG signal If detected the unit will switch to fax re ception when set for FAX TAD mode When the desired Fax monitor time is displayed on the LCD press Enter the FAX Monitor Time 4 Displayed for 2 seconds Returns to display the SETUP menu screen Go to Step 6 Enter the d...

Page 66: ...t that is less than 10 mm longer than the effective printable area will be discarded Contact your authorized TOSHIBA service representa tive for additional information To set Copy Reduction to AUTO press To set Copy Reduction to OFF press Copy Reduction Setting Display the COPY REDUCTION Menu 1 Select the Copy Reduction 2 Displayed for 2 seconds Returns to display the SETUP menu screen After compl...

Page 67: ... of information stored in each location Up to 128 digits can be programmed into a One Touch or Abbreviated number Press MENU To select ABB NUMBERS press Enter an Abbreviated Dial Num ber from 1 to 999 Make sure the 3 digit number 001 to 999 appears correctly then press NOTE Any leading zero 0 can be omitted from the Abbrevi ated Dial Number If the ABB Dial Number you entered has not been previ ous...

Page 68: ...iated Dial Numbers registered in this facsimile DELETE Deletes the information stored in the selected Ab breviated Dial Number It will also remove the number from all associated Group Dialing Directories MODIFY Allows you to change the remote facsimile number and or associated Location ID name This selection is recommended if the location is used in Group Dialing Di rectories RETAIN Retains the se...

Page 69: ...low you to specify one or more of the fol lowing Communication Options for the Abbreviated Dial Num ber you are registering Delayed Communication Default off Select to program a trans mission start time Transmission Report Default off Enables or disables the printing of a TX Report Line Monitor Default off Enables or disables the line monitor speaker during dial ing Fax Speed Default off Selects a...

Page 70: ...s Ab breviated Dial Number press Line Monitor Speaker 9e To request a Transmission Re port automatically after sending documents using this Abbrevi ated Dial Number select TransmissionReport 9d To enable a TX Report press To disable a TX Report press To enable the monitor speaker press To disable the monitor speaker press Enter the desired transmission start time in either the 12 hour or 24 hour f...

Page 71: ...dress the communica tion will result in an error If you designate an unnecessary sub address the communication will result in error Select Communication Options continued 9 Fax Speed 9f If the remote party assigned to the Abbreviated Dial Number requires or provides a Sub Ad dress to route or retrieve mes sages press To complete Sub Address en try or skip this option press The display returns to t...

Page 72: ...Key press the desired One Touch Key Example One Touch Key 01 If the desired One Touch Key has been previously linked to another Abbreviated Dial Num ber or preset with a separate One Touch number one of the following screens will be dis played Assignthe One Touch Key 10a After 2 seconds Returns to Step 2 Press STOP to exit the Menu Operation mode and return to the Standby Mode 10 Assign the Abbrev...

Page 73: ...f Polling Recep tion Relay Transmission and Mailbox Transmission the documents are not au tomatically transferred to the Alternate Numbers If the pressed One Touch key has already been registered with a telephone number the following information appears on the LCD display Display the TEL LIST ENTRY Menu 1 Display the ONE TOUCH KEYS Menu 2 Select a One Touch Location 3 When a Preset One Touch is Ac...

Page 74: ...acsimile number and or associated Location ID name This selection is recommended if the location is used in Group Dialing Di rectories RETAIN Retains the selected One Touch key information with out modification Delete the One Touch Assignment 5a Retain the One Touch Assignment 5c Change One Touch Information 5 To change the number or Loca tion ID remote facsimile name currently assigned to an exis...

Page 75: ...en ap pears Follow the next steps for each item selection This setting will allow you to specify one or more of the fol lowing Communication Options for the One Touch Number you are registering Delayed Communication Default off Select to program a trans mission start time Transmission Report Default off Enables or disables the printing of a TX Report Line Monitor Default off Enables or disables th...

Page 76: ...s One Touch Dial Number press Line Monitor Speaker 9e To request a Transmission Re port automatically after sending documents using this One Touch Dial Number select TransmissionReport 9d To enable a TX Report press To disable a TX Report press To enable the monitor speaker press To disable the monitor speaker press Enter the desired transmission start time in either the 12 hour or 24 hour format ...

Page 77: ...IMPORTANT If you designate an incorrect sub address the communica tion will result in an error If you designate an unnecessary sub address the communication will result in error Select Communication Options continued 9 Fax Speed 9f If the remote party assigned to the One Touch Dial Number requires or provides a Sub Ad dress to route or retrieve mes sages press To complete Sub Address en try or ski...

Page 78: ...ct a PWD Sub Address Communication Enter the required number max 20 digits then press Returns to Step 9g 1 Enter the required number max 20 digits then press Returns to Step 9g 1 Enter the required number max 20 digits then press Returns to Step 9g 1 SUB 20MAX SEP 20MAX PWD 20MAX After completing this Configura tion Setting you may continue to select other settings refer ring to their associated p...

Page 79: ... can contain any combination of the 150 Abbre viated and or 38 One Touch dial locations and can be as signed to a One Touch key Press MENU Enter a Group Number 1 to 1999 Example 1 To select GROUP NUM BERS press Group Number Registration Display the TEL LIST ENTRY Menu 1 Display the GROUP NUMBERSMenu 2 Enter a Group Number 3 If the number entered is al ready registered as a Group Number you will re...

Page 80: ...y press Group Number Registration continued Enter the Group Name 5 Retain the Existing Group 4c Cancel the Existing Group 4a Modify the Existing Group 4b Enter a Remote Station 6 Enter the addresses of the re mote stations to be preset in the group If a remote station is assigned to a One Touch key press the One Touch key If a remote station is assigned to an Abbreviated Dial Num ber enter the num...

Page 81: ... the existing remote station from this group press to DELETE To retain this remote station in this group press to RETAIN When all the stations neces sary for this group are entered in Step 6 press Cancel the Group NumberSetting 7a Retain the Group NumberSetting 7b Complete Group Station Entries 8 Assign a One Touch Key 9 To assign this group to a One Touch key press the desired One Touch key Examp...

Page 82: ...stration continued Assign a One Touch Key continued 9 Return to Step 3 Press STOP to complete the Group Setting operation and return to the Standby Mode To select 1 DELETE to de lete the existing link or preset data of this One Touch key press Returns to Step 9 To RETAIN press Returns to Step 9 Displayed for 2 seconds COMPLETED ALREADY ASSIGNED 1 DELETE ONE TOUCH NBR 2 RETAIN ...

Page 83: ...simile dealer or use a transparency with a paper backing attached at the lead edge Document Specifications NOTES Operator assistance may be required for pages longer than 356 mm 14 02 inches For multiple sheets the documents must be the same size and paper type A small border region of each document is not imaged when each document is scanned The effective scanning area is as shown in the figure b...

Page 84: ...ent one page at a time manually fed When the document sheet is longer the Document Support assist it with your hand to in sure proper feeding Up to 30 sheets Letter size can be loaded and sent at a time Stagger the leading edges of the sheets slightly and insert them into the document feeder After the facsimile pulls the document into the scan posi tion slightly and stops you may change the resolu...

Page 85: ...r very detailed photos or documents with colors or shading Press MODE until the required resolution mode is indicated by the appropriate LED When Ultra Fine is selected the e STUDIO170F will scan all documents at 406 dots inch horizontal x 391 lines inch vertical Depending on the capabilities of the remote facsimile receiving this document the document may be transmitted by the e STUDIO170F at Ult...

Page 86: ...andard originals DARKER To darken light originals i e for documents with light or faint print LIGHTER To lighten the dark originals i e for documents with dark print or shaded areas Contrast Setting Press CONTRAST until the required contrast level is indicated by the appropriate LED CONTRAST DARKER LIGHTER Darker level Normal level when all the lamps are extinguished Lighter level Each correspondi...

Page 87: ...trast Select the Resolution 2 Display the DOCUMENT MODE Menu 1 Select the default contrast level by pressing one of the following keys Select NORMAL for normal documents by pressing Select DARKER to darken light originals i e for documents with light or faint print by pressing Select LIGHTER to lighten dark originals i e for docu ments with dark print by pressing Select the Contrast 3 After comple...

Page 88: ...tomatically sorted Requires enough memory for the entire multi page document If there is not enough memory memory overflow the copying procedure will be canceled Collation is slower than non col lation because the entire docu ment must be scanned into memory first then printing can occur NOTES Sorting is the responsibility of the operator Memory requirements are limited to one page at a time NOTE ...

Page 89: ... To select Paper Tray press Go to Step 8 To select Bypass Tray press To select Optional Paper Tray if installed press Copying Procedure Load the Document 1 Press the COPY Key 2 Display the SORT COPY Menu 3 Select the SORT COPY Option 4 Select the Paper Tray 5 If installed Optional Paper Tray If you select 2 BYPASS the following screen is displayed Go to Step 6 NOTE To start copying immedi ately ke...

Page 90: ... Bypass Tray 6 Select the Thick Paper Option 7 Select the paper size of the Bypass Tray To select the A4 size press To select the Letter size press To select the Legal size press Select the thick paper mode To enable the thick paper mode press To disable the thick paper mode press NOTE When the Recording Paper runs out during copying and the copying stops supply the Recording Paper to re start the...

Page 91: ...One Touch key The resolution and contrast settings may be changed if necessary see pages 83 and 84 Select the desired One Touch key from 01 to 38 see page 71 for programming To select the One Touch key 20 to 38 press before pressing the desired One Touch key Example One Touch key 01 One Touch key 20 The One Touch key number and the name of the party ap pear on the LCD display for about 2 seconds Y...

Page 92: ... to 999 assigned to the desired party NOTES When an incorrect num ber is entered use to delete preceding dig its or press STOP once to start over from the be ginning Any leading zero 0 can be omitted from the Ab breviated Dial Number Example of Abbreviated Dial Number 10 Abbreviated Dialing Press the SPEED DIAL Key 1 Enter the Abbreviated Number 2 Press the START Key Tray 3 Displayed for 2 seconds...

Page 93: ...ne Touch key or Abbrevi ated Dial Number and the name of the party appear on the LCD display for about 2 seconds Your facsimile will automati cally start scanning the docu ment into memory if enabled While scanning the facsimile dials connects and starts transmission Alphabet Dialing Press the SPEED DIAL Key 1 Press the START Key 3 Display the Name of the Desired Remote Party 2 Use the following k...

Page 94: ... party NOTE When an incorrect number is entered use to delete preceding digits or press STOP once to start over from the beginning Example with 012345678 en tered When the correct number is displayed press START Your facsimile will automati cally start scanning the docu ment into memory if enabled While scanning the facsimile will dials connects and starts transmission Enter the Facsimile Number 1...

Page 95: ...ach transmission or polling recep tion job for internal control of reserved communications This File Number is very useful should it become necessary to cancel a memory operation It is also useful when tracking communication activities using the transmission and reception journals see page 186 File Number Display Example TRANSMITTING Memory Transmission RESIDUAL MEMORY The amount of memory remaini...

Page 96: ...ed while a number is entered by Keypad Dialing The facsimile starts scanning and storing the document into memory A File Number is assigned Residual Memory will decrease as the document is scanned Press STOP to cancel the transmission operation When the document scanning is complete the facsimile re turns to the Standby Mode Load the Document 1 Dial the Facsimile Number 2 Start Scanning 3 Return t...

Page 97: ... to visually confirm the actual transmission of the document to the remote party The documents will remain in the ADF and be transmitted one by one All transmissions will be sent via Direct Transmission if the Memory Transmission function is set default off See page 142 Direct Transmission Load the Document 1 Dial the Facsimile Number 2 Start Dialing 3 Direct Transmission as a Default Setting Line...

Page 98: ... below is displayed When the communication is complete BUSY lamp turns off and the facsimile returns to the Standby Mode Complete the Transmission 6 Direct Transmission continued Direct Transmission as a Default Setting continued TRANSMIT P001 81 559 761234 JAN 31 09 43 AM 100 AUTO RECEIVE ...

Page 99: ...o small to store the docu ment data Select the desired function key on the operation panel Press DIRECT SEND Select 1 YES by pressing Dial the facsimile number of the remote party using any of the four dialing methods One Touch Key Dialing See page 89 Abbreviated Dialing See page 90 Alphabet Dialing See page 91 Keypad Dialing See page 92 Direct Transmission continued Load the Document 1 Select YES...

Page 100: ...ee page 90 Alphabet Dialing See page 91 Keypad Dialing See page 92 NOTE If an incorrect number is dialed press STOP and follow the instruction dis played on the LCD display to start the operation over Example of screen displayed while a number is entered us ing Keypad Dialing When you hear the answering tone press START Upon hearing the facsimile tone press START When the transmission is com plete...

Page 101: ...dis played the Dial Keypad on the facsimile does not ac cept any key entry When you hear the answering tone press START on the facsimile If the remote party answers the phone you can inform the remote party that you wish to send a document Upon hearing the facsimile tone press START Then replace the handset of the External Telephone When the transmission is com pleted the facsimile returns to the ...

Page 102: ...rvals of the set length see page 61 If the line is not connected af ter the set number of redialing attempts the facsimile will record a LINE BUSY Confirm the facsimile number of the remote party and repeat the transmission procedure When you hear the answering tone press START If the remote party answers the phone pick up the handset Inform the remote party that you wish to send a document Upon h...

Page 103: ...ocate the screen of the de sired job using the following scroll keys MENU for the previous screen for the next screen Press REDIAL PAUSE When the desired job is dis played press The facsimile starts to dial the number for a transmission Press the REDIAL Key 1 Start Redialing 3 Manual Redialing Jobs in Memory Select the Job to be Redialed 2 If there are no jobs to be redialed the screen below is di...

Page 104: ...lly made for Facsimile Reception mode 2 Caller Attempting a Phone Call After the TAD Answering Message and the TAD Beep Tone the TAD will record the message from the caller 3 Caller in Manual Facsimile Transmission Mode may first leave a voice message if within the FAX Monitor Time When the caller starts a facsimile transmission during the Answering Message or after the TAD Beep Tone switching is ...

Page 105: ...ou can talk with the caller then press START to start receiving a document When the Pseudo Ringer period ends because no one answers the facsimile is automatically switched to Facsimile Re ception mode In this mode the remote party can manually send a document as well 3 Caller Attempting a Phone Call You can talk with the caller if you pick up the handset of the external telephone during the Pseud...

Page 106: ...per If you desire to receive large originals without reduction or excessive paper usage set the DISCARD function to ON If the lower part of the original exceeds the recording paper by 13 mm or less the image will be automatically discarded This predetermined dimension is a ser vice function setting Contact your Toshiba dealer for setup If the RX REDUCTION function is OFF the larger original will b...

Page 107: ...b being processed can be monitored via the LCD You can cancel the job if neces sary NOTES When no communication job is being processed only the number of re served jobs is displayed as below While the screen above is dis played pressing JOB STATUS will dis play the Pending Job for 10 seconds Press the JOB STATUS Key 1 A Communication Journal or Transmission Journal and Re ception Journal separatel...

Page 108: ...IT 2 RECEIVE 3 POLLING 4 POLLING RESERVE 5 JOB NUMBER In the Standby Mode press JOB CANCEL CANCELLING A COMMUNICATION JOB Cancelling a Direct Transmission Cancelling a Job Reservation A Document is Being Transmitted 1 Press the STOP Key 2 Select the Desired Option 3 Display the JOB CANCEL Menu 1 NOTE The types of jobs displayed within the Job Cancel screen will vary depending upon the actual job t...

Page 109: ...tatus of the de sired job by using MENU and or Go to Step 5 When the desired job screen is displayed press A screen like the one below is displayed Select the Job Type 2 Enter JOB NUMBER 3 Cancel Other Jobs 4 Press the ENTER to Cancel the Job 5 Cancelling a Job Reservation continued To confirm deletion press Go to Step 5 To not cancel the selection press return to Standby Mode 2 NO CANCEL 1 YES Pr...

Page 110: ... Number 0001 press Leading zeros if any may be omitted NOTES When an incorrect num ber is entered use to delete the preceding digits or press STOP once to start over from the beginning Any leading zero 0 can be omitted from the Ab breviated Dial Number When the correct Group Num ber is displayed press START ADVANCED FUNCTIONS MULTI ADDRESS TRANSMISSION BROADCASTING Group Broadcast Transmission Loa...

Page 111: ...lphabet Dialing See page 91 Keypad Dialing See page 92 A screen like the one below is displayed Load the document face down in the Document Support see page 82 Adjust the resolution and con trast if desired see pages 83 and 84 Press MULTI CHARGE CODE Multi Key Quick Broadcast Transmission Load the Document 1 Press the MULTI Key 2 NOTE If you select the same entry twice you are prompted to delete o...

Page 112: ...b To cancel the existing number press to CANCEL Cancel the Existing Number 4a Then press To retain the existing number press to RETAIN Retain the Existing Number 4b Press START Press the START Key 5 Return to Step 3 Return to Step 3 Select the CANCEL or RETAIN Facsimile Number 4 Standby Mode screen When document scanning is completed 2 RETAIN ALREADY ASSIGNED 1 CANCEL ABB NBR 154 ARE YOU SURE ABB ...

Page 113: ... Hub Station must be an ITU T relay communication compatible facsimile unit with Hub Station functions such as DP120F DP125F NOTE The e STUDIO170F can only function as an originator station 3 The Relay Hub Station must have the end station settings pre programmed as a Relay Box 4 Due to advanced planning and setup requirements for the Relay Relay trans missions involving two or more Hub Station tr...

Page 114: ... sending documents Load the document face down in the Document Support see page 82 Adjust the resolution and con trast if desired see pages 83 and 84 Press Relay Transmission Originating Procedure Load the Document 1 Select the RELAY REQUEST 3 Display the MAILBOX Menu 2 Enter the Box Number max 20 digits Then press Enter the Box Number 4 JAN 31 09 43 AM 100 AUTO RECEIVE 04 SETUP DELETE 03 RELAY RE...

Page 115: ... Keypad Dialing See page 92 The facsimile starts scanning the document into memory The following screen is dis played for about 2 seconds be fore returning to the Standby Mode Enter the Password 6 Dial the Remote Hub Unit 7 Complete the Procedure 8 If the relay station is a pass word is programmed press Go to Step 6 If the relay station is not a password is programmed press Go to Step 7 Select the...

Page 116: ...lable when communicating with other TOSHIBA facsimiles See page 116 Multi Mailbox Documents can be reserved for multiple polling operations us ing the facsimile s memory so that any facsimile with polling capabilities can remotely retrieve the document See page 119 Polling Reception is the ability to call up another facsimile and re motely retrieve a document stored within the remote facsimile The...

Page 117: ...to prevent unauthorized re trieval of documents This password is used only when retrieving documents and not used during document reservation Bulletin Board Box Bulletin Board box allows multiple document retrievals from the mailbox If a new document is stored using the same Box number where another document is already present it replaces the existing one It is possible to setup a password require...

Page 118: ...th facsimiles made by other manufacturers This TTI must be properly pro grammed into the remote fac simile for this procedure to function NOTES Only one Simple Polling reservation can be set at one time Simple Polling reserva tion is not available if a document is reserved in the Multi Mailbox Load the document face down in the Document Support see page 82 Adjust the resolution and con trast if de...

Page 119: ... digit of the en tered code is displayed as an asterisk Then press Go to Step 7 NOTE You must provide this 4 digit number to the remote party in advance or they will not be able to retrieve this document If no code or an incorrect code is used a polling error will occur Enter the number of the polling remote facsimile using the Dial Keypad max 20 digits Then press Go to Step 7 NOTE This number mus...

Page 120: ...played You may select one of the fol lowing three options 1 DELETE Select this option to replace the previous reservation 2 ADD Select this option to add this document to the exist ing reservation 3 RETAIN Select this option to retain the existing reservation Complete the Procedure continued 7 3 RETAIN 2 ADD ALREADY ASSIGNED 1 DELETE ...

Page 121: ...NOTES Only one Multi Mailbox polling reservation can be set at one time When a Simple Polling reservation is reserved Multi Mailbox reservation is not available Even in the Direct Trans mission mode a docu ment is scanned and stored in the memory Press MENU Multi Mailbox Polling Reservation Load the Document 1 Select 2 MULTI POLL BOX by pressing Select MULTI POLL BOX 4 Select 02 POLLING RESERVE by...

Page 122: ...d the fol lowing screen is displayed You may select one of the fol lowing three options 1 DELETE Select this option to replace the previous reservation 2 ADD Select this option to add this document to the exist ing reservation 3 RETAIN Select this option to retain the existing reservation Multi Mailbox Polling Reservation continued SCANNING DOC P001 FILE NBR 140 3 RETAIN 2 ADD ALREADY ASSIGNED 1 D...

Page 123: ...One Touch Key Dialing See page 89 Abbreviated Dialing See page 90 Alphabet Dialing See page 91 Keypad Dialing See page 92 Press Select the security code op tion If the remote facsimile is a TOSHIBA facsimile and a 4 digit security code is pro grammed to the document to be polled select 1 YES by pressing Go to Step 5 If the remote facsimile is not a TOSHIBA facsimile or a Secu rity Code is not in u...

Page 124: ...ve the document When the operation is complete the following screen is displayed for about 2 seconds and your documents will be printed Enter the Security Code 5 Complete the Procedure 6 When the 4 digit security code is entered press Go to Step 6 Simple Secure Polling continued SECURITY CODE OPERATION COMPLETED FILE NBR 167 ...

Page 125: ...ialing methods One Touch Key Dialing See page 89 Abbreviated Dialing See page 90 Alphabet Dialing See page 91 Keypad Dialing See page 92 Group Dialing See page 108 After each entry the selected facsimile is displayed for 2 seconds Press MULTI CHARGE CODE Multi Address Polling Display the POLLING Menu 1 Select POLLING 2 Press the MULTI Key 3 Enter the Number of Remote Facsimiles 4 Repeat this proce...

Page 126: ...he Security Code Option 5 Enter the Security Code 6 Complete the Procedure 7 If all of the remote facsimiles are TOSHIBA facsimiles and the same 4 digit security code is programmed for all of the documents to be polled select 1 YES by pressing Go to Step 6 If all or some the remote fac similes are not a TOSHIBA facsimile or no Security Codes are being used select 2 NO by pressing Go to Step 7 When...

Page 127: ... from a Confidential mailbox The party retrieving the contents of this mailbox must use the correct password Bulletin Board Box Bulletin Board box allows multiple document retrievals from the mailbox It is pos sible to add a password re quirement for document res ervation so that only users with the correct password can reserve documents The password is not re quired to retrieve docu ments from th...

Page 128: ...Bulletin Board Box in Step 4 as signing a password will re quire a password to be en tered before any documents can be reserved into the Bulletin Board Box Enter the password max 20 digits Setting Up a Mailbox continued Enter the Box Number 5 Select the Password Option 6 Enter the Password 7 Then press After completing this Configu ration Setting you may con tinue to select other settings referrin...

Page 129: ...ts of the Mailbox you want to delete Then press If the entered Box number does not have a password pro grammed go to Step 6 If the entered Box number has a password programmed the screen below is displayed Go to Step 5 Deleting a Mailbox Select SETUP DELETE 2 Select MAILBOX DELETE 3 Enter the Box Number 4 Display the MAILBOX Menu 1 Press MENU Select 04 SETUP DELETE by pressing 04 SETUP DELETE 03 R...

Page 130: ... other settings referring to their associated pages for instructions or press STOP to exit the Configuration Set ting mode and return to the Standby Mode Select Another SETUP Item or 6 Displayed for 2 seconds Return to Step 2 NOTE Make sure that the correct password is entered Other wise the machine will in form you that the password is incorrect PASSWORD DELETED ...

Page 131: ...the resolution and con trast if desired see pages 83 and 84 Select the desired type of Mail box To send the document to a Confidential Box press Sending a Document to a Mailbox Remote Hub Load the Document 1 To reserve the document to a Bulletin Board Box press Display the MAILBOX Menu 2 Press MENU Select the Mailbox Type 3 JAN 31 09 43 AM 100 AUTO RECEIVE 04 SETUP DELETE 03 RELAY REQUEST 02 BULLE...

Page 132: ...een is dis played for about 2 seconds be fore returning to the Standby Mode Enter the Box Number 5 Enter the Password for Reservation 6 Dial the Remote Hub Unit 7 Complete the Procedure 8 Sending a Document to a Mailbox Remote Hub continued Select 2 SEND TO MAIL BOX by pressing Select SEND TO MAILBOX 4 If you are sending to a Bulletin Board go to Step 6 NOTE If a document is not set the following ...

Page 133: ...sired see pages 83 and 84 Select the desired type of Mail box To reserve the document to a Confidential Box press Reserving a Document to a Mailbox Local Hub Load the Document 1 To reserve the document to a Bulletin Board Box press Display the MAILBOX Menu 2 Press MENU Select the Mailbox Type 3 JAN 31 09 43 AM 100 AUTO RECEIVE 04 SETUP DELETE 03 RELAY REQUEST 02 BULLETIN BOARD ITU MAILBOX 01 CONFI...

Page 134: ...yed for about 2 seconds be fore returning to the Standby Mode Enter the Box Number 5 Enter the Password for Reservation 6 Complete the Procedure 7 Reserving a Document to a Mailbox Local Hub continued Then press Select 4 STORE TO MAIL BOX by pressing Select STORE TO MAILBOX 4 NOTE If a document is not set the following screen will be dis played The menu will return to the Standby Mode in about 60 ...

Page 135: ...cument in a Confidential Box press To retrieve a document in a Bulletin Board Box press Select the Mailbox Type 2 Select 3 POLL FROM MAIL BOX by pressing Select POLL FROM MAILBOX 3 04 SETUP DELETE 03 RELAY REQUEST 02 BULLETIN BOARD ITU MAILBOX 01 CONFIDENTIAL 5 DELETE CONTENTS 4 STORE TO MAILBOX 3 POLL FROM MAILBOX 2 SEND TO MAILBOX CONFIDENTIAL 1 PRINT MAILBOX 5 DELETE CONTENTS 4 STORE TO MAILBOX...

Page 136: ... Mode Enter the Password 5 Dial the Remote Hub Unit 6 Complete the Procedure 7 Retrieving a Document from a Mailbox Remote Hub continued Enter the Box Number max 20 digits Then press If you are retrieving from a Confidential Box go to Step 5 Enter the Box Number 4 If you are retrieving from a Bul letin Board Box go to Step 6 Then press NOTE If a document is not set the following screen will be dis...

Page 137: ...BOX Menu 1 Press MENU Select the desired type of Mail box To print the contents of a Con fidential Box press To print the contents of a Bul letin Board Box press Select the Mailbox Type 2 04 SETUP DELETE 03 RELAY REQUEST 02 BULLETIN BOARD ITU MAILBOX 01 CONFIDENTIAL 5 DELETE CONTENTS 4 STORE TO MAILBOX 3 POLL FROM MAILBOX 2 SEND TO MAILBOX CONFIDENTIAL 1 PRINT MAILBOX 5 DELETE CONTENTS 4 STORE TO ...

Page 138: ... a Document from a Mailbox Local Hub continued Enter the Password 5 Complete the Procedure 6 Enter the Box Number max 20 digits Then press If you are printing from a Confi dential Box go to Step 5 Enter the Box Number 4 If you are printing from a Bulle tin Board Box go to Step 6 NOTE If there is no document in the mailbox the following is displayed for about 2 sec onds PASSWORD NO ENTRY JAN 31 09 ...

Page 139: ...isplay the MAILBOX Menu 1 Press MENU Select the desired type of Mail box To delete the contents of a Confidential Box press To delete the contents of a Bulletin Board Box press Select the Mailbox Type 2 04 SETUP DELETE 03 RELAY REQUEST 02 BULLETIN BOARD ITU MAILBOX 01 CONFIDENTIAL 5 DELETE CONTENTS 4 STORE TO MAILBOX 3 POLL FROM MAILBOX 2 SEND TO MAILBOX CONFIDENTIAL 1 PRINT MAILBOX 5 DELETE CONTE...

Page 140: ...ued Enter the Password 5 Complete the Procedure 6 Then press Enter the Box Number max 20 digits Then press If you are cancelling the con tents of a Box with a password assigned go to Step 5 If you are cancelling the con tents of a Box with no pass word assigned go to Step 6 NOTE If the specified data in the mailbox are in the commu nication process they can not be cancelled Enter the Box Number 4 ...

Page 141: ... tion Panel function printing a list accessing a Mailbox etc If the password does not match verify your password and re enter ADVANCED TRANSMISSION FUNCTIONS Department Code Access DEPT CODE Standby Menu 1 Enter the Department Code 2 Complete the Procedure 3 Then press NOTE If you do not have a valid Department Code Password you cannot access this fac simile Contact the key operator or supervisor ...

Page 142: ...ter the 4 digit Account Code The facsimile starts scanning the document into memory When the document scanning is complete the display returns to the Standby Mode Load the document face down in the Document Support see page 82 Adjust the resolution and con trast if desired see pages 83 and 84 Enter the number of the remote facsimile using any of the fol lowing dialing methods One Touch Key Dialing...

Page 143: ...ialing Alphabet Dialing One Touch Dialing and Keypad Di aling and pauses in a Chained dial sequence by us ing the Chain Dial Key If your operation requires paus ing for voice prompts you will need to insert pause signals between dial strings To determine the correct amount of time for your paus es you should perform the op eration using MONITOR first This way you will know how many 3 second pauses...

Page 144: ...rect Docu ment Transmission tray mode is active by default This allows your facsimile to function with out the use of document memo ry Press Select the desired transmis sion mode To set Memory Transmission to ON press Display the MEMORY TX Menu 1 Select the Transmission Mode 2 Default Setting for Memory Transmission After completing this Configu ration Setting you may con tinue to select other set...

Page 145: ...o set Security Transmission to ON press Press Default Setting for Security Transmission Display the SECURITY TX Menu 1 Select the Desired Option 2 Displayed for 2 seconds Returns to display the SETUP menu screen After completing this Configu ration Setting you may con tinue to select other settings referring to their associated pages for instructions or press Select Another SETUP Item or 3 MENU To...

Page 146: ...ET Menu 1 Enable Disable the Cover Sheet 2 Include an Image on the Cover Sheet 3 Load the Image Document 4 Cover Sheet Registration Image Area Go to Step 4 To omit an image on the cover sheet press LOAD DOCUMENT PRESS START MENU When OFF is selected the COMPLETED message will be displayed The facsimile re turns to the Standby Mode for OFF Disable When ON is selected the fol lowing screen is displa...

Page 147: ...n ON Recovery Trans mission press Enter the stored time length 01 to 24 in unit of hours Select the Recovery Transmit Option 2 Enter the STORED TIME 3 Display the RECOVERY TRANSMIT Menu 1 Setting Recovery Transmission STORE TIME 1 24 8 COMPLETED MENU Go to Step 3 To turn OFF Recovery Trans mission press When OFF is selected the COMPLETED message will be displayed The facsimile re turns to the Stan...

Page 148: ...ument jobs You can select the following options for your TTI information Inside The document is sent to the receiver with the TTI included in the document data Accordingly if any characters exist near the top edge of the sending data they may be overlapped with the TTI Outside The document is sent to the receiver with the TTI to be printed outside the sending data Accordingly if any characters exi...

Page 149: ...s Select the TTI Print Option 2 TTI Transmit Terminal ID Print continued MENU To select OUTSIDE press To select OFF press The display shows the screen below to indicate that the menu selection is completed To return to the Standy Mode press STOP 3 OFF 2 OUTSIDE TTI 1 INSIDE COMPLETED ...

Page 150: ...ress Go to Step 3 To disable Send After Scan press Displayed for 2 seconds Returns to display the SETUP menu screen COMPLETED After completing this Configu ration Setting you may con tinue to select other settings referring to their associated pages for instructions or press Select Another SETUP Item or 4 MENU Select the desired Send After Scan Option To enable Send After Scan press Go to Step 4 T...

Page 151: ...ct the Document Length Option 2 After completing this Configura tion Setting you may continue to select other settings referring to their associated pages for instructions or press Select Another SETUP Item or 3 Display the DOCUMENT LENGTH Menu 1 Document Length Setting Displayed for 2 seconds Returns to display the SETUP menu screen COMPLETED MENU To select ANY LENGTH press to exit the Configurat...

Page 152: ...aling Load the document face down in the Document Support see page 83 Adjust the resolution and con trast if desired see pages 84 and 85 Press the CHARGE CODE key to initiate the PIN number se quence A will be displayed on the LCD display Enter the number of the re mote facsimile Enter the PIN number PIN Mask Load the Document 1 Enter the Facsimile Number 2 Press the CHARGE CODE Key 3 Enter the PI...

Page 153: ...elect a security code for the first time or to change an existing security code press If the security code already ex ists and you wish to change the current code go to Step 3 When you enter a security code for the first time go to Step 4 If a new code needs to be en tered Before you change the security code you must enter the exist ing code to gain access Enter the current security code Secure Re...

Page 154: ...fter completing this Configura tion Setting you may continue to select other settings referring to their associated pages for instructions or press Select Another SETUP Item or 5 to exit the Configuration Set ting mode and return to the Standby Mode STOP ...

Page 155: ... to ON Press To set the activity period for Secure RX press NOTE If a security code is not set the e STUDIO170F auto matically prompts the secu rity code setting See the preceding section for details on setting the security code Enter the current security code Select the SECURE RX Option 2 Enter the Security Code 3 Display the SECURE RX Menu 1 Secure RX Activation Period Setting SECURITY CODE Acti...

Page 156: ... end time of the desired period is displayed correctly press Enter the Start and End Time 6 COMPLETED START STOP TIME 10 00PM 09 00AM If you select 1 ALL DAY for every day of the week you will go to Step 7 To specify a time period for Secure Rx operation on this day press Repeat this step until you se lect ALL DAY or FIXED TIME for each day of the week up to Sunday If you selected 2 FIXED TIME for...

Page 157: ...ult setting is ON When OFF is selected no receptions will be possible should the paper supply be exhausted or a paper jam oc curs Note that Memory Reception will not occur when the re sidual memory is zero When the residual memory be comes zero during a Memory Reception document recep tion will stop and no further receptions are possible until memory becomes available Memory Reception Setting COMP...

Page 158: ...e Configuration Set ting mode and return to the Standby Mode STOP NOTES The default setting is ON If the size of the received document exceeds the pre determined dimensions 1 When RX Reduction is ON The document will be reduced and recorded if it is within the predeter mined reduction ratio If the portion of the docu ment to be discarded is within the predetermined dimensions it will be discarded ...

Page 159: ... completing this Configu ration Setting you may con tinue to select other settings referring to their associated pages for instructions or press Select Another SETUP Item or 3 NOTES The default setting is ON When the portion of the received document to be discarded exceeds the predetermined dimensions Even if Reception Discard is ON the document will be divided and recorded onto two or more sheets...

Page 160: ...ayed for 2 seconds Returns to display the SETUP menu screen COMPLETED After completing this Configu ration Setting you may con tinue to select other settings referring to their associated pages for instructions or press Select Another SETUP Item or 3 NOTES The default setting is OFF If the dimension of the memory is 256KB or less the setting of Reverse Or der Printing is invalid MENU To set REVERS...

Page 161: ...ram the numbers of the facsimiles in your communication sys tem into your e STUDIO170F s Abbreviat ed Number or One Touch Dial Key database In addi tion the remote facsimile must have the correct tele phone number programmed as its terminal identifica tion To turn ON Privileged Recep tion press Display the PRIVILEGED RX Menu 1 Select the Privileged Reception Option 2 Privileged Reception COMPLETED...

Page 162: ...eceiving Station ID will only be provided if it is programmed in this facsimile s Terminal ID Display the RTI Menu 1 Select the RTI Print option To print press Select the RTI Print Option 2 RTI Remote Terminal ID Print MENU To not print press Displayed for 2 seconds Returns to display the SETUP menu screen The press STOP to return to the Standby Mode RECEIVED 01 31 2005 10 00 FROM 81425887449 TO T...

Page 163: ... memory is output Press To temporarily de activate Se cure RX press Secure RX Temporary Stop Display the SECURE RX Menu 1 ENTER SECURITY CODE SECURE RX 1 TEMPORARY STOP Select TEMPORARY STOP 2 ENTER the Security Code 3 COMPLETED Then press ENTER SECURITY CODE NOTE If Secure RX Activation is set to OFF an error will re sult in the operation above The message SETTING IS OFF will be displayed for 2 s...

Page 164: ...smis sion by pressing Load the document face down in the Document Support see page 83 Adjust the resolution and con trast if desired see pages 84 and 85 Enter the number of the remote facsimile using any of the fol lowing dialing methods or you may designate another option at this point One Touch Key Dialing See page 89 Abbreviated Dialing See page 90 Alphabet Dialing See page 91 Keypad Dialing Se...

Page 165: ...ce dure this procedure is not applicable and the fac simile will warn you with an error message NOT ALLOWED NOW You can change the set ting even when a docu ment is not set on the Document Support The setting becomes invalid if no keys are pressed for about 60 seconds Display the SET ECM Menu 1 Select the ECM Option 2 JAN 31 09 43 AM 100 ENTER TEL NUMBER Disabling ECM Temporarily MENU The followin...

Page 166: ...h Dial NOTE For more information on when to use SUB SEP PWD refer to page 69 If you designate an erroneous or unnecessary sub ad dress the communication will result in an error Press Load the document face down in the Document Support see page 82 Adjust the resolution and con trast if desired see pages 83 and 84 Select one of the following op tions from the menu To select SUB press Enter the requi...

Page 167: ...ss Entry 7 Enter the Facsimile Number 8 JAN 31 09 43 AM 100 ENTER TEL NUMBER The display returns to the screen at the bottom of Step 2 You may continue from Step 3 and enter another sub address of a different type To complete your sub address entry select option 1 DONE in step 3 The display returns to the screen at the bottom of Step 2 You may continue from Step 3 and enter another sub address of ...

Page 168: ...esired see pages 83 and 84 Press Display the SEND AFTER SCAN Menu 2 Select the Send After Scan Option 3 Select the Memory Full Option 4 Select the desired Memory Full Option To cancel the pages that have been scanned press JAN 31 09 43 AM 100 AUTO RECEIVE Go to Step 4 To disable Send After Scan press COMPLETED JAN 31 09 43 AM 100 ENTER TEL NUMBER NOTES To change the default set ting of this functi...

Page 169: ...g any of the fol lowing dialing methods One Touch Key Dialing See page 89 Abbreviated Dialing See page 90 Alphabet Dialing See page 91 Keypad Dialing See page 92 Enter the Facsimile Number 5 Enabling or Disabling Send after Scan Temporarily continued ...

Page 170: ...e data of the facsimile will be printed but not the cover page data The cover sheet is always sent in Letter size The resolution for the cover sheet is fixed to FINE How ever if the receiving unit is set to STD the cover sheet is sent in STD Press Load the document face down in the Document Support see page 82 Adjust the resolution and con trast if desired see pages 83 and 84 Enter the name of the...

Page 171: ...mission only Remote Station ID printed when preset to the Abbrevi ated Dial Number or One Touch Dial Key used for dial ing Max 20 characters Your Station ID if preset max 40 characters Remote Name which was entered using this operation Dialed Facsimile Number first 38 digits Your Name which was entered using this operation Your Facsimile Number max 20 digits Number of document pages to be transmit...

Page 172: ...One Touch Key Dialing See page 89 Abbreviated Dialing See page 90 Alphabet Dialing See page 91 Keypad Dialing See page 92 NOTES If the day of month value entered in Step 2 does not exist in the current month the communication will start on the first day of the next month For example if 30 is entered in Febru ary the communication will start on March 1st If a time in the past is pro grammed communi...

Page 173: ...oad the document face down in the Document Support see page 82 Adjust the resolution and con trast if desired see pages 83 and 84 Enter the number of the remote facsimile using any of the fol lowing dialing methods One Touch Key Dialing See page 89 Abbreviated Dialing See page 90 Alphabet Dialing See page 91 Keypad Dialing See page 92 Priority Transmission Load the Document 1 Display the PRIORITY ...

Page 174: ...Change the Facsimile Number 3 Display the RECOVERY TRANSMIT Menu 1 To start the transmission press Press Cancel the Document 4 RECOVERY TX ENTER START FILE NBR 005 12345 2 CHANGE JOB NUMBER 005 1 START FAX NUMBER MAX128 12345 To cancel the document go to Step 4 Press MENU or to view the jobs stored for resend ing The information is dis played on the LCD display MENU When the sending document to be...

Page 175: ...ment stored for resending press Sending Recovery Transmission continued Select the Cancel Option 5 DELETED Displayed for 2 seconds Returns to display the Standby Mode screen To retain the selected docu ment stored for resending press ...

Page 176: ... POS SIBLE press Press Load the document face down in the Document Support see page 82 Adjust the resolution and con trast if desired see pages 83 and 84 Enter the number of the remote facsimile using any of the fol lowing dialing methods or you may designate another option at this point One Touch Key Dialing See page 89 Abbreviated Dialing See page 90 Alphabet Dialing See page 91 Keypad Dialing S...

Page 177: ...nd 84 Turn ON the monitor speaker by pressing Enter the number of the remote facsimile using any of the fol lowing dialing methods or you may designate another option at this point One Touch Key Dialing See page 89 Abbreviated Dialing See page 90 Alphabet Dialing See page 91 Keypad Dialing See page 92 Line Monitor Load the Document 1 Display the LINE MONITOR Menu 2 Select the Option 3 Enter the Fa...

Page 178: ... 3 5 etc The facsimile will compare the number of pages actually sent with the number you entered Press Enter the number of document pages 1 to 999 Load the document face down in the Document Support see page 82 Adjust the resolution and con trast if desired see pages 83 and 84 Enter the number of the remote facsimile using any of the fol lowing dialing methods or you may designate another option ...

Page 179: ...s op tion Select the function key on the Operation Panel Press Load the document face down in the Document Support see page 82 Adjust the resolution and con trast if desired see pages 83 and 84 Enter the number of the remote facsimile using any of the fol lowing dialing methods One Touch Key Dialing See page 89 Abbreviated Dialing See page 90 Alphabet Dialing See page 91 Keypad Dialing See page 92...

Page 180: ...fication To setup the Communication Report go to page 178 to 185 RECEPTION LIST The e STUDIO170F will print a reception list under the following conditions Reservation to Local Mailbox When reserving a document to a Mailbox within the e STUDIO170F locally a reception list is printed Remote Mailbox When reserving a document to a Mailbox within the e STUDIO170F remotely from another facsimile a rece...

Page 181: ...ctions have taken in place To turn ON Automatic printing of journal press AUTO PRINT Options 4 Reception Journal Settings continued COMPLETED Press STOP to complete this setting To turn OFF Automatic printing of journal press The following screen is dis played for 2 seconds to con firm your selection ...

Page 182: ...e TX REPORT Menu 1 Select the Option for TX REPORT 2 Direct Transmission Report Setting COMPLETED MENU Press STOP to complete this setting To only print a Transmission Report when an error occurrs press To turn OFF automatic printing of Transmission Reports press The following screen is dis played for 2 seconds to con firm your selection 3 OFF 2 ON ERROR TX REPORT 1 ALWAYS ...

Page 183: ...sions To ALWAYS print a Transmis sion Report whenever a docu ment is transmitted press To only print a Transmission Report when an error occurrs press Go to Step 3 To turn OFF automatic printing of Transmission Reports press The following screen is dis played for 2 seconds to confirm your selection Press STOP to complete this setting To not print a first page image of the document on the Trans mis...

Page 184: ...LTI ADD REPORT 1 ALWAYS COMPLETED 2 OFF SHOW FIRST PAGE 1 ON Select the Option for MULTI ADD REPORT 2 COMPLETED MENU Go to Step 3 Press STOP to complete this setting To turn OFF automatic printing of Transmission Reports press To only print a Transmission Report when an error occurs press The following screen is dis played for 2 seconds to confirm your selection Press STOP to complete this setting...

Page 185: ...eport whenever a polling operation occurs press MULTI POLL REPORT Options 2 3 OFF 2 ON ERROR MULTIPOLL REPORT 1 ALWAYS COMPLETED MENU Press to complete this setting To only print a report when an error occurrs press To turn OFF automatic printing of this report press The following screen is dis played for 2 seconds to con firm your selection STOP ...

Page 186: ...W FIRST PAGE 3 Display the RELAY ORIGINATOR Menu 1 COMPLETED 2 OFF SHOW FIRST PAGE 1 ON COMPLETED Select the Option for RELAY ORIGINATOR 2 MENU Go to next step Press STOP to complete this setting To turn OFF Automatic printing of reports press To only print a report when an error occurs press The following screen is dis played for 2 seconds to confirm your selection Press STOP to complete this set...

Page 187: ...CAL MAILBOX 2 OFF 1 ON REMOTE MAILBOX 2 OFF MENU Go to Step 3 To select the REMOTE MAIL BOX press Go to Step 4 Press STOP to complete this setting When 01 LOCAL MAILBOX is selected in Step 2 the follow ing screen displays To turn OFF press The following screen is dis played for 2 seconds to confirm your selection Press STOP to complete this setting When 02 REMOTE MAILBOX is selected in Step 2 the ...

Page 188: ...tation s Fax Telephone Num ber an alternate number or sub ad dress dial was used Department No indicates the depart ment responsible for this transmission job printed only when the Department Control option is ON Account No printed only when the Account Number op tion is ON and used Error Code Result OK successful NG failure Communication Mode G3 G3 EC ECM is 2nd line communication LIST AND REPORT...

Page 189: ...ee page 180 Printing will automatically start after a transmission is completed This is the result report printed after a Direct Transmission a job transmitted directly from the document feeder instead of from memory The print format is the same as that for the Transmission Journal on the preceding page except that the record of the only last transmission job is issued in a Transmission Report Tra...

Page 190: ...ted Remote Party s Name or Facsimile Tele phone Number Number of pages input to memory Time when the transmission started Time when the transmission ended the time when a Recovery Transmission is designated Number of pages transmitted normally Transmission result Auto Print if programmed see page 181 Printing will automatically start after a transmission is completed This is the result report prin...

Page 191: ...R 01 010 MULTIPOLLING JAN 30 22 25 GROUP 1001 1002 1999 POLL FAX MAILBOX FILE NBR FUNCTION PGS DATE TIME TO 961 POLLING 099 JAN 27 17 30 RECOVERY TX FILE NBR FUNCTION PGS MAIL DATE TIME TO 970 SINGLE TX 003 JAN 29 14 20 123 4567 Type of communication Box Number in case of Mail Box communication Destination Name or Dial Number of the Remote Party This is a listing of the commu nication jobs now res...

Page 192: ...IHGFEDCBA TEL NUMBER 12345678901234567890 UNSUCCESSFUL SENT PAGES GROUP NUMBER 0002 AABBCCDDEEFFGGHHIIJJ 0T 33 AAABBBCCCDDDEEEFFFGG 01 Auto Print if programmed see page 182 Printing will automatically start after all transmissions in the operation have been completed successfully or unsuccessfully This is the result report printed after a Multi address Trans mission Receiver where an error occurre...

Page 193: ...NUMBER 014 HONG KONG OFFICE TEL NUMBER 1234567890123456789 UNSUCCESSFUL SENT PAGES GROUP NUMBER 0002 AABBCCDDEEFFGGHHIIJJ 0T 33 AAABBBCCCDDDEEEFFFGG 01 Auto Print if programmed see page 183 Printing will automatically start after all polling opera tions have been completed successfully or unsuccess fully This is the result report printed after a Multi polling Reception Receiver where an error occu...

Page 194: ... originating station transmits to all of the assigned relay stations successfully or unsuccess fully This is the result report the Originating Terminal prints af ter a Relay Transmission Relay Send Originator Report Printing Procedure FILE NUMBER 009 DATE JAN 31 10 55 TO ABCDEFGHIJKLMNOPQRST DOCUMENT PAGES 015 START TIME JAN 31 10 56 END TIME JAN 31 14 18 RECOVERY TIME JAN 31 14 10 SENT PAGES 015 ...

Page 195: ...will automatically start after a data is stored on Mailbox This is the report printed after a data is stored on Mailbox Mailbox Reception Report Printing Procedure FILE NUMBER 999 BOX NUMBER 015 BOX TYPE CONFIDENTIAL BOX DOCUMENT PAGES 005 TOTAL 999 FROM 1234567890123456789 Document Originator ID LOCAL Your Own Station Other indication Remote station s ID Name or Dial Number ...

Page 196: ...7 099 198 JAN 30 19 37 LOCAL 999 BULLETIN BOARD 033 173 JAN 31 07 43 LOCAL Issues a list of the documents reserved through the local i e your own station and remote stations using the Open Mail box System ITU T Compatible F code Communication Press Mailbox ITU T Compatible F code Communication List Printing Procedure Box No Mailbox Type Number of Document pages entered File No Date and Time the Do...

Page 197: ... 4 7 Issues a list of Department Codes and data processed for the Department Control Mode Press Available only when the Department Control Mode option is selected Department No Department Name Department Code for operating the department Accumulated number of pages operated by the department Sent NOTE The list shown is produced when the Master code 01 is used to initiate the print list operation I...

Page 198: ...art of one oper ation sequence or individually one by one Issues three lists one after another in one operation se quence The following will be printed For the print format and description of printed items see the page listed below Abbreviated Dial Number List page 197 One Touch Number List page 198 Group Number List page 199 Preset Dialing Number Lists All of Lists Printing Procedure MENU ...

Page 199: ...P or PWD Type of Sub address Designated Time Line Monitoring Communication Speed Limit x 100 TX Report Issue Non issue Status Attached Fax Option Status if any Preset Dialing Number Lists continued Abbreviated Dial Number List Printing Procedure ABB NBR NAME TEL NUMBER TIME MONI BPS REPORT 001 ABCDEFGHIJKLMNOPQRST 1234567890123456789012345678901234567890 23 45 ON 144 ON 1234567 0987654321 SUB 1234...

Page 200: ...pe of Sub address Preset Dialing Number Lists continued One Touch Number List Designated Time Line Monitoring Communication Speed Limit x 100 TX Report Issue Non issue Status Attached Facsimile Option Status if any Printing Procedure ONE TOUCH NUMBER INFORMATION OT NBR NAME FUNCTION ABB GROUP TEL NUMBER TIME MONI BPS REPORT 01 ABCDEFGHIJKLMNOPQRST 1234567890123456789012345678901234567890 23 45 ON ...

Page 201: ...oup Name Preset Dialing Number Lists continued Group Number List Printing Procedure Group Number GROUP NUMBER NAME OT ABB NUMBER 0001 ABCDEFGHIJKLMNOPQRST OT 01 ABCDEFGHIJKLMNOPQRST 02 MASAYA 03 akira ABB 111 ABCDEFGHIJKLMNOPQRST 1111 COMPANIES ABB 121 HADANO 122 Tokyo_Office 1999 AIUEOcorp OT 25 Al_section 36 UEO_section One Touch Key Numbers and Abbreviated Dial Numbers belonging to the Group OT...

Page 202: ...5678901234567890 1234567 Chicago Group GROUP 0001 GREENVILLE OFFICE ABB 109 999999999 NEW YORK OFFICE ABB 900 333 912345678 Issues a listing of names pro grammed to Abbreviated Dial Number One Touch Key and Group Number Press Names of Abbreviated Dial Number One Touch Key or Group Number OT One Touch Key Numbers ABB Abbreviated Dial Numbers Group Group Number Preset Dialing Number Lists continued ...

Page 203: ...STD CONTRAST NORMAL DOCUMENT LENGTH 1m PAPER SIZE TRAY 1 LETTER TRAY 2 LETTER LETTER HEAD PAPER OFF TX SETTING MEMORY TX ON SECURITY TX OFF COVER SHEET OFF RECOVERY TX OFF TTI INSIDE SEND AFTER SCAN OFF RX SETTING SECURE RX OFF MEMORY RX ON RX REDUCTION ON DISCARD ON REVERSE ORDER PRINT OFF PRIVILEGED RX OFF RTI OFF LISTS JOURNAL MANUAL TX RX AUTO ON ERROR CODE ON COMMUNICATION REPORT DOCUMENT FEE...

Page 204: ...LL OF LISTS 02 ABB NUMBERS 03 ONE TOUCH NUMBERS 04 GROUP NUMBERS 05 ALPHABETICAL 3 TEL LIST ENTRY 1 ABB NUMBERS 2 ONE TOUCH KEYS 3 GROUP NUMBERS 4 INITIAL SETUP 1 LANGUAGE 2 DATE TIME 3 TERMINAL ID 4 DIAL TYPE 5 DEFAULT SETTINGS 1 MACHINE SETTINGS 01 SPEAKER VOLUME 01 RINGER VOLUME 02 ALARM VOLUME 03 KEY TOUCH VOLUME 04 MONITOR VOLUME 02 POWER SAVER 01 SUPER E S 02 PRINTER P S 03 DEPARTMENT CODE 0...

Page 205: ...wer failure event Type of communication Box Number in case of Mail Box communication Station where the communication or the Mail Box is input Power Failure List File Number of the communication Time of Input Printing Procedure TX RX FILE NBR FUNCTION 001 MULTI TX 005 POLLING RX 006 PRG CONT POLL 010 MULTI POLLING POLLING FAX M BOX MAILBOX FILE NBR FUNCTION MAIL FROM DATE TIME 101 POLLING LOCAL JAN...

Page 206: ...al numbers i e One Touch Keys and Abbreviated Dial Numbers has been ex hausted Delete unneed numbers alter nate numbers and unnecessary pauses Use shorter names for the dialing addresses BROKEN REGISTRATION POWER FAILURE RX COVER OPEN OR NO PROCESS UNIT MEMORY OVERFLOW DOCUMENT JAM PAPER SIZE ERROR OR PAPER JAM XX UPPER PAPER EMPTY The maximum number of manu ally input phone numbers 100 has been r...

Page 207: ... reached the end of its life Replace the drum unit see page 31 LOWER PAPER EMPTY PAPER EMPTY TONER LOW TONER EMPTY DRUM UNIT WARNING REPLACE DRUM UNIT CHECK TELEPHONE LINE Line is not connected to the telephone line Correctly connect a modular phone cord between the tele phone line jack and the LINE connector on the rear side of the machine see page 10 A printer system failure has oc curred Power ...

Page 208: ...ct 10 20 80 90 A paper jam has occurred in the Recording Paper Tray or Bypass Tray A paper jam has occurred in the Optional Recording Paper Tray A paper jam has occurred at the paper feed section of the paper transport path A paper jam has occurred at the paper exit section of the paper transport path Remove the jammed recording pa per Remove the jammed recording pa per Open the Front Cover remove...

Page 209: ...rected call your ser vice representative Power the unit ON OFF then retry Retry the transmission or ask the remote party to transmit the docu ment again Check the actual document count Check polling options setup securi ty code etc and check if the poll ing document exists Error Code Cause How to Correct 42 50 53 B0 B5 C0 C4 D0 D2 F0 F1 87 Memory Overflow Line Busy Security Mismatch in Relay or Ma...

Page 210: ...ully Clear the error Make sure the power plug is plugged into the AC outlet and the power switch is ON When document pag es are fed into the unit two pages are drawn into the slot The sending proce dure was completed but nothing was re corded on the record ing paper of the re ceiving party or the image was elongated The sending proce dure was completed correctly but nothing happened Documents cann...

Page 211: ...djustment The recording unit requires cleaning The remote party loaded the document face up The recording paper tray is not firmly closed Something is wrong with the recording paper itself Check the paper installation and make sure it is correct Ask the sending party if the document contents are clear enough Ask the sending party to make a copy of the same document using their facsimile If the qua...

Page 212: ...ocu ment Check for pieces of pa per clips or staples which may have caused the failure Firmly close the Operation Panel Confirm that the LCD display indicates that the facsimile is in the Standby Mode NOTE As for a document that has jammed in the facsimile make a duplicate using a copier and do the transmis sion over again with the new duplicate used as the send ing document Clearing a Document Ja...

Page 213: ...move any document or re cording paper from the Docu ment Support Document Exit Tray or Recording Paper Exit Tray Remove the jammed paper from the Bypass Tray Remove the Bypass Tray Clearing a Recording Paper Jam Remove the Documents 1 Code Location 10 In the Paper Tray and Bypass Tray 20 In the Optional Paper Tray 80 At the paper feed area 90 At the paper exit area Remove the Jammed Paper Bypass T...

Page 214: ... Recording Paper Tray 6 RemovetheJammed Paper Optional RecordingPaperTray 7 Insert the Optional Recording Paper Tray all the way into the machine NOTE As the tray is inserted lis ten for the sound of the pa per pressure plate moving up into position Insert the Optional Recording Paper Tray 8 Hold the Front Cover by the grips on both sides of its upper part and pull it down to open it NOTE Do not p...

Page 215: ... to fold the edge of jammed paper as shown in the figure when you remove the jammed pa per If the paper is jammed partway through the Fuser Unit black colored housing remove the jammed paper in the direction of the arrow Avoid tearing the paper Remove the Jammed Paper Fuser Area 12 NOTE If a paper is jammed before toner on the paper is fused be careful not to stain your hand or fingers with toner ...

Page 216: ...Cover until it clicks to ensure the latches are engaged Close the Front Cover 16 Close the RX Cover 17 Press down on the RX Cover until a Click is heard to en sure the latches engage Verify the display has returned to the Standby Mode If there is any received document stored in memory If a recording paper jam oc curs during a reception the received documents are au tomatically stored in memo ry In...

Page 217: ...loth soaked in water and wrung out then wipe it with a dry cloth When the Recorded Image is not Clear Open the Operation Panel 1 Wipe the Glass Surface and White Plate 2 Document Scanner Cleaning Procedure Wipe the ADF Pad and Rollers with a dry cloth If it is very dirty wipe it with a cloth soaked in water and wrung out then wipe it with a dry cloth CAUTION Be careful not to injure your finger s ...

Page 218: ... Close the Operation Panel Make sure that the hooks on both sides are firmly latched Close the Operation Panel 4 When the Recorded Image is not Clear continued Document Scanner Cleaning Procedure continued ...

Page 219: ...e the Paper Pickup Roller with a dry cloth If the surfaces require moisture to remove the dirt use a cloth slightly damp ened with water to remove the dirt followed by a dry cloth Lift up and holding the green handle gently pull out the Pro cess Unit CAUTION Always hold the Process Unit by the green handle Remove the Process Unit 2 Process Unit 4 Install the Process Unit into the machine aligning ...

Page 220: ...R IC NOTE AUTO TEST cannot be performed if data such as re ceived data delayed transmission or polling data is stored in memory Press Select the AUTO TEST Menu 2 Press Completed the AUTO TEST 3 When all the tests end the word OPERATION COM PLETED is displayed on the screen and a Test Pattern is printed After printing the dis play returns to showing the standby mode screen The results of the auto t...

Page 221: ...NDIVIDUAL TEST 01 07 2 Press or MENU un til the desired INDIVIDUAL TEST is displayed or enter the desired INDIVIDUAL TEST 01 through 08 using the dial key pad INDIVIDUAL TEST MODE NOTE Only 1 selection can be dis played at one time MENU INDIVIDUAL TEST 01 ADF TEST 02 KEY TEST 03 LED TEST 04 LCD TEST 05 SPEAKER TEST 06 SENSOR TEST 07 PRINT TEST 08 TONER IC TEST ...

Page 222: ...F TEST PAGES 01 ADF TEST DOCUMENT JAM To continue the ADF Test press ADF TEST STOP TO COMPLETE Load the Documents 2 ADF TEST PRESS START To end the test press Select the ADF Test Result 3 If the number of documents loaded is consistent with the number of documents unload press You can change the transport speed by pressing MODE STD Fast FINE Same when HALF TONE is set Medium U FINE Same when HALF ...

Page 223: ...e screen and the unit returns to the individual test selection screen The result of the ADF test can be confirmed with the self test report To print the self test re port refer to PRINTING A TEST RESULT on page 230 If the result of the ADF test is judged to be NG call your ser vice representative ...

Page 224: ...t of the key test is judged to be NG call your ser vice representative Completed the KEY TEST 4 KEY TEST PRESS STOP LAST KEY TEST PRESS STOP KEY TEST OK KEY TEST NG NOTE If you press STOP before you press every key the machine will reset to the Individual Test menu screen and no test result will be issued NOTE The name of each key is displayed on the LCD after it is pressed MENU Press The result o...

Page 225: ...T 4 The word OPERATION COM PLETED is displayed on the screen and the unit returns to the individual test selection screen The result of the LED test can be confirmed with the self test report To print the self test re port refer to PRINTING A TEST on page 230 If the result of the LED test is judged to be NG call your ser vice representative LED TEST STOP TO COMPLETED MENU If there was no input for...

Page 226: ... the screen and the unit returns to the individual test selection screen The result of the LCD test can be confirmed with the self test report To print the self test re port refer to PRINTING A TEST RESULT on page 230 If the result of the LCD test is judged to be NG call your ser vice representative LCD TEST PRESS START MENU An underline moves from the first column through the last column of the L...

Page 227: ...the screen and the unit returns to the individual test selection screen The result of the speaker test can be confirmed with the self test report To print the self test report refer to PRINTING A TEST RESULT on page 230 If the result of the speaker test is judged to be NG call your service representative SPEAKER TEST PRESS START After checking press OFF MENU Pressing START changes the volume level...

Page 228: ...tate is detected the screen below appears After checking that the screen is dis played close the Top Cover Detects the open state of the Top Cover SENSOR TEST OPEN TOP COVER Close the Top Cover SENSOR TEST OPEN FRONT COVER SENSOR TEST CLOSE TOP COVER MENU If no recording paper is placed in the Recording Paper Tray the screen below is displayed You can resume the test by loading the paper SENSOR TE...

Page 229: ...s After checking that the screen is displayed install the Recording Paper in the Pa per Tray Detects the absence of the Recording Paper If an Optional Recording Paper Tray is installed follow the same test procedure for the Optional Recording Paper Tray Install the Recording Paper SENSOR TEST OK SENSOR TEST PUT IN PAPER Detects the absence of the Recording Paper SENSOR TEST PUT IN PAPER TRAY 2 SEN...

Page 230: ...e unit returns to the individual test selection screen The result of the print test can be confirmed with the self test report To print the self test re port refer to PRINTING A TEST RESULT on page 230 If the result of the print test is judged to be NG call your ser vice representative Select the Print Result Option 2 If the test pattern prints prop erly press Print Sample Press MENU If the test p...

Page 231: ...ONER IC TEST 3 The result of the toner IC test can be confirmed with the self test report To print the self test report refer to PRINTING A TEST RESULT on page 230 If the result of the toner IC test is judged to be NG call your service representative TONER IC TEST TESTING If the test result is OK MENU Start the Toner Ic Test TONER IC TEST OK If the test result is NG TONER IC TEST NG Press ...

Page 232: ...out the results of the individual tests as a self test report PRINTING a TEST RESULT Select the TEST RESULT Menu 1 Press Print Sample TEST RESULT After completion of the list out put the display returns to the standby mode screen MENU ...

Page 233: ...machine can automatically send an order sheet to a designated fax machine informing your supplier that a replacement Drum Unit or Toner Cartridge is required Contact your local authorized dealer for information on this setting NOTE This function is not available in the United States ...

Page 234: ...Systems JBIG MMR MR MH Recording and Printing Method Electrophotography and Laser Printing Memory Capacity 7 MB Machine Type Desktop type with both transmission and re ception functions Applicable Networks PSTN Public Switched Telephone Network Power Required 220 VAC 50 60 Hz Power Consumed Max 1000 W operating 2 W or less standby in Super Energy Saver mode Unit Dimensions Width 408 mm 16 06 inche...

Page 235: ...233 A4 size Recording Paper Letter size Recording Paper Legal size Recording Paper Drum Unit DK 18 Toner Cartridge TK 18 Optional Paper Tray FU 18L SUPPLIES HARDWARE OPTIONS ...

Page 236: ...234 MEMO ...

Page 237: ...servation 106 Open Mailbox Documents Local Hub 137 Reception 106 ChainDial 141 CharacterEntry 36 Deleting 37 Inserting 37 Replacing 37 Cleaning DocumentScannerCleaning 215 RecordingUnitCleaning 217 CommunicationJournal 186 Settings 178 CommunicationStatus Displaying Current Job Status 105 ConfidentialBox 115 125 ConfigurationSummary 45 Contrast Setting 84 CopyReduction 64 Copying 86 Page Sorting F...

Page 238: ...ocument Length Setting 149 DocumentSupport 9 15 18 Loading 82 DrumUnitReplacement 31 E ECM ErrorCorrectionMode Default ECM Setting 59 DisablingECMTemporarily 163 Error Codes Printed on Reports 207 ErrorMessages 204 F Fax Speed 67 73 174 Features 7 File Number and Residual Memory 93 Front View 9 Function Keys 14 Discard see Reception Settings Function List 201 G Group GroupBroadcastTransmission 108...

Page 239: ...leting a Mailbox 127 DeletingDocuments 137 Mailbox List 194 Overview 114 Printing a Document from a Mailbox Local Hub 135 Reserving a Document to a Mailbox Local Hub 131 Retrieving Polling a Document from a Mailbox Remote Hub 133 Sending a Document to a Mailbox Remote Hub 129 Setting Up a Mailbox 125 MailboxCommunications MailboxReceptionReport 193 OpenMailbox ITU TCompatible 115 Overview 114 Rece...

Page 240: ...ecting Quick Start 34 TEL FAX Switching Mode 103 Reception Mode Default Setting 62 ReceptionModeSelection 104 Receiving Interval Setting 58 ReceptionJournal 186 Automatic Output 178 ManualOutput 178 Settings 178 Reception List Settings see Lists And Reports Options Settings ReceptionSettings Discard 157 Reduction 156 Reverse Order Printing Setting 158 RecordingPaper Installation 20 Paper Size Reco...

Page 241: ...ber Sub AddressCommunication DialingwithSub address 164 UsingwithAbbreviatedNumberRegistration 67 Using with One Touch Key Registration 73 Supplies Automatic Supplies Order 231 Installation 27 Replacement 29 T TerminalID 34 Terminal ID Setting 42 Terminal ID Quick Start 34 Test Mode 218 TonerCartridgeReplacement 29 TransmissionJournal 186 Setting 178 TransmissionOptions 162 Attaching or Printing a...

Page 242: ...o Test 218 Individual Test 219 ADF Test 220 Key Test 222 LCD Test 224 LED Test 223 Sensor Test 226 Speaker Test 225 Print Test 228 TONER IC Test 229 Printing a Test Result 230 V Volume Adjustment AlarmTone 47 BellRinger 46 Key Touch Tone 48 Monitor 49 ...

Page 243: ...DP 1700F OME04009900 ...

Page 244: ......

Reviews: