


User’s Manual
EN-33
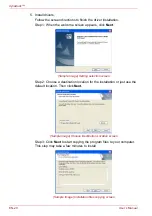
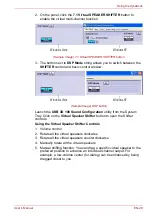
Using the dynadock
Although the ports and video drivers are different, the connection and setup
is the same.
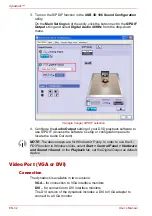
Connect the monitor cable (not provided) to the video output port on the
dynadock and the external monitor. This cable can be connected and
disconnected any time without disconnecting the dynadock from the USB
port on your computer.
You can adjust video settings to customize your use of the dynadock with
video. See Adjusting Video Settings for more information.
If the video output of the dynadock does not work once the dynadock is
properly connected to an external monitor, the video (USB-VGA or USB-
DVI) driver has probably not been installed correctly. Please make sure the
driver is installed correctly by referring to the
Viewable screens
The dynadock video drivers give you the option of viewing a total of three
screens.
1. The screen on the notebook,
2. External monitor connected to the video port on the notebook (if
available)
3. External monitor connected to the dynadock
Video Modes
The dynadock video output works in two modes:
■
Mirror Mode
■
Extended Mode (Windows XP only)
Mirror Mode
This mode “mirrors”–creates an identical display – from your computer
screen to the external monitor. This is useful, for example, if you want to
use a larger desktop monitor rather than the computer screen. In Mirror
Mode, the dynadock automatically selects the settings (screen resolution,
color quality and refresh rate) for the external monitor that will allow the
best resolution based on your computer’s settings.
By default, the dynadock uses video output in Mirror Mode.
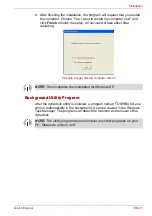
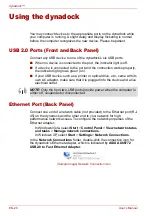
NOTE:
The dynadock should be connected to a USB 2.0 port for optimal
video performance. The dynadock will work connected to a USB1.1 port,
however video performance will be compromised. The USB connector may
be plugged and unplugged while the dynadock is on.
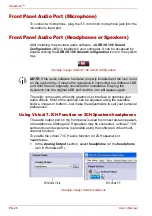
NOTE:
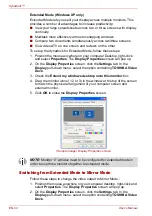
The external monitor connected to the dynadock may be identified
as either “2” or “3” on the Windows Display Properties screen (depending
on your model) although there may not be a total of 3 screens connected.
NOTE:
In Windows Vista™, the dynadock does not support extended
mode for display.
Summary of Contents for dynadock
Page 1: ...User s Manual dynadock ...
Page 47: ...Manuel de l utilisateur dynadock ...
Page 93: ...Benutzerhandbuch dynadock ...
Page 141: ...Manual del usuario dynadock ...
Page 189: ...Manuale utente dynadock ...
Page 236: ...IT 48 Manuale utente dynadock ...
Page 237: ...Gebruikershandleiding dynadock ...
Page 284: ...NL 48 Gebruikershandleiding dynadock ...
Page 285: ...Manual do Utilizador dynadock ...
Page 332: ...PT 48 Manual do Utilizador dynadock ...
Page 333: ...Användarhandbok dynadock ...
Page 379: ...Brukerhåndbok dynadock ...
Page 425: ...Brugerhåndbog dynadock ...
Page 471: ...Käyttöopas dynadock ...


