background image

Following table shows best cleaning procedures and amount of dishwashing 
powder required according to the dirty level of the dishes, as well as the 

Washing program

Dishwashing

powder (g)

Highest Water
Temperature

Time 
(min)

Power 

(

K

wh)

Water 

(L)

Program

65

185

0.72

8

GLASS

60

95

0.7

10.5

90MIN

68

90

1.15

11

RAPID

55

35

0.52

7

HYGIENE

70

160

1.25

12.5

4/20

1 piece

The above program data is for reference only. Test conditions are as follows:

Attention

Power consumption at shutdown state and standby state similarly are 0.49w.

Washing capacity: 96 pcs (Cup x8 + Saucer x8+ Glass x8 + Medium serving bowl x1 + 
Small serving bowl x1 + Large serving bowl x1 +Oval platter x1 + Dinner plate x8 + 
Soup plate x8 + Dessert dish x8 + Fork x8 + Soup spoons x8 + Dessert spoon x8 + 
Teaspoon x8 + Knife x8 + Serving spoon x2 + Gravy ladle x1 + Serving fork x1)

Program Setting

English

13

NORMAL

SELF-CLEAN

68

150

1.05

12.5

4/20

70

50

0.8

7

4/20

4/20

24

15

18

Summary of Contents for DW-08T1(S)-MY

Page 1: ...English DISHWASHER INSTRUCTION MANUAL Model Read these instructions carefully before using your DISHWASHER and keep it carefully DW 08T1 S MY ...

Page 2: ...ed instructions would be indicated on the inside of the circle or around the symbol in figures or in writing CAUTION Recommends to take precautions Detailed instructions would be indicated on the inside of the triangle or around the symbol in figures or in writing Do not allow below people to operate the dishwasher The dishwasher cannot be used by persons including children with reduced physical s...

Page 3: ...sonnel having similar qualificarion so as to prevent dangers Do not spray water directly onto the parts of the main body of the dishwasher This may cause accidents of electric shock or short circuit Do not put flammable materials into the dishwasher Do not put flammable materials of kerosene gasoline volatile oil diluent ethyl alcohol etc as well as dishes having such matters into the dishwasher I...

Page 4: ...ing the door may cause injury Also spilled water may deteriorate insulation and cause electric leakage and fire Do not place the dishwasher near fire Do not put the burning candle or cigarette on the dishwasher It may cause fire Make sure the dishwasher can be set at a smooth drainage location The use of dishwasher having poor drainage may cause water to flow back to the dishwasher and cause elect...

Page 5: ...Do not sit or stand on the dish rack or door of the dishwasher It may cause dangers of injuries due to deformation or damage When the dishwasher is not used for long time pull off the power plug from the power socket and close the dishwasher door Electric shock or short circuit may be caused due to the degradation of insulating material The door shall keep close to prevent stumble It is very dange...

Page 6: ...of getting hurt while pinching fingers Do not get close to the exhaust port Steam or hot air may cause the burns While using or after using the dishwasher pay attention to hot water drained out High temperature hot water may come out there is a risk of burns Prohibit to hit or tap the dishwasher Electric shock electric leakage short circuit may cause fire Set the filters correctly Residues clogs c...

Page 7: ... off the power and close the machine door The cardboard package is made by recycled paper and shall be collected for recycling If the generated rubbish cannot be treated properly they will be harmful to the environment and human health and they shall be properly disposed to prevent potential threat For more details of product recycle please contact relevant departments of local government or the s...

Page 8: ...to the dispenser 10 11 13 01 02 03 04 Rinse aid and detergent 16 17 18 24 25 26 19 14 Please carefully read the instruction manual before using the dishwasher and this is helpful for the use and maintenance of the product Contents Program Setting Washing program 08 Changing the program mid cycle Put additional dishes in End of washing program Install dishwasher bowl basket 20 21 Adding rinse aid t...

Page 9: ...sh 09 Troubleshooting Before connecting customer service center Error code Installation Product dimension Power connection 05 27 28 31 33 34 Specification 06 Water connection Connection of drain hoses 29 29 ...

Page 10: ...her features Important Before using the dishwasher for the first time read following instructions to ensure the best results 10 Cutlery rack Lower basket Upper basket Upper spray arm Filter assembly Spray arm Dispenser Salt container ...

Page 11: ...program For general dirty dishes and utensils such as pots plates glasses pans HYGIENE Use to our dishes and glassware Maintains the water temperature at 70 C SELF CLEAN An effective cleaning of the dishwasher itself NORMAL For normally soiled loads such as pots plates glasses and lightly soiled pans 1 5 2 3 3 4 6 2 3 Delay Press the button to add the delay time or press the button to decrease the...

Page 12: ...ns the dishwasher is low on dishwasher rinse aid and requires a refill If the indicator is lit it means the dishwasher is low on dishwasher salt and requires a refill To show the remaining time and delay time error codes etc 5 Warning indicator ...

Page 13: ... piece The above program data is for reference only Test conditions are as follows Attention Power consumption at shutdown state and standby state similarly are 0 49w Washing capacity 96 pcs Cup x8 Saucer x8 Glass x8 Medium serving bowl x1 Small serving bowl x1 Large serving bowl x1 Oval platter x1 Dinner plate x8 Soup plate x8 Dessert dish x8 Fork x8 Soup spoons x8 Dessert spoon x8 Teaspoon x8 Kn...

Page 14: ...A wash cycle can only be changed if it has been running for a short time otherwise the detergent may have already been released and the dishwasher may have already drained the wash water If this is the case the dishwasher needs to be reset and the detergent dispenser must be refilled To reset the dishwasher follow the instructions below 1 Press the Start Pause button to pause the washing 2 Press t...

Page 15: ...er 10 seconds the dishwasher will start again End of washing program After the program finishes the machine show End after the buzzer beeps for 8 seconds Warning Turn off the machine Press ON OFF button to turn off the dishwasher Hot dishes are more likely to be damaged The dishes shall be cool for about 15 minutes and then taken out from the dishwasher Open the door carefully It is extremely emel...

Page 16: ...f measurement for the water hardness 2 millimol international unit for water hardness The manufactory setting H4 The dishwasher is designed to allow for adjustment in the amount of salt consumed based on the hardness of the water used This is intended to optimise and customise the level of salt consumption Please follow the steps below for adjustment in salt consumption 1 Close the door and switch...

Page 17: ...d for dishwashers use Every other type of salt not specifically designed for dishwasher use especially table salt will damage the water softener In case of damages caused by the use of unsuitable salt the manufacturer does not give any warranty nor is liable for any damages caused Only fill with salt before running a cycle This will prevent any grains of salt or salty water which may have been spi...

Page 18: ... this purpose When to refill the rinse aid Warning Warning Proper Use of Detergent Use only detergent specifically made for dishwashers use Keep your detergent fresh and dry Don t put powdered detergent into the dispenser until you are ready to wash dishes Dishwasher detergent is corrosive Keep dishwasher detergent out of the reach of children 18 Unless the rinse aid warning light on the control p...

Page 19: ...our dishes are spot free Reduce it if there are sticky whitish stains on your dishes or a bluish film on glassware or knife blades Attention Clean up any spilled rinse aid with an absorbent cloth to avoid excessive foaming during the next wash 1 Remove the rinse aid reservoir cap by rotating it counterclockwise 2 Carefully pour in the rinse aid into its dispenser whilst avoiding it to overflow 3 C...

Page 20: ...spenser to open the cover 2 Add detergent into the larger cavity A for the main wash cycle For more heavily soiled wash loads also add some detergent into the smaller cavity B for the pre wash cycle 3 Close the cover and press on it until it locks into place Push latch to open A A B ...

Page 21: ...are will become dull Color of smooth dishes may fade out if often washed Silver or aluminum products tend to change color during cleaning For the best use of dishwasher follow the instructions below For different models the characteristics and appearance of the basket will be different Clear larger food residues Soften the residue of burnt food left on the pan It is not necessary to rinse dishes w...

Page 22: ... soup bowls dishes pots pans lids and grill trays Plates should be positioned vertically and facing the center of the rack Make sure that large items do not interfere with the rotation of the spray arms and do not prevent the detergent dispenser from opening 1 2 3 4 5 Item Number 6 7 8 9 10 Item Number Large serving bowl Dessert dishes Dinner plates Soup plates Oval platter Cups Saucers Small serv...

Page 23: ...om each other in the appropriate positions and do make sure the utensils do not nest together this may cause bad performance Up rack Down rack 4 2 1 2 1 3 5 6 7 8 4 1 2 3 4 Soup spoons Forks Knives Teaspoons Item Number 5 6 7 8 Dessert spoons Serving spoons Serving forks Gravy ladles Item Number ...

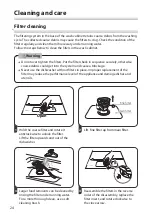
Page 24: ...her Lift fine filter up from main filter Warning Do not over tighten the filters Put the filters back in sequence securely otherwise coarse debris could get into the system and cause a blockage Never use the dishwasher without filters in place Improper replacement of the filter may reduce the performance level of the appliance and damage dishes and utensils 3 4 Larger food remnants can be cleaned ...

Page 25: ...instructions below 2 To remove the lower spray arm pull out the spray arm upward 1 To remove the upper spray arm hold the nut in the center still and rotate the spray arm counterclockwise to remove it Spray arms cleaning English 25 3 Wash the arms in soapy and warm water and use a soft brush to clean the jets Replace them after rinsing them thoroughly ...

Page 26: ...ter from the spray arms Any deposits should be wiped off before the door is closed The control panel Control panel can be wiped with a slightly wet cloth After cleaning make sure it is completely dry Do not use Sharp tools Scratch sponge or Rough detergent anywhere in the machine Do not use spray detergent to clean the door as it may damage the door lock and other electrical components Do not use ...

Page 27: ...Height H Width W Depth D1 Depth D2 590 mm 550 mm 500 mm with the door closed 964 mm with the door opened 90 Installation Product dimension H H W W D2 D2 D1 D1 English 27 ...

Page 28: ...uit is suitable for this machine Machine connection Make sure that supplied voltage and frequency correspond to those on rating plate Plug can only be connected to a properly grounded socket If the socket that the machine must be connected to is not suitable for the plug replace the socket and do not use a power adapter that may cause overheating and burning 28 Grounding Instructions This applianc...

Page 29: ... from constant electric shock When power supply safely the indicator A lights up If the electric shock happens the switch B will eject After the problem has been solved please press the switch B to reset For your safty and proper operation of the appliance make sure the appliance is grounded A A B B Please securely fix the drain hose in either position A or position B Insert the drain hose into a ...

Page 30: ...eld outside and lower than the sink Connect the water drain hose The drain hose must be correctly fitted to avoid water leaks Ensure that the water drain hose is not kinked or squashed The waste connection must be at a height less than 100 cm maximum from the bottom of the dish The water drain hose should be fixed If you need a drain hose extension make sure to use a similar drain hose It must be ...

Page 31: ...o evaporate In case of too much foam start any washing program for cleaning Colors on liner Use dishwashing powder with coloring agent Make sure that dishwashing powder used is free of coloring agent Rust on dishes Dishes with rust are easily to be corroded Avoid washing dishes that are easily to be corroded in dishwasher Crush in dishwasher Dishes in the rack prevents spray arm from rotating Susp...

Page 32: ...nage ability which are not suitable to be washed in dishwasher Dishwashing powder remains in adding position Place the dishes correctly Placement of dishes hinders the addition of dishwashing powder White point on dishes or glassware Add dishwashing powder Hard water produces more scale Dishes remain dirty after washing Please see Loading the basket information for details Page 22 Dishes are not p...

Page 33: ...o be unplugged the power plug from the outlet and needs to be repaired by qualified serviceman Overflow or water tank problem The machine occur overflow or something wrong with the floater in the water tank needs to be repaired by qualified serviceman E1 E3 E4 Error code Possible cause Flow meters drain valves or pump failures shall be repaired by qualified serviceman English 33 ...

Page 34: ...590 H x 500 D 220 240V 50 Hz 1380 1620W 8 L 0 72 kWh Electronic type IPX1 31 Kg 27 Kg 96 pcs Cup x8 Saucer x8 Glass x8 Medium serving bowl x1 Small serving bowl x1 Large serving bowl x1 Oval platter x1 Dinner plate x8 Soup plate x8 Dessert dish x8 Fork x8 Soup spoons x8 Dessert spoon x8 Teaspoon x8 Knife x8 Serving spoon x2 Gravy ladle x1 Serving fork x1 Specification 34 ...

Reviews: