background image

English -

17

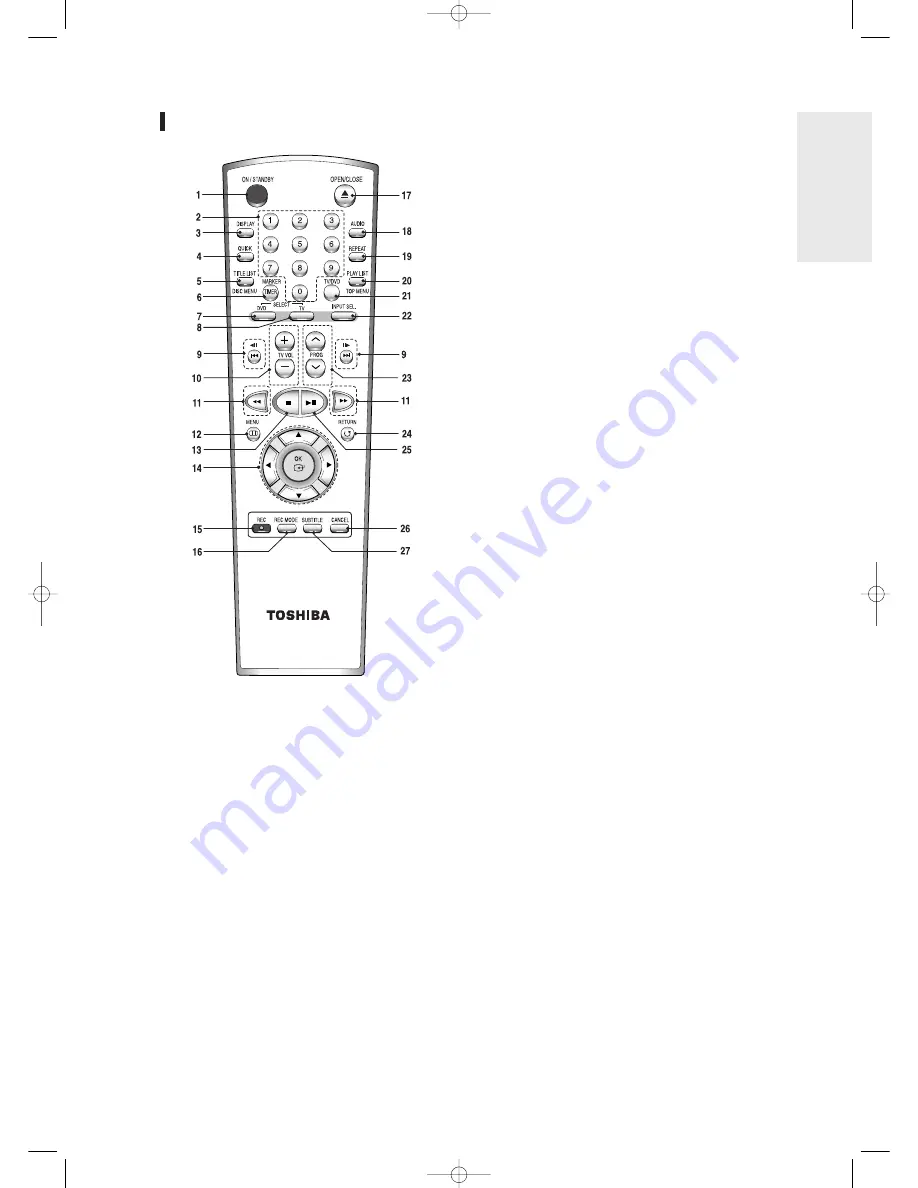
9. Reverse/Forward SKIP Buttons 

Press to skip a disc backwards or forwards.
These buttons also function as 

STEP

buttons. 

Each press will play one-frame forward or reverse
(See page 55).

10. TV VOL Buttons

TV volume adjustment.

11. Reverse/Forward SEARCH Buttons 

Press to search a disc backwards or forwards.

12. MENU Button

Brings up the DVD recorder’s setup menu.

13. STOP Button 

Press to stop a disc.

14. OK/DIRECTION Buttons 

(

…  †

†  œ

œ  √

Buttons)

15. REC Button

Use to make a recording on DVD-RAM/-RW/-R
discs.

16. REC MODE Button

This will display the recording status.(XP/SP/LP/EP)

17. OPEN/CLOSE Button

To open and close the disc tray.

18. AUDIO Button

Use this to access various audio functions on a
disc. (DVD mode)

19. REPEAT Button

Allows you to repeat a title, chapter, track or disc.

20. PLAY LIST/TOP MENU Button

Use this to return to the Top menu, or to view the
recorded files list

in Stop mode.

21. TV/DVD Button

(See page 19)

22. INPUT SEL. Button

Select line input signal in external input mode
(PROG, AV input or DV INPUT)

23. PROG Button

Select preset channels in a specific order. 
Same as 

PROGRAM

buttons in front panel.

24. RETURN Button

Returns to a previous menu.

25. PLAY/PAUSE Button 

Press to play/pause a disc.

26. CANCEL Button

27. SUBTITLE Button

Press this to switch the DVD’s subtitle language.

Tour of the Remote Control

1. ON/STANDBY Button

2. Number Buttons

3. DISPLAY Button

This will display current settings or disc status.

4. QUICK Button

Use this to view the status of the disc that is being
played.

5. TITLE LIST/DISC MENU Button

Use this to enter the View Recording list/Disc menu.

6. MARKER/TIMER Button

Use this to bookmark a position while playing a
disc. 
Press to directly enter the Timer Recording Mode
menu while stopping a disc.

7. DVD Button

Press this when you use a DVD Recorder.

8. TV Button

Press this to operate TV.

G

etting Started

00838A-D-R255-SG_02~18  6/10/05  3:46 PM  Page 17

Summary of Contents for D-R255-SG

Page 1: ...2005 Toshiba Corporation DVD RECORDER D R255 SG Read this booklet first OWNER S MANUAL C 00838A D R255 SG_Cover 6 10 05 3 44 PM Page 2 ...

Page 2: ...censed contents No rights are granted for commercial use The license does not cover any product unit other than this product unit and the license does not extend to any unlicensed product unit or process conforming to ISO IEC 11172 3 or ISO IEC 13818 3 used or sold in combination with this product unit The license only covers the use of this product unit to encode and or decode audio files conform...

Page 3: ...ratus When a cart is used use caution when moving the cart apparatus combination to avoid injury from tip over 13 Unplug this apparatus during lightning storms or when unused for long periods of time 14 Refer all servicing to qualified service personnel Servicing is required when the apparatus has been damaged in any way such as power supply cord or plug is damaged liquid has been spilled or objec...

Page 4: ...under direct sunlight Keep in a cool ventilated area Store vertically Keep in a clean protection jacket If you move your DVD RECORDER suddenly from a cold place to a warm place condensation may generate on the operating parts and lens and cause abnormal disc playback If this occurs remove the disc and wait for one to two hours with the power on before attempting playback Disc Storage Handling Caut...

Page 5: ...ons of this product or discs during operation and is not liable for incidental damages such as profit loss or interruption in business etc produced by such conditions Exemptions After a power outage the clock display will flash Set the clock to the correct time It is prohibited law to copy broadcast show broadcast on cable play in public and rent copyrighted material without permission Some DVD vi...

Page 6: ... DVD R that space does not become available Once an area on a DVD R is recorded on that area is no longer available for recording whether the recording is erased or not It takes about 30 seconds for the unit to complete recording management information after recording finishes This product optimizes the DVD R for each recording Optimizing is carried out when you start recording after inserting the...

Page 7: ...claims of certain U S patents and other intellectual property rights owned by Macrovision Corporation and other rights owners Use of this copyright protection technology must be authorized by Macrovision Corporation and is intended for home and other limited viewing uses only unless otherwise authorized by Macrovision Corporation Reverse engineering or disassembly is prohibited It is permissible t...

Page 8: ...to your TV 22 Case 2 Connecting to a stereo amplifier with AV output jacks 23 Case 3 Connecting to an AV amplifier with a digital output jack 23 Connecting to AV3 IN DV input jack 24 Case 1 Connecting a VCR Set Top Box STB DVD player or Camcorder to the AV3 IN jacks 24 Case 2 Connecting a Camcorder to the DV IN jack 24 System Setup System Setup On Screen Menu Navigation 25 Plug Auto Setup 26 Setti...

Page 9: ...cording 41 Recordable discs 41 Recording Formats 42 Recording Mode 42 Unrecordable video 42 About DISPLAY Key 43 Checking the available disc space Disc Information 43 Recording the current TV programme you are watching 43 Recording from external equipment you are watching 45 Copying from a Camcorder 46 Making a One Touch Recording OTR 47 Making a Timer Recording 48 Flexible Recording for Timer rec...

Page 10: ...hey were VCR tapes High quality digital audio and video recording and playback Record up to 16 hours of video with a double sided 9 4 GB DVD RAM disc up to 8 hours of images with a 4 7 GB DVD RAM DVD RW DVD R disc depending on the recording mode Selectable Recording Mode You can set your recorder to one of four different recording speeds each varying in recording quality and length EP 6Hr or 8Hr m...

Page 11: ...to format in VR Mode or not is displayed You can play a Video mode disc on various DVD components A VR mode disc allows more varied editing Using a DVD R This type of disc can be formatted in DVD Video format After formatting is complete you can record on the disc You can play this type of discs on various DVD components only when they have been finalised You can only use either the VR or Video mo...

Page 12: ...her DVD components finalising may be necessary First finish all editing and recording operations then finalise the disc When using a DVD RW disc in VR Mode Although finalising is generally unnecessary when playing the disc on a VR Mode compatible component a finalised disc should be used for playback When using a DVD RW disc in Video Mode The disc should be finalised first to enable playback on an...

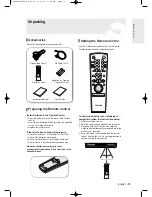
Page 13: ...onmental regulations Do not put them in the household trash Video Audio Cable RF Cable for TV Batteries for Remote Control AA Size Remote Control Instruction Manual Quick Guide Setting the Remote Control Your DVD Recorder remote control will work with Toshiba televisions and compatible brands To determine whether your television is compatible follow the instructions below 1 Switch your television ...

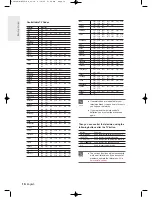
Page 14: ... LUXOR 0241 0261 0271 0281 0351 MAGNAVOX 0501 0071 0191 0221 0461 0471 0591 0611 0651 MARANTZ 0201 0501 MATSUI 0001 0171 0191 0231 0411 0441 0451 0501 0551 0571 METZ 0041 0331 0361 0461 0471 0651 MITSUBISHI 0201 0321 0331 0451 0501 0511 0571 0651 0771 NATIONAL 0371 0501 0511 0531 0761 0841 0911 1061 NOKIA 0231 0241 0261 0271 0401 0611 NORDMENDE 0281 0351 0381 0421 0431 0461 0521 0541 0641 0671 OCE...

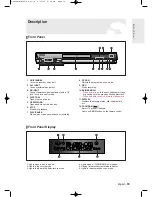
Page 15: ...ipment with a DV jack such as a camcorder 4 DISC TRAY Opens to accept a disc 5 OPEN CLOSE Opens and closes the disc tray 6 STOP Stops disc playback 7 PLAY PAUSE Plays a disc or pauses playback or recording 8 P SCAN Selects the progressive scan mode 9 REC Starts recording 10 SKIP SEARCH Press briefly to go to the next title chapter track or goes back to the previous title chapter track Press and ho...

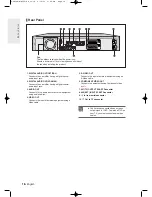
Page 16: ...EO OUT Connects the input of external equipment using an S Video cable 6 COMPONENT VIDEO OUT Connects to equipment having Component video inputs 7 AV1 TV OUTPUT SCART Connector 8 AV2 EXT INPUT SCART Connector 9 In from aerial connector 10 Out to TV connector Rear Panel Fan The fan always revolves when the power is on Ensure a minimum of 10cm clear space on all sides of the fan when installing the ...

Page 17: ...to view the recorded files list in Stop mode 21 TV DVD Button See page 19 22 INPUT SEL Button Select line input signal in external input mode PROG AV input or DV INPUT 23 PROG Button Select preset channels in a specific order Same as PROGRAM buttons in front panel 24 RETURN Button Returns to a previous menu 25 PLAY PAUSE Button Press to play pause a disc 26 CANCEL Button 27 SUBTITLE Button Press t...

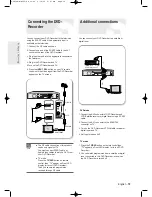
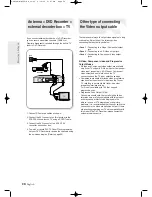
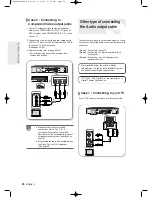
Page 18: ...e 20 Other type of connecting the Audio output cable 22 Connecting to AV3 IN DV input jack 24 This section involves various methods of connecting the DVD Recorder to other external components and required initial setting modes Connecting the DVD Recoder Additional connections Antenna DVD Recorder external decoder box TV Other type of connecting the Video output cable Other type of connecting the A...

Page 19: ...evision using the SCART cable if the appropriate input is available on the television 1 Connect the RF cable as shown 2 Connect one end of the SCART cable to the AV1 socket on the rear of the DVD Recorder 3 Plug the other end into the appropriate connector on the television 4 Plug in the DVD Recorder and TV 5 Turn on the DVD Recorder and TV 6 Press the INPUT SEL button on your TV remote control un...

Page 20: ...cks S Video Component video and Progressive Output Modes S Video and Component video output are available only if your TV supports S Video input or Component video input respectively If S Video or Component video output does not work check the TV connections and the TV input selection settings Compared to standard interlaced video progressive scan doubles the amount of video lines fed to your TV r...

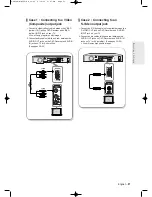
Page 21: ...e pages 22 23 You will enjoy high quality images Case 1 Connecting to a Video Composite output jack 1 Connect a video yellow cable between the VIDEO yellow OUT jack on DVD Recorder and VIDEO yellow INPUT jack on your TV You will enjoy regular quality images 2 Connect audio cables white and red between the AUDIO OUT jacks on the DVD Recorder and AUDIO IN jacks on TV or AV amplifier See pages 22 23 ...

Page 22: ...be connected to the exact corresponding component input jacks on your TV Progressive setting is only available when the Video Out is set to Component See page 36 NOTE There are several ways to output audio signal not using scart cables Select the audio connection that best suits you below Case 1 Connecting to your TV Case 2 Connecting to a stereo amplifier with AV output jacks Case 3 Connecting to...

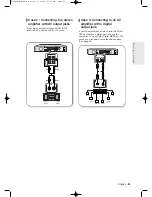
Page 23: ... Digital MPEG2 or DTS sound you will need to set up the audio settings See page 35 Case 2 Connecting to a stereo amplifier with AV output jacks If your stereo amplifier only has AUDIO INPUT jacks L and R use the AUDIO OUT jacks white or red white red Front L speaker Front R speaker Rear L Front L Subwoofer Center Front R Rear R Connecting Setting Up 00838A D R255 SG_19 42 6 10 05 3 47 PM Page 23 ...

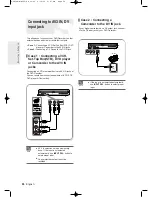
Page 24: ...d equipment VCR STB DVD player or Camcorder Connecting to AV3 IN DV input jack AV 3 in selection will be automatically done If the input is not selected automatically use INPUT SEL button to select proper input Copy protected content cannot be recorded NOTE DVD STB VCR Camcorder yellow white red yellow white red If the input is not selected automatically use INPUT SEL button to select proper input...

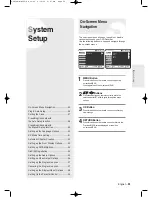
Page 25: ...een Menu Navigation On Screen Menu Navigation 25 Plug Auto Setup 26 Setting the Clock 27 Presetting Channels with the Auto Setup function 28 Presetting Channels with the Manual Setup function 29 Setting up the Language Options 30 EP Mode Time Setting 31 Automatic Chapter Creation 32 Setting up the Front Display Options 33 Setting up NICAM Options 34 DivX R Registration 34 Setting up the Audio Opti...

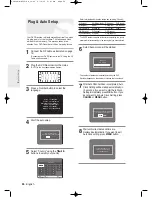
Page 26: ...DVD Recorder searches for the stations according to a preset preference list corresponding to the country that you have selected 6 Auto Channel scan will be started The number of stations automatically stored by the DVD Recorder depends on the number of stations that it has found 7 After Auto Channel Scan is completed Auto Clock Setting will be started automatically in 10 seconds If you want to st...

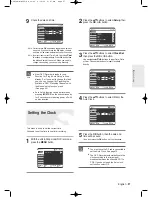
Page 27: ... No Disc 12 00 01 JAN 2005 SAT Off Time Date Auto Clock Programme Setup RETURN OK MOVE EXIT Setup No Disc System Clock Set Language Audio Video Parental Control Install Programme Setup 9 Check the date and time if it is Correct press OK button then the date and time will be saved If you don t press the OK button the date and time will be saved automatically after 5 seconds if it is Incorrect input...

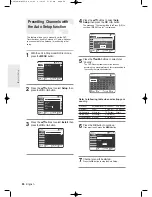
Page 28: ...button 3 Press the buttons to select Install then press the OK or button Presetting Channels with the Auto Setup function RETURN OK MOVE EXIT Setup No Disc System Clock Set Language Audio Video Parental Control Install Programme Setup RETURN OK MOVE EXIT Install No Disc Auto Setup Manual Setup Programme Setup RETURN OK MOVE EXIT Install No Disc Auto Setup Manual Setup Programme Setup Your data wil...

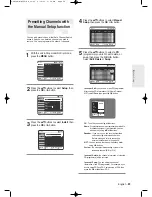
Page 29: ... the channel information of two PR programme For example if you wish to swap PR2 and PR5 select swap at PR2 then press the OK or button at PR5 You can add preset channel that Auto Channel Search missed And you can delete a channel you wish to remove You can programme the order of channels 1 With the unit in Stop mode No Disc mode press the MENU button 2 Press the buttons to select Setup then press...

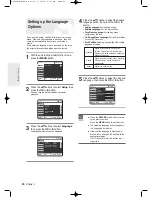
Page 30: ...uage Options Press the RETURN or œ button to return to the previous menu Press the MENU button to exit the menu The selected language will only appear if it is supported by the disc If the subtitle language is displayed in broken fonts change DivX Subtitle to the appropriate region If it still does not work the format is not supported NOTE RETURN OK MOVE EXIT Setup No Disc System Clock Set Languag...

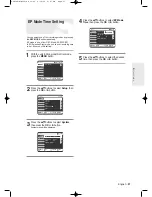
Page 31: ...ons to select EP Mode Time then press the OK or button 5 Press the buttons to select the desired time then press the OK or button EP Mode Time Setting RETURN OK MOVE EXIT System No Disc EP Mode Time 6Hours Chapter Creator Off Front Display Bright NICAM On DivX R Registration Programme Setup RETURN OK MOVE EXIT Setup No Disc System Clock Set Language Audio Video Parental Control Install Programme S...

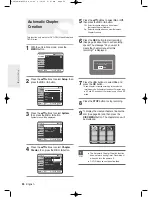
Page 32: ...nu will be displayed This function only works for DVD RW Video Mode and DVD R discs 1 With the unit in Stop mode press the MENU button 2 Press the buttons to select Setup then press the OK or button 3 Press the buttons to select System then press the OK or button System menu will be displayed 4 Press the buttons to select Chapter Creator then press the OK or button Automatic Chapter Creation Do yo...

Page 33: ...akes the Front Panel Display dim Auto Dim Makes the Front Panel Display dim automatically during power off Setting up the Front Display Options RETURN OK MOVE EXIT Timer Record No Disc Timer Record Programme Setup RETURN OK MOVE EXIT Setup No Disc System Clock Set Language Audio Video Parental Control Install Programme Setup RETURN OK MOVE EXIT System No Disc EP Mode Time 6Hours Chapter Creator Of...

Page 34: ...her language NICAM programmes are always accompanied by a standard mono sound broadcast and you can select the desired sound by setting NICAM on or off Setting up NICAM Options Please use the Registration code to register this DVD Recorder with the DivX R Video On Demand format To learn more visit www divx com vod DivX R Registration RETURN OK MOVE EXIT Timer Record No Disc Timer Record Programme ...

Page 35: ...e to select the correct Digital Output or you will hear no sound or loud noise NOTE DTS 1 Off Doesn t output DTS signal Select this when your AV receiver or AV amplifier does not have DTS decoder 2 On Outputs DTS Bitstream via digital output when you play DTS track Select this only when your AV receiver or AV amplifier have DTS decoder Dynamic Compression This is only active when a Dolby Digital s...

Page 36: ...ons RETURN OK MOVE EXIT Setup No Disc System Clock Set Language Audio Video Parental Control Install Programme Setup RETURN OK MOVE EXIT Timer Record No Disc Timer Record Programme Setup RETURN OK MOVE EXIT Video No Disc TV Aspect 4 3 Letter Box 3D Noise Reduction Off Video Output Component Programme Setup RETURN OK MOVE EXIT Video No Disc TV Aspect 4 3 Letter Box 3D Noise Reduction Off Video Outp...

Page 37: ...input To deactivate press STOP key OK Video Output Mode Progressive Scan System Setup 1 With the unit in Stop mode press the P SCAN button on the front of the DVD Recorder The message Press Yes to confirm Interlace scan mode Otherwise press No will appear Press the œ buttons to select Yes and then press the OK button 2 The message Please set your TV to Interlace input To deactivate press STOP key ...

Page 38: ...ction Off Video Output Component Programme Setup 4 3 Letter Box 4 3 Pan Scan 16 9 Wide Display Video Options This function depends on disc type It may not work for some disc types TV Aspect Depending on the type of television you have you may want to adjust the screen setting aspect ratio 4 3 Letter Box Select when you want to see the total 16 9 ratio screen DVD supplies even though you have a TV ...

Page 39: ... The Confirm the password message will be displayed Enter your password again Setting up the Parental Control Press the RETURN or œ button to return to the previous menu Press the MENU button to exit the menu NOTE RETURN OK MOVE EXIT Setup No Disc System Clock Set Language Audio Video Parental Control Install Programme Setup RETURN OK MOVE EXIT Timer Record No Disc Timer Record Programme Setup RET...

Page 40: ...y screen will change depending on which disc is played If you select YES with the OK button Enter the Password screen then appear Input the 4 digit password as you have set and playback will start If NO is selected press the OPEN CLOSE to remove the disc About the Rating Level About the Change Password RETURN OK NUMBER EXIT Change Password No Disc Enter the password RETURN OK NUMBER EXIT Change Pa...

Page 41: ...c Types Recording Recording Finalising Additional Recording in format Device Toshiba Recorder DVD RAM VR Mode Toshiba X Recordable Other Company X Recordable Toshiba finalised Not recordable VR Mode not finalised Recordable Other Company finalised Not recordable DVD RW not finalised Recordable Toshiba finalised Not recordable V Mode not finalised Recordable Other Company finalised Not recordable n...

Page 42: ...scs in Video mode with the Chapter Creator has been set to On The chapter s length interval between chapters varies according to the recording mode Simple editing erasing titles changing title name DVD RW VR mode RAM This mode allows multiple editing functions such as deletion of the whole title partial deletion of a title etc Various editing options using a created Playlist Recording Mode Select ...

Page 43: ...en may be different Checking the available disc space Disc Information When recording on an used disc make sure that there is enough disc space for recording With DVD RWs or DVD RAMs you can free up disc space by erasing titles Press the DISPLAY button The display window of disc information appears Items in the display differ depending on the disc type or recording format 1 Disc Type 2 Current inf...

Page 44: ...the disc will appear Press the DISPLAY button once again to view information about the recording Record Mode SP 02 12 Recording PR 1 SP You can not change the recording mode and the PROG while recording Recording will stop automatically if there is no free space left for recording Up to 99 titles can be recorded onto a disc Recording will stop automatically if a copy protected image is selected DV...

Page 45: ...d first See page 42 If an unused DVD RW disc is used whether to initialize or not will be asked first See page 42 3 Press the INPUT SEL button to select the input source according to the connection you made The front panel display changes in the following sequence PR Number AV1 AV2 AV3 DV If you connect a digital camcorder press the INPUT SEL button to select DV See page 46 4 Press the REC MODE bu...

Page 46: ... Press the OPEN CLOSE button to close the disc tray Wait until LOAD disappears from the front panel display If an unused DVD RAM disc is used whether to format or not will be asked first See page 42 If an unused DVD RW disc is used whether to initialize or not will be asked first See page 42 3 Press the REC MODE button repeatedly or Press the REC MODE button then press the button to select the rec...

Page 47: ...ds before the recording is done a message asking whether you want the recorder to power off when the recording is done will appear on your screen To stop recording Press the STOP button The message Do you want to stop recording is displayed Press the œ buttons to select Yes then press the OK button Or press the STOP button again OTR Mode 0 30 The timer counter decreases by the minute from 8 00 to ...

Page 48: ...ally Set up the start time EXACTLY according to the published TV schedule Otherwise the timer recording will not take place Do not select PDC or VPS unless you are sure the programme you wish to record is broadcast with PDC or VPS 1 Check the antenna cable is connected 2 Check the remaining time of the disc 3 Check the date and time are correct Make sure the Clock Setup Clock Set must be set befor...

Page 49: ...1 With the unit in Stop mode press the TIMER button Using the MENU button With the unit in Stop mode press the MENU button Press the buttons to select Programme then press the OK or button twice Press the OK or buttons to select Timer Record 2 Press the OK or button 3 Press the RETURN button to close the Timer Recording screen 4 Press the buttons to select the number of the timer recording you wan...

Page 50: ... Press the buttons to select Timer Record 2 Press the OK or button 5 Press the buttons to select Edit then press the OK or button The Timer Record Input item is displayed Edit the items you want to modify See the Making a Timer Recording section for more information on Timer Recording Input items 6 Press the OK button to confirm the edited setting 7 Press the MENU button after finishing the operat...

Page 51: ... want to see the programmed being recorded on TV To stop Recording Press the STOP button and a message that asks whether to end recording or not will be displayed When Yes is selected Recording stops When No is selected Recording continues Do you want to stop recording Yes No If there is not enough disc space or a copy prevention signal is received during recording recording will stop If there is ...

Page 52: ... MPEG4 67 Playing the Title List 68 This section introduces basic functions of playback and playback by disc type DIGITAL OUT D I G I T A L Dolby Digital DTS Digital Audio Stereo PAL broadcast system in U K France Germany etc MP3 DivX Depending on the disc type it may take up to one minute to load NOTE Disc Types Disc Logo Recorded content Disc Shape Max Playing Time Single sided 12cm 240 DVD VIDE...

Page 53: ... or scratched Fingerprints dirt dust scratches or deposits of cigarette smoke on the recording surface may make it impossible to use the disc for recording DVD RAM RW R discs may not be able to play on some DVD Recorders depending on the player disc and the condition of the recording NOTE When you stop playing disc the recorder remembers where you stopped When you press the PLAY button again it wi...

Page 54: ... move to the Top menu of the disc Use this button if the disc contains more than one title Some type of discs may not support the Top menu function For DVD RAM RW R discs 1 Press the TITLE LIST button to move to the Title List Title List Title List shows a list to help you select a title Since the title list consists of the information on video that is actually recorded if one title is deleted tha...

Page 55: ...utton on the remote control If you press the button Slow 1 8 Slow 1 4 Slow 1 2 If you press the œœ button Slow 1 8 Slow 1 4 Slow 1 2 To return to normal speed playback press the button Press and hold the SEARCH button during pause the disc will play slowly at a 1 4 speed If the button is released the pause operation will resume Step Motion Play 1Press the button on the remote control in the still ...

Page 56: ...ton during playback 2 Press the buttons to select Time 3 Enter the time in the sequence of hours minutes seconds using the number buttons then press the OK button Repeat Off Repeat Title This may not work for some discs When an audio CD CD DA or an MP3 disc is inserted according to a disc type the information display may not appear The Time Search function does not operate in some discs To make th...

Page 57: ...u can select Track Folder or Disc To return to normal playback 3 Press the REPEAT button repeatedly to select Off Press the CANCEL button to return to normal playback DVD RAM DVD RW VR mode unfinalised DVD R and unfinalised DVD RW Video mode do not repeat a chapter NOTE Playing Repeatedly Repeat Playback CHANGE MOVE DVD VIDEO 1 10 1 40 00 01 45 Off ENG D 5 1CH Title 1 1 Off OK MOVE DVD VIDEO 1 10 ...

Page 58: ... Subtitle ENG Title Chapter Time Subtitle Audio Repeat Angle Zoom Title Chapter Time Subtitle Audio Repeat Angle Zoom Using the QUICK button Using the QUICK button 1 Press the QUICK button during playback 2 Press the buttons to select Repeat then press the button to select A B 3 Press the OK button 4 Press the OK button at the point where you want the repeat play to start A then press it again at ...

Page 59: ... Dolby Digital 5 1CH Title Chapter Time Subtitle Audio Repeat Angle Zoom Title Chapter Time Subtitle Audio Repeat Angle Zoom Playback Changing the Camera Angle When a DVD VIDEO contains multiple angles of a particular scene you can select the Angle function This is only available during playback If the disc contains multiple angles the ANGLE mark appears on the screen 1 Press the QUICK button duri...

Page 60: ...the disc tray is opened and then closed bookmarks will disappear NOTE Zooming In 1 Press the QUICK button during playback or pause 2 Press the buttons to select Zoom then press the OK button will be displayed 3 Press the œ buttons to move to the area you want to enlarge 4 Press the OK button The screen will be enlarged to twice the normal size If you press the OK button again after the screen was ...

Page 61: ... OK button when the desired scene appears The number 01 is displayed and the scene is memorized 3 Press the œ button to move to the next position 4 Press the OK button when the desired scene appears The number 02 is displayed and the scene is memorized DVD RAM or DVD RW VR Mode discs have the Marker function instead of the Bookmark function The Marker function allows you to mark up to 99 scenes Si...

Page 62: ...MOVE Music CD Repeat Off Play Option Normal 01 TRACK 1 02 TRACK 2 03 TRACK 3 04 TRACK 4 05 TRACK 5 06 TRACK 6 4 39 4 31 4 30 3 53 4 23 4 24 00 52 01 TRACK 1 01 12 Playing an Audio CD CD DA Audio CD CD DA Screen Elements 1 2 3 7 4 5 6 1 Press the MARKER button during playback 2 Press the œ buttons to select a bookmarked scene 3 Press the OK or button to start playing from the selected scene If you ...

Page 63: ...ack 1 Insert an MP3 Disc into the disc tray 2 Press the buttons to select the Disc Navigation and then press the OK or button The MP3 menu is displayed as in Step 3 when the disc with only MP3 files are played 3 Press the buttons to select the Music and then press the OK or button The MP3 menu appears and the tracks songs are played automatically 4 1 Press the buttons to select the track song you ...

Page 64: ...p menu on screen display Repeat or Play Option Buttons on the Remote Control used for MP3 playback MP3 Screen Elements OK RETURN EXIT MOVE Music CD Repeat Off Play Option Normal ROOT Bryan Adams Bryan Adams_2 Straight from the heart Run to you Heaven 00 22 Straight from the heart ROOT 03 06 1 2 3 7 4 5 6 1 Repeat mode Repeat off Repeat Track Repeat Folder or Repeat Disc 2 Current track song Displa...

Page 65: ...ndom list is generated and played completely another random list is generated and played Random Play is continued until the play option is changed Intro The first 10 seconds of each track will be played If you want to listen to the music that you have selected press the OK or button The play option will be changed to Normal Play If you When Intro Play is completed Normal Play is performed Playlist...

Page 66: ... to display or clear menus 1 Insert a JPEG into the disc tray 2 Press the buttons to select the Disc Navigation and then press the OK or button The Picture menu is displayed as in Step 4 when the disc with only JPEG files are played 3 Press the buttons to select the Photo and then press the OK or button 4 Press the œ buttons to select a picture To see the next 6 pictures press the button To see th...

Page 67: ...h or Slow Motion Play Step Motion Play During play press the or button it moves forward or backward 5 minutes During play press the SEARCH or button and press again to search at a faster speed 2X 4X 8X In pause or step mode press the SEARCH button on the remote control 1 8X 1 4X 1 2X Press the button on the remote control in the still mode This unit can play the following video compression formats...

Page 68: ...MOVE EXIT Title List DVD RAM VR No Title Length Edit 19 APR 2005 12 00 PR12 19 APR 2005 12 00 SP 01 19 APR 2005 1 00 00 21 02 19 APR 2005 1 00 00 03 03 20 APR 2005 2 00 00 15 04 20 APR 2005 2 00 00 16 05 21 APR 2005 1 00 06 32 06 21 APR 2005 1 00 08 16 07 22 APR 2005 1 00 09 36 RETURN OK MOVE EXIT Title List DVD RAM VR No Title Length Edit 21 APR 2005 11 50 PR11 21 APR 2005 11 50 SP 01 19 APR 2005...

Page 69: ...0 SP 01 19 APR 2005 1 00 00 21 02 19 APR 2005 1 00 00 03 03 20 APR 2005 2 00 00 15 04 20 APR 2005 2 00 00 16 05 21 APR 2005 1 00 06 32 06 21 APR 2005 1 00 08 16 07 22 APR 2005 1 00 09 36 1 2 3 4 5 7 6 This may depend on the the disc type DVD R DVD RW Video has limited editing function NOTE You can also play a recorded programme by pressing the QUICK button during playback Press the buttons to sele...

Page 70: ...n stop Since only the information necessary for playing a desired scene is included in a playlist even if that playlist is deleted the original stream will not be deleted Recording or editing might not be completed if an error such as a sudden power failure occurs Please be aware that a material that has been damaged is unable to be retrieved to its original content Editing Basic Editing Title Lis...

Page 71: ...inputs Save Registers the character inputs 5 Press the œ buttons to select Save then press the OK button The changed title name is displayed on the title item of the selected entry RETURN OK MOVE EXIT Title List DVD RAM VR No Title Length Edit 19 APR 2005 12 00 PR12 19 APR 2005 12 00 SP 01 19 APR 2005 1 00 00 21 02 19 APR 2005 1 00 00 03 03 20 APR 2005 2 00 00 15 04 20 APR 2005 2 00 00 16 05 21 AP...

Page 72: ...00 SP 01 Drama 00 00 21 02 Music 00 00 03 03 Sports 00 00 15 04 Movie 00 00 16 05 Sports A1 00 06 32 06 Edu 1 00 08 16 RETURN OK MOVE EXIT Title List DVD RAM VR No Title Length Edit 19 APR 2005 12 00 PR12 19 APR 2005 12 00 SP 01 Drama 00 00 21 02 Music 00 00 03 03 Sports 00 00 15 04 Movie 00 00 16 05 Sports A1 00 06 32 06 Edu 1 00 08 16 Play Rename Delete Edit Protection RETURN OK MOVE EXIT Title ...

Page 73: ... 03 Sports 00 00 15 04 Movie 00 00 16 05 Sports A1 00 06 32 06 Edu 1 00 08 16 RETURN OK MOVE EXIT Title List DVD RAM VR No Title Length Edit Sports A1 19 APR 2005 12 00 SP 01 Drama 00 00 21 02 Music 00 00 03 03 Sports 00 00 15 04 Movie 00 00 16 05 Sports A1 00 06 32 06 Edu 1 00 08 16 Play Rename Delete Edit Protection RETURN OK MOVE EXIT Title List DVD RAM VR Sports A1 19 APR 2005 12 00 SP Do you ...

Page 74: ...d time precedes the starting point you will be prompted with the message End point cannot be marked earlier than start point The section cannot be deleted when it includes a still picture Press the MENU button after the operation has finished The Edit Title List screen will disappear NOTE RETURN OK MOVE EXIT Edit Title List DVD RAM VR Sports A1 21 APR 2005 11 50 00 00 06 Start End Delete Return Ti...

Page 75: ...on from which you want to create a new scene using the playback related buttons Advanced Editing Playlist You can create up to 99 playlist entries Depending on the kind of disc the displayed screen may have a slight difference NOTE You can check and see all the scenes on Edit Playlist screen Repeat steps 1 6 if you want to make a new playlist Repeat steps 3 6 if you want to make scenes of the play...

Page 76: ...you want to edit from the Playlist then press the OK or button The Edit Playlist menu is displayed Play Rename Edit Screen Copy Delete VR mode RETURN OK MOVE EXIT Edit Playlist DVD RAM VR No Title Length Edit 24 APR 2005 10 43 7 Scenes 24 APR 2005 10 43 01 23 APR 2005 0 00 00 21 02 23 APR 2005 0 00 00 03 03 24 APR 2005 1 00 00 15 04 24 APR 2005 1 00 00 16 05 25 APR 2005 2 00 06 32 RETURN OK MOVE E...

Page 77: ... 3 Press the buttons to select Rename then press the OK button The Rename screen is displayed VR mode Editing RETURN OK MOVE EXIT Rename DVD RAM VR Dolphin RETURN OK MOVE EXIT Edit Playlist DVD RAM VR No Title Length Edit Dolphin 7 Scenes 24 APR 2005 10 43 01 23 APR 2005 0 00 00 21 02 23 APR 2005 0 00 00 03 03 Dolphin 00 00 15 04 24 APR 2005 1 00 00 16 05 25 APR 2005 2 00 06 32 RETURN OK MOVE EXIT...

Page 78: ...OVE EXIT Edit Playlist DVD RAM VR No Title Length Edit Dolphin 7 Scenes 24 APR 2005 10 43 01 Science 00 00 17 02 Sky 00 00 06 03 Dolphin 00 00 06 04 Natural 00 00 37 Play Rename Edit Scene Copy Delete RETURN OK MOVE EXIT Edit Playlist DVD RAM VR No Title Length Edit Dolphin 7 Scenes 24 APR 2005 10 43 01 Science 00 00 17 02 Sky 00 00 06 03 Dolphin 00 00 06 04 Natural 00 00 37 Play Rename Edit Scene...

Page 79: ...he playback related buttons Modifying a Scene Replacing a Scene RETURN OK MOVE EXIT Modify Scene DVD RAM VR Natural 23 APR 2005 03 34 00 00 00 30 Start End Change Cancel Scene No 002 Start 00 00 25 End 00 00 30 RETURN OK MOVE EXIT Edit Scene DVD RAM VR Scene No 2 7 Playlist No 3 Play Modify Move Add Delete 01 00 00 26 02 00 00 07 03 00 00 04 04 00 00 03 05 00 00 11 06 00 00 04 RETURN OK MOVE EXIT ...

Page 80: ...ed scene should be inserted before that position which requires no action Depending on the kind of disc the displayed screen may have a slight difference NOTE RETURN OK MOVE EXIT Edit Scene DVD RAM VR Scene No 3 7 Playlist No 3 Play Modify Move Add Delete 01 00 00 26 02 00 00 07 03 00 00 04 04 00 00 03 05 00 00 11 06 00 00 04 RETURN OK MOVE EXIT Edit Scene DVD RAM VR Scene No 3 7 Playlist No 3 Pla...

Page 81: ...clence APR 23 2005 06 43 AM 00 00 35 Start End Add Cancel Scene No 004 Start 00 00 15 End 00 00 35 RETURN OK MOVE EXIT Edit Scene DVD RAM VR Scene No 2 6 Playlist No 3 Play Modify Move Add Delete 01 00 00 26 02 00 00 07 03 00 00 04 04 00 00 00 04 00 00 00 RETURN OK MOVE EXIT Edit Playlist DVD RAM VR No Title Length Edit Science 7 Scene APR 23 2005 06 43 AM 01 Science 00 00 17 02 Sky 00 00 06 03 Do...

Page 82: ...the MENU button after the operation has finished The Edit Playlist screen will disappear NOTE RETURN OK MOVE EXIT Edit Playlist DVD RAM VR No Title Length Edit Science 7 Scene APR 23 2005 06 43 AM 01 Science 00 00 17 02 Sky 00 00 06 03 Dolphin 00 00 06 04 Natural 00 00 37 05 Dolphin 00 00 06 RETURN OK MOVE EXIT Edit Playlist DVD RAM VR No Title Length Edit Dolphin 7 Scene APR 23 2005 06 43 AM 01 S...

Page 83: ...e then press the OK or button The Edit Name screen is displayed Disc Manager You may need to clear disc protect before beginning editing Depending on the kind of disc the displayed screen may be different NOTE RETURN OK MOVE EXIT Rename DVD RAM VR RETURN OK MOVE EXIT Rename DVD RAM VR Disc RETURN OK MOVE EXIT Disc Manager DVD RAM VR Disc Name Disc Protection Not Protected Disc Format Delete All Ti...

Page 84: ...Programme Setup RETURN OK MOVE EXIT Disc Manager DVD RAM VR Disc Name Disc Protection Not Protected Disc Format Delete All Title Lists Disc Navigation Playlist Disc manager Programme Setup RETURN OK MOVE EXIT Disc Manager DVD RAM VR Disc Name Disc Protection Not Protected Disc Format Delete All Title Lists Disc Navigation Playlist Disc manager Programme Setup RETURN OK MOVE EXIT Disc Manager DVD R...

Page 85: ...s 1 With the unit in Stop mode press the MENU button DVD VR DVD V DVD RAM DVD RW DVD RW DVD R DISC RETURN OK MOVE EXIT Disc Manager DVD RW VR Disc Name Disc Protection Not Protected Disc Format Delete All Title Lists Disc Navigation Playlist Disc manager Programme Setup Choose the recording format for DVD RW DVD VR DVD V RETURN OK MOVE EXIT Disc Manager DVD RAM VR Disc Name Disc Protection Not Pro...

Page 86: ...rogramme Setup RETURN OK MOVE EXIT Disc Manager DVD R V Disc Name Disc Protection Not Protected Disc Finalise Delete All Title Lists Disc Navigation Disc manager Programme Setup RETURN OK MOVE EXIT Disc Manager DVD RW VR Disc Name Disc Protection Not Protected Disc Format DVD VR Disc Finalise Delete All Title Lists Disc Navigation Playlist Disc manager Programme Setup RETURN OK MOVE EXIT Disc Mana...

Page 87: ... VR Disc Unfinalise Disc Navigation Playlist Disc manager Programme Setup Do you want to unfinalise disc Yes No RETURN OK MOVE EXIT Disc Manager DVD RW VR F Disc Name Disc Format DVD VR Disc Unfinalise Disc Navigation Playlist Disc manager Programme Setup Disc will be unfinalised Do you want to continue Yes No A DVD RW can be finalised or unfinalised in Video mode A DVD RW can be finalised or unfi...

Page 88: ... Troubleshooting 88 Specifications 92 The DVD recorder requires some time to initialize and the input will be displayed for approx 10 seconds after it is turned on Checkpoint 1 Check whether the power cord is securely plugged into the power outlet Did you set the DVD recorder channel settings correctly Check the free space on your DVD RAM DVD RW DVD R discs Checkpoint 1 Checkpoint 2 Checkpoint 3 T...

Page 89: ...isc does not support all selected functions In this case some settings configured in the settings menu may not work properly Checkpoint 1 Play mode settings are different from the settings configured in the Settings menu The aspect ratio is fixed for DVD discs See page 38 Checkpoint 1 Cannot change the aspect ratio The angle operation is available only when the disc contains images captured from d...

Page 90: ...r there is damage to or any foreign material on your disc Some low quality discs may not play properly If scenes change from dark to bright suddenly the screen may shake vertically temporarily but this is not a fault Checkpoint 1 Checkpoint 2 Checkpoint 3 Checkpoint 4 The disc revolves but no image or bad quality images are displayed Re check the recording time and the end time settings again Reco...

Page 91: ...r the TV DVD selection button Checkpoint 1 Checkpoint 2 Checkpoint 3 The remote control doesn t work A recorded disc is played with only the subtitle and the audio signal which were selected during recording Checkpoint 1 Is it possible to change a subtitle and an audio sig nal on a recorded disc Other Press the button on the front panel of the Recorder for more than 5 seconds with no disc in the u...

Page 92: ...ue Analogue output jacks x 2 Optical Coaxial digital audio output Composite Video Video output jack x 1 S Video output x 1 Y 1 0Vp p C 0 286Vp p at 75Ω load Component output x 1 Y 1 0Vp p Pb 0 70Vp p Pr 0 70Vp p at 75Ω load Video Composite RGB Audio analogue MPEG II Dolby Digital 2ch 256Kbps MPEG II XP about 8 Mbps SP about 4 Mbps LP about 2 Mbps EP about 1 2 Mbps or about 0 8 Mbps 20 Hz 20 kHz Ge...

Page 93: ...Printed in Slovakia AK68 00838A 00 00838A D R255 SG_Cover 6 10 05 3 44 PM Page 1 ...

Reviews: