background image

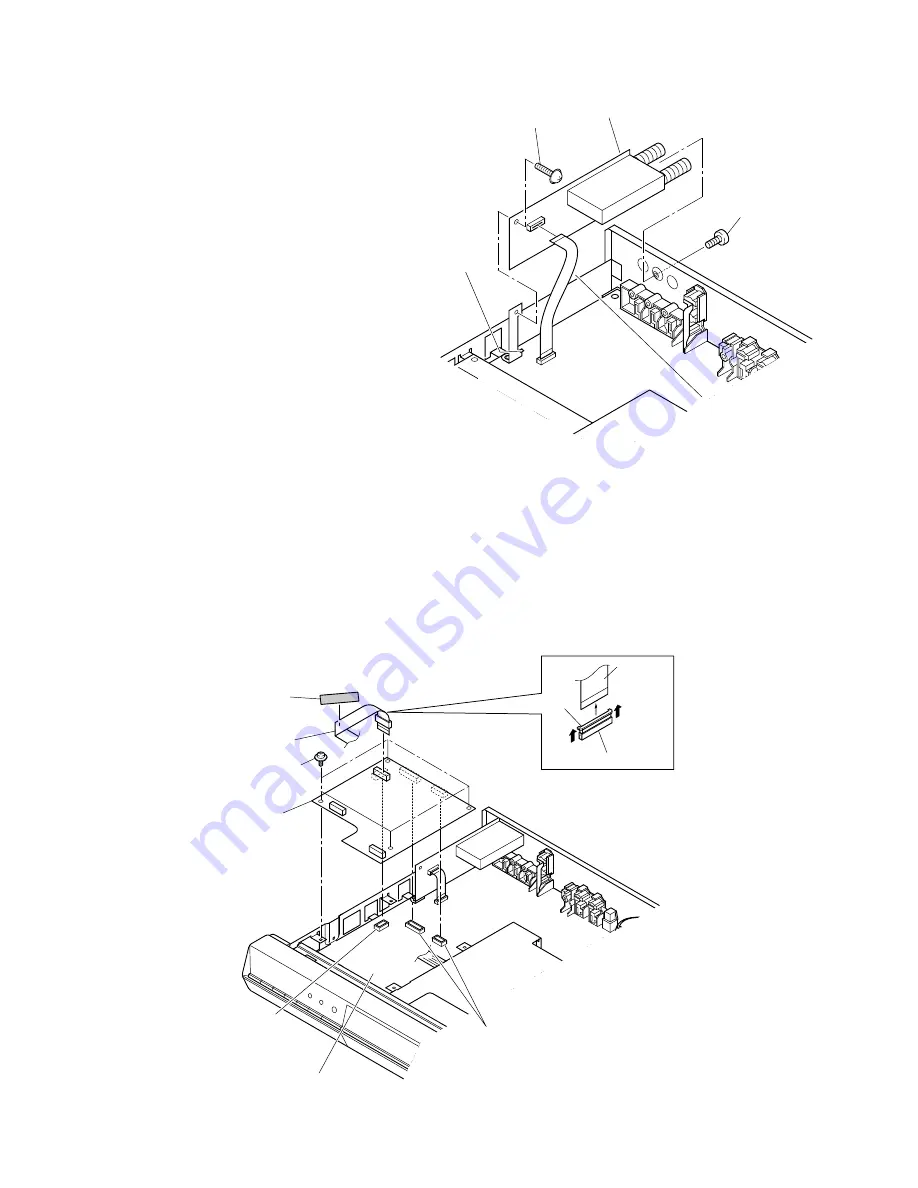
1-2. PC Board Replacement

1-2-1. Tuner Unit PC Board

1. Remove the top cover. (Refer to item 1-1-1.)

2. Disconnect the flexible cable  (1).

3. Remove the screw (2) and the screw (3).

4. Remove the claw, then remove the Tuner Unit PC board (4).

Screw (2)

Tuner Unit

PC board (4)

Screw (3)

Claw

Flexible

cable (1)

1-2-2. Digital PC Board

1. Remove the top cover. (Refer to item 1-1-1.)

2. Peel off the tape (1).

2. Disconnect the flexible cable  (2).

3. Remove four screws (3), then remove the Digital PC board (4).

Note:

• The Digital PC board (4) is connected to the Mother PC board (5) by three connectors (6). Take notice when removing.

Fig. 2-1-7

Fig. 2-1-6

Screws (3)

Digital PC

board (4)

Flexible

cable (2)

Tape (1)

Flexible

cable (2)

Connector

Claw

Connector (6)

Connectors (6)

Mother PC board (5)

Remove the connector claw

in the direction indicated

by the arrows to release the

flexible cable.

Summary of Contents for D-KR4SU

Page 1: ...DVD VIDEO RECORDER SERVICE MANUAL Mar 2005 S FILE NO 810 200531 D R4SU D R4SC D KR4SU DIGITAL VIDEO ...

Page 2: ...round wire or ceramic type Conductive mat The ground resistance between the ground line and the ground is less than 10W LASER BEAM CAUTION LABEL When the power supply is being turned on you may not remove this laser cautions label If it removes radiation of a laser may be received Manufactured under license from Dolby Laboratories Dolby and the double D symbol are trademarks of Dolby Laboratories ...

Page 3: ...xists the fault must be located and corrected Repeat the above test with the DVD VIDEO RECORDER power plug reversed NEVER RETURN A DVD VIDEO RECORDER TO THE CUSTOMER WITHOUT TAKING NECESSARY CORRECTIVE ACTION READING SHOULD NOT EXCEED 0 3V The lightning flash with arrowhead symbol within an equilateral triangle is intended to alert the user to the presence of uninsulated dangerous voltage within t...

Page 4: ...agram 4 4 2 Timer Circuit Diagram 4 4 3 Audio Circuit Diagram 4 4 4 Video Circuit Diagram 4 3 Tuner Unit Circuit Diagram 5 PC BOARDS 5 1 Front Jack PC Board 5 2 Front LED PC Board 5 3 Front L PC Board 5 4 Front R PC Board 5 5 Tuner Unit PC Board 5 6 Digital PC Board 5 7 Mother PC Board CONTENTS SECTION 1 GENERAL DESCRIPTIONS 1 OPERATING INSTRUCTIONS 1 REPLACEMENT OF MECHANICAL PARTS 1 1 Cabinet Re...

Page 5: ...SECTION 1 GENERAL DESCRIPTIONS 1 OPERATING INSTRUCTIONS Please refer to the owner s manual about the contents SECTION 1 GENERAL DESCRIPTIONS ...

Page 6: ...Fig 1 2 1 2 2 Location of PC Boards Fig 1 2 2 ZG45 FAN RAM1 RAM DRIVE EU05 Mother PC board EU05A Tuner Unit PC board EU01 Digital PC board EU02 Power PC board EU03A Front R PC board EU55 Front Jack PC board EU03B Front L PC board EU56 Front LED PC board ...

Page 7: ...ic electricity and may easily damaged so do not forget to ground as required Many screws are used inside the unit To prevent the screws from missing or dropping etc always use a magnetized screwdriver in servicing Several kinds of screws are used and some of them need special cautions That is take care of the tapping screws securing molded parts and fine pitch screws used to secure metal parts If ...

Page 8: ...1 Remove the front panel Refer to item 1 1 2 2 Disconnect the flexible cable 1 and connector 2 3 Remove three screws 3 and the screw 4 then remove the RAM drive 5 4 Remove the shield cover 6 Note After replacing attach the tape 1 to its original position Fig 2 1 3 Connector 1 Connector 1 Connector 1 Screws 3 Screws 2 Earth Front panel 4 Claw Claw Claws Flexible cable 1 Connector 2 Screws 3 Screw 4...

Page 9: ...aws then remove the rear panel 3 5 Remove two screws 4 then remove the fan 5 Fig 2 1 4 1 1 5 Fan 1 Remove the top cover Refer to item 1 1 1 2 Peel off the tape 1 3 Disconnnect two connectors 2 4 Remove two screws 3 then remove the fan 4 Fig 2 1 5 Screw 1 Screws 2 Screws 4 Fan 5 Rear panel 3 Claw Claw Bush Screws 3 Connectors 2 Fan 4 Tape 1 Hexagonal nuts ...

Page 10: ...move the top cover Refer to item 1 1 1 2 Peel off the tape 1 2 Disconnect the flexible cable 2 3 Remove four screws 3 then remove the Digital PC board 4 Note The Digital PC board 4 is connected to the Mother PC board 5 by three connectors 6 Take notice when removing Fig 2 1 7 Fig 2 1 6 Screws 3 Digital PC board 4 Flexible cable 2 Tape 1 Flexible cable 2 Connector Claw Connector 6 Connectors 6 Moth...

Page 11: ... board Refer to item 1 2 1 3 Remove the Digital PC board Refer to item 1 2 2 4 Disconnect three connectors 1 5 Remove five screws 2 and the screw 3 6 Pull out the Mother PC board 4 toward the rear side indicated by the arrow Fig 2 1 8 Screws 2 Screw 3 Mother PC board 4 Connectors 1 Connector 1 ...

Page 12: ...ove the top cover Refer to item 1 1 1 2 Peel off the tape 1 3 Disconnect four connectors 2 4 Remove four screws 3 then remove the Power PC board 4 Fig 2 1 9 Connectors 2 Connectors 2 Tape 1 Connectors 2 Power PC board 4 Screws 3 ...

Page 13: ...ack PC board 9 6 Remove four screws 10 then remove the Front L PC board 11 Note After replacing attach the tape 1 to its original position Fig 2 1 10 Screws 2 Screws 8 Screws 4 Screws 5 Screws 10 Front LED PC Board 7 Stay 3 Front L PC board 11 Front R PC board 6 Tapes 1 Front Jack PC board 9 Front panel Stay Front L PC board Tray door Wire Front R PC board Front Jack PC board Fasten with the tape ...

Page 14: ...nit PC board WB01 W701 W801 Power PC board Mother PC board Digital PC board W051 Fan W101 W104 W102 2 WIRING CONNECTION DIAGRAM After the servicing is complete return the wiring to its original state by using the diagram below as a reference Fig 2 2 1 ...

Page 15: ...in processing be sure to include the model number and description ABBREVIATIONS Integrated Circuit IC Capacitor Cap CapacitanceTolerance forNominal Capacitance more than 10pF P 100 0 Symbol Tolerance B 0 1 C 0 25 D 0 5 F 1 G 2 J 5 K 10 M 20 N 30 V 20 10 W 100 10 U 75 10 Q 30 10 T 50 10 Symbol Tolerance X 40 20 Y 150 10 Z 80 20 Ex 10µF J 10µF 5 Symbol Tolerance pF B 0 1 C 0 25 D 0 5 F 1 G 2 Ex 10pF...

Page 16: ...1 EXPLODED VIEWS 1 1 Packing Assembly Fig 4 4 1 ZF35 Note The shape of the packing material is sometimes different ZF01 ZF10 ZF11 ZF12 D R4SU KR4SU ZF13 ...

Page 17: ...1 2 Chassis Assembly Fig 4 4 2 RAM1 ZG45 P801 EU02 EU05 ZG20 W051 WB01 EU01 EU55 EU56 ZG01 EU05A EU03B EU03A ...

Page 18: ...glish D R4SU SC KR4SU ZF11 P000416400 Owners Manual ST English D R4SU SC KR4SU ZF12 P000416430 Owners Manual Quick Spanish D R4SU KR4SU ZF13 P000416420 Owners Manual Quick English D R4SU SC KR4SU ZF10 P000416450 Owners Manual OP French D R4SC ZF11 P000416440 Owners Manual ST French D R4SC ZF35 P000416800 IR Blaster RWS1000 0062E ZG01 P000438710 Panel Assy Front D R4SU R4SC ZG01 P000440030 Panel As...

Page 19: ...MISCELLANEOUS X201 P000440380 Oscillator Crystal X302 79089168 Oscillator Crystal X303 P000377990 Oscillator Crystal 27 0M EU02 P000438620 PC Board Assy Power EU03A P000438660 PC Board Assy Front R INTEGRATED CIRCUITS IC101 P000416700 IC PT6315 DIODES D101 79060019 Diode Chip 1SS355 MISCELLANEOUS DS101 P000440490 Display FL VFD20 0812FN MT101 P000440420 Module IR GP1UM261XK0F S107 P000377940 Switc...

Page 20: ...Y QX06 79050018 Transistor Chip 2SA1162 Y QX09 79050018 Transistor Chip 2SA1162 Y QX31 79050016 Transistor Chip 2SC2712 Y QX32 79050100 Transistor Chip RN1402 QX33 P000440390 Transistor Chip RN1404 DIODES D702 79060028 Diode Chip 1SS226 D901 79060019 Diode Chip 1SS355 D902 79060019 Diode Chip 1SS355 MISCELLANEOUS J901 P000440440 Jack RCA MSD 244V 09 JW01 P000440450 Jack RCA MSP 801V1 02 01 B JW02 ...

Page 21: ...t rear 1 in front 1 0Vp p 75W Sync signal negative Pin jack x 1 system 1 at rear Y 1 0Vp p 75W Sync signal negative C 0 286Vp p 75W 1 at rear 1 in front Mini DIN4 Pin x 2 systems Y 1 0Vp p 75W Sync signal negative C 0 286Vp p 75W 1 at rear Mini DIN4 Pin x 1 system Y output green 1 0Vp p 75W Sync signal negative Pin jack x 1 system PB PR output blue red 0 7Vp p 75W Pin jack x 1 system each 2 0V rms...

Page 22: ...1 1 SHIBAURA 1 CHOME MINATO KU TOKYO 105 8001 JAPAN ...

Reviews: