background image

28

Modo Grabar

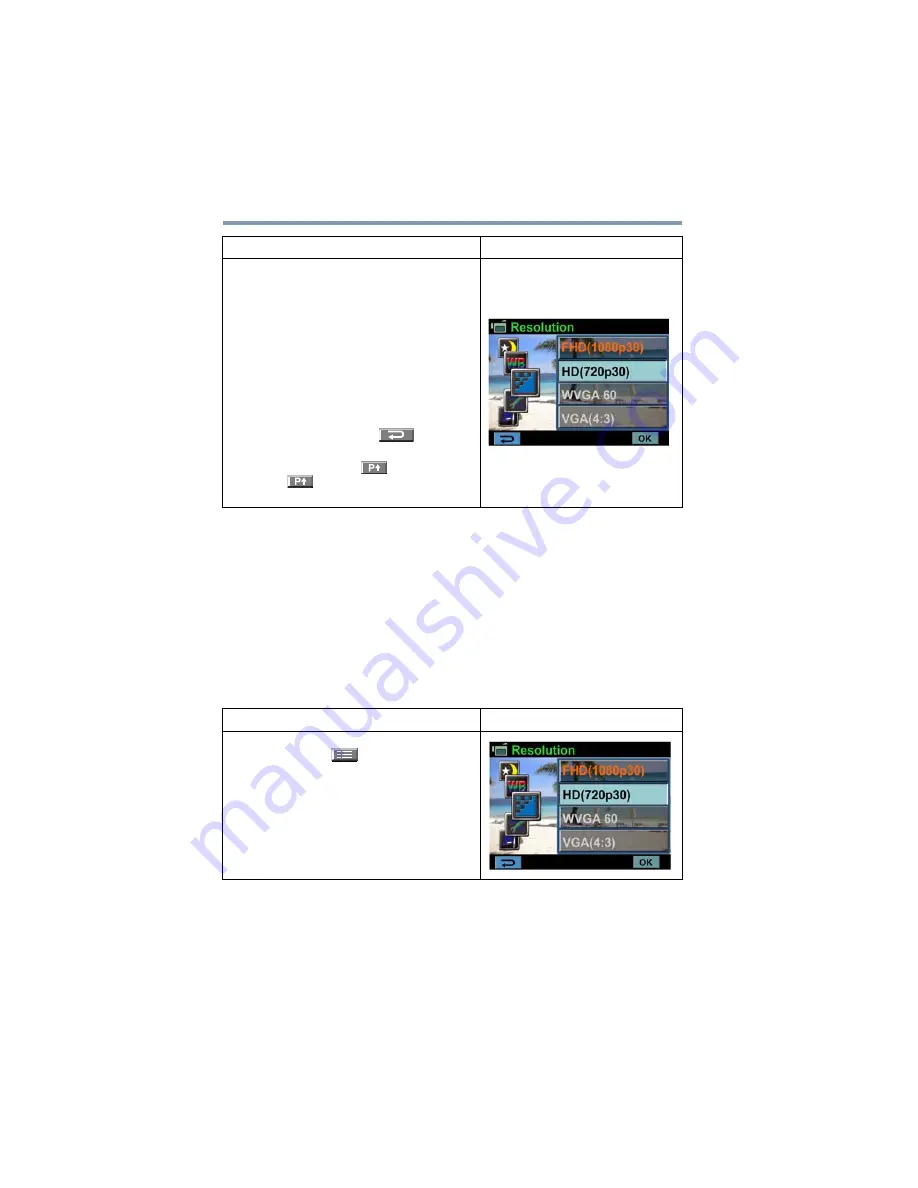
Resolución de las películas

Resolución de las películas

Las cuatros configuraciones de resolución disponibles son:

FHD (1080p/30fps):

 Grabar películas con resolución de

1920 x 1080p/30.

HD (720p/30fps):

 Grabar películas con resolución de

1280 x 720p/30.

WVGA 60: 

Grabar películas con resolución de 848 x 480p/60.

VGA (4:3):

 Grabar películas con resolución de 640 x 480p/30.

2

Con los dedos, desplácese con delicadeza 
a través de la rueda del menú para ver las 
siguientes opciones: Resolución, Escena, 
Efectos, Balance de blancos y 
Configuraciones.

3

A medida que se desplaza, aparecen los 
submenús de cada opción.

4

Toque la opción específica que desee 
ajustar, y luego toque 

OK

 para confirmar la 

configuración.

5

Para salir sin efectuar ningún cambio 
toque el ícono Regresar (

).

6

En la pantalla toque los íconos de 
Retroceso de página (

) y Avance de 

página (

) para desplazarse a través de 

las páginas.

Operación

Pantalla

1

En el modo Grabar películas, toque el 
ícono de Menú (

) en la pantalla para 

mostrar la rueda del menú.

2

Desplácese por las opciones para 
seleccionar 

Resolución

. Aparece el 

submenú Resolución.

3

Toque la opción que desea usar para 
seleccionarla. 

4

Toque 

OK

 para confirmar la configuración.

Operación

Pantalla

Summary of Contents for CAMILEO H30

Page 1: ...GMAA00218011 03 10 English Español CAMILEOH30 User sGuide ...

Page 2: ...ommunications However there is no guarantee that interference will not occur in a particular installation If this equipmentdoescause harmful interference to radioortelevision reception which can be determined by turning the equipment off and on the user is encouraged to try to correct the interference by one or more of the following measures Reorient or relocate the receiving antenna Increase the ...

Page 3: ...ands before using 3 Do not expose the camcorder to high temperature or leave it in direct sunlight Doing so may damage the camcorder 4 Use the camcorder with care Avoid pressing hard on the camcorder body 5 For your own safety avoid using the camcorder when there is a storm or lightning 6 Do not use batteries of different specifications Doing so may lead to the potential for serious damage 7 Remov...

Page 4: ... Toshiba battery charger to charge the battery pack Never attempt to charge the battery pack with any other charger Safety icons This manual contains safety instructions that must be observed to avoid potential hazards that could result in personal injuries damage to your equipment or loss of data These safety cautions have been classified according to the seriousness of the risk and icons highlig...

Page 5: ...registered trademarks of ArcSoft Inc HDMI the HDMI Logo and High Definition Multimedia Interface are trademarks or registered trademarks of HDMI Licensing LLC Intel Intel Core Celeron Centrino and Pentium are trademarks or registered trademarks of Intel Corporation or its subsidiaries in the United States and other countries Microsoft Windows and Windows Vista are either registered trademarks or t...

Page 6: ...ar view 11 Side views 12 Underside view 12 Chapter 2 Getting Started 13 Loading the battery 13 Charge your battery 14 Inserting and removing an SD Card optional 18 Turning the camcorder on and getting started 19 Turning off the camcorder 19 Chapter 3 Record Mode 20 Button functions 20 LCD touch screen information 21 Menu options 22 Movie recording 24 ...

Page 7: ...rd mode operations 27 Movie resolution 28 Picture resolution 29 White balance 29 Scene 30 Movie effects 31 Stabilization 31 Macro mode 32 Motion Detection 32 Slow Motion 33 Time Lapse 33 Picture effects 34 Self Timer 34 Macro mode 35 ISO 35 Chapter 4 Playback Mode 36 LCD touch screen information 37 Playback mode operations 39 Movie playback 40 Delete movies 41 Picture playback 42 Delete picture 43...

Page 8: ...dled software 52 Transferring pictures or movies to a computer 53 Chapter 8 Burning Recorded Clips to DVD 54 Chapter 9 Uploading Video Files to YouTube 58 Chapter 10 Video File Converter 64 Chapter 11 Specifications 67 Operating Environment Conditions 68 Chapter 12 Troubleshooting 69 Chapter 13 Other Information 71 Toshiba Support 71 Before you call 71 Contacting Toshiba 72 Toshiba s technical sup...

Page 9: ...f video and pictures Video recording at an HD resolution of 1920 x1080 HDTV connectivity via an HDMI cable Easy playback of recorded high definition videos on wide screen HDTV Built in YouTube Direct application allowing you to upload videos captured by the camcorder to YouTube more effortlessly ISO and color balance can be set to automatic or manually adjusted 5x optical zoom 4x 1x for 1080p digi...

Page 10: ...l Pentium III 800 MHz or above 256 MB RAM 4x CD ROM Drive 700 MB free HDD space Available USB 2 0 port The LCD touch screen is manufactured using extremely high precision technology However some tiny black and or bright dots white red blue or green may appear on the LCD touch screen These dots are a normal result of the manufacturing process and do not affect the recording NOTE AC Adaptor USB Cabl...

Page 11: ...mple Illustration Front view Rear view Sample Illustration Rear view Lens Self Timer LED Tele Wide button Flash Microphone Speaker Movie Mode LED indicator Playback button Mode button Rolling wheel OK button Picture Mode LED indicator Playback LED indicator ...

Page 12: ...Overview Side views Sample Illustration Side views Underside view Sample Illustration Underside view Pre Record YouTube Power button Direct button LCD touch screen TV port HDMI port Mini USB 2 0 port Battery SD Card cover Tripod socket ...

Page 13: ...ng the battery Before using the camcorder you will need to remove the protective film from the battery To do so remove the battery then remove the film and replace the battery as shown below Sample Illustration Reinserting the battery ...

Page 14: ... cause serious injury Never attempt to disassemble tamper with or repair a battery pack The battery pack could overheat and ignite Leakage of the caustic alkaline solution or other electrolytic substances could cause fire possibly resulting in death or serious injury Never short circuit the battery pack by either accidentally or intentionally bringing the battery terminals in contact with another ...

Page 15: ...se a fire or explosion possibly resulting in serious injury Never expose a battery pack to abnormal shock vibration or pressure Never use a battery pack which has been exposed to abnormal shock even if the appearance is normal The battery pack s internal protective device could fail causing it to overheat or ignite resulting in caustic liquid leakage or explosion or fire possibly resulting in deat...

Page 16: ... possibly resulting in serious injury Battery pack warning indicators Always immediately turn the power off and disconnect the power cable cord plug from the plug socket and stop using the battery pack if you observe any of the following conditions Offensive or unusual odor Excessive heat Discoloration Deformation cracks or leaks Smoke Other unusual event during use such as abnormal sound In such ...

Page 17: ...alls out while you are carrying the product you could be injured or the battery pack could be damaged Do not use an impaired or exhausted battery pack Never continue to use a battery pack after its recharging capability has become impaired or after the warning message indicating that the battery pack power is exhausted has been displayed Continued use of an exhausted or impaired battery pack could...

Page 18: ...hortened Never install or remove the battery pack without first turning off the power and disconnecting the AC adaptor Inserting and removing an SD Card optional Your camcorder comes with internal memory that allows you to store pictures and movies You can expand the memory capacity by using an optional SD SDHC memory card 1 Insert the memory card into the slot until it locks in place as shown bel...

Page 19: ...hts up Press the OK button half way down until the focusing frame turns from white to green Continue to press the button down to take a picture To take a picture while recording a movie When recording movies press the Mode button to capture a still image The Dual record icon displays on the LCD touch screen To view stored movies and pictures Press the Playback button or press on the screen to swit...

Page 20: ... In Record menu press to return to the main menu Up button Move between option items Down button Move between option items OK button 1 Confirm settings 2 In Movie Record mode press to record movies press again to stop recording 3 In Picture Record mode press to take pictures Tele button Zoom in Wide button Zoom out Playback button 1 Switch between Record and Playback modes 2 Press after recording ...

Page 21: ...Sample Image LCD touch screen icons Mode button 1 Switch between Movie mode and Picture mode 2 When recording movies press to capture a still image Power button Press down for one second to turn the camcorder on or off Pre Record YouTube Direct button In Record mode press to activate the Pre Record function and the movie will be recorded 3 seconds before the OK button is pressed ...

Page 22: ...Picture resolution High 16 MP Standard 10 MP Low 3 MP 2 Remaining time of recording that can be made at the current resolution Number of images that can still be taken at the current resolution 3 Self timer enabled Dual Record to take a still picture while recording a movie 4 Stabilization 5 Pre Record Mode Time Lapse Scene 6 Skin Night Backlight 7 Macro Position Focusing ...

Page 23: ...igital zoom Other video resolution 1X 20X 5X Optical zoom and 4X Digital zoom 11 Record menu 12 Playback mode 13 Movie Picture Record mode 14 Movie mode Digital Light Picture mode Flash Auto Red Eye Reduction Digital Light Flash Off 15 SD Card Inserted 16 Battery Full power Battery Medium power Battery Low power Battery No power DC power mode ...

Page 24: ... screen Press the Playback button to view a recorded movie The four resolution settings available are The still image resolution captured during the recording of a movie is the same as the video resolution Using the pre record function The Pre record function ensures that you will not miss any critical recording opportunities as movies are recorded 3 seconds before the OK button is pressed To use ...

Page 25: ...e Taking close up pictures movies Slide the macro switch to change the focus range for different distances of objects To take close up pictures 1 Slide the Macro switch to Macro 2 Press the Record button to start recording a movie or to take a still picture In Macro mode the macro icon appears on the LCD touch screen Remember to turn the macro switch back to Normal when you are not taking close up...

Page 26: ...cture Recording only 3 Digital Light Extends the dynamic range for backlight and high contrast sensitivity so that objects will be brighter and clearer 4 Flash Off The flash will not fire under any circumstances Use this mode when taking pictures in a place where flash photography is prohibited or when the subject is distant beyond the range of the flash Picture Recording only The flash will be di...

Page 27: ...uorescent Tungsten Auto Skin Night Backlight B W Black White Classic Negative Stabilization Macro mode Motion Detect Motion Detection Slow Motion Time Lapse Movie Resolution White Balance Scene Effect High 16 MP Standard 10 MP Low 3 MP Auto Daylight Fluorescent Tungsten Auto Skin Night Backlight B W Black White Classic Negative Self Timer Macro mode ISO Operation Screen 1 Touch the Menu icon in Re...

Page 28: ...tion Scene Effect White Balance Scene and Setting 3 As you scroll the submenus for each option will display 4 Touch the specific option you want to adjust then touch OK to confirm the setting 5 You may also touch the Return icon to exit without any making any changes 6 Touch the on screen Page Up and Page Down icons to scroll through the pages Operation Screen 1 In Movie Record mode touch the on s...

Page 29: ... automatically adjusts white balance Daylight Use in outdoor conditions Fluorescent Use under fluorescent light condition Tungsten Use under tungsten light condition Operation Screen 1 In Picture Record mode touch the on screen Menu icon to display the wheel menu 2 Scroll to select Resolution The Resolution submenu displays 3 Touch the desired option to select it 4 Touch OK to confirm the setting ...

Page 30: ...ght light is behind the subject B W The image is converted to black and white Classic The image is converted to a sepia look Negative The image is converted to a negative version of the original To avoid blurry pictures place the camcorder on a flat steady surface or use a tripod when taking photos in Night Mode Operation Screen 1 In Movie Picture Record mode touch the on screen Menu icon to displ...

Page 31: ...e touch the on screen Menu icon to display the wheel menu 2 Scroll to select Effect The Effect submenu displays 3 Touch the desired option to select it 4 The Movie Effect submenu contains five options to select from Stabilization Macro mode Motion Detection Slow Motion and Time Lapse Operation Screen 1 In the Effect submenu touch to select Stabilization which will display the options screen 2 Touc...

Page 32: ...automatically record videos when the camcorder detects movement Operation Screen 1 In the Effect submenu touch to select Macro Mode which will display the options screen 2 Touch the desired option to select it 3 Touch OK to confirm the setting Operation Screen 1 In the Effect submenu touch to select Motion Detect which will display the options screen 2 Touch the desired option to select it 3 Touch...

Page 33: ...e frame per second 3 Sec Record one frame every 3 seconds 5 Sec Record one frame every 5 seconds The Stabilization function can not be used when the Time Lapse function is activated Operation Screen 1 In the Effect submenu touch to select Slow Motion which will display the options screen 2 Touch the desired option to select it 3 Touch OK to confirm the setting Operation Screen 1 In the Effect subm...

Page 34: ...e picture is taken Operation Screen 1 In Picture Record mode touch the on screen Menu icon to display the wheel menu 2 Scroll to select Effect The Effect submenu displays 3 Touch the desired option to select it 4 The Picture Effect submenu contains Three options to select from Self Timer Macro mode and ISO Operation Screen 1 In the Effect submenu touch Self Timer to display the options screen 2 To...

Page 35: ...wo manual ISO sensitivity settings are also available 800 1600 Use the higher setting to take a picture in the dark or in a poorly lit location or for a subject moving at a high rate of speed The image may become grainy with a higher ISO setting Operation Screen 1 In the Effect submenu touch Macro Mode to display the options screen 2 Touch the desired option to select it 3 Touch OK to confirm the ...

Page 36: ...ture or all movies pictures OK button 1 Enter Movie Picture Playback mode 2 Confirm the setting 3 In Picture Playback mode press to start stop the slideshow Tele button Zoom in Wide button Zoom out Playback button 1 Switch between Record and Playback modes 2 Return to the previous screen Mode button Switch between Movie Preview screen and Picture Preview screen Pre Record YouTube Direct button In ...

Page 37: ...37 Playback Mode LCD touch screen information LCD touch screen information Indicators on the LCD touch screen while in Playback Mode Playback Preview Screen Movie Playback Mode Picture Playback Mode ...

Page 38: ...lution captured during movie recording is the same as the vide resolution 2 Current number Total number of pictures movies 3 Movie Picture Preview screen ON 4 Return to the previous screen or switch to Record mode 5 Movie playback time counter 6 Delete 7 Upload selected movies to YouTube 8 Volume 9 Previous movie picture 10 Movies fast rewind 11 Movies play Movies pause 12 Movies fast forward 0003...

Page 39: ...w stop 15 Magnification indicator Operation Screen 1 Press the Playback button or touch to switch to Playback mode 2 In the Playback preview screen press the Mode button or touch to switch between Movie mode and Picture mode 3 With your fingers sweep to the left to go to the previous picture movie Sweep to the right to go to the next picture movie 4 Touch picture movie to switch between Picture Mo...

Page 40: ...ile in Movie Playback mode touch to play pause the movies 2 Sweep to the left or touch to go to the previous movie sweep right or touch to go to the next movie 3 While playing movies touch to fast rewind forward 4 Touch to increase the volume touch to reduce the volume 5 Touch to exit 6 Press the YouTube Direct button to select the current movie to upload to YouTube NOTE ...

Page 41: ...write protected memory card cannot be deleted Operation Screen 1 Touch to go to the Delete option screen 2 Touch Yes to delete the current movie or No to cancel the operation and exit touch All to delete all movies 3 Before all movies are deleted a confirmation screen appears touch Yes to perform the operation and No to cancel the operation NOTE ...

Page 42: ...he next picture 2 While the picture is selected press on the screen and slide your finger upward to enter Magnification mode The magnification indicator appears on the screen 3 In Magnification mode sweep to the top to zoom in or to the bottom to zoom out 4 To navigate the magnified picture press on the screen and move as well The inner Magnification indicator turns red 5 Press the OK button or sw...

Page 43: ...write protected memory card cannot be deleted Operation Screen 1 Touch to go to the Delete option screen 2 Touch Yes to delete the current picture or No to cancel the operation and exit touch All to delete all pictures 3 Before all pictures are deleted a confirmation screen appears touch Yes to perform the operation and No to cancel the operation NOTE ...

Page 44: ...reen Menu icon to display the wheel menu 2 Scroll and stop on Setting The Setting submenu displays 3 The Setting submenu offers six options for configuring your camcorder setup Sound operation sound TV Language Time Setting Format and Default Setting 4 Touch on the screen to change between the pages ...

Page 45: ...flicker NTSC 60Hz standard USA Canada Japan South Korea and Taiwan etc PAL 50Hz standard UK Europe China Australia Singapore and Hong Kong etc Operation Screen 1 In the Setting submenu touch Sound to enter the options screen 2 Touch the desired option 3 Touch OK to confirm the setting Operation Screen 1 In the Setting submenu touch TV to enter the options screen 2 Touch the desired option 3 Touch ...

Page 46: ...e Setting submenu touch Language to enter the options screen 2 Touch the desired option 3 Touch OK to confirm the setting Operation Screen 1 In the Setting submenu touch Time Setting on the screen to go to the Time Setting menu 2 Touch Year Month Day Hour or Minute to set 3 Adjust the numeric value by touching 4 Touch OK to confirm the settings ...

Page 47: ...n memory When there is no SD Card in the camcorder or SD Card When there is an SD card inserted into the camcorder All data will be erased if the SD card is formatted Make sure all data is copied to your computer or other media before formatting the SD Card Operation Screen 1 In the Setting submenu touch Format on the screen to go to the format confirmation screen 2 Touch Yes to perform the operat...

Page 48: ...submenu touch Default Setting on the screen to go to the Default Setting confirmation screen 2 Touch Yes to perform the operation and No to cancel the operation Setting Default Factory Setting Resolution FHD 1080p 30fps for Movies Standard 10 MP for Pictures Scene Auto Stabilization Off Macro mode Auto Motion Detection Off Slow Motion Off Time Lapse Off White Balance Auto Self Timer Off ISO Auto S...

Page 49: ...49 Camcorder Settings Settings Menu TV Depends on shipping area Language Depends on shipping area Volume Level 6 Setting Default Factory Setting ...

Page 50: ...16 9 wide TV To view images or movies from your camcorder on a TV 1 Connect the HDMI cable to your camcorder s HDMI Out port 2 Connect the other end of the cable to a television 3 Set the video input source of your TV to HDMI Sample Image Connecting a high definition TV 16 9 ...

Page 51: ...the direction button to view stored pictures and movie on a TV Sample Image Connecting a standard TV Operation Screen 1 Press OK button to play movies and press it again to pause 2 While playing movies press the Right Left buttons to fast forward rewind and then release the button to stop 3 Use the Up Down buttons to adjust the volume 4 In Picture Playback mode use the Tele button to magnify the p...

Page 52: ...hat converts multiple video formats into compatible format with your camcorder Adobe Reader is a popular program that you need to have installed to read the User s Manual Many computer users will find they already have this software installed on their computer To install the bundled software 1 Insert the CD ROM into your computer s optical disc drive The autorun screen appears 2 Click Install Appl...

Page 53: ... to friends or post them on the Internet To do this 1 Connect the computer and camcorder with the supplied mini USB 2 0 cable The LED lights up and blinks 2 After the LED stops blinking movies and pictures can be found on your computer at My Computer Removable Disk DCIM 100MEDIA 3 Under this folder you can view delete move or copy any movie picture you want 4 Use the bundled ArcSoft application so...

Page 54: ...to burn movie clips onto a DVD You can share this DVD with family or friends by using a standard DVD player To create a DVD 1 Install ArcSoft MediaImpression Refer to Installing bundled software on page 52 2 Click Start All Programs and then ArcSoft MediaImpression 3 The ArcSoft MediaImpression main screen displays ...

Page 55: ...eos Sample Image 5 The operation screen appears Select the folder that contains the video files you want to burn Select the files in the display area Click Make Movie on the bottom menu Sample Image 6 Click Add Media to add the files onto the slide ...

Page 56: ...56 Burning Recorded Clips to DVD 7 Click Save Share Sample Image 8 Select Burn and click Next to proceed Sample Image ...

Page 57: ...57 Burning Recorded Clips to DVD 9 Click Start to start the VCD DVD burning Sample Image Insert a blank writable CD or DVD into the writable optical disc drive before clicking on Start NOTE ...

Page 58: ...e them with your family and friends on the YouTube website Also the bundled software ArcSoft MediaImpression can be used to upload your video clips to YouTube You must have internet access to upload videos to YouTube 9 1 YouTube Direct To upload video files marked with to YouTube 1 Select the video clips in Movie Playback mode by pressing the YouTube Direct button NOTE ...

Page 59: ...on the camcorder to launch the YouTube Direct application automatically Before the computer launches YouTube Direct you must install the application included on the CD first Sample Image 4 Upload video clips Press YouTube Direct button on the camcorder again The videos clips marked with will be uploaded to the website automatically You may be asked to fill in ...

Page 60: ... uploading by clicking on Click CANCEL to stop uploading Sample Image To upload video files selected manually to YouTube 1 Follow the step 2 and 3 on page 59 2 On the thumbnail screen click on the up down icon to change the pages Click on the video clips you want to upload 3 Click UPLOAD to start uploading Sample Image ...

Page 61: ...lay Pause icon to play pause Click the Return icon to return to the thumbnail preview screen Sample Image To setup your account information for YouTube 1 Click on to go to the setup screen 2 Fill in your account information in the blanks Then click on Save Sample Image If you do not have a account please sign up on YouTube first NOTE ...

Page 62: ...then ArcSoft MediaImpression The ArcSoft MediaImpression main screen appears on your desktop 3 Click Videos Sample Image ArcSoft MediaImpression main screen 4 The operation screen appears Select the folder that contains the video files you want to upload Select the files in the display area Click Upload to YouTube on the bottom menu Sample Image Selecting files ...

Page 63: ... YouTube 5 Fill in your YouTube account information in the blanks and then click Login Sample Image Entering account information 6 Fill in the information on the video clips and then click Upload Sample Image Uploading to YouTube ...

Page 64: ...mats into a format compatible with your camcorder You can then convert various video files and play them back on your camcorder To convert a video file 1 Install ArcSoft MediaConverter Refer to Installing bundled software on page 52 2 Click Start All Programs and then ArcSoft MediaConverter 3 The ArcSoft MediaConverter main screen appears on your desktop ...

Page 65: ...65 Video File Converter 4 Select Profile 1 Sample Image 5 Select the video file you want to convert and then click Open to convert the file Sample Image ...

Page 66: ...corder otherwise the video files in your camcorder may be overwritten 8 Connect your camcorder to your computer and copy the converted videos to My Computer Removable Disk DCIM 100MEDIA in your camcorder If your files were stored in an SD Card in the camcorder and the operating system of your computer is Windows XP 9 After transferring the converted videos to the camcorder press the Playback butto...

Page 67: ...finite 3 9 inch infinite tele 100 cm Infinite 39 inch infinite Zoom FHD 1080p 30fps 1X 5X 5X Optical zoom and 1X Digital zoom Other video resolution 1X 20X 5X Optical zoom and 4X Digital zoom Shutter Electronic LCD touch screen 3 7 6 cm LCD touch screen Storage media Built in 128 MB memory memory partially reserved for firmware SD SDHC card slot support up to 32GB Image resolution High 4608 x 3456...

Page 68: ... 3 640 x 480p 30fps White balance Auto Manual Daylight Fluorescent Tungsten ISO Auto 800 1600 Self timer 10 second delay Light Digital Light ON Light ON Light OFF Flash Flash Auto Red Eye Reduction Digital Light Flash Off File format Picture JPG Movie AVI Image play Single image slideshow PC interface Mini USB 2 0 port TV out NTSC PAL selectable HDMI Battery Lithium ion rechargeable battery Dimens...

Page 69: ...SD card is too low of a speed or contains corrupted files To solve this problem format the SD card using the camcorder instead of a computer Refer to Format on page 47 4 Why is the camcorder flash not active when taking pictures In flash auto mode the camcorder flash fires only when necessary e g in the dark 5 Why do some of my indoor pictures look blurry and dark The camcorder extends picture exp...

Page 70: ...the supplied AC adaptor or the USB cable The camcorder must be turned OFF A blinking light confirms the camcorder is currently charging A steady light indicates that charging has been completed The light turns off automatically after 5 minutes In AC charging Mode ...

Page 71: ...stigate other sources of assistance first Try the following before contacting Toshiba Review the documentation supplied with your product If a problem occurs when you are running software applications consult the software documentation for troubleshooting suggestions Contact the software company s technical support department for assistance Consult the reseller or dealer from whom you purchased yo...

Page 72: ...Standard Limited Warranty The full warranty document can be found online by going to www warranty toshiba com then selecting Click to view Standard Limited Warranty Terms Conditions at the bottom right side of the page The CAMILEO warranty booklet is found under the category of Computer Accessories labeled as One Year Accessories Limited Warranty Warranty Service Customers located in the fifty 50 ...

Page 73: ...CAMILEOH30 Manualdelusuario ...

Page 74: ...iones puede provocar interferencias perjudiciales a las comunicaciones por radio Sin embargo no se garantiza que no habrá interferencias en una instalación en particular Si este equipo provoca interferencias perjudiciales en la recepción de radio o televisión lo que se puede determinar apagando y encendiendo el equipo recomendamos al usuario que intente corregir la interferencia adoptando una o va...

Page 75: ...a temperaturas elevadas ni la deje en contacto directo con la luz del sol ya que la videocámara podría averiarse 4 Use la videocámara con cuidado No presione el cuerpo de la videocámara con fuerza 5 Para su seguridad personal no utilice la videocámara durante una tormenta ni cuando relampaguea 6 No utilice baterías de especificaciones diferentes ya que se podrían causar daños graves a la videocáma...

Page 76: ...ro tipo de cargador Íconos de seguridad Este manual contiene instrucciones de seguridad que deben seguirse a fin de evitar posibles peligros que podrían tener como consecuencia lesiones personales daños al equipo o pérdida de datos Son advertencias de seguridad que están clasificadas de acuerdo con la gravedad del peligro y están representadas por íconos que distinguen cada instrucción como se mue...

Page 77: ...marcas registradas de ArcSoft Inc HDMI el logotipo de HDMI y High Definition Multimedia Interface son marcas comerciales o marcas registradas de HDMI Licensing LLC Intel Intel Core Celeron Centrino y Pentium son marcas comerciales o marcas registradas de Intel Corporation o de sus subsidiarias en Estados Unidos y otros países Microsoft Windows y Windows Vista son marcas registradas o marcas comerc...

Page 78: ...posterior 11 Vistas laterales 12 Vista inferior 12 Capítulo 2 Para comenzar 13 Inserción de la batería 13 Carga de la batería 14 Inserción y extracción de una tarjeta SD opcional 18 Encender la videocámara y empezar a usarla 19 Cómo apagar la videocámara 19 Capítulo 3 Modo Grabar 20 Funciones de los botones 20 Información de la pantalla LCD táctil 21 Opciones del menú 22 ...

Page 79: ... películas 28 Resolución de las fotografías 29 Balance de blancos 29 Escena 30 Efectos para las películas 31 Estabilización 31 Modo Macro 32 Detección de movimiento 32 Cámara lenta 33 Tiempo de espera 33 Efectos para las fotografías 34 Autotemporizador 34 Modo Macro 35 ISO 35 Capítulo 4 Modo Reproducir 36 Información de la pantalla LCD táctil 37 Operaciones del modo Reproducir 39 Reproducción de p...

Page 80: ...fotografías o películas a la computadora 53 Capítulo 8 Para transferir videoclips grabados a un DVD 54 Capítulo 9 Subir archivos de video a YouTube 58 Capítulo 10 Convertidor de archivos de video 64 Capítulo 11 Especificaciones 67 Condiciones ambientales de funcionamiento 68 Capítulo 12 Solución de problemas 69 Capítulo 13 Información adicional 71 Asistencia técnica de Toshiba 71 Antes de contacta...

Page 81: ...s Pantalla LCD táctil a color para visualizar video y fotografías con mayor facilidad Grabación de video con resolución de alta definición HD de 1920 x1080 Conectividad HDTV a través de un cable HDMI Fácil reproducción de videos grabados en alta definición en un televisor de pantalla ancha de alta definición Aplicación integrada YouTube Direct que permite transferir a YouTube los videos grabados c...

Page 82: ...idos los artículos enumerados a continuación Ilustración de muestra Componentes Asegúrese de retirar la película protectora del lente antes de usar la videocámara Requisitos del sistema Microsoft Windows XP Windows Vista Windows 7 Intel Pentium III 800 MHz o superior 256 MB de RAM Unidad de 4x CD ROM 700 MB de espacio libre en el disco duro Un puerto USB 2 0 disponible NOTA Adaptador de CA Cable U...

Page 83: ... o verdes Estos puntos son el resultado normal del proceso de fabricación y no afectan la grabación Vista frontal Ilustración de muestra Vista frontal Vista posterior Ilustración de muestra Vista posterior NOTA Lente Flash Parlante LED del Autotemporizador Micrófono Botón Tele Gran angular Indicador LED de Reproducción Botón Reproducir Rueda de desplazamiento Indicador LED del modo Película Indica...

Page 84: ...s Ilustración de muestra Vistas laterales Vista inferior Ilustración de muestra Vista inferior Puerto de TV Puerto HDMI Mini puerto USB 2 0 Botón de encendido Botón Pregrabar YouTube Direct Pantalla LCD táctil Ranura para el trípode Cubierta de la batería tarjeta SD ...

Page 85: ...ría Antes de utilizar la videocámara debe retirar la película protectora de la batería Para hacerlo saque la batería retire la película y vuelva a insertar la batería como se muestra a continuación Ilustración de muestra Cómo reinsertar la batería ...

Page 86: ...ico que podrían ambos causar lesiones graves Nunca intente desarmar alterar o reparar la batería ya que ésta podría sobrecalentarse e incendiarse La fuga de la solución alcalino cáustica o de otras sustancias electrolíticas podría provocar un incendio que podría ocasionar la muerte o lesiones graves Nunca ponga en contacto accidental o intencionalmente las dos terminales de la batería con otro obj...

Page 87: ...que podría ocasionar lesiones graves Nunca exponga la batería a condiciones anormales de impacto vibración o presión Nunca use una batería que haya sido expuesta a condiciones anormales de impacto aunque la apariencia de ésta sea normal El dispositivo de protección interno de la batería puede fallar ocasionando que ésta se sobrecaliente o encienda provocando una fuga de líquido cáustico una explos...

Page 88: ...lo que podría ocasionar lesiones graves Indicadores de advertencia de la batería Si observa cualquiera de las siguientes condiciones apague inmediatamente la alimentación desconecte la clavija del cable de alimentación del tomacorriente y deje de usar la batería Mal olor u olor inusual Calor excesivo Decoloración Deformación grietas o fugas Humo Otras situaciones poco usuales durante el uso tal co...

Page 89: ... seguro Si la batería llegara a caerse mientras traslada el producto usted podría sufrir lesiones o la batería podría dañarse No use una batería dañada o agotada Nunca continúe usando una batería después de que se haya afectado su capacidad de recargarse o después de que aparezca un mensaje de advertencia que indique que se le ha agotado la energía Si continúa usando una batería agotada o dañada p...

Page 90: ...in antes apagar la alimentación y desconectar el adaptador de CA Inserción y extracción de una tarjeta SD opcional Su videocámara viene con una memoria interna que le permite almacenar fotografías y películas Usted puede aumentar la capacidad de la memoria utilizando una tarjeta de memoria SD SDHC opcional 1 Inserte la tarjeta de memoria en la ranura hasta que encaje en su lugar como se muestra a ...

Page 91: ...e a medias el botón OK Aceptar hasta que el marco de enfoque pase de blanco a verde Siga presionando el botón para tomar la fotografía Para tomar una fotografía mientras esté grabando una película Mientras esté grabando una película presione el botón Modo para capturar una fotografía En la pantalla LCD táctil aparece el ícono de grabación Dual Para ver las fotografías y las películas almacenadas P...

Page 92: ... rojos Luz digital Flash apagado En el menú Grabar presione este botón para regresar al menú principal Botón Arriba Para moverse entre las opciones Botón Abajo Para moverse entre las opciones Botón OK Aceptar 1 Para confirmar las configuraciones 2 En el modo Grabar películas presione este botón para grabar una película Presiónelo de nuevo para detener la grabación 3 En el modo Grabar fotografías p...

Page 93: ...r 2 Después de grabar presione este botón para ver un resumen corto 3 En el menú Grabar presione este botón para salir Botón Modo 1 Para alternar entre el modo Película y el modo Fotografía 2 Cuando esté grabando una película presione este botón para capturar una fotografía Botón de encendido Presione durante un segundo para encender o apagar la videocámara Botón Pregrabar YouTube Direct En el mod...

Page 94: ...20 x 240 Resolución de fotografías Alta 16 MP Estándar 10 MP Baja 3 MP 2 Tiempo de grabación restante que se puede efectuar con la resolución actual Númerodeimágenesrestantesquese puedentomarconla resolución actual 3 Autotemporizador habilitado Grabación Dual para tomar una fotografía mientras se graba una película 4 Estabilización 5 Modo Pregrabar Tiempo de espera Escena 6 Piel Noche Contraluz ...

Page 95: ...ones de video 1X 20X 5X zoom óptico y 4x zoom digital 11 Menú Grabar 12 Modo Reproducir 13 Modo Grabar películas fotografías 14 Modo Película Luz digital Modo Fotografía Flash automático Reducción del efecto de ojos rojos Luz digital Flash apagado 15 Tarjeta SD insertada 16 Batería Alimentación plena Batería Alimentación media Batería Alimentación baja Batería Sin alimentación Modo de alimentación...

Page 96: ...rabación Dual presione el botón Modo para capturar la fotografía El ícono de grabación Dual aparece en la pantalla LCD táctil Presione el botón Reproducir para ver una película grabada Las cuatros configuraciones de la resolución disponibles son La resolución de la fotografía que se captura durante la grabación de una película es la misma que la resolución del video Uso de la función Pregrabar La ...

Page 97: ...ón Reproducir para ver la fotografía Las tres configuraciones de la resolución disponibles son Grabar fotografías películas en primer plano Deslice el interruptor macro para cambiar el rango de enfoque para objetos que se encuentren a diferentes distancias Para tomar fotografías en primer plano 1 Deslice el interruptor Macro para seleccionar Macro 2 Presione el botón Grabar para empezar a grabar u...

Page 98: ...as solamente 3 Luz digital Extiende el rango dinámico para la retroiluminación y la sensibilidad de alto contraste a fin de que los objetos se vean más brillantes y claros 4 Flash apagado El flash no se dispara bajo ninguna circunstancia Utilice este modo cuando esté tomando fotografías en un lugar donde se prohíba el uso del flash o cuando el sujeto esté distante más allá del alcance del flash gr...

Page 99: ...ngsteno Auto Piel Noche Contraluz B N Blanco Negro Clásica Negativa Estabilización Modo Macro Detectar movimiento Detección de movimiento Cámara lenta Tiempo de espera Resolución de fotografías Balance de blancos Escena Efectos Alta 16 MP Estándar 10 MP Baja 3 MP Auto Luz de día Fluorescente Tungsteno Auto Piel Noche Contraluz B N Blanco Negro Clásica Negativa Autotemporizador Modo Macro ISO Opera...

Page 100: ...ctos Balance de blancos y Configuraciones 3 A medida que se desplaza aparecen los submenús de cada opción 4 Toque la opción específica que desee ajustar y luego toque OK para confirmar la configuración 5 Para salir sin efectuar ningún cambio toque el ícono Regresar 6 En la pantalla toque los íconos de Retroceso de página y Avance de página para desplazarse a través de las páginas Operación Pantall...

Page 101: ... automáticamente Luz de día Utilizar bajo condiciones de luz en exteriores Fluorescente Utilizar bajo condiciones de luz fluorescente Tungsteno Utilizar bajo condiciones de luz de tungsteno Operación Pantalla 1 En el modo Grabar fotografías toque el ícono de Menú en la pantalla para mostrar la rueda del menú 2 Desplácese para seleccionar Resolución Aparece el submenú Resolución 3 Toque la opción q...

Page 102: ...te detrás del sujeto B N La imagen se convierte a blanco y negro Clásica Le da una apariencia sepia a la imagen Negativa La imagen se convierte en una versión negativa del original Para evitar las imágenes borrosas coloque la videocámara sobre una superficie plana y firme o utilice un trípode cuando esté tomando fotografías en el modo Noche Operación Pantalla 1 En el modo Grabar películas fotograf...

Page 103: ...e Menú en la pantalla para mostrar la rueda del menú 2 Desplácese para seleccionar Efectos Aparece el submenú Efectos 3 Toque la opción que desea usar para seleccionarla 4 En el submenú Efectos para películas se puede seleccionar entre las siguientes cinco opciones Estabilización modo Macro Detección de movimiento Cámara lenta y Tiempo de espera Operación Pantalla 1 En el submenú Efectos toque Est...

Page 104: ...e que la videocámara grabe videos automáticamente cuando la videocámara detecta movimientos Operación Pantalla 1 En el submenú Efectos toque el modo Macro para mostrar la pantalla con las opciones 2 Toque la opción que desea usar para seleccionarla 3 Toque OK para confirmar la configuración Operación Pantalla 1 En el submenú Efectos toque Detección de movimiento para mostrar la pantalla con las op...

Page 105: ...po de espera 1 segundo Grabar un fotograma por segundo 3 segundos Grabar un fotograma cada 3 segundos 5 segundos Grabar un fotograma cada 5 segundos La función Estabilización no se puede utilizar cuando la función Tiempo de espera está activada Operación Pantalla 1 En el submenú Efectos toque Cámara lenta para mostrar la pantalla con las opciones 2 Toque la opción que desea usar para seleccionarla...

Page 106: ...ía Operación Pantalla 1 En el modo Grabar fotografías toque el ícono de Menú en la pantalla para mostrar la rueda del menú 2 Desplácese para seleccionar Efectos Aparece el submenú Efectos 3 Toque la opción que desea usar para seleccionarla 4 En el submenú Efectos para fotografías se puede seleccionar entre tres opciones Autotemporizador modo Macro e ISO Operación Pantalla 1 En el submenú Efectos t...

Page 107: ...dos configuraciones ISO de sensibilidad 800 1600 manuales Utilice la configuración más alta para tomar fotografías en la oscuridad o en un lugar poco iluminado o de un sujeto que se esté moviendo a alta velocidad Con una configuración ISO más alta la imagen se puede volver granulosa Operación Pantalla 1 En el submenú Efectos toque el modo Macro para mostrar la pantalla con las opciones 2 Toque la ...

Page 108: ...ícula fotografía corriente o todas las películas fotografías Botón OK Aceptar 1 Ingresar al modo Reproducir películas fotografías 2 Confirmar la configuración 3 En el modo Reproducir fotografías presione este botón para iniciar detener la presentación gráfica Botón Tele T Efectuar acercamientos Botón Gran angular W Efectuar alejamientos Botón Reproducir 1 Alternar entre los modos Grabar y Reproduc...

Page 109: ...cadores de la pantalla LCD táctil en el modo Reproducir Botón Pregrabar YouTube Direct En el modo Reproducir películas presione este botón para seleccionar la película corriente que desee subir a YouTube Pantalla de Vista previa de la reproducción Modo Reproducir películas Modo Reproducir fotografías ...

Page 110: ... una película es la misma que la resolución del video 2 Número corriente Número total de fotografías películas 3 Pantalla Vista previa de películas fotografías ACTIVADA 4 Regresar a la pantalla anterior o cambiar al modo Grabar 5 Contador de tiempo de reproducción de películas 6 Eliminar 7 Subir la película seleccionada a YouTube 8 Volumen 9 Película fotografía previa 10 Rebobinado rápido de pelíc...

Page 111: ...dicador de ampliación Operación Pantalla 1 Presione el botón Reproducir o toque para pasar al modo Reproducir 2 En la pantalla de vista previa de la Reproducción presione el botón Modo o toque para alternar entre el modo Película y el modo Fotografía 3 Con los dedos deslícese hacia la izquierda para ir a la fotografía película anterior Deslícese hacia la derecha para ir a la fotografía película si...

Page 112: ...lículas toque para reproducir pausar las películas 2 Deslícese hacia la izquierda o toque para ir a la película anterior deslícese hacia la derecha o toque para ir a la película siguiente 3 Mientras esté reproduciendo películas toque para rebobinar avanzar rápidamente 4 Toque para aumentar el volumen toque para reducir el volumen 5 Toque para salir 6 Presione el botón YouTube Direct para seleccion...

Page 113: ...nadas en una tarjeta de memoria protegida contra escritura Operación Pantalla 1 Toque para ir a la pantalla de la opción Eliminar 2 Toque Sí para eliminar la película corriente o No para cancelar la operación y salir toque Todas para eliminar todas las películas 3 Antes de que se eliminen todas las películas aparece una pantalla de confirmación toque Sí para llevar a cabo la operación y No para ca...

Page 114: ...tras la fotografía está seleccionada haga presión en la pantalla y deslice el dedo hacia arriba para entrar en el modo Ampliación el indicador de ampliación aparece en la pantalla 3 En el modo Ampliación deslícese hacia arriba para efectuar acercamientos o hacia abajo para efectuar alejamientos 4 Para navegar en la fotografía ampliada haga presión en la pantalla y mueva el dedo el indicador intern...

Page 115: ...enadas en una tarjeta de memoria protegida contra escritura Operación Pantalla 1 Toque para ir a la pantalla de la opción Eliminar 2 Toque Sí para eliminar la fotografía corriente o No para cancelar la operación y salir toque Todas para eliminar todas las fotografías 3 Antes de que se eliminen todas las fotografías aparece una pantalla de confirmación toque Sí para llevar a cabo la operación y No ...

Page 116: ...talla para mostrar la rueda del menú 2 Desplácese y deténgase en Configuración Aparece el submenú Configuración 3 El submenú Configuración ofrece seis opciones para configurar la videocámara Sonido sonido de funcionamiento TV Idioma Ajuste de la hora Formato y Configuraciones predeterminadas 4 Toque en la pantalla para moverse entre las páginas ...

Page 117: ...o de la imagen Estándar NTSC 60Hz EE UU Canadá Japón Corea del Sur Taiwán etc Estándar PAL 50Hz Reino Unido Europa China Australia Singapur Hong Kong etc Operación Pantalla 1 En el submenú Configuración toque Sonido para ingresar en la pantalla de opciones 2 Toque la opción deseada 3 Toque OK para confirmar la configuración Operación Pantalla 1 En el submenú Configuración toque TV para ingresar a ...

Page 118: ...guración toque Idioma para ingresar en la pantalla de opciones 2 Toque la opción deseada 3 Toque OK para confirmar la configuración Operación Pantalla 1 En el submenú Configuración toque Ajuste de la hora en la pantalla para ingresar al menú Ajuste de la hora 2 Para ajustar la hora toque año mes día hora o minutos 3 Ajuste el valor numérico tocando 4 Toque OK para confirmar las configuraciones ...

Page 119: ...rada cuando no hay una tarjeta SD en la videocámara o la tarjeta SD cuando hay una tarjeta SD en la videocámara Si se formatea la tarjeta SD se borran todos los datos Por lo tanto asegúrese de copiar todos los datos en una computadora o en otro medio antes de formatear la tarjeta SD Operación Pantalla 1 En el submenú Configuración toque Formato en la pantalla para ir a la pantalla de confirmación ...

Page 120: ...onfiguración predeterminada en la pantalla para ir a la pantalla de confirmación de las Configuraciones predeterminadas 2 Toque Sí para llevar a cabo la operación y No para cancelarla Configuración Configuración predeterminada de fábrica Resolución FHD 1080p 30fps para películas Estándar 10 MP para fotografías Escena Auto Estabilización Desactivada Modo Macro Auto Detección de movimiento Desactiva...

Page 121: ... videocámara Menú Configuración Sonido Activado TV Depende del área geográfica desde donde se envía Idioma Depende del área geográfica desde donde se envía Volumen Nivel 6 Configuración Configuración predeterminada de fábrica ...

Page 122: ... fotográficas o películas almacenadas en la videocámara a través de un televisor 1 Conecte el cable HDMI al puerto de salida HDMI de la videocámara 2 Conecte el otro extremo del cable a un televisor 3 Fije la fuente de entrada de video del televisor en HDMI Ilustración de muestra Conexión a un televisor de alta definición 16 9 ...

Page 123: ... de un televisor Ilustración de muestra Conexión a un televisor estándar Operación Pantalla 1 Presione el botón OK Aceptar para reproducir películas y presiónelo de nuevo para pausar 2 Mientras está reproduciendo una película presione los botones Derecha Izquierda para avanzar rápidamente rebobinar la película y luego suelte el botón para detenerla 3 Utilice los botones Arriba Abajo para ajustar e...

Page 124: ...atos de video a un formato que sea compatible con su videocámara Adobe Reader es un programa muy conocido que debe estar instalado en la computadora para leer el Manual del usuario Muchos usuarios ya tienen este último programa instalado Para instalar el paquete de software incluido 1 Inserte el CD ROM en la unidad de discos ópticos de la computadora Aparece la pantalla de ejecución automática 2 H...

Page 125: ... sus amigos o colocarlas en Internet Para hacerlo 1 Conecte la computadora y la videocámara con el mini cable USB 2 0 que se suministra El LED se ilumina y parpadea 2 Después de que deja de parpadear las películas y fotografías se pueden encontrar en la computadora bajo Mi PC Disco extraíble DCIM 100MEDIA 3 En esta carpeta puede ver eliminar mover o copiar las películas y fotografías que desee 4 U...

Page 126: ...bar videoclips en un DVD Estos DVD se pueden compartir con los familiares y amigos mediante un reproductor de DVD estándar Para crear un DVD 1 Instale ArcSoft MediaImpression Consulte Instalación del paquete de software en la página 52 2 Haga clic en Inicio Todos los programas y luego en ArcSoft MediaImpression 3 Aparece la pantalla principal de ArcSoft MediaImpression ...

Page 127: ...alla de funcionamiento Seleccione la carpeta que contenga los archivos de video que desee grabar Seleccione los archivos en el área de visualización Haga clic en Make Movie Hacer película en el menú inferior Imagen de muestra 6 Haga clic en Add Media Añadir medio para añadir los archivos en la diapositiva ...

Page 128: ...56 Para transferir videoclips grabados a un DVD 7 Haga clic en Save Share Guardar Compartir Imagen de muestra 8 Seleccione Burn Grabar y luego Next Siguiente para continuar Imagen de muestra ...

Page 129: ...lips grabados a un DVD 9 Haga clic en Start Iniciar para empezar a grabar el VCD DVD Imagen de muestra Inserte un CD o DVD escribible en blanco en la unidad de discos ópticos escribible antes de hacer clic en Start Iniciar NOTA ...

Page 130: ...amiliares y amigos a través del sitio YouTube Además el software ArcSoft MediaImpression incluido también se puede utilizar para subir videoclips a YouTube Para subir videos a YouTube tiene que tener acceso a Internet 9 1 YouTube Direct Para subir a YouTube los archivos de video marcados con 1 En el modo Reproducir películas seleccione los videoclips presionando el botón YouTube Direct NOTA ...

Page 131: ...ámara para iniciar automáticamente la aplicación YouTube Direct Antes de que la computadora inicie la aplicación YouTube Direct usted debe instalar primero la aplicación incluida en el CD Imagen de muestra 4 Suba los videos En la videocámara presione de nuevo el botón YouTube Direct Los videos marcados con se transfieren al sitio automáticamente Antes de subir los videos es posible ...

Page 132: ... en CANCEL Cancelar para detener la carga Imagen de muestra Para subir manualmente a YouTube los archivos de video seleccionados 1 Siga las pasos 2 y 3 que aparecen en la página 59 2 En la pantalla de miniaturas haga clic en el ícono arriba abajo para cambiar las páginas Haga clic en los videoclips que desee cargar 3 Haga clic en UPLOAD Cargar para iniciar la carga Imagen de muestra ...

Page 133: ...usar el video Haga clic en el ícono Regresar para regresar a la pantalla de vista previa de las miniaturas Imagen de muestra Para configurar las información de la cuenta para YouTube 1 Haga clic en para ir a la pantalla de configuración 2 Escriba la información de su cuenta en los espacios en blanco Haga clic en Save Guardar Imagen de muestra Si no tiene una cuenta inscríbase primero en YouTube NO...

Page 134: ... principal de ArcSoft MediaImpression en el escritorio 3 Haga clic en Videos Imagen de muestra Pantalla principal de ArcSoft MediaImpression 4 Aparece la pantalla de funcionamiento Seleccione la carpeta que contenga los archivos de video que desea transferir Seleccione los archivos en el área de visualización En el botón del menú inferior haga clic en Upload to YouTube Cargar a YouTube Imagen de m...

Page 135: ... de YouTube en los espacios en blanco y luego haga clic en Login Iniciar sesión Imagen de muestra Cómo escribir la información de la cuenta 6 Llene la información relativa a los videoclips y luego haga clic en Upload Cargar Imagen de muestra Cómo subir los archivos a YouTube ...

Page 136: ... un formato compatible con su videocámara Puede entonces convertir distintos archivos de video y reproducirlos en su videocámara Para convertir un archivo de video 1 Instale el programa ArcSoft MediaConverter Consulte Instalación del paquete de software en la página 52 2 Haga clic en Inicio Todos los programas y luego en ArcSoft MediaConverter 3 Aparece la pantalla principal de ArcSoft MediaConver...

Page 137: ...vertidor de archivos de video 4 Seleccione Profile 1 Perfil 1 Imagen de muestra 5 Seleccione el archivo de video que desea convertir y luego haga clic en Open Abrir para convertir el archivo Imagen de muestra ...

Page 138: ...a videocámara de lo contrario se podrían sobrescribir los archivos de video de la videocámara 8 Conecte la videocámara a la computadora y copie los videos convertidos en el archivo Mi PC Disco extraíble DCIM 100MEDIA de la videocámara Si los archivos se almacenaron en una tarjeta SD en la videocámara y si el sistema operativo de la computadora es Windows XP 9 Después de transferir los videos conve...

Page 139: ...lgadas infinito Modo automático gran angular 10 cm Infinito 3 9 pulgadas infinito Tele 100 cm Infinito 39 pulgadas infinito Zoom FHD 1080p 30fps 1X 5X 5X zoom óptico y 1X zoom digital Otras resoluciones de video 1X 20X 5X zoom óptico y 4X zoom digital Obturador Electrónico Pantalla LCD táctil Pantalla LCD de 7 6 cm 3 pulgadas Medios de almacenamiento Memoria integrada de 128 MB memoria parcial uti...

Page 140: ... x 480 60fps VGA 4 3 640 x 480p 30fps Balance de blancos Automático Manual Luz de día Fluorescente Tungsteno ISO Auto 800 1600 Autotemporizador Demora de 10 segundos Luz Luz digital encendida Luz encendida Luz apagada Flash Flash automático Reducción del efecto de ojos rojos Luz digital Flash apagado Formato de archivo Fotografías JPG Películas AVI Reproducción de imágenes Imagen individual presen...

Page 141: ...ta de memoria no aparecen correctamente cuando la pantalla LCD táctil muestra la marca El símbolo indica que la velocidad de la tarjeta SD es muy baja o que la tarjeta contiene archivos corrompidos Para resolver este problema formatee la tarjeta SD utilizando la videocámara en vez de la computadora Consulte Formato en la página 47 4 Por qué no está activo el flash de la videocámara cuando estoy to...

Page 142: ...l objetivo firmes durante algunos segundos mientras toma las fotografías El obturador suena cuando se toma una fotografía 6 Cómo se carga la batería Debe utilizar el adaptador de CA o el cable USB suministrados con la videocámara La videocámara debe estar APAGADA Una luz parpadeante confirma que la batería se está cargando Una luz sólida indica que se completó la carga La luz se apaga automáticame...

Page 143: ...ro a otras fuentes de asistencia técnica Intente lo siguiente antes de comunicarse con Toshiba Consulte la documentación suministrada con el producto Si el problema se produce mientras está ejecutando una aplicación de software consulte las sugerencias sobre posibles soluciones de problemas en la documentación del software Póngase en contacto con el personal de asistencia técnica del fabricante de...

Page 144: ...de la garantía se puede encontrar en línea visitando el sitio www warranty toshiba com y luego seleccionando Click to view Standard Limited Warranty Terms Conditions Haga clic para ver los términos y condiciones de la Garantía limitada estándar en la parte inferior derecha de la página El folleto de garantía de CAMILEO se encuentra bajo la categoría de Computer Accesories Accesorios para computado...

Reviews: