background image

E-7 

4. Loading 

the 

Media


This section describes how to load the media in the printer. This 
printer accepts label rolls, tag rolls, and fanfold paper stocks. Please 
use TOSHIBA TEC CORPORATION approved media. 


NOTES: 

1.  Please perform a media sensor calibration whenever you change the 

media type. 
For instructions on how to perform a media sensor calibration, refer to 

2.9.1 Media Sensor Calibration

 of the Owner’s Manual. 


2.  The size of the media which can be loaded inside the printer is as 

follows: 

Outer roll diameter: Max. 127mm (5”) 
Inner core diameter: 25.4 (1”) mm or 38.1 mm (1.5”)  

When the outer roll diameter exceeds 127 mm or the inner core 
diameter exceeds 38.1 mm, an optional External Media Stand is 
required. For details, refer to the 

Installation Manual for the B-FV904-

PH-QM-R External Media Stand

 
At factory shipment, the core holder size is set for 1.5" on the Media 
Roll Holders. If you want to use 1" core media, detach the core holders 
by loosening the thumb screws, reverse the core holders then re-attach 
them with the thumb screws to the Media Roll Holders as shown below. 


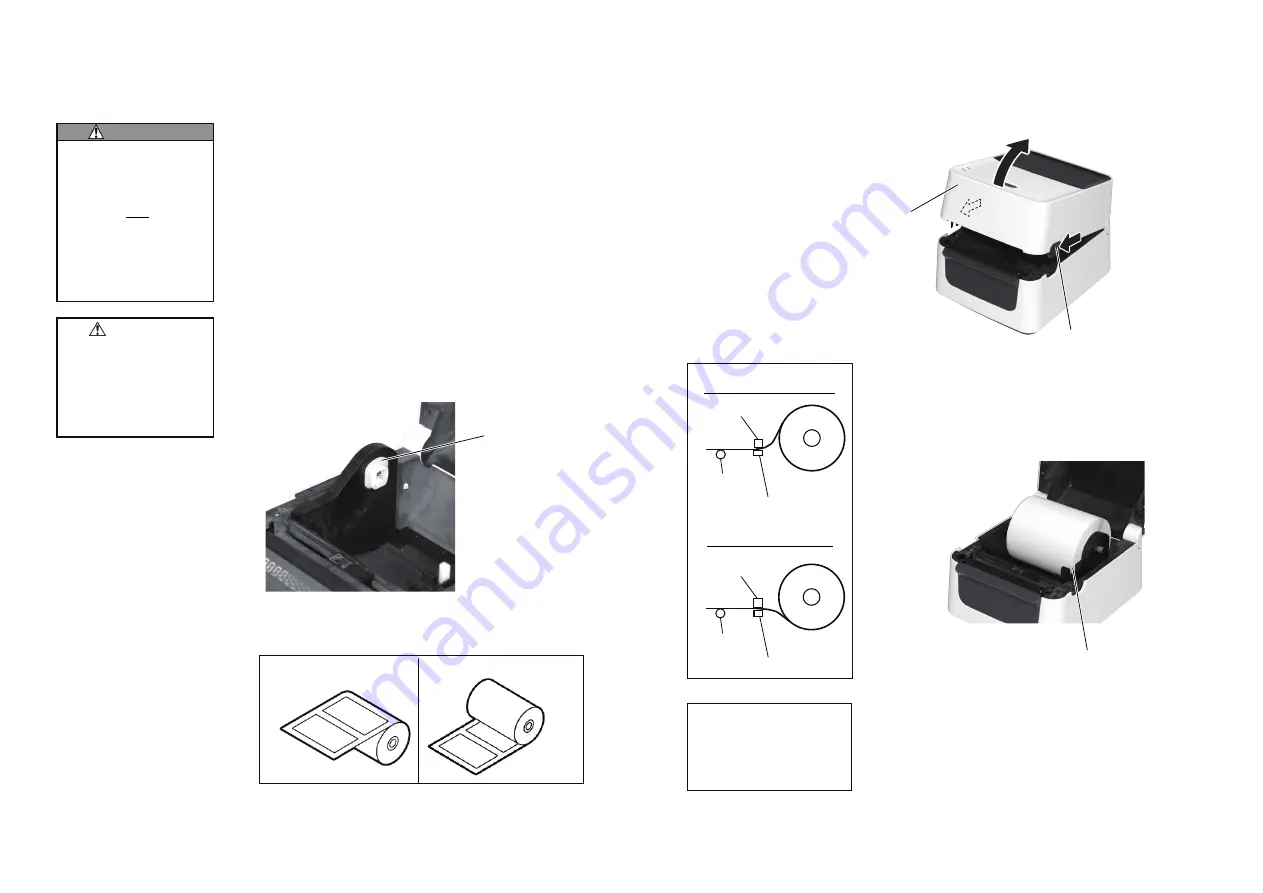
3.  Media rolls can be wound inside or wound outside. (See the diagram 

below.) Both types of media roll should be loaded so that the print side 
faces up. 


WARNING! 

1.  Do not touch any moving 

parts. To reduce the risk of 
fingers, jewellery, clothing, 
etc. being drawn into the 
mechanism, be sure to load 
the media 

only

 once the 

printer has completely 
stopped moving. 

2.  To avoid injury, be careful 

not to trap your fingers 
while opening or closing 
the Top Cover.  

CAUTION! 

Be careful not to touch the 
Print Head Elements when 
opening the Top Cover. Doing 
this may cause damage to 
some of the dots through 
static discharge or other print 
quality problems.


Outside wound  

Inside wound 


Core Holder 

E-8 


1.


Open the Top Cover while pulling the Lock Release Portions as 
indicated by the arrows. 


2.


Open the Media Roll Holders by pressing the Holder Lock Lever 
and slide them outward. Place the media roll between the holders 
ensuring that print side is facing up, then using Holder Lock Lever 
slide the Media Roll Holders to clamp the media roll tightly. 


NOTE:

 Media path


For the outside-wound media 


For the inside-wound media 


NOTES: 

1.  Make sure that the print side 

faces up.  

2.  Cut the leading edge of the 

media straight with scissors.  

Top Cover 

Platen 

Feed Gap Sensor


Platen 

Feed Gap Sensor

Black mark sensor 

Lock Release Portion 

Holder Lock Lever 

Black mark sensor 

Summary of Contents for B-FV4D SERIES

Page 1: ...ting dust and dirt could cause a fire due to the heat released by electric leakage NOTES 1 This manual may not be copied in whole or in part without prior written permission of TOSHIBA TEC CORPORATION 2 The contents of this manual may be changed without notification 3 Please refer to your local Authorized Service representative with regard to any queries you may have in this manual 4 Centronics is...

Page 2: ...net Interface Serial Interface RS 232C Some models have no serial interface RS 232C Parallel Interface Centronics CAUTION The areas indicated by the ellipse have sharp edges To avoid injury be careful not to touch them when handling the printer E 4 2 1 3 Interior D B FV4D GS12 QM R x xx xxxxxxxxx Paper Slot CAUTION To avoid injury be careful not to trap your fingers in the Paper Slot while opening...

Page 3: ...itch to turn the printer on off Plugging or unplugging the power cord to turn the printer on off may cause fire an electric shock or damage to the printer Power Switch NOTE If LED 1 is illuminated in colors other than green or unlit refer to Section 4 TROUBLESHOOTING of the Owner s Manual E 6 3 2 Turning OFF the Printer 1 Before turning off the printer power switch verify the following LED 1 is il...

Page 4: ...ide or wound outside See the diagram below Both types of media roll should be loaded so that the print side faces up WARNING 1 Do not touch any moving parts To reduce the risk of fingers jewellery clothing etc being drawn into the mechanism be sure to load the media only once the printer has completely stopped moving 2 To avoid injury be careful not to trap your fingers while opening or closing th...

Page 5: ...lack Mark Sensor align it with the centre of the black mark on the media Failure to do this will disable the detection of printed black marks resulting in an error NOTE Be careful not to squeeze the media with the Media Guides Doing so bends the media which can cause a paper jam or feed failure NOTES 1 The sensor type used in the last print job is selected by default To change the sensor type refe...

Page 6: ...the Strip Block 2 When the media is correctly set the backing paper should be pinched between the Platen and the Strip Feed Roller as shown below Strip Feed Roller Strip mode Option When printing in strip mode labels are automatically removed from the backing paper as each label is printed How to set the media When issuing labels in the strip mode set the label in the following procedure 1 Load th...

Page 7: ...handling the cutter WARNING NOTE When placing fanfold paper stock at the rear of the printer care should be taken of the following points 1 Face the print surface up 2 The fanfold paper stock is parallel to the fanfold paper slot 3 The interface and power cables do not interfere with the feeding of the fanfold paper Media Outlet Cutter Cover Fanfold Paper Stock Fanfold Paper Slot E 14 When the med...

Reviews: