Toshiba B-EX6T Series Quick Installation Manual Download Page 7

E-7 

3.2  Loading the Ribbon


There are two types of media available for printing on: these are thermal transfer media and direct 
thermal media (a chemically treated surface). DO NOT LOAD a ribbon when using a direct thermal 
media. 
 

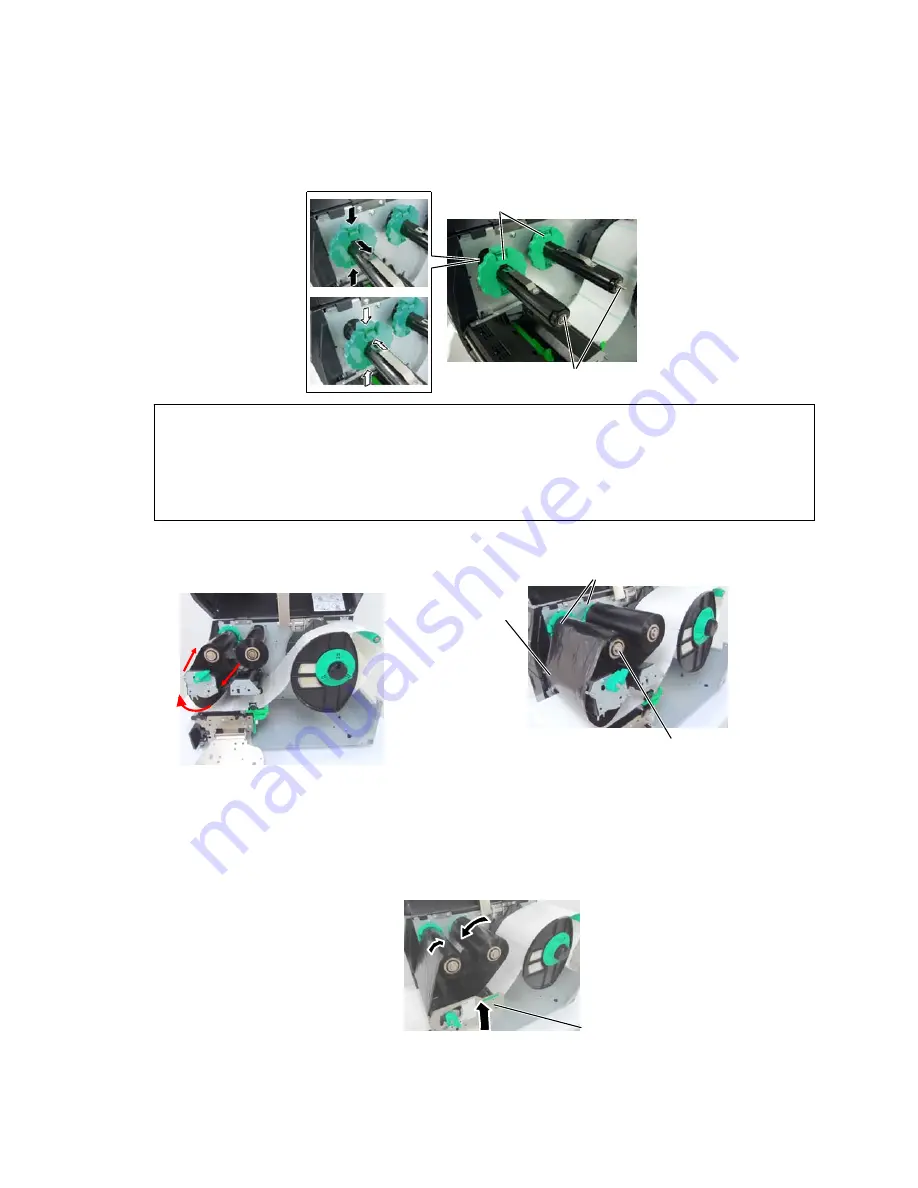
1. Grasp the tabs on the top and bottom of the Ribbon Stoppers and move the Ribbon Stoppers 

back to the end of the Ribbon Shaft. 


2.  Leaving plenty of slack between the ribbon spools, place the ribbon onto the Ribbon Shafts as 

shown below. 


3.  Slide the Ribbon Stoppers along the Ribbon Shafts to a position where the ribbon is centred 

when fitted. 

4.  Lower the Print Head Block and set the Ribbon Shaft Holder Plate aligning its holes with the 

Ribbon Shafts. 

5.  Take up any slack in the ribbon. Wind the leading tape onto the ribbon take-up roll until the ink 

ribbon can be seen from the front of the printer. 


6.  Turn the Head Lever to Lock position to close the Print Head. 
7.  Close the Top Cover. 

NOTES: 

1.  When attaching the ribbon stoppers, make sure that the pinchers face into the printer. 
2.  Be sure to remove any slack in the ribbon when printing.  Printing with a wrinkled ribbon will lower the 

print quality.  

3.  The Ribbon Sensor is mounted on the rear of the Print Head Block to detect a ribbon end.  When a ribbon 

end is detected, “NO RIBBON” message will appear on the display and the ERROR LED will illuminate. 

Print Head Block Holder 
Plate 

Ribbon Stopper 

Ribbon Shaft 

Print Head Block 

Ribbon Take-up Roll

Ribbon Shaft 

Summary of Contents for B-EX6T Series

Page 1: ...ct Otherwise this cable needs to meet the following standards Power Cord For this product a UL listed detachable power cord is required Outside the US power cords need to meet the particular country s certification and application requirements If a different power cord is used from that described above you might violate safety certifications which are in force in the country of use The socket outl...

Page 2: ...printer However please note that TOSHIBA TEC shall have no liability for any damage of any kind sustained during transportation of the product 2 Keep the carton and internal packaging for future transportation of the printer Contents Bar code printer application BarTender Ultra Lite Windows Driver Owner s Manual Specifications Programming Key operation etc Product information Catalogue LCD Message...

Page 3: ... the print head with a hard object like a watch or a ring Since the print head element can be easily damaged by shock please treat it carefully and do not hit it with any hard object WARNING 1 Do not touch any moving parts To reduce the risk of fingers jewellery clothing etc being drawn into the moving parts be sure to load the media once the printer has stopped moving completely 2 The Print Head ...

Page 4: ... the Head Lever is turned to FREE position the Print Head is raised 2 To enable printing the Head Lever must be set to the Position1 Position2 This ensures that the Print Head is closed There are two head pressure levels Set the Head Lever depending on the media type Position Position2 Labels Position Position1 Tags However proper position may differ depending on media For details refer to your TO...

Page 5: ...Print Head 10 Lower the Print Head Block until it stops Batch mode In the batch mode the media is continuously printed and fed until the number of labels tags specified in the issue command have been printed In the case of labels rolled with the print side facing inside In the case of labels rolled with the print side facing outside Guide Shaft Media Media Guide Supply Holder Media Guide Print Hea...

Page 6: ... in the same way Insert the leading edge of the media into the cutter until it comes out the Media Outlet of the Cutter Module WARNING The cutter is sharp so care must be taken not to injure yourself when handling the cutter CAUTION 1 Be sure to cut the backing paper of the label Cutting labels will cause the glue to stick to the cutter which may affect the cutter quality and shorten the cutter li...

Page 7: ... Shaft Holder Plate aligning its holes with the Ribbon Shafts 5 Take up any slack in the ribbon Wind the leading tape onto the ribbon take up roll until the ink ribbon can be seen from the front of the printer 6 Turn the Head Lever to Lock position to close the Print Head 7 Close the Top Cover NOTES 1 When attaching the ribbon stoppers make sure that the pinchers face into the printer 2 Be sure to...

Page 8: ...ress the Power Switch as shown in the diagram below Note that O is the power OFF side of the switch CAUTION Use the power switch to turn the printer On Off Plugging or unplugging the Power Cord to turn the printer On Off may cause fire an electric shock or damage to the printer NOTE If a message other than ON LINE appears on the display or the ERROR LED lamp is illuminated refer to Owners manual E...

Reviews: