background image

Cleaning the TOSHIBA Label Printer for Business Partner Systems 

V2.1 

Model #B-EV4D-GS24 
 

November 2016   

Always follow instructions to ensure the protection of personnel, devices, and data 

 Page 1 of 16  

LIMITED RIGHTS NOTICE


Cleaning the TOSHIBA Label Printer 


LIMITED RIGHTS NOTICE 

This technical data, the installing instructions and hardware diagrams, is submitted with LIMITED RIGHTS under Postal Service Contract No. 
1BITRT-09-B-0001.  The data may be reproduced and used by the Postal Service with the express limitation that the data will not, without 
written permission of NCR Government Systems LLC, be used for purposes of manufacture or disclosed outside the Postal Service; except 
that the Postal Service may disclose this data outside the Postal Service for purposes identified under the Contract. 

Read these important instructions first  

Who should clean the TOSHIBA Label Printer?  
The retail associates are responsible for cleaning the TOSHIBA Label Printer as 

prescribed below.  
 

Why does the Toshiba printer need regular cleaning? 


The Toshiba printer needs to be cleaned regularly and routinely. If not 
cleaned regularly per the schedule below, this printer will cease to print 

labels as a result of accumulated dirt and residue on dirt-sensitive parts. 

When should the printer be cleaned?  
Whichever comes first: 


Each time the label roll is replaced 
 

OR 


On a weekly basis 

Tools needed 
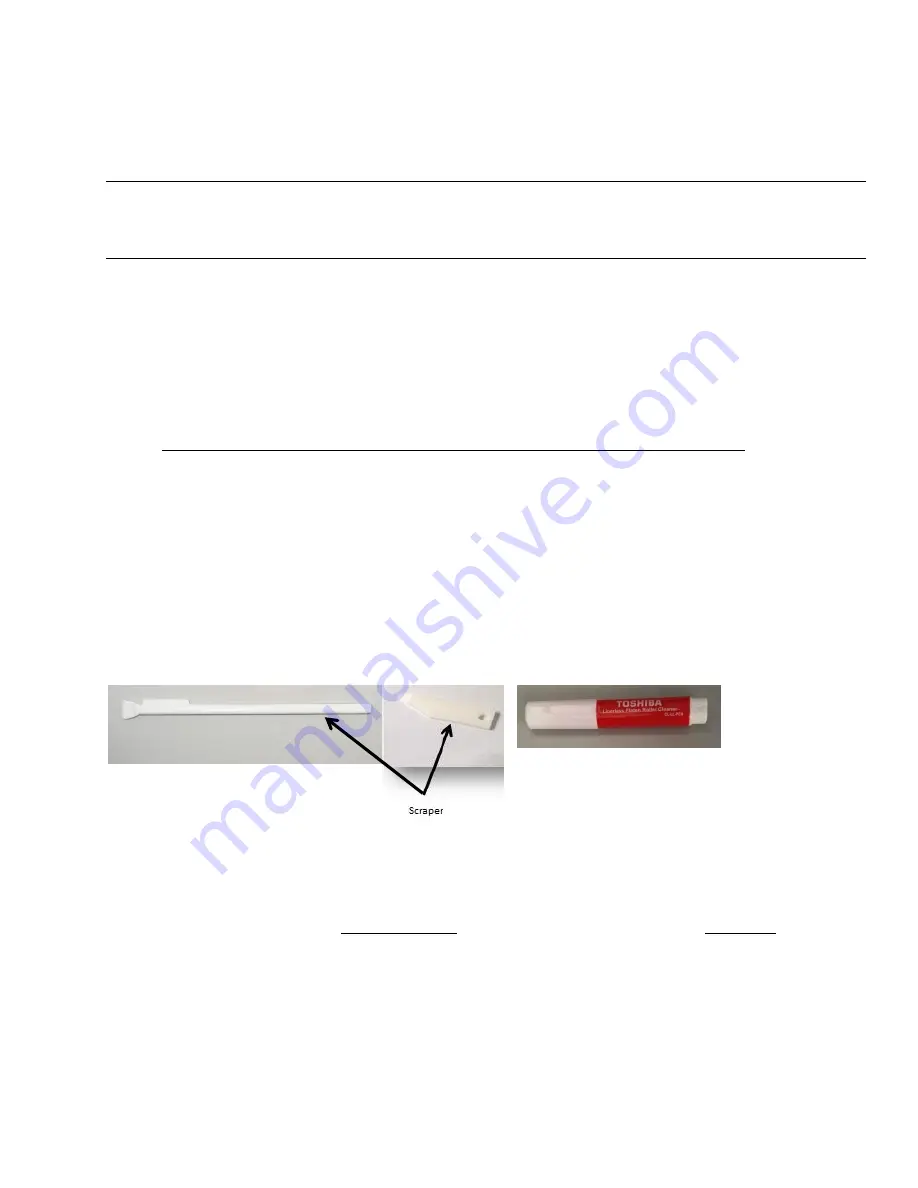
Cleaning Pen & one of two Approved Scrapers (Pen color may vary.) 


Important Information: 


All three printer components (Print Head, Linerless Cutter Block, Media 
Housing) covered by this document must be cleaned each time you clean the 
printer, so perform all five Steps of this cleaning procedure in order each 

time.  


DO NOT allow any alcohol-based cleaning product to have contact with any 

of the anti-stick rubber surfaces or the platen roller (see Figure 18).  The 
alcohol will erode the surfaces and require replacement of these parts.  The 
USPS approved silicone cleaning pen must be used to clean the printer.  

(Cont’d on next page) 

Silicone Cleaning Pen 

Summary of Contents for B-EV4D-GS24

Page 1: ...esponsible for cleaning the TOSHIBA Label Printer as prescribed below Why does the Toshiba printer need regular cleaning The Toshiba printer needs to be cleaned regularly and routinely If not cleaned regularly per the schedule below this printer will cease to print labels as a result of accumulated dirt and residue on dirt sensitive parts When should the printer be cleaned Whichever comes first Ea...

Page 2: ...o remove sticky residue from the printer parts A USPS approved plastic scraper must be used as part of these cleaning procedures There are currently two approved plastic scrapers Support information Follow the cleaning instructions in this document to ensure optimal performance of your TOSHIBA Label Printer No interaction with the Help Desk is required However if you encounter any difficulty durin...

Page 3: ...er was just used allow the printer print head to cool before performing any maintenance as the print head may become hot immediately after printing IMPORTANT NOTE If the Status indicator light on the top of the printer is slowly flashing alternating red and green wait to allow the printer print head to cool down before performing any maintenance Figure 1 Status Light 2 Be sure to power OFF see Fig...

Page 4: ...of 16 LIMITED RIGHTS NOTICE Step 2 Cleaning the Print Head 1 The TOSHIBA Label Printer must remain powered OFF before continuing with this Step 2 Open the top cover of the printer by pressing the top cover release button on the right Figure 3 Top Cover 3 Under the printer cover you will see a black magnetic strip over a green area which is the Thermal Print Head Figure 4 Thermal Print Head ...

Page 5: ...vices and data Page 5 of 16 LIMITED RIGHTS NOTICE 4 Use the Silicone Cleaning Pen to clean the Thermal Print Head and a USPS approved plastic scraper to scrape off any remaining residue see Figure 5 Figure 5 Approved tools Pen color may vary and their use 5 Continue to Step 3 Silicone Cleaning Pen Arrows point to examples of residue to be removed with plastic scraper ...

Page 6: ...powered OFF before continuing with this Step 2 Lift the Linerless Cutter Block on the front of the printer by lifting up on both sides Lay the cutter down in order to clean the inside being careful not to break the plastic label tray that sticks out in front Figure 6 Linerless Cutter Block 3 Slide the lock levers in the direction indicated by the arrows by pushing against the raised back edge of e...

Page 7: ...age 7 of 16 LIMITED RIGHTS NOTICE 4 Raise the Paper Guide to expose the Cutter Blade for cleaning Figure 8 Paper Guide Cutter Blade 5 Clean the Cutter Blade see Figure 8 which is located down inside the diagonal slot with the Thermal Head Cleaner pen Again use the scraper to remove any residue that may have built up Figure 9 Figure 9 Oval indicates residue to be removed with scraper ...

Page 8: ...6 LIMITED RIGHTS NOTICE 6 Clean the media outlet which is the straight slot through which the labels pass and is located next to the diagonal cutter blade Figure 10 using the Thermal Head Cleaner pen Again use the scraper to remove any residue that may have built up Figure 10 Media Outlet 7 Close the Paper Guide and return the Lock Levers to the lock position Figure 11 Lock Levers Media outlet ...

Page 9: ...uilt up residue Pay special attention to ensuring the top of the small raised platform that touches the labels as they exit is clean and free of residue IMPORTANT Regularly maintaining the cleanliness of the media outlet will help prevent dirt from accumulating on a sensor inside the printer If this sensor gets blocked by dirt the Toshiba printer will stop printing labels If that occurs the printe...

Page 10: ...pper hooks slide into the upper slots as indicated by the yellow and red arrow stickers on the sides of the printer If you encounter difficulty aligning these hooks and slots check that the electric wire from the printer is not interfering with the alignment Once everything is properly aligned push down firmly To verify proper attachment close the printer cover If the cover closes properly the Lin...

Page 11: ...CE Step 4 Clean the Media Housing 1 The TOSHIBA Label Printer must remain powered OFF before continuing with this Step 2 Release the label roll by turning the green Media Guide Adjustment Dial towards the back of the printer to move the Media Guides outward Figure 14 Media Guides Media Guide Adjustment Dial 3 Gently rotate the label roll towards the back of the printer so that it is wrapped up Fig...

Page 12: ...nstructions to ensure the protection of personnel devices and data Page 12 of 16 LIMITED RIGHTS NOTICE 4 Move the Media Holder Lock Switch on the left of the label holder up to the Unlock position Figure 16 Media Holder Lock Switch 5 Slide the Media Holders apart and then remove the label roll Figure 17 Media Holders ...

Page 13: ...vertical bars on the inside of each Label Holder using the Thermal Head Cleaner Again use the scraper to remove any remaining glue residue Figure 18 Vertical Bars 7 Clean the paper guides using the Thermal Head Cleaner Figure 19 Paper Guides REMEMBER DO NOT use an alcohol based cleaner pen or any alcohol based product to clean the anti stick rubber areas or the platen roller shown below Figure 20 ...

Page 14: ...roll fits snugly 10 Move the Media Holder Lock Switch down to the Lock position Figure 21 Media Holder Lock Switch 11 Thread the label roll over the blue roller and under the metal lip to feed through the Media Outlet until the label extends beyond the front of the printer 12 Turn the Media Guide Adjustment Dial in the direction indicated by the arrow Figure 22 to move the guides inward to hold th...

Page 15: ...s Partner Systems V2 1 Model B EV4D GS24 November 2016 Always follow instructions to ensure the protection of personnel devices and data Page 15 of 16 LIMITED RIGHTS NOTICE 13 Close the printer cover Press down until it clicks 14 Continue to Step 5 ...

Page 16: ...l does not feed stop here Call the Help Desk Specify to the Help Desk Analyst that the Toshiba printer did not feed a second test label immediately after cleaning 4 If you are not already logged on to the terminal to which this Toshiba Label Printer is attached log on to that terminal now 5 From RSS Admin Functions select More 6 Select System Admin 7 Select Status Check and the Toshiba BEV4 Label ...

Reviews: