background image


- 12 - 


If  plug-and-play  installation  fails  under  Windows  Vista/Server2008/7/Server2008R2/8/ 

Server2012/Server2012R2/10 

If an undefined device is created after a plug-and-play installation, follow the procedure below.   


1.


Select  the 

“Start”,  “All  programs”,  “TOSHIBA 

TEC

”, “TPCL Printer Driver”, and “PnP recovery”.   

Note

Log on as the user with administrative 
privilege.     
The 

“User account control” dialog may be 

displayed.    In that case, click the [Allow]. 


2.


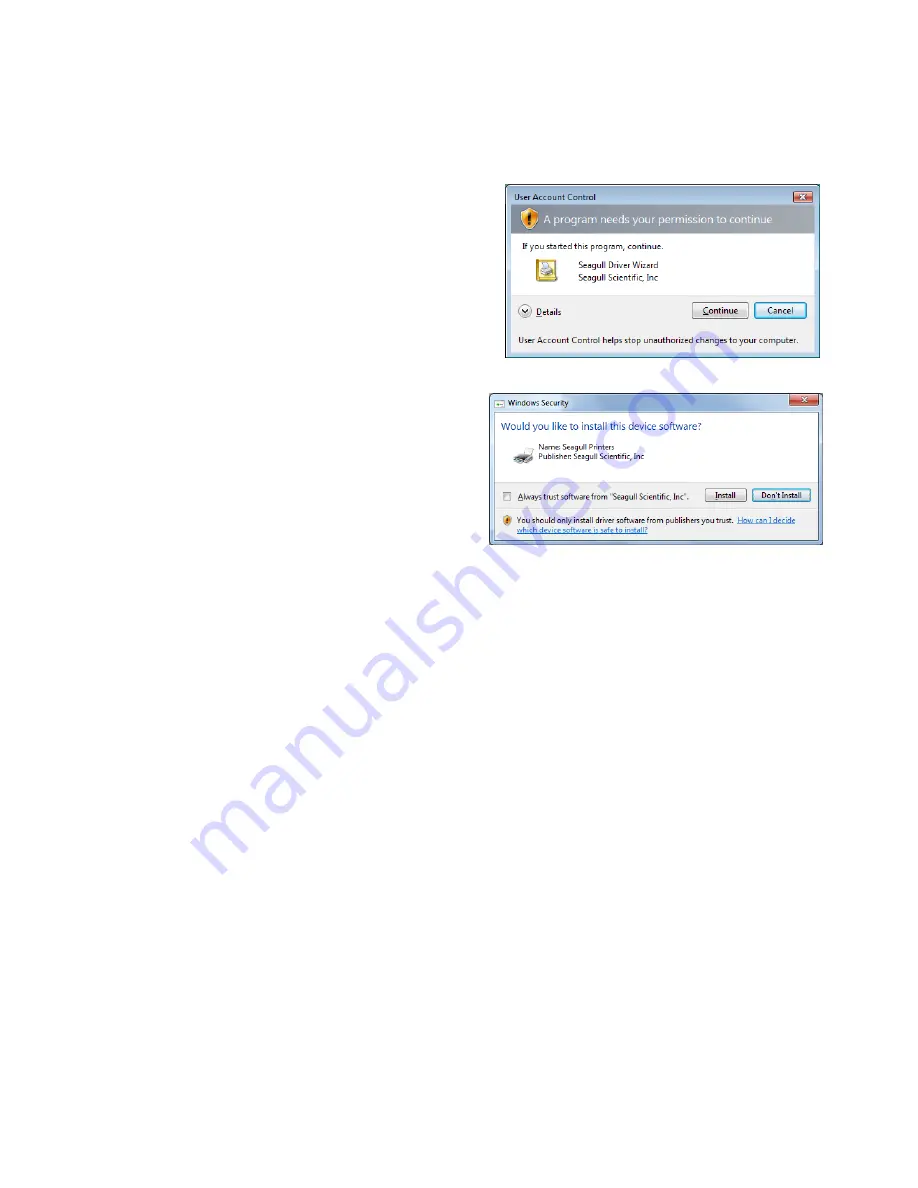
When  the  screen  on  the  right  appears,  click  the 
[Install] button. 


Summary of Contents for B-452-R

Page 1: ...TOSHIBA Bar Code Printer Printer Driver Operating Manual 16th Edition Sep 1 2016 ...

Page 2: ...3 Parallel interface with Plug Play Enabled 42 2 9 Installation under Windows Vista Server2008 7 Server2008R2 8 Server2012 Server2012R2 10 Parallel Interface with Plug Play Enabled 44 2 10 Uninstalling the Printer Driver 45 2 10 1 To delete the printer drivers except for V6 5 Build75 and V6 5 Build77 45 2 10 2 To delete the V6 5 Build75 or V6 5 Build77 48 3 FUNCTIONS 49 3 1 Page Setup Tab 56 3 1 1...

Page 3: ...installation operation and functions of the TPCL enabled printer driver BDRV WBX8 Z31 Version 7 4 1 M 5 The latest printer driver can be downloaded from TOSHIBA TEC bar code system website at the following URL http www toshibatec com download_overseas printer printer_driver TPCL Abbreviation of TEC Printer Control Language ...

Page 4: ... 2 Applicable printers B 452 R B 452 TS R B SX5T 305 dpi B SX5T TS12 QQ QQ US QP B SX5T TS22 QQ QQ US QP QM R B 852 R B 852 TS22 QQ QP R B SX5T C N 305 dpi B SX5 TS12 CN B SX5T TS22 CN CN R B EP2DL G B EP2DL GH20 GH30 GH40 QM R B SX6T 305 dpi B SX6T TS12 QM R B EP4DL G B EP4DL GH20 GH30 GH40 QM R B SX8T 305 dpi B SX8T TS12 QM R B EV4 203 dpi B EV4D G B EV4T G B EX4T1 203 dpi B EX4T1 GS12 QM CN R B...

Page 5: ... operating system Windows XP Microsoft Windows Server 2003 Standard Edition operating system Microsoft Windows Server 2003 Enterprise Edition operating system Windows Server 2003 Datacenter Edition operating system Windows Server 2003 Web Edition operating system Microsoft Windows Server 2003 R2 Standard Edition operating system Microsoft Windows Server 2003 R2 Enterprise Edition operating system ...

Page 6: ...ystems except Windows 7 Windows Server 2008 R2 Windows 8 Windows Server 2012 Windows Server 2012 R2 and Windows 10 are not applicable 2 Windows 2000 is not supported though installation of this product is possible 1 6 2 Hardware A DOS V IBM AT compatible machine running the above Windows operation system must be used along with the following mandatory or recommended requirements Requirement Recomm...

Page 7: ... B SX8T 305 dpi X Not supported X X B EX4T1 203 dpi B EX4T1 305 dpi X Not supported X X B EX4T2 203 dpi B EX4T2 300 dpi B EX4T2 600 dpi B EX4D2 203 dpi X Not supported X X B EX6T1 203 dpi B EX6T1 305 dpi X Not supported X X B EX6T3 203 dpi B EX6T3 305 dpi X Not supported X X B EX4T3 600 dpi X Not supported X X B EV4 203 dpi X X Not supported X X X X B EV4 300 dpi X X Not supported X X X X B FV4 20...

Page 8: ... by mistake close the status monitor and disable the Printer Status Monitoring When the status monitor is used to monitor the printer statuses do not install more than one printer driver specifying the same output port in one host PC When more than one printer driver is installed in a PC disable the Printer Status Monitoring Also when multiple computers connect to the same printer specify that pri...

Page 9: ...s the function character enter as bar code data Click the Page Setup tab Advanced Options button and specify the Function Character This is used when binary data is specified as bar code data When installing the printer driver via USB with Plug Play enabled the messages like Insert Disk and Files Needed dialog boxes may be displayed In this case click the OK button in the Insert Disk dialog box an...

Page 10: ...gs may be reset After importing the preset settings check the settings When Access2007 is used some paper names may not be correctly shown To set the paper names click the Page Setup and open the Edit Stock dialog When the LPT or COM port configuration is changed under Windows Vista Server2008 conduct it with administrative privilege When the port configuration is changed under Windows Vista Serve...

Page 11: ...a large number of digits is encoded into a bar code or 2D code and if that bar code cannot be printed within a page width such data will be invalid When you use data with a large number of digits click the Fonts tab select the bar code font click the Font button and the Edit then check the Join Multiple Lines checkbox When this checkbox is checked every data specifying the same font will be incorp...

Page 12: ...st When the OS is Windows Vista 7 8 10 changing the printer name with Enable bi directional support unchecked may cause the setup information to be non editable In this case check the Enable bidirectional support checkbox and click the OK button Then open the same screen again and remove the check from the Enable bidirectional support checkbox It is possible to save the setup information by tempor...

Page 13: ...that case click the Allow How to set up Windows Vista Server2008 7 Server2008R2 8 Server2012 Server2012R2 10 again If you uninstall the printer driver set up the Windows again This should be also conducted when the installation does not succeed 1 Select the Start All programs TOSHIBA TEC TPCL Printer Driver and TECDRVIN Note Log on as the user with administrative privilege The User account control...

Page 14: ...eated after a plug and play installation follow the procedure below 1 Select the Start All programs TOSHIBA TEC TPCL Printer Driver and PnP recovery Note Log on as the user with administrative privilege The User account control dialog may be displayed In that case click the Allow 2 When the screen on the right appears click the Install button ...

Page 15: ...n method Plug and Play is not used Plug and Play is used RS232C LAN Parallel Bluetooth USB Parallel B SX8T 305 dpi X B SX6T 305 dpi X B SV4 X X B EV4 203 dpi B EV4 300 dpi X X B EP2DL G X X B EP4DL G X X B 452 R X B 462 R X B 852 R X B SA4T 203 dpi B SA4T CN 203 dpi B SA4T 300 dpi B SA4T CN 300 dpi X B SX4T 203 dpi B SX4T CN 203 dpi X B SX5T 305 dpi B SX5T CN 305 dpi X B EX4T1 203 dpi B EX4T1 305 ...

Page 16: ... as default for the parallel interface connection See the following In the case installing a shared printer follow the procedure described in To print on the shared printer in Section 2 2 Installation under Windows 2000 XP Server2003 and Section 2 3 Installation under Windows Vista Server2008 7 Server2008R2 8 Server2012 Server2012R2 10 When you want to use Plug and Play follow the above procedure ...

Page 17: ...ouble click the downloaded TPCL drv_7 4 1_M 5_E exe and the TPCL PRINTER DRIVER Installshield Wizard is displayed Click the Next button Note Log on as the user with administrative privilege When the User Account Control screen is displayed under Windows Vista Server2008 7 Server2008R2 8 Server201 2 Server2012R2 10 click on the Allow 3 The Software License Agreement is displayed Select I accept the...

Page 18: ...ted in C TEC_DRV Note The folder name cannot be changed from C TEC_DRV 5 When the installation is completed click the Finish button Note In the case of Windows Vista Server2008 7 Server2008R2 8 Server2012 Server2012R2 10 the screen on the right will appear Click the Install button ...

Page 19: ...AX In the case of the category view click the Printer and Other Hardware and select the Printer and FAX 3 Select the Add printer from the File menu The Add Printer Wizard is displayed 4 Click the Next button in the Add Printer Wizard 5 Select the Local printer attached to this computer and click the Next button Note Do not check the Automatically detect and install my Plug and Play printer checkbo...

Page 20: ...n 7 When the Install Printer Software screen appears click the Have Disk button 8 Specify the printer driver install folder C TEC_DRV created in Section 2 1 Preparation for Installation and click the Open button Select the TEC inf and click the OK button ...

Page 21: ...DL GH30 QM R B EP4DL GH40 QM R TEC B EV4 203 dpi B EV4D GS14 QM R B EV4T GS14 QM R TEC B EV4 305 dpi B EV4D TS14 QM R B EV4T TS14 QM R TOSHIBA B EX4T1 203 dpi B EX4T1 GS12 QM R B EX4T1 GS12 CN R TOSHIBA B EX4T1 305 dpi B EX4T1 TS12 QM R B EX4T1 TS12 CN R TOSHIBA B EX4T2 203 dpi B EX4T2 GS12 QM R B EX4T2 GS12 CN R B EX4D2 GS12 QQ R B EX4D2 GS12 QM R TOSHIBA B EX4T2 300 dpi B EX4T2 TS12 QM R B EX4T2...

Page 22: ...lick the Next button Supplement This step will be omitted when the printer driver is installed for the first time 12 Select whether or not to use the printer as a default printer then click the Next button 13 Select whether or not to share the printer with other users on the network then click the Next button ...

Page 23: ...played click the Finish button 16 When the screen on the right appears click the Continue Anyway button Note Digital Signature Not Found message may be displayed In that case click the Yes button 17 Installation of the printer driver starts 18 When the installation is completed a new printer icon will be added to the Printer folder ...

Page 24: ...wed to access the PC with which the printer is shared Note This work requires the administrative privilege For the user with no administrative privilege grant it temporarily 3 Right click the newly added icon and select the Properties to open the Properties screen 4 Click the Port tab then click the Add Port button ...

Page 25: ...click the OK button to close the Properties screen Note After installing this printer driver be sure to disable the Bi directional support For details refer to Section 6 1 How to Enable Bi directional Communication Support Since the setup information is stored in each PC that shares the printer please configure the printer driver settings after the completion of the port setting ...

Page 26: ...r2012 Server2012R2 10 again 1 Turn on the PC Note Log on as the user with administrative privilege 2 Select Start Control Panel Hardware and Sound and Printer to open the printer folder Supplement Entering Printer in the Search box of the Start menu causes the Printer to be shown in the Program 3 Click the Install a Printer to start adding a printer 4 Select the Add a local printer 5 Select a prin...

Page 27: ...EC B SX4T CN 203 dpi B SX4T GS10 CN B SX4T GS20 CN B SX4T GS20 CN R TEC B SX5T 305 dpi B SX5T TS12 QQ B SX5T TS12 QQ US B SX5T TS12 QP B SX5T TS22 QQ B SX5T TS22 QQ US B SX5T TS22 QP B SX5T TS22 QM R TEC B SX5T CN 305 dpi B SX5T TS12 CN B SX5T TS22 CN B SX5T TS22 CN R TEC B SX6T 305 dpi B SX6T TS12 QM R TEC B SX8T 305 dpi B SX8T TS12 QM R TEC B 452 R B 452 TS22 QQ QP R B 452 TS22 CN TEC B EP2DL G ...

Page 28: ...TS14 CN R B FV4T TS16 CN R B FV4D TS12 QM R B FV4D TS14 QM R B FV4D TS16 QM R B FV4D TS14 CN R B FV4D TS16 CN R TOSHIBA B EX6T1 203 dpi B EX6T1 GS12 QM R B EX6T1 GS12 CN R TOSHIBA B EX6T1 305 dpi B EX6T1 TS12 QM R B EX6T1 TS12 CN R TOSHIBA B EX6T3 203 dpi B EX6T3 GS12 QM R B EX6T3 GS12 CN R TOSHIBA B EX6T3 305 dpi B EX6T3 TS12 QM R B EX6T3 TS12 CN R TOSHIBA B EX4T3 600 dpi B EX4T3 TS12 QM R B EX4T...

Page 29: ...nstallation is completed the Add Printer screen is displayed At this time a new printer icon is added to the Printer folder Click the Finish button If you want to perform a print test click the Print a test page button ...

Page 30: ...r with no administrative privilege grant it temporarily 3 Right click the newly added icon and select the Properties to open the Properties screen 4 Click the Ports tab and remove the check from the Enable bi directional support checkbox Click the Add Port button Note After installing this printer driver be sure to disable the bi directional support For details refer to Section 6 1 How to Enable B...

Page 31: ...click the OK button to close the Properties screen Note After installing this printer driver be sure to disable the Bi directional support For details refer to Section 6 1 How to Enable Bi directional Communication Support Since the setup information is stored in each PC that shares the printer please configure the printer driver settings after the completion of the port setting ...

Page 32: ...installed in or uninstalled from each user account Configure the network settings for the Server PC s shared printer driver as shown in the screen on the right 1 Turn on the PC Note Log on as the user with administrative privilege 2 Follow the procedure described in Section 2 1 Preparation for Installation 3 Log on as the user which is allowed to access the PC with which the printer is shared 4 Se...

Page 33: ...Add a network wireless or Bluetooth printer 7 Click the The printer that I want isn t listed 8 Click the Select a shared printer by name enter the network path of the shared printer e g TECB SA4 then click the OK button ...

Page 34: ...ext button 11 When the installation is completed the screen on the right will appear At this time a new printer icon is added to the Printer folder Click the Finish button If you want to perform a print test click the Print a test page button Note Since the setup information is stored in each PC that shares the printer please configure the printer driver settings after the completion of the port s...

Page 35: ...ative privilege 2 Turn on the printer and connect it to the PC with a USB cable 3 USB DEVICE is detected and USB Print support is automatically installed 4 After a while the Found New Hardware Wizard is displayed Click the Next button 5 Select the Search for a suitable driver for my device recommended and click the Next button 6 Check the Specify a location checkbox then click the Next button ...

Page 36: ...ck the Next button Device driver name B SA4G B SA4G CN B SA4T B SA4T CN B SX4 B SX4 CN B SX5 B SX5 CN B SX6T R B SX8T R B 852 R B 452 R B 462 R B EX4T1 G B EX4T1 T B EX4T2 G B EX4T2 T B EX4T2 H B EP2DL G B EP4DL G B EV4 G B EV4 T B SV4 B FV4 G B FV4 T B FP3D B EX6T1 G B EX6T1 T B EX6T3 G B EX6T3 T B EX4T3 H 9 When the screen on the right is displayed click the Yes button ...

Page 37: ... 35 10 When the Completing the Found New Hardware Wizard is displayed click the Finish button 11 When the installation is completed a new printer icon is added to the Printer folder ...

Page 38: ...X4 B SX4 CN B SX5 B SX5 CN B SX6T R B SX8T R B 852 R B 452 R B 462 R B EX4T1 G B EX4T1 T B EX4T2 G B EX4T2 T B EX4T2 H B EP2DL G B EP4DL G B EV4 G B EV4 T B SV4 B FV4 G B FV4 T B FP3D B EX6T1 G B EX6T1 T B EX6T3 G B EX6T3 T B EX4T3 H 5 When the Found New Hardware Wizard is displayed select Install from a list or specific location Advanced and click the Next button 6 Select the Search for the best ...

Page 39: ...the right appears click the Continue Anyway button 8 When the Completing the Found New Hardware Wizard is displayed click the Finish button 9 When the installation is completed a new printer icon is added to the Printer folder ...

Page 40: ...g and play installation fails under Windows Vista Server2008 7 Server2008R2 8 Server2012 Server2012R2 10 1 Turn on the PC Note Log on as the user with administrative privilege 2 Turn on the printer and connect it to the PC with a USB cable 3 Installation of the device driver software is automatically started 4 After a while the printer driver installation is completed 5 When the installation is co...

Page 41: ...MODE ECP PLUG PLAY ON B SA4 Series B 852 R B 452 R B SX6T 305 dpi B SX8T 305 dpi B EX4 Series B EX6 Series and B 462 R PLUG PLAY ON Note For the parameter setting procedure refer to Section 6 2 Parameter Setting on the Printer 4 Turn on the PC Note Log on as the user with administrative privilege 5 After the system started new hardware is detected When the Welcome to the Found New Hardware Wizard ...

Page 42: ...Next button 9 Make sure the applicable drivers are detected then click the Next button Device driver name B SA4G B SA4G CN B SA4T B SA4T CN B SX4 B SX4 CN B SX5 B SX5 CN B SX6T R B SX8T R B 852 R B 452 R B 462 R B EX4T1 G B EX4T1 T B EX4T2 G B EX4T2 T B EX4T2 H B FV4 G B FV4 T B EX6T1 G B EX6T1 T B EX6T3 G B EX6T3 T B EX4T3 H 10 When the screen on the right is displayed click the Yes button ...

Page 43: ... 41 11 When the Completing the Found New Hardware Wizard is displayed click the Finish button 12 When the installation is completed a new printer icon is added to the Printer folder ...

Page 44: ... PLAY ON Note For the parameter setting procedure refer to Section 6 2 Parameter Setting on the Printer 4 Turn on the PC Note Log on as the user with administrative privilege 5 After the system is started new hardware is detected When the Found New Hardware Wizard is displayed select the Install from a list or specific location Advanced then click the Next button 6 Select the Search for the best d...

Page 45: ...the right appears click the Continue Anyway button 8 When the Completing the Found New Hardware Wizard is displayed click the Finish button 9 When the installation is completed a new printer icon is added to the Printer folder ...

Page 46: ...the printer 3 Set the printer parameters in the system mode B SX4 Series and B SX5 Series CENTRO MODE ECP PLUG PLAY ON B SA4 Series B 852 R B 452 R B SX6T 305 dpi B SX8T 305 dpi B EX4 Series B EX6 Series and B 462 R PLUG PLAY ON Note For the parameter setting procedure refer to Section 6 2 Parameter Setting on the Printer 4 Turn on the PC Note Log on as the user with administrative privilege 5 Aft...

Page 47: ...d in Section 2 1 Preparation for Installation Doing this causes the previously installed printer driver to be updated and creates the shortcut of the Driver Wizard in the TPCL Printer Driver of TOSHIBA TEC folder However it is not possible to update the printer driver which is older than V6 9 3 M 0 For such versions first delete C TEC_DRV folder then conduct the Preparation for Installation When t...

Page 48: ...Select the Remove printer drivers and click the Next button 3 Select the Automatically remove all TEC Printer Drivers and click the Next button 4 Click the Finish button to start to delete the printer drivers ...

Page 49: ...R2 10 again In the case a network printer has been installed in multiple user accounts under Windows Vista server 2008 7 Server2008R2 8 Server2012 Server2012R2 10 it is not possible to delete the printer driver First delete the printer icon from each user account then delete the printer driver Deleting the setup information configured during the preparation 1 Select the Start Control Panel and Add...

Page 50: ...ndicates a printer model name For example B 452 R B 462 R etc 3 Confirm that the selected file in the File Delete confirmation window is correct then click the Yes button 4 When Uninstall completed is displayed click the OK button NOTE If you deleted the printer icon without performing Steps 1 to 4 above delete the setup information through the Add Remove Programs after re installing the printer d...

Page 51: ...a mirror image Negative When enabled the print will be white on black When disabled the print will be black on white Preset Allows saving the settings of this printer driver such as fine adjustment values When a preset setting file is selected the current settings will be replaced by the settings of that preset file Advanced Options Printing position tab Position Adjustment Allows specifying the o...

Page 52: ...zontal flip vertical rotation color balance adjustment etc Dithering Setup Allows detailed setting for the selected dithering method Color Color Control Allows setting the color processing Stock Media settings Print Method Allows selecting whether the ribbon is used thermal transfer or not Direct thermal Sensor Allows selecting a sensor type used to detect a print start position Label Gap Allows s...

Page 53: ...adjusting the print density for the thermal transfer mode Optimization Allows selecting the printer s optimization level from Quality Balanced middle and Speed This feature is provided only for the B EP series Feed Adjustment Feed Adjustment Specifies the length of label to feed after printing feed Before a next printing is started the label is fed in the reverse direction to the print start posit...

Page 54: ...elected the scalable fonts are usable List Condensed and Expanded Widths When selected the fonts of which character width is condensed or expanded are usable List Specified Scale Factors When selected the fonts of which character width is scalable at any scale ratio are usable X Percentages Allows specifying the scale ratio X List Bitmap Fonts When selected the bitmap fonts are usable Simulate Sca...

Page 55: ...er Option of the Tool tab Tool tab Print Allows performing print tests Action Form Feed The printer feeds one label Cut The printer cuts the label immediately Read Printer Information Shows the printer version and option information obtained from the printer X Manage XML Print Files Allows managing the files of label formats graphics and fonts stored in the printer X Reset Printer Resets the print...

Page 56: ...rk settings Network Setting When the shared printer is installed as a network printer the setting or status information can be shared between the server and the client X Regional Options Language Allows selection of the desired language to be used in the printer driver property screens Units Allows the selection of the desired units of measurement Windows Setting Displays the Regional and Language...

Page 57: ...he timeout and polling interval X About tab License Shows the license information Version Shows the driver version settings and PC information The shown information can be stored in a file Reference A part of the above settings can be changed in the print dialog box of the application but such changes may only temporary take effect ...

Page 58: ...pecifying a previously loaded stock by name to use modify or delete New Edit Delete Allows adding a new label stock specification to the list editing or deleting a label stock already on the list Section 3 1 1 Registering a new stock or editing the existing stock The number of registerable stocks is unlimited Orientation By clicking on the Portrait Landscape Portrait rotated 180º or Landscape rota...

Page 59: ... the following screen will appear To register a new stock click the New button and enter the stock name and the size To edit the label stock already on the list click the Edit button The changes will be applied to the other printer drivers stock information Stock Name Displays the stock name When a new stock is registered any stock name can be set 2 byte characters are acceptable Type Select the p...

Page 60: ...atching in the stock IDs between the older printer driver and the new one causes an error For example when printing is performed from the application which manages stock types for Excel Access etc by their stock IDs assigned by the older printer driver a wrong stock may be selected even though the correct one has been registered ...

Page 61: ...ting is performed based on the preset settings designated for each stock type Procedure 1 Set the print settings such as sensor fine adjustment and print density adjustment for the selected stock and save them as a preset setting file 3 1 2 Preset 2 Check the Selecting stock loads settings from preset checkbox and select the created preset file from the list 3 When a stock for which a preset has b...

Page 62: ...he OK button to save Settings saved Page Setup tab Label size Orientation Effects Advanced setting Graphics tab Dithering Stock tab Print method Issue mode Print speed Fine adjustment Option tab Graphic options Print density adjustment Feed adjustment Multiple Part Print Area Settings Ribbon Adjustments Delete Clicking the Delete button enables deletion of a selected preset name When the OK button...

Page 63: ...ition in the vertical direction Since this feature is not supported do not change the default setting Orientation Adjustment Default Orientation Enables specifying the default orientation 0º Bottom first 180º Top first Since this feature is not supported do not change the default setting User Commands tab You can program printer command strings which are to be sent to the printer at Start of Job S...

Page 64: ...mage with a Line Command When this checkbox is not checked the line is processed as a Graphic Command When checked the line is drawn using the printer s line drawing function which may result in higher throughput Minimum Length The minimum length of a line that is to be recognized as a Line Command The line shorter than this value is processed as a Graphic Command Note Some applications do not alw...

Page 65: ... the Default Copies Since this feature is not supported do not change the default setting Disable User Defined Paper Size This feature disables the user defined paper size USER When this checkbox is checked USER cannot be used Since this feature is not supported do not change the default setting ...

Page 66: ...ng the illusion of different shades of gray by varying the pattern of dots The more dither patterns that a device or program supports the more shades of gray it can represent None Halftone Ordered Algebraic Error Diffusion When the Dithering Setup button is clicked you can select an algorithm from multiple options The algorithm differs according to the dithering patterns Color Control Enables sele...

Page 67: ...ct thermal Direct thermal Head up Thermal transfer Thermal transfer Ribbon save The Thermal transfer Ribbon save is available only to the printer supporting the ribbon saving function The Direct thermal Head up is available only to the RFID enable printer The print head is lifted to avoid RFID tag embedded area to protect the RFID tag If you select the Direct thermal Head up for non RFID enable pr...

Page 68: ...ag paper enter the non printable area size Issue Settings Issue Mode Batch Mode with Back Feed Strip Mode with Back feed Strip Mode when using the applicator Partial Cut without Back Feed Batch Mode Cut Mode When the cutter unit is installed on the printer to perform the cut issue select the Batch Mode with Back Feed or the Cut Mode When the strip module is installed on the printer to perform the ...

Page 69: ...pecified interval Per page 3 1 1 1 1 1 2 2 2 2 2 3 3 3 3 3 4 4 4 4 4 Identical copies 1 1 1 1 1 2 2 2 2 2 3 3 3 3 3 4 4 4 4 4 After job 1 1 1 1 1 2 2 2 2 2 3 3 3 3 3 4 4 4 4 4 Specified interval depending on the printers 3 1 1 1 1 1 2 2 2 2 2 3 3 3 3 3 4 4 4 4 4 Interval Enables specifying the cut interval Print Speed Enables specifying the print speed Selectable speed differs according to the pri...

Page 70: ...oltage for each of the Direct thermal and Thermal transfer When not checked the printer operates according to its current setting For the B EP2DL G B EP4DL G and B FP3D the Head Output Division feature is provided which enables properly changing the print quality and print speed depending on the selected print head control When the Set checkbox is not checked the printer operates according to its ...

Page 71: ...ted in the printer behavior 3 4 1 Multiple Part Print Area Settings B EV4 203 dpi only Clicking the Multiple Part Print Area Settings button on the Options page enables setting the duplicate print area properties for the double layer thermal paper Multiple Part Print Area When the Set checkbox is checked you can specify the details of the Multiple Part Print Area The Multiple Part Print Area is th...

Page 72: ... than the Multiple Part Print Area Multiple Part Print Area High Density Adjustment 0 to 10 Supplement 1 Duplicate printing is available only to double layer thermal paper Triple or more layer paper is not accepted 2 If the print on the second sheet is too light specifying this print area as a Multiple Part High Density Print Area Doing this improves the print result 3 It is possible to specify a ...

Page 73: ... Set checkbox is checked the ribbon motor voltage can be adjusted for preventing ribbon wrinkles When unchecked the printer operates according to the currently selected settings Rewind Motor The rewind motor which drives the ribbon take up core takes up the used ribbon When the value is reduced the rewind motor torque turns down causing a decease in the ribbon tension The setting value range varie...

Page 74: ...e to share the bar code fonts between the client PC and the printer server PC The Import and Export features are useful to easily register the bar code font list to other printer drivers Refer to Driver Options 2 To use Kanji as bar code font click the Tools tab Configure button select Printer Options and set the ESC LF NUL for the Control Codes 3 Chinese Gothic and Chinese Serif are not supported...

Page 75: ...ptions Resident Fonts tab Scalable Font Settings List Scalable Fonts When this checkbox is checked the scalable fonts outline fonts can be used on the application When not checked the scalable fonts cannot be used List Condensed and Expanded Widths When this checkbox is checked scalable fonts outline fonts with the width condensed or expanded can be used List Specified Scale Factors When this chec...

Page 76: ... Font Settings List Utility Fonts When this checkbox is checked the utility fonts can be used on the application When not checked the utility fonts cannot be used List Bar Code and RFID Fonts When this checkbox is checked bar code fonts and RFID fonts can be used However the RFID fonts is not supported List Printer Command Font When this checkbox is checked specified data can be sent to the printe...

Page 77: ... case the code page of B 850 B 852 or Arabic is selected for the printer the data is printed as it looks with the printer font But unsupported characters are not processed as the printer font For the code page other than B 850 B 852 and Arabic some characters may not be printed as they look or processed as the printer font Only the characters in the code page provided in the External Equipment Int...

Page 78: ...e 2 byte characters like Kanji are used specify Japanese Join Multiple Lines When this checkbox is checked multiple line data specifying the same bar code font is combined into a single bar code This allows paragraph text to be encoded into one bar code When this setting is not enabled each row of text will generate a separate bar code Supplement The all texts specifying the same bar code font in ...

Page 79: ...ow bar or a cell It differs depending on the printer models or selected bar code symbologies Supplement The height of a bar code is adjustable by specifying the font size on the application Human Readable Enables specifying the visibility of the human readable characters displayed with the bar codes on the labels Depending on the bar code symbologies this feature may not be available None Below Ba...

Page 80: ...ing with the printer Blank page Prints a blank label on the specified conditions Media size position adjustment sensor type etc Action Available features differ depending on the printer models Form Feed Feeds a label on the specified conditions Media size position adjustment sensor type etc Cut Cuts the label immediately Read Printer Information Displays the version and option information obtained...

Page 81: ...ogrammed printer commands to the printer Clicking the Query button enables displaying the printer status returned in response to the printer command The Query feature is available only when the bi directional communication is enabled and the query commands are sent to the printer For details of the printer commands refer to the External Equipment Interface Specification of each printer model Send ...

Page 82: ...he control code specified on the printer Note By default the Standard is specified When Kanji code is specified for the printer font PEF417 MicroPDF417 Data Matrix Maxicode or QR code set the Control Codes to ESC LF NUL Failure to do so causes an error Bluetooth Connection In the case of Bluetooth connection using the virtual COM port enable the checkbox Delay Close Sets the wait time before link ...

Page 83: ...h printer model When the OK button is clicked the changes are sent to the printer Driver Driver Options Administration tab Enables saving the settings of this printer driver in a file or importing the settings into a different or freshly installed printer driver It also allows importing previously saved settings to replace the current settings of this printer driver Import Allows reading the check...

Page 84: ...er its setup information or statuses can be shared between the server and the client This feature is not supported To set the printer as a network printer refer to To print on the shared printer and follow the procedure Note Disable the Bidirectional support on the client PC Regional Options tab Allows changing the language and units of measurement to agree with the region in which these printers ...

Page 85: ...ab Unprintable Width Allows making minor adjustments in the horizontal positioning of the printed image on the label Since this feature is not supported do not change the default setting Model Specifications Allows setting the specification of the printer such as the resolution and media size Since this feature is not supported do not change the default settings If they are changed printing cannot...

Page 86: ...ed by clicking the Tools button and Add Legacy Log is supported Printer Code Recording tab Allows recording of all of the commands sent to the printer to a file When the Record Printer Code checkbox is checked the printer codes are recorded to the specified directory Unlike using the Print to File option in most applications Printer Code Recording allows printing to the printer and to a file simul...

Page 87: ...Continuous Printer status is always monitored Status Display Options Show advanced status in Comments field When checked a printer status is displayed on the Comment column of the Printer FAX window Since this feature is not supported do not change the default settings Show icon in taskbar notification area When checked the status monitor icon is displayed on the task bar and the printer statuses ...

Page 88: ...d When either checkbox is checked printing is performed while verifying a completion of printing Since this feature is not supported do not change the default settings Communication tab Enables setting the timeout and polling interval for the status monitoring are set Do not change the default settings Notes Be sure to disable the status monitor when uninstalling the printer driver or changing the...

Page 89: ...5 dpi and B EX4T3 600 dpi It takes time to detect an OFFLINE status 30 sec at least If the Show icon in taskbar notification area and Show Status Window checkboxes are checked the status monitor may not work properly when the PC is started If the OFFLINE is displayed at the start of the PC remove the checks from these options ...

Page 90: ...s It is possible to expect an increase of the printing throughput if the printer font is used Printer fonts including bar code fonts shown on the application screen look different from the actually printed ones in on appearance and size To use the TEC Kanji Outline fonts on the B 372 B 472 and B 872 separately sold fonts are required Example of bar code font programming Visual Basic 5 0 6 0 In the...

Page 91: ...data and adjust the position of the printed image The height of bar code is specified by the character size point The character size points are converted into millimeters on the basis of the following table or there may be a case that the bar code font is converted into other character font and no bar code is printed Point Bar height mm Point Bar height mm 8 2 8 36 12 7 9 3 2 48 16 9 10 3 5 60 21 ...

Page 92: ...Commands of the Advanced Options replace the with the specified character Control code Input data Control code Input data Control code Input data 00H N A P 10H DLE 0 A 01H SOH Q 11H DC1 1 DEL B 02H STX R 12H DC2 2 3 C 03H ETX S 13H DC3 3 2 D 04H EOT T 14H DC4 4 s or S E 05H ENQ U 15H NAK 5 c or C F 06H ACK V 16H SYN 6 b or B G 07H BEL W 17H ETB 7 a or A H 08H BS X 18H CAN 8 1 I 09H HT Y 19H EM J 0...

Page 93: ... 5 15 4 16 5 to 18 0 16 9 17 0 to 18 5 17 3 18 5 to 21 5 18 8 19 0 to 22 0 19 2 22 0 to 27 0 22 6 22 5 to 27 5 23 0 27 5 to 32 5 28 2 28 0 to 33 0 28 8 33 0 to 50 0 33 9 33 5 to 50 0 34 6 203dpi 600dpi Specified size Print size Specified size Print size 1 0 to 3 5 2 8 1 0 to 1 0 1 0 4 0 to 5 0 4 3 1 5 to 1 5 1 4 5 5 to 7 5 5 7 2 0 to 2 5 1 9 8 0 to 10 0 8 5 3 0 to 3 5 2 9 10 5 to 13 5 11 3 4 0 to ...

Page 94: ...l PCMCIA board and LAN card B SX Optional LAN board B SA4 B 852 R B 452 R B EP2 B EP4 B EV4 B SX6T 8T B EX4T1 T2 B 462 R B FP B EX6T1 B EX6T3 B EX4T3 The LAN interface is provided as standard Notes 1 When the printer server is used set the port by following the guideline of the printer server device 2 When the Toshiba TEC optional LAN board or a set of the optional PCMCIA board and a LAN card is u...

Page 95: ...om another Windows PC 2 via TCP IP 1 Install the printer driver for Windows 9X or Windows NT in the PC 1 Specify the LPT1 local port for the output port 2 Right click the printer icon open the Properties and specify the printer connected to the PC 1 as a shared printer 3 Install the printer driver for Windows 9X or Windows NT in the PC 2 4 Specify the network path of the printer connected to the P...

Page 96: ... 1 and install it as a network printer Example 4 In the case print jobs are sent from Windows PC 1 Windows 9x and Windows PC 2 Windows NT to the multiple printers via TCP IP 1 Install the printer drivers for Windows 9X in the PC 1 for the number of printers connected 2 Add the LPR port specifying the printer server address Use other software like the printer server specific setting utility to add ...

Page 97: ... SOCKET PORT are used as the Printer Name or IP address and Port No respectively when adding a port Note When the Bi directional support is used do not specify the same output port for the multiple printer drivers on a computer When you want to specify the same output port for the multiple printer drivers disable the Printer Status Monitoring Also when multiple computers connect to the same printe...

Page 98: ...the printer icon and click the Properties to open the printer properties screen 2 Select the Ports tab and click the Add Port button 3 Select the Standard TCP IP Port from the Available port types list then click the New Port button ...

Page 99: ... is started click the Next button 5 Type in the Printer Name or IP Address and click the Next button Note The Port Name is automatically set when the Printer Name or IP Address is entered 6 Select the Device Type to the Custom then click the Settings button ...

Page 100: ...he Protocol enter any queue name e g lpr and click the OK button Do not check the LPR Byte Counting Enabled and SNMP Status Enabled checkboxes Note When the status monitor feature is used with the bi directional support select the Raw The default port number 9100 B FP series B FV series B EX6 series 8000 Other 8 Click the Next button and Finish button 9 When the Add Standard TCP IP Printer Port Wi...

Page 101: ...ht click the printer icon and click the Properties to open the printer properties screen 2 Select the Ports tab and click the Delete Port button 3 When the deletion of the port is completed it is deleted from the print port ...

Page 102: ...ort 1 Right click the printer icon and open the Properties 2 Click the Port tab To enable the bi directional support check the Enable bi directional support checkbox To disable the bi directional support remove the check from the Enable bi directional support checkbox ...

Page 103: ... FEED 3 Press the FEED key 2 PARAMETER SET The Parameter Setting menu is displayed PAUSE 4 Press the PAUSE key 2 PARAMETER SET FONT CODE PC 850 PAUSE 5 Press the PAUSE key until the CENTRO MODE SPP is displayed 2 PARAMETER SET CENTRO MODE SPP Centronics interface operating mode selection 6 Select the ECP by using the FEED or RESTART key PAUSE 7 Press the PAUSE key 2 PARAMETER SET PLUG PLAY OFF Plu...

Page 104: ...5 dpi Unidirectional Raw or LPR protocol B 9700 LAN QM R Bi directional Raw protocol Standard feature B EV4 203 dpi B EV4 300 dpi Unidirectional LPR protocol B SA4T 203 dpi B SA4T CN 203 dpi B SA4T 300 dpi B SA4T CN 300 dpi B 852 R B 452 R B 462 R B EP2DL G B EP4DL G B SV4D GS12 QM R B SX6T 305 dpi B SX8T 305 dpi B EX4T1 203 dpi B EX4T1 305 dpi B EX4T2 203 dpi B EX4T2 305 dpi B EX4T2 600 dpi B EX4...

Page 105: ......

Reviews: