background image

Intr

oduction

Connecting

y

our T

V

Using the

remote contr

ol

Setting up

y

our T

V

Using the T

V’s

F

eatur

es

Appendix

Index

41

(E) 51H85C, 57H85C, 65H85C

1

2

3

4

5

6

7

8

9

ENT

100

0

POWER

RECALL

CHRTN

FAV

FAV

TV / VIDEO

+10

PIC SIZE

EXIT

INFO

STOP

POP DIRECT CH MUTE

SLEEP

TV/VCR

PAUSE

FF

REW

SKIP / SEARCH

SPLIT

SWAP

POP CH

LIGHT

REC

CH SCAN

FREEZE

SOURCE

PLAY

TV
CBL/SAT
VCR
DVD

VOL

CH

FAVORITE

ENTE

R

DVDMENU

MENU

TO

P

ME

NU

GU

ID

E

CL

EA

R

E

N

TE

R

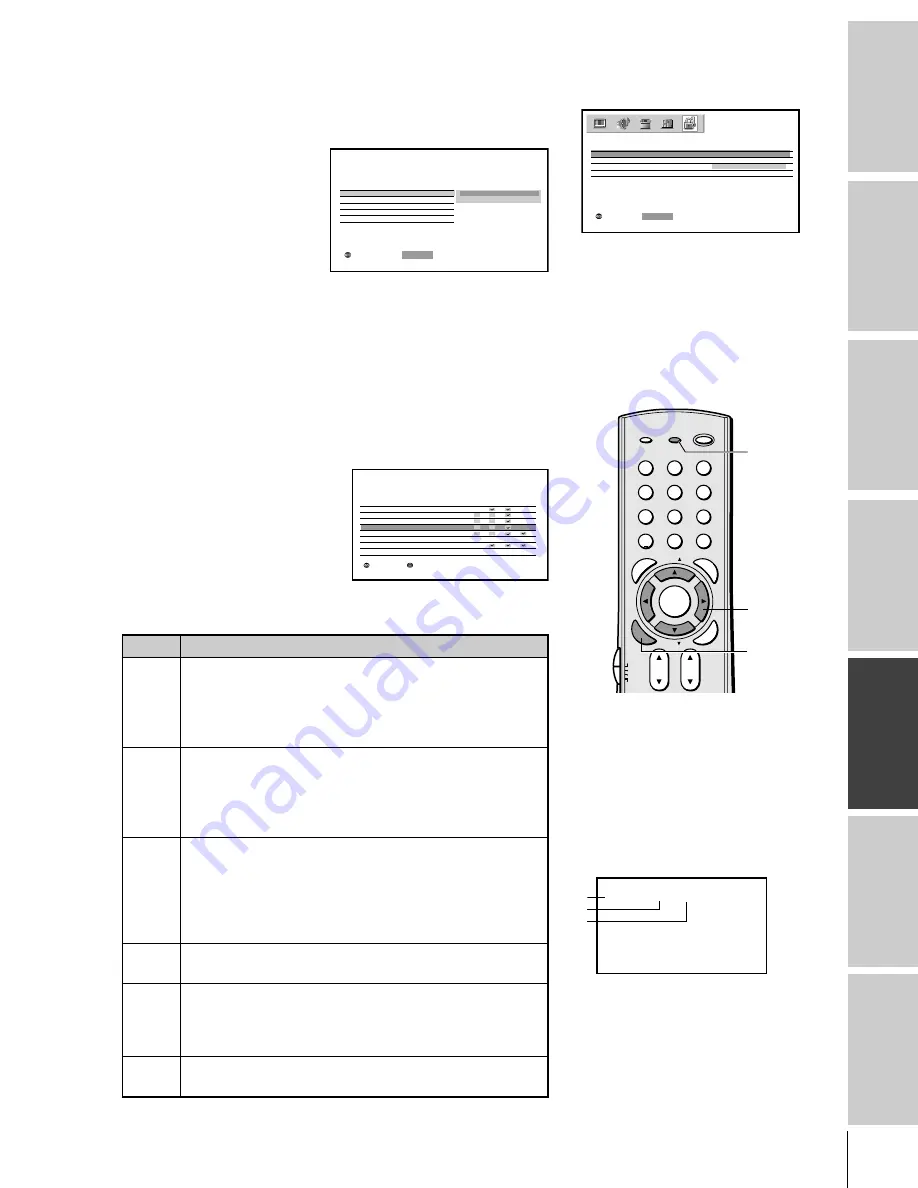
ENABLE BLOCKING

1. From the LOCKS menu, press 

z

 or 

y

 to highlight V-CHIP, and

then press ENTER.
The V-CHIP menu appears.

2. Press 

z

 or 

y

 to highlight

ENABLE BLOCKING,
and then press ENTER.

  3. Press 

y

 or 

z

 to select ON or OFF.

ON : To enable your setting (Lock)
OFF: To release your setting (Unlock)

Note: 

The CH LOCK function is not affected by this selection.

TV RATING (Independent rating system for
broadcasters)

1. From the V-CHIP menu, press 

z

 or 

y

 to highlight TV

RATING, and then press ENTER.
The TV RATING menu appears.

2. Press 

z

 or 

y

 to select item.

3. Press 

 to lock (display “

X


)

Press 

x

 to unlock (display


”)

4. Repeat steps 2 and 3 to set

the next item.

The TV age-based ratings and content themes you can lock are listed
in the table below.

Ratings

Description and Content themes

MA

Mature Audience Only (This program is specifically
designed to be viewed by adults and therefore may be
unsuitable for children under 17.)
L) Crude or indecent language  S) Explicit sexual activity
V) Graphic violence

14

Parents Strongly Cautioned (This program contains some
material that many parents would find unsuitable for
children under 14 years of age.)
D) Intensely suggestive dialog  L) Strong, coarse language
S) Intense sexual situations  V) Intense violence

PG

Parental Guidance Suggested (This program contains
material that parents may find unsuitable for younger
children.)
D) Some suggestive dialog  L) Infrequent coarse
language  S) Some sexual situations  V) Moderate
violence

G

General Audience (Most parents would find this program
suitable for all ages.)

Y7,

Directed to Older Children (This program is designed for

Y7FV

children age 7 and above. Note: Programs in which fantasy
violence may be more intense or more combative than other
programs in this category are designated Y7FV.)

Y

All Children (This program is designed to be appropriate for
all children.)

Press RECALL to display the rating of
the TV program you are currently
watching.

33 34 35

ANT

FULL

TV

L

V

PG

CABLE

1

6

PG

L

V

yzx


X

X

X

X

X

X

X

X

D I ALOG

TV  RAT I NG

G

PG

1 4

MA

Y 7 F V     Y 7     Y

LANGUAGE
SEX
V I OLENCE
NO  DLSV

YOUTH  TV  RAT I NG
V – CH I P  MENU

MOVE

:

: SELECT

ENTER

ENABLE  BLOCK I NG

ON
OFF

V – CH I P

TV  RAT I NG
MPAA  RAT I NG
BLOCK I NG  OPT I ON
LOCKS  MENU

: SET

E N T E R

SELECT

:

LOCKS menu

V - CH I P

LOCKS

CH  LOCK
V I DEO  LOCK
NEW  P I N  CODE

: MOVE

OFF

: START

ENTER

RECALL

#01E_41-45_57H85C

3/9/05, 10:45 PM

41

Black

Summary of Contents for 51H85C

Page 1: ...d these numbers in the spaces below Refer to these numbers whenever you communicate with your Toshiba dealer about this TV Model Serial No YC N 23566608 Projection Television OWNER S MANUAL Introduction Connecting your TV Using the remote control Setting up your TV Using the TV s Features Appendix Index ...

Page 2: ...TV keep these safety tips in mind The Issue If you are like most consumers you have a TV in your home Many homes in fact have more than one TV The home theater entertainment experience is a growing trend and larger TVs are popular purchases however they are not always supported on the proper TV stands Sometimes TVs are improperly secured or inappropriately situated on dressers bookcases shelves de...

Page 3: ...instructions 5 Do not use this apparatus near water 6 Clean only with a dry cloth 7 Do not block any ventilation openings Install in accordance with the manufacturer s instructions 8 Do not install near any heat sources such as radiators heat registers stoves or other apparatus including amplifiers that produce heat 9 Do not defeat the safety purpose of the polarized or grounding type plug A polar...

Page 4: ...6 to 7 hours to allow the condensation to evaporate 31 For added protection of your TV from lightning and power surges always unplug the power cord and disconnect the antenna from the TV if you leave the TV unattended or unused for long periods of time 32 During normal use the TV may make occasional snapping or popping sounds This is normal especially when the unit is being turned on or off If the...

Page 5: ... disassembled 1 Always handle and treat the top section of the TV cabinet with the viewing screen which contains a glass mirror with great care If subjected to excessive mechanical abuse for example if bumped or dropped the mirror may break creating exposed glass fragments with sharp edges Contact with these glass fragments may result in injury 2 Never temporarily locate the disassembled bottom se...

Page 6: ...31 Viewing the wide screen picture formats 480i 480p and 1080i signals only 32 Selecting the picture size 32 Scrolling the TheaterWide picture TheaterWide 2 and 3 only 34 Using the AUTO ASPECT feature 35 Using the POP double window feature 36 Switching the main and POP pictures 37 Switching the speaker sound of main and POP programs 37 Double Window aspect ratio 38 Using the programmed channel sea...

Page 7: ...ont panel or the remote control The back panel and front panel behind the door provide all the terminal connections you will need to connect other equipment to your TV See Connecting your TV on page 8 Illustrations represent 57H85C 1 2 3 4 5 6 7 8 9 ENT 100 0 POWER RECALL CHRTN FAV FAV TV VIDEO 10 P I C S I Z E E X I T INFO STOP POP DIRECT CH MUTE SLEEP TV VCR PAUSE FF REW SKIP SEARCH SPLIT SWAP P...

Page 8: ...OTE REGARDING PICTURE QUALITY When connecting video equipment to your Toshiba TV For GOOD picture quality Use a standard yellow video cable For BETTER picture quality If your equipment has an S video input use an S video cable instead of a standard yellow video cable You still must connect the standard red and white audio cables for full system connection but do not connect the standard yellow vid...

Page 9: ...ur area and use the converter box to change channels You will need three coaxial cables IN OUT Cable converter box Note When you use a converter box with your TV the remote control will not operate some features such as programming your favorite channels labeling channels and locking channels Note If you have a mono VCR connect L Mono to VCR Audio OUT using only one audio cable If you have a VCR w...

Page 10: ...IN from ANT OUT to TV CH 3 CH 4 VIDEO AUDIO L R IN OUT IN OUT Cable converter box Stereo VCR Note If you have a mono VCR connect L Mono to VCR Audio OUT using only one audio cable If you have a VCR with S video use an S video cable in the S video jacks instead of a standard video cable Do not connect a standard video cable and an S video cable to Video 1 or Video 2 at the same time or the picture ...

Page 11: ...T VIDEO OUT OUT S VIDEO AUDIO OUT L R IN from ANT VIDEO OUT OUT S VIDEO AUDIO OUT L R Stereo VCR Note For the highest possible picture quality from a DVD player or satellite receiver without component video or HDMI use an S video cable If your DVD player has component video see page 12 If your DVD player or satellite receiver has HDMI or DVI see page 15 Do not connect both an S video cable and a s...

Page 12: ...onent video cables one S video cable for a DVD player without component video inputs see notes at right IN from ANT OUT to TV CH 3 CH 4 VIDEO AUDIO L R IN OUT VIDEO OUT S VIDEO AUDIO COMPONENT VIDEO OUT L R L R PR PB Y DVD player with component video Stereo VCR From Antenna The unauthorized recording use distribution or revision of television programs videotapes DVDs and other materials is prohibi...

Page 13: ...eed three coaxial cables two sets of standard A V cables one pair of audio cables one set of component video cables one S video cable for a DTV receiver without component video see notes at right IN from ANT OUT to TV CH 3 CH 4 VIDEO AUDIO L R IN OUT VIDEO OUT S VIDEO AUDIO COMPONENT VIDEO OUT L R L R PR PB Y Satellite IN Note For the highest possible picture quality use component video cables or ...

Page 14: ...rd video cable and an S video cable to Video 1 or Video 2 at the same time or the picture performance will be unacceptable Do not connect the same VCR to the output and input jacks on the TV at the same time To dub or edit VCR 2 must select Line IN and the TV must select VIDEO 1 see Selecting the antenna input on page 24 The Video OUT jack does not output the POP picture The Audio OUT jacks can ou...

Page 15: ...procedures When turning on your electronic components turn on the TV first and then the HDMI or DVI device When turning off your electronic components turn off the HDMI or DVI device first and then the TV The HDMI 1 input on your TV receives digital audio and uncompressed digital video from an HDMI device or uncompressed digital video from a DVI 2 device This input is designed to accept HDCP 3 pro...

Page 16: ...TV s remote control To control the audio turn on the TV and the stereo amplifier and turn off the built in speakers see Turning off the built in speakers on page 57 You will need one pair of standard audio cables Note To hear sound when using an external audio amplifier the volume of both the TV and the amplifier must be set above 0 zero For example if the volume of the TV is set to 0 you will not...

Page 17: ...ol directly at the TV and make sure there is no obstruction between the remote control and the TV Squeeze tab and lift cover Note Be sure to use AA size batteries Dispose of batteries in a designated disposal area Batteries should always be disposed of with the environment in mind Always dispose of batteries in accordance with applicable laws and regulations If the remote control does not operate ...

Page 18: ...se a code that is not recognized by the TV remote control If this happens use the device s remote control Note In addition to POWER confirm that all necessary keys on the TV remote control operate your device If some keys are not operational repeat the device code setup using another code if other codes are listed for your device If after trying all listed codes the necessary keys do not operate y...

Page 19: ...40 042 048 056 Go Video 056 059 061 081 Goldstar 005 010 014 054 056 065 067 Gradiente 018 065 Harman Kardon 005 Hitachi 024 025 035 037 042 063 070 080 JBL 076 JC Penney 005 006 007 008 009 010 023 024 025 026 035 056 061 063 065 Jensen 024 025 037 050 JVC 005 006 007 014 037 043 062 063 068 082 Kenwood 005 006 007 012 014 037 043 053 068 071 Kodak 010 LG 010 Lloyds 053 073 079 Logik 061 LXI 010 ...

Page 20: ...le converter box or satellite receiver set the Device Switch to CBL SAT VCR set the Device Switch to VCR DVD player or HTIB set the Device Switch to DVD Note Even after the TV remote control is programmed it may not operate certain features on your other device If this happens and you wish to use those features you will need to use the device s original remote control 1 2 3 4 5 6 7 8 9 ENT 100 0 P...

Page 21: ...00 10 CH RTN ENT Previous channel CH Enter CH Enter TOP MENU Favorites Top Menu FAVORITE GUIDE Selects the Guide PIC SIZE image shape ENTER ENTER Enter Select Enter CLEAR EXIT Exit Exit Clear yz FAVyz Menu select Menu select Menu select FAVyz x Menu select Menu select Menu select VOLyz Volume up down TV Volume up down TV Volume up down TV Volume up down CHyz Channel up down Channel up down Channel...

Page 22: ...18 20 Set to TV to control the TV CH channel y z cycles through programmed channels page 26 Channel Numbers 0 9 100 allow direct access to channels page 26 VOL volume y z adjusts the volume level CH RTN returns to the memorized channel page 29 MENU allows access to on screen programming menus page 23 ENTER activates the function settings in the menu page 23 y z x select or adjust programming menus...

Page 23: ...A MOVE ADJUST BASS AUD I O I SETT NGS TREBLE BALANCE RESET SAVE RESET AUD I O MENU 0 5 0 5 0 SELECT LANGUAGE SET UP CLOCK SET 0 0 0 0 ENGLISH ANT 1 2 ANT1 TV CABLE CABLE ADD CH PROGRAM ADD ERASE END SELECT EX I T END SELECT EX I T ON T I MER CUSTOM SLEEP T I MER 0 0 h 0 0 m 0 h 0 0 m CC OFF FAVOR I TE CH SHADED CH LABEL I NG V I DEO LABEL BACKGROUND END SELECT EXIT V CH I P LOCKS CH LOCK V I DEO L...

Page 24: ...using the TV VIDEO button 1 Press the TV VIDEO button on the remote control or TV see illustrations below The current signal source displays in purple 2 Continue pressing the TV VIDEO button to select ANT 1 or ANT 2 SOURCE 0 1 2 3 4 ANT 1 HDM I V I DEO 1 V I DEO 2 V Color Stream 5 6 ANT 2 7 I DEO HD1 Color Stream HD2 3 SELECT I ON 0 7 TO SELECT SOURCE ANT 1 HDM I V I DEO 1 V I DEO 2 V Color Stream...

Page 25: ...E LANGUAGE SET UP CLOCK SET TV CABLE ANT 1 2 TV CABLE CH PROGRAM ADD ERASE SELECT SET ENTER 4 Press ENTER 5 Press z to select CH PROGRAM LANGUAGE SET UP CLOCK SET 0 0 0 0 ENGLISH ANT 1 2 ANT1 TV CABLE CABLE ADD CH PROGRAM ADD ERASE MOVE START ENTER 6 Press ENTER to start channel programming The TV will automatically cycle through all the TV or Cable channels depending on which you selected and sto...

Page 26: ...or erase If you are adding a channel you must select the channel using the Channel Number buttons 2 Press MENU and then press x or until the SET UP menu appears 3 Press y or z to highlight ADD ERASE and then press ENTER to display the pull down menu LANGUAGE SET UP CLOCK SET ADD ERASE ANT 1 2 TV CABLE CH PROGRAM ADD ERASE SELECT SET ENTER 4 Press y or z to select ADD or ERASE depending on the func...

Page 27: ... auto convergence TouchFocus and manual convergence adjustments 1 Press MENU and then press x or until the PICTURE menu appears 2 Press y or z to highlight CONVERGENCE and then press ENTER to display the pull down menu 3 Press y or z to highlight ADJUST and then press ENTER The TV will perform TouchFocus When the adjustment is complete the TV will enter 56 point static convergence mode automatical...

Page 28: ...N I SH ADJUSTMENT ENTER TO CHANGE COLOR TO ADJUST RED EX I T TO F I N I SH ADJUSTMENT ENTER TO SELECT POS I T I ON TO ADJUST BLUE 7 If both red and blue need adjusting you will need to perform steps 5 and 6 twice 8 Press ENTER to display the cursor 9 Repeat steps 4 to 8 to adjust another position 10 Press EXIT to close the Convergence menu To reset your adjustments 1 Select RESET in step 3 on page...

Page 29: ...he last two channels that were selected Switching between two channels using SurfLock The SurfLock feature temporarily memorizes one channel in the CH RTN button so you can return to that channel quickly from any other channel by pressing CH RTN To memorize a channel in the CH RTN button 1 Select the channel you want to program into the CH RTN button 2 Press and hold CH RTN for about 2 seconds unt...

Page 30: ... Press FAV z or y To quickly scan through your favorite channels in a twelve picture multi window Press FAVORITE see page 39 for detail To clear a favorite channel 1 Press MENU and then press x or until the CUSTOM menu appears 2 Press y or z to highlight FAVORITE CH 3 Press ENTER to display the FAVORITE CH menu 4 Press yzx to highlight the channel you want to clear then press ENTER 5 Repeat step 4...

Page 31: ...STOM MENU 4 Press the Channel Number buttons to select a channel you want to label 5 Press z to highlight LABEL 6 Press x or repeatedly to select a character for the first space and then press ENTER SELECT SET ENTER 0 9 CH I NPUT CH LABEL I NG 06 LABEL CLEAR CUSTOM MENU SELECT SET ENTER CH I NPUT CH LABEL I NG 0 6 LABEL A CLEAR CUSTOM MENU 7 Repeat step 6 to enter the rest of the characters If you...

Page 32: ...variety of picture sizes Natural TheaterWide 1 TheaterWide 2 TheaterWide 3 and Full The Full picture size is not selectable for 1080i format program The way the image displays in any of the picture sizes will vary depending on the format of the program you are viewing Select the picture size that displays the current program the way that looks best to you See Notice of possible adverse effects on ...

Page 33: ...screen but not stretched taller None of the picture is hidden Note To select the picture size press PIC SIZE on the remote control or select PICTURE SIZE in the PICTURE menu The PICTURE SIZE feature is not available for some program formats such as 1080i or 720p Such formats will display in Natural picture size see page 32 If you select TheaterWide 2 or 3 the top and bottom edges of the picture ma...

Page 34: ...menu appears 3 Press y or z to highlight PICTURE SCROLL MOVE START ENTER P I CTURE S I ZE P I CTURE AUTO ASPECT OFF P I CTURE SCROLL RESET SAVE 4 Press ENTER to display the Scroll Adjustment mode SCROL L ADJUSTMENT 0 TO ADJUST 5 Press y or z to adjust the vertical position of the picture Normal center position SCROL L ADJUSTMENT 0 TO ADJUST To raise the picture press y SCROL L ADJUSTMENT 20 TO ADJ...

Page 35: ...AUTO ASPECT feature 1 Press MENU and then press x or until the PICTURE menu appears END SELECT EX I T MODE P I CTURE P I CTURE SETT I NGS SPORTS 1 0 8 0 i V I DEO D I SPLAY FORMAT RESET SAVE C I NEMA MODE CONVERGENCE 2 Press y or z to highlight AUTO ASPECT and then press ENTER SET ENTER P I CTURE S I ZE P I CTURE AUTO ASPECT ON OFF P I CTURE SCROLL RESET SAVE SELECT 3 Press y or z to select ON and...

Page 36: ...ect a channel for the POP window using the VCR s channel keys POP SOURCE SELECT I ON 0 TV 1 V I DEO V 1 2 3 4 Color Stream HD1 5 Color Stream HD2 I DEO 2 V I DEO 3 6 HDM I 0 6 TO SELECT While the above menu is on the screen you can select the desired signal input source by pressing the corresponding number button 0 6 To close the POP window Press SPLIT again or EXIT POP CH zy SPLIT SOURCE Main win...

Page 37: ...l not display in the main window when you press SWAP The SAP channel will not be decoded when the speaker source is switched to POP Even if SAP is selected in the menu see page 54 the main audio channel will be heard when the speaker sound is switched to POP The VARIABLE AUDIO OUT jacks will switch with the speaker sound However the source of the regular AUDIO OUT jacks is determined by the AUDIO ...

Page 38: ...programmed channels Press CH SCAN again to return to a normal picture 10 2 3 4 5 6 7 8 9 10 11 12 13 2 Press the Channel Number buttons to select one of the twelve pictures 2 3 4 5 6 7 8 9 10 11 12 13 CH SCAN Note The AUTO ASPECT feature page 34 does not operate in double window mode Aspect ratio is the ratio of width to height of the picture Channel Number Note During the programmed channel searc...

Page 39: ... details 2 3 4 5 6 7 8 10 11 13 9 X 12 X Moving picture 1 2 3 4 5 6 7 8 9 ENT 100 0 POWER RECALL CHRTN FAV FAV TV VIDEO 10 P I C S I Z E E X I T INFO STOP POP DIRECT CH MUTE SLEEP TV VCR PAUSE FF REW SKIP SEARCH SPLIT SWAP POP CH LIGHT REC CH SCAN FREEZE SOURCE PLAY TV CBL SAT VCR DVD VOL CH FAVORITE ENTER DVDMENU MENU T O P MENU GUID E CLE A R E N T ER yzx FAVORITE ENTER Moving picture purple pur...

Page 40: ...d Press the Number buttons 0 9 to enter the 4 digit PIN code used for blocking channels SELECT SET ENTER 0 9 BLOCK I NG RESET LOCKS P I N CODE 1 1 1 0 BLOCK I NG ACT I VE LOCKS P I N CODE 1 2 3 4 SELECT SET ENTER 0 9 If the wrong PIN code is entered the message Incorrect appears Enter the code again and then press ENTER If you cannot remember your PIN code 1 While the PIN code entering screen is d...

Page 41: ... viewed by adults and therefore may be unsuitable for children under 17 L Crude or indecent language S Explicit sexual activity V Graphic violence 14 Parents Strongly Cautioned This program contains some material that many parents would find unsuitable for children under 14 years of age D Intensely suggestive dialog L Strong coarse language S Intense sexual situations V Intense violence PG Parenta...

Page 42: ...y to highlight BLOCKING OPTION and then press ENTER The BLOCKING OPTION menu appears 2 Press y or z to select item MPAA UNRATED 1 Highlight MPAA UNRATED and then press ENTER 2 Press y or z to select ON Lock or OFF Unlock for unrated programs in the MPAA rating system then press ENTER ENABLE BLOCK I NG ON V CH I P TV RAT I NG MPAA RAT I NG BLOCK I NG OPT I ON LOCKS MENU MOVE START ENTER MPAA UNRATE...

Page 43: ...ing channels With the CH LOCK feature you can lock specific channels You will not be able to tune locked channels with the Channel y z buttons or Channel Number buttons unless you clear the setting You can lock a maximum of nine channels To lock channels 1 Make sure the POP is not tuned to a channel you want to lock 2 From the LOCKS menu press y or z to highlight CH LOCK and then press ENTER The C...

Page 44: ...CABLE LOCKS MENU 33 SELECT CLEAR ENTER 3 Repeat step 2 for other channels To unlock all locked channels at once Press y or z to highlight CLEAR ALL and then press ENTER MOVE START ENTER CH I NPUT CH LOCK CLEAR ALL TV CABLE LOCKS MENU 1 2 3 4 5 6 7 8 9 ENT 100 0 POWER RECALL CHRTN FAV FAV TV VIDEO 10 PIC SIZE E X I T INFO STOP POP DIRECT CH MUTE SLEEP TV VCR PAUSE FF REW SKIP SEARCH SPLIT SWAP POP ...

Page 45: ...r one of the video modes OFF Unlocks all video input sources SET ENTER V CH I P LOCKS CH LOCK V I DEO LOCK V I DEO V I DEO OFF NEW P I N CODE SELECT 3 Press ENTER Changing the PIN code 1 From the LOCKS menu press y or z to highlight NEW PIN CODE 2 Press the Number buttons 0 9 to enter a 4 digit code The numbers you enter will replace the dashes in the display SELECT SET ENTER 0 9 V CH I P LOCKS CH...

Page 46: ...and dynamic picture factory setting Standard Standard picture setting factory setting Movie Movie like picture setting factory setting Preference Your personal preference Note If you select one of the factory set picture modes SPORTS STANDARD or MOVIE and then change a picture quality setting for example increase the contrast the picture mode automatically changes to PREFERENCE in the Picture menu...

Page 47: ...e picture mode on page 46 Selecting the color temperature You can change the quality of the picture by selecting from three preset color temperatures cool medium and warm To select the color temperature 1 Press MENU and then press x or until the PICTURE menu appears 2 Press y or z to highlight PICTURE SETTINGS and then press ENTER The PICTURE SETTINGS menu appears 3 Press y or z to highlight COLOR...

Page 48: ...tion adjusts the picture qualities to the following factory settings 1 2 3 4 5 6 7 8 9 ENT 100 0 POWER RECALL CHRTN FAV FAV TV VIDEO 10 P I C S I Z E E X I T INFO STOP POP DIRECT CH MUTE SLEEP TV VCR PAUSE FF REW SKIP SEARCH SPLIT SWAP POP CH LIGHT REC CH SCAN FREEZE SOURCE PLAY TV CBL SAT VCR DVD VOL CH F A V O R I T E E N T E R DVDMENU MENU T O P MENU GUID E CLE A R E N T ER MENU yzx Note When i...

Page 49: ... DISPLAY FORMAT and then press ENTER 3 Press y or z to select 540p or 1080i whichever you prefer Selecting the cinema mode When you view a DVD movie 3 2 pulldown processed or interlaced mode from a DVD player connected to the ColorStream component video inputs on the TV smoother and more natural motion can be obtained by setting the CINEMA MODE to FILM To set the CINEMA MODE to FILM 1 Press MENU a...

Page 50: ...Press y or z to select the desired label for that input source 6 Finish labeling the other video sources as desired To return to the previous menu press y or z to highlight CUSTOM MENU and then press ENTER 7 To exit the menu press EXIT Note When ColorStream HD 1 or HD 2 is selected the VIDEO OUT jack does not output a signal To receive a VIDEO OUT signal use a standard video or S video IN connecti...

Page 51: ...eaves To view text highlight TEXT in step 4 above and then highlight T1 T2 T3 or T4 Note If text is not available in your area a black rectangle may appear on your screen If this happens turn the Closed Caption feature OFF WORLD WEATHER Temps Current F C Weather LONDON 51 11 MOSCOW PARIS ROME TOKYO 57 14 53 12 66 19 65 18 Cloudy Clear Cloudy Rain Clear To turn off the Closed Caption feature Highli...

Page 52: ...ET ENTER 0 9 5 Press POWER to turn off the TV The TV will turn on automatically after the length of time you set in the ON Timer Setting the sleep timer To set the sleep timer to turn off the TV automatically 1 Press SLEEP to set the length of time until the TV turns off T I MER 0 h 00m Every time you press SLEEP the time display will increase by 10 minutes up to 3 hours 0h00m 0h10m 0h20m 2h50m 3h...

Page 53: ...he clock LANGUAGE SET UP CLOCK SET ANT 1 2 TV CABLE CH PROGRAM ADD ERASE 0 9 2 5 SELECT SET ENTER 0 9 To display the time on screen Press RECALL POWER RECALL FAV FAV TV VIDEO P I C S I Z E E X I T INFO STOP POP DIRECT CH MUTE SLEEP TV VCR PAUSE FF REW SKIP SEARCH SPLIT SWAP POP CH LIGHT REC CH SCAN FREEZE SOURCE PLAY TV CBL SAT VCR DVD VOL CH FAVORITE ENTER DVDMENU MENU T O P MENU GUID E CLE A R E...

Page 54: ... AUDIO SETTINGS WOW SRS 3D FOCUS T r u B a s s STEREO SAP MONO You can leave your TV in STEREO mode because it will automatically output the type of sound being broadcast stereo or monaural The word STEREO or SAP displays in yellow in the menu when the TV receives the signal If the stereo sound is noisy select MONO to reduce the noise To listen to SAP if available 1 Press MENU and then press x or ...

Page 55: ... To turn on or off the vocal emphasis effect TruBass To select your desired bass expansion level HIGH LOW or OFF MTS AUDIO AUDIO SETTINGS WOW SRS 3D FOCUS T r u B a s s ON OFF SELECT SET ENTER 4 Press y or z to adjust the item then press ENTER Adjusting the sound quality You can change the quality of your TV s sound by adjusting the bass treble and balance To adjust the sound quality 1 Press MENU ...

Page 56: ...ten happens when a TV program switches to a commercial To turn on the StableSound feature 1 Press MENU and then press x or until the AUDIO menu appears 2 Press y or z to highlight STABLE SOUND and then press ENTER 3 Press y or z to select ON and then press ENTER SET SELECT ENTER STABLE SOUND AUDIO SPEAKERS ON OFF AUD I O OUT To turn off the StableSound feature Select OFF in step 3 above 1 2 3 4 5 ...

Page 57: ...ilt in speakers To select the Audio OUT sound 1 Press MENU and then press x or until the AUDIO menu appears 2 Press y or z to highlight AUDIO OUT and then press ENTER 3 Press y or z to select MAIN or POP and then press ENTER SET SELECT ENTER STABLE SOUND AUDIO SPEAKERS MA I N POP AUD I O OUT MAIN Outputs the sound of the main left window program to the Audio OUT terminals POP Outputs the sound of ...

Page 58: ...on Press RECALL to display the following information on screen Antenna mode when in TV mode Channel number or VIDEO mode selected Remaining time of ON SLEEP timer if set Channel label if set Video label when in video mode Stereo or SAP audio status V CHIP rating status Picture size 1 2 3 4 5 6 7 8 9 10 11 12 13 14 15 16 17 18 33 34 35 33 34 35 ANT ABCD FULL STEREO SAP TV ON T I MER 10h34m SLEEP T ...

Page 59: ...ions This model complies with the specifications listed below Design and specifications are subject to change without notice This model may not be compatible with features and or specifications that may be added in the future WARNING RISK OF ELECTRIC SHOCK Never attempt to service the TV yourself Opening and removing the covers may expose you to dangerous voltage or other hazards Refer all servici...

Page 60: ... VCR button is set correctly Cannot receive above channel 13 Make sure the TV CABLE switch is set to the mode that corresponds with the signal source type cable company or outside antenna Black box appears on the screen The closed caption feature may be set to one of the Text modes T1 T2 T3 or T4 Turn closed captioning OFF Unable to select a certain channel The channel may be locked out with the C...

Page 61: ...ter your television does not diminish your warranty rights Your Responsibility THE ABOVE WARRANTIES ARE SUBJECT TO THE FOLLOWING CONDITIONS 1 You must retain your original bill of sale or provide other proof of purchase 2 All warranty servicing of this television must be performed by an Authorized TCL Service Depot 3 The warranties from TCL are effective only if this television is purchased in Can...

Page 62: ...n 15 16 L M Labeling channels 31 Labeling video inputs 50 Language selection 24 Last mode memory 58 Locking channels 43 Locking video inputs 45 Locks menu 40 Menu system 23 MTS feature 54 MUTE button 54 O P ON timer 52 Picture adjustments COLOR TEMPERATURE 47 Picture mode 46 Picture quality 46 Picture out picture POP CH SCAN button 38 POP CH yz buttons 36 POP DIRECT CH button 36 SOURCE button 36 S...

Page 63: ...Introduction Connecting your TV Using the remote control Setting up your TV Using the TV s Features Appendix Index 63 Notes ...

Page 64: ...905 470 5400 MONTREAL 18050 TRANS CANADA KIRKLAND QUEBEC H9J 4A1 CANADA TEL 514 390 7766 VANCOUVER 22171 FRASERWOOD WAY RICHMOND B C V6W 1J5 CANADA TEL 604 303 2500 MANUFACTURED BY CableClear ColorStream StableSound TheaterWide and TouchFocus are registered trademarks of Toshiba America Consumer Products L L C SurfLock is a trademark of Toshiba America Consumer Products L L C ...

Reviews: