background image

40

Using the 

TV’

s Features

Selecting the color temperature

Change the picture quality by selecting from three preset color tem-
peratures—cool, medium, and warm—as described in the following
table:

To select the color temperature:

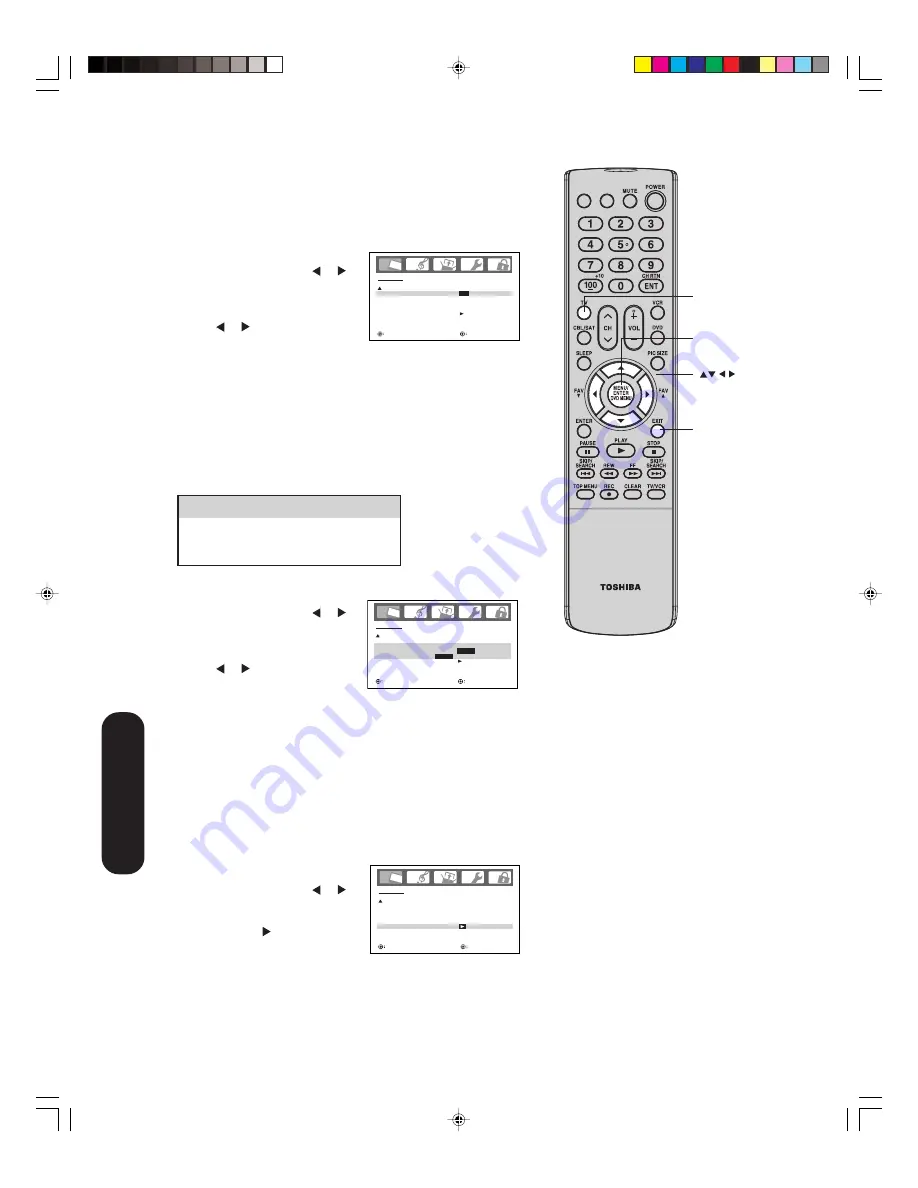
1. Press TV to select the TV mode.
2. Press MENU, then press   or   to

display the PICTURE menu.

3. Press 

 or 

 to highlight COLOR

TEMPERATURE.

4. Press   or   to highlight the mode

you prefer.

5. Press EXIT to return to normal

viewing.

Resetting your picture adjustments

The RESET function returns your picture quality adjustments to the
following factory settings:

Mode ........................... sports

Tint .......................... center (0)

Brightness ............ center (25)

Sharpness ............ center (25)

Contrast .................. max (50)

Color temperature ............ cool

Color .................... center (25)

To reset your picture adjustments:

1. Press TV to select the TV mode.
2. Press MENU, then press   or   to

display the PICTURE menu.

3. Press 

 or 

 to highlight RESET,

and then press  .

Mode


Picture Quality

COOL

Blueish

MEDIUM

Neutral

WARM

Reddish

Using the CableClear

®


feature

CableClear

®

 reduces visible interference in your TV picture. This

is useful when receiving a broadcast with a weak signal (especially a
Cable channel) or playing a video cassette or disc damaged by
repeated use.

To turn on the CableClear

®

 feature:

1. Press TV to select the TV mode.
2. Press MENU, then press   or   to

display the PICTURE menu.

3. Press 

 or 

 to highlight

CableClear.

4. Press   or   to highlight ON.
5. Press EXIT to return to normal

viewing.

To turn off the CableClear

®

 feature:

Highlight OFF in step 4, above.

P I C T U R E

S P O R T S


C a b l e C l e a r

O N

  /   O F F  

C O L O R
T E M P E R AT U R E

C O O L

R E S E T

        S E L E C T

       A D J U S T

CT-885

INPUT DISPLAY

Menu/Enter

Exit

Note:

If the remote control does not operate your TV,
press the “TV” button on the remote control
and try again.

TV

P I C T U R E

S P O R T S


C a b l e C l e a r

O N  

C O L O R
T E M P E R AT U R E

C O O L


C O O L

  /   M E D I U M   /   WA R M

R E S E T

        S E L E C T

       A D J U S T

 3X80501A_En_p32-41

3/7/06, 3:52 PM

40

Summary of Contents for 50HP16

Page 1: ...50HP16 Integrated High Definition Plasma Television Introduction Connecting your TV Setting up your TV Using the TV s Features Appendix 3X80501A_En_cov 3 7 06 3 50 PM 1 ...

Page 2: ...htning flash with arrowhead symbol within an equilateral triangle is intended to alert the user to the presence of uninsulated dangerous voltage within the product s enclosure that may be of sufficient magnitude to constitute a risk of electric shock to persons The exclamation point within an equilateral triangle is intended to alert the user to the presence of important operating and maintenance ...

Page 3: ...s 5 Do not use this apparatus near water 6 Clean only with dry cloth 7 Do not block any ventilation openings Install in accordance with the manufacturer s instructions 8 Do not install near any heat sources such as radiators heat registers stoves or other apparatus including amplifiers that produce heat 9 Do not defeat the safety purpose of the polarized or grounding type plug A polarized plug has...

Page 4: ...nufacturer Upon completion of service ask the service technician to perform routine safety checks to determine that the TV is in safe operating condition 37 When the TV reaches the end of its useful life ask a qualified service technician to properly dispose of the TV Installation cont from previous page 26 Always make sure the antenna system is properly grounded to provide adequate protection aga...

Page 5: ...tain types of electronic equipment that easily receive electromagnetic waves e g AM radios and video equipment In particular the display of this Plasma TV may affect certain types of electronic equipment that are located beyond the area where the Plasma TV is being used 3 The display panel of this Plasma TV is manufactured using an extremely high level of precision technology however occasionally ...

Page 6: ...ng your favorite channels 25 Using the LOCKS menu 26 Selecting a password 26 Using the V Chip parental control feature 27 Locking channels 28 Locking the video inputs 28 Setting the GameTimerTM 29 Using the panel lock feature 29 Labeling channels 30 Selecting the video input source 31 Labeling the video input sources 31 Setting the clock 31 Setting the ON timer 32 Setting the sleep timer 32 Viewin...

Page 7: ...on the right side panel Introduction Remote sensor Power indicator Right side panel VIDEO 3 IN CHANNEL VOLUME INPUT POWER Remote control CT 885 INPUT DISPLAY Features of your new TV The following are some of the exciting features of your new Toshiba widescreen integrated High Definition Plasma TV Integrated digital tuning 8VSB ATSC and QAM eliminates the need for a separate digital converter set t...

Page 8: ...ner as the cables S video cables provide better picture performance than standard video cables S video cables can only be used with S video compatible components Component video cables provide better picture performance than S video cables Component video cables can only be used with component video compatible components HDMI High Definition Multimedia Interface cable is for use with video equipme...

Page 9: ... two set signal splitter sometimes called a two set coupler and an A B Switch box from the cable installer or an electronics supply store Follow the connections shown below With the switch in the B position you can directly tune any nonscrambled channels on your TV With the switch in the A position tune your TV to the output of the Converter Descrambler box usually channel 3 or 4 and use the box t...

Page 10: ...n S video cable between the TV and DVD player satellite receiver make the audio connections but remove the standard video cable Do not connect both an S video and a standard video cable to VIDEO 1 or VIDEO 2 at the same time or the picture performance will be unacceptable DVD player Satellite Receiver Stereo VCR TV back panel The unauthorized recording use distribu tion or revision of television p...

Page 11: ... player such as a Toshiba DVD player with ColorStream can greatly enhance picture quality and performance DVD player with Component video Stereo VCR Note You can connect the component video cables to either set of ColorStream jacks on the TV HD 1 or HD 2 The ColorStream HD 1 and HD 2 jacks can be used with Progressive 480p 720p and Interlaced 480i 1080i scan systems A 1080i signal will provide the...

Page 12: ...either set of ColorStream jacks on the TV HD 1 or HD 2 The ColorStream HD 1 and HD 2 jacks and HDMI 1 and HDMI 2 jacks can be used with Progressive 480p 720p and Interlaced 480i 1080i scan systems If your DTV receiver does not have compo nent video use the S video and standard audio connections instead Do not connect both an S video and a standard video cable to VIDEO 1 or VIDEO 2 at the same time...

Page 13: ...ndard audio cables VHS Camcorder Note For better picture quality if your camcorder has S video you can use an S video cable plus the standard audio cables instead of a standard video cable Do not connect both a standard video cable and an S video cable at the same time or the picture performance will be unacceptable You will need one set of standard AV cables TV right side panel S VHS Camcorder Co...

Page 14: ... 6 6 ft 2m one pair of standard analog audio cables An HDMI to DVI adapter cable transfers only video Separate analog audio cables are required see illustration below You must set the HDMI audio input setting to DVI in the AUDIO menu see page 43 The HDMI inputs on your TV receive digital audio and uncompressed digital video from an HDMI source device or uncompressed digital video from a DVI Digita...

Page 15: ...uts output a Dolby Digital or 2 channel down mixed PCM pulse code modulation signal for use with an external Dolby Digital decoder or other external audio system with optical or coaxial audio input You will need one pair of standard audio cables The COAXIAL DIGITAL AUDIO OUT jack outputs digital audio only during digital broadcasts with digital audio To hear analog broadcast audio you also must co...

Page 16: ... TV and press the button for the desired function The signal passes from the remote control through the TV to the device via the IR blaster cable You will need one IR blaster IR emitter cable 3 5mm mono mini plug other audio video cables as required to connect the device s to the TV see pages 7 15 TV back panel Front of IR controlled device Infrared sensor IR blaster cable wand approx 1 inch from ...

Page 17: ...e TV see page 45 Note Make sure to insert the plug of each cord securely WARNING Do not connect this unit to power using any other power cord This could cause fire electric shock or damage Do not use with a voltage other than the power voltage displayed This could cause fire electric shock or damage CAUTION When this unit is not used for a long time e g if you are away on a trip in the interest of...

Page 18: ... to operate your other devices on the next page The buttons shown at right will control the cable TV converter satellite receiver Press CBL SAT first Power CH RTN Channel Return Channel Numbers Input TV Pic Size TV Channel Volume TV TV VCR Power CH RTN Channel Return Channel Numbers Input TV Pic Size TV Channel Volume TV VCR controls Mute TV CBL SAT VCR Note The TV remote control may not operate y...

Page 19: ... or DVD player and press POWER to test the code If the device responds you entered the correct code If the device does not respond repeat steps 1 4 using another code 5 Press TV to control the TV For future reference write down the codes you used Cable TV converter satellite receiver code _____________________ VCR code ______________________________________________ DVD player code ________________...

Page 20: ...i Funai Garrard GE Go Video Goldstar Gradiente Harman Kardon Hitachi JBL JC Penney Jensen JVC Kenwood Kodak LG Lloyds Logik LXI Magnasonic Magnavox 004 041 018 073 018 001 002 009 040 042 048 056 056 059 061 081 005 010 014 054 056 065 067 018 065 005 024 025 035 037 042 063 070 080 076 005 006 007 008 009 010 023 024 025 026 035 056 061 063 065 024 025 037 005 006 007 014 037 043 062 063 068 082 ...

Page 21: ...025 031 035 049 051 056 057 060 065 066 079 073 018 005 006 007 014 037 053 004 032 034 041 047 069 086 Brand Code Code Brand Code TV VCR Combo Brand Action GE Goldstar Panasonic 078 059 062 065 065 078 065 079 074 Precision Quasar Realistic Sony Toshiba Zenith Totevision 057 065 009 010 065 Brand Code Brand Code Portable DVD Brand Code Aiwa Audiovox 093 094 095 024 096 099 Panasonic RCA 098 Brand...

Page 22: ...ite channels page 25 EXIT closes on screen menus page 23 DVD MENU accesses the DVD menu PAUSE pauses a videotape DVD PLAY plays a videotape DVD STOP stops a videotape DVD DVD SKIP SEARCH skips DVD chapter REW rewinds reverses a videotape DVD FF fast forwards a videotape DVD TOP MENU accesses the DVD TOP menu REC starts recording a videotape CLEAR clears input data in DVD mode TV VCR toggles betwee...

Page 23: ... control you need to set some preferences on the TV using the menu system You can access the menu system with the buttons on the remote control When you make a menu selection your changes are immediate You do not have to press MENU or EXIT to save your changes After one minute the menu screen will automatically close if you do not make a selection Your changes will still be saved When you are fini...

Page 24: ...enu 5 Select the desired channel to be memorized or deleted using or Press or to select either ADD or ERASE 6 Repeat step 5 for other channels you want to add or erase then press ENTER 7 Press EXIT to return to the normal screen To add a digital channel you are watching Select a channel you want to add Press or to select ADDING CHANNEL in step 4 above then press To erase all channels from the chan...

Page 25: ...r to highlight FAVORITE CH 5 Press to display the FAVORITE CH menu SET CLEAR will be highlighted 6 Press or to highlight SET and press ENTER 7 Press EXIT to return to normal viewing 8 Repeat steps 1 7 for up to 12 channel To select your favorite channels Press the FAV buttons on the remote control to select your favorite channels The FAV buttons will not work until you have programmed your favorit...

Page 26: ...Enter the password again to confirm it and then press ENTER The LOCKS menu appears If the wrong password is entered ERROR blinks about 4 seconds 6 You may now set up the LOCKS menu See Using the V Chip parental control feature page 27 Locking channels page 28 Locking the video inputs page 28 Setting the GameTimerTM page 29 or Using the panel lock feature page 29 To change your password 1 Press TV ...

Page 27: ... 17 years old and above When you select TV Y7 TV PG TV 14 or TV MA press DISPLAY to explain the rating Press or to select the desired rating you want Press or to select the setting ON or OFF then press ENTER 8 Press or to highlight MOVIE RATING Then press or to display the RATING SET menu Press or to select the desired rating then press or to select ON or OFF G All ages PG Parental guidance PG 13 ...

Page 28: ...ode 2 Use the Channel Number buttons 0 9 and 100 to display the television channel you wish to lock 3 Press MENU then press or to display the LOCKS menu 4 Press or to display the password entering mode 5 Use the Channel Number buttons 0 9 to enter your password then press ENTER The LOCKS menu appears 6 Press or to highlight CH LOCK and press to display the CH LOCK menu 7 Press or to select the fol...

Page 29: ...xit Channel Numbers Setting the GameTimerTM With the GameTimerTM feature you can automatically activate the VIDEO LOCK feature VIDEO setting to set a time limit for playing a video game 30 60 90 or 120 minutes To set up the GameTimer 1 Press TV to select the TV mode 2 Press MENU then press or to display the LOCKS menu 3 Press or to display the password entering mode 4 Use the Channel Number button...

Page 30: ...eling channels Channel labels appear above the on screen channel number display each time you turn on the TV select a channel or press the DISPLAY button You can choose any four characters to create a channel label To create channel labels 1 Press TV to select the TV mode 2 Select a channel you want to label 3 Press MENU then press or until the OPTION menu appears 4 Press or to highlight CH LABEL ...

Page 31: ...e allows you to label each input source for your TV from the following preset list of labels Uses the default label name VCR Video cassette recorder DVD DVD video DTV Digital TV set top box SAT Satellite box CBL Cable box HD HDMI device To label the video input sources 1 Press TV to select the TV mode 2 Press MENU then press or to display the OPTION menu 3 Press or to highlight VIDEO LABEL 4 Press...

Page 32: ... press ENTER 9 Press EXIT to return to normal viewing To cancel the on timer Select CLEAR in step 8 above Setting the sleep timer You can use the sleep timer to automatically turn off the TV at a set time To set the sleep timer Repeatedly press SLEEP on the remote control to set the length of time until the TV turns off The clock will increase 10 minutes for each press of the SLEEP button 0h00m 0h...

Page 33: ...rogram formats such as 1080i or 720p Such formats will display in Natural picture size Conventional 4 3 picture in Natural size on your wide screen TV Conventional 4 3 picture on a conventional TV screen The center of the picture remains close to its original proportion but the left and right edges are stretched wider to fill the screen The top and bottom edges of the picture may be hidden however...

Page 34: ...ns video game patterns TV station logos stock tickers websites and special formats that do not use the entire screen can become permanently ingrained in the Plasma display and cause subtle but permanent ghost images This type of damage is NOT COVERED BYYOUR WARRANTY A B C D E F G A B C D E F G A B C D E F G Using these functions to change the picture size i e changing the height width ratio for an...

Page 35: ...he scroll amounts are as follows 480i 480p signal source Wide 1 Not adjustable Wide 2 10 to 20 Wide 3 10 to 10 5 Press or to adjust the vertical position of the picture Normal center position To raise the picture press To lower the picture press SCROLL ADJUSTMENT 0 ADJUST SCROLL ADJUSTMENT 0 ADJUST SCROLL ADJUSTMENT 20 ADJUST SCROLL ADJUSTMENT 10 ADJUST CT 885 INPUT DISPLAY Pic Size Menu Enter Not...

Page 36: ... to FILM 1 Press TV to select the TV mode 2 Press MENU then press or until the SETUP menu appears 3 Press or to highlight CINEMA MODE 4 Press or to highlight FILM 5 Press EXIT to return to normal viewing To set the CINEMA MODE to VIDEO off Highlight VIDEO in step 4 above Using the ASPECT feature When the ASPECT feature is set to ON and the TV receives a 480i signal the picture size is automaticall...

Page 37: ... Press or to highlight CC ADVANCED then press 4 Press or to select the desired item to adjust then press or 5 Press or to select the desired setting then press ENTER You can select from among the following items and parameters TEXT SIZE AUTO SMALL STANDARD LARGE TEXT TYPE AUTO DEFAULT MONO W SERIF PROP W SERIF MONO W O SERIF PROP W O SERIF CASUAL CURSIVE SMALL CAPITALS TEXT COLOR AUTO BLACK WHITE ...

Page 38: ...sk of phosphor burn in the default setting for the Picture shift function is ON 1 Press TV to select the TV mode 2 Press MENU then press or to display the SETUP menu 3 Press or to highlight PICTURE SHIFT then press or to highlight ON Side panel color The gray level feature will set the sidebar to two different levels of darkness Sidebars are the blanks spaces on either side of a 4 3 viewing area U...

Page 39: ...ovie and Memory as described in the following table To select the picture mode 1 Press TV to select the TV mode 2 Press MENU then press or to display the PICTURE menu 3 Press or to highlight MODE 4 Press or to highlight the mode you prefer 5 Press EXIT to return to normal viewing Mode Picture Quality SPORTS Bright and dynamic picture factory set STANDARD Standard picture quality factory set MOVIE ...

Page 40: ...the PICTURE menu 3 Press or to highlight RESET and then press Mode Picture Quality COOL Blueish MEDIUM Neutral WARM Reddish Using the CableClear feature CableClear reduces visible interference in your TV picture This is useful when receiving a broadcast with a weak signal especially a Cable channel or playing a video cassette or disc damaged by repeated use To turn on the CableClear feature 1 Pres...

Page 41: ...dio 5 Press EXIT to return to normal viewing Adjusting the sound quality You can change the sound quality of your TV by adjusting the bass treble and balance To adjust the sound quality 1 Press TV to select the TV mode 2 Press MENU then press or to display the AUDIO menu 3 Press or to highlight the item you want to adjust 4 Press or to adjust the level makes the sound quality weaker or increases t...

Page 42: ...ound feature Highlight OFF in step 4 above AUDIO MTS STEREO BASS 25 TREBLE 25 BALANCE 0 STABLE SOUND ON OFF SPEAKERS ON SELECT ADJUST Turning off the built in speakers Use this feature to turn off the TV speakers when you connect an audio system see Connecting an analog audio system on page 15 To turn off the built in speakers 1 Press TV to select the TV mode 2 Press MENU then press or to display ...

Page 43: ...etting to DVI with this connection If you connect an HDMI device and play media with digital audio output to hear digital audio set the HDMI audio input setting to HDMI with this connection If you connect an HDMI device but play media with analog audio output for example certain CDVs do not output digital audio to hear audio you must also connect the analog audio cables to the HDMI audio IN jacks ...

Page 44: ...on on screen Press DISPLAY to display the following information on screen Analog channel Clock Channel number or VIDEO mode selected Channel label if set Stereo or SAP second audio program audio status Content rating On timer Sleep timer if set Picture size Picture format Digital channel Clock Channel number station name program name Remaining time Audio language Content rating HD or SD mark Close...

Page 45: ...ired menu 4 Press or to highlight RESET and then press PICTURE menu settings BRIGHTNESS To adjust the brightness of PC Monitor screen CONTRAST To adjust the contrast of PC Monitor screen HOR POSITION To adjust the horizontal position of the image on the PC Monitor screen Each video standard will require a different value for this setting VER POSITION To adjust the vertical position of the image on...

Page 46: ...The station may have broadcast difficulties Try another channel The MTS feature may be in SAP mode Select STR or MONO in the MTS menu Poor picture sound OK Check the antenna connections The station may have broadcast difficulties Try another channel Adjust the PICTURE menu Picture and sound are out of sync As with all products that contain a digital display in rare instances when viewing certain c...

Page 47: ...er channel Adjust the TINT and or COLOR in the PICTURE menu No stereo or SAP sound from a Make sure the MTS feature in the AUDIO menu is set properly known MTS broadcast The V Chip password does not work Change or reset your password U S V Chip system only The remote control does not operate Make sure the TV CBL SAT VCR DVD mode is set properly on the remote control Remove all obstructions between...

Page 48: ... 3 C INPUT 0 286V p p burst signal 75 ohm VIDEO AUDIO INPUT VIDEO 1V p p 75 ohm negative sync pin jack x 3 AUDIO 300 mV rms 60 modulation equivalent 35k ohm pin jack L R x 6 ColorStream component video HD INPUT Y 1V p p 75 ohm PR 0 7V p p 75 ohm PB 0 7V p p 75 ohm VIDEO AUDIO OUTPUT VIDEO 1V p p 75 ohm negative sync pin jack x 1 AUDIO 300 mV rms 60 modulation equivalent 1k ohm pin jack L R x 1 COA...

Page 49: ...installation setup adjustment of customer controls and installation or repair of antenna systems are not covered by this warranty Reception problems caused by inadequate antenna systems misaligned satellite dishes cable television distribution VCRs DVD players recorders personal computer level IEEE 1394 devices and any other connected signal source device are your responsibility 5 Warranties exten...

Page 50: ...50 Appendix Memo 3X80501A_En_p46 bc 3 7 06 3 52 PM 50 ...

Page 51: ...51 Introduction Connecting your TV Setting up your TV Using the TV s Features Appendix Memo Appendix 3X80501A_En_p46 bc 3 7 06 3 52 PM 51 ...

Page 52: ...eSoundare registered trademarks of Toshiba America Consumer Products L L C GameTimer is a trademark of Toshiba America Consumer Products L L C National Service Division PRINTED IN THAILAND J3X80501A SH06 03 N 3X80501A_En_p46 bc 3 7 06 3 52 PM 52 ...

Reviews: