background image

English

   - 6 -

Features

• TV supports Ultra HD (Ultra High Definition - also 

known as 4K) which provides resolution of 3840 x 

2160 (4K:2K). It equals 4 times the resolution of Full 

HD TV by doubling the pixel count of the Full HD TV 

both horizontally and vertically. Ultra HD contents are 

supported from HDMI, USB inputs and over DVB-T2 

and DVB-S2 broadcasts. 

• Remote controlled colour TV
• Fully integrated digital terrestrial/cable/satellite TV 

(DVB-T-T2/C/S-S2)

• HDMI inputs to connect other devices with HDMI 

sockets

• USB input
• OSD menu system
• Scart socket for external devices (such as DVD 

Players, PVR, video games, etc.)

• Stereo sound system
• Teletext
• Headphone connection
• Automatic programming system
• Manual tuning
• Automatic power down after up to eight hours.
• Sleep timer
• Child lock
• Automatic sound mute when no transmission.
• NTSC playback
• AVL (Automatic Volume Limiting)
• PLL (Frequency Search)
• PC input
• Game Mode (Optional)
• Picture off function
• Programme recording
• Programme timeshifting
• Ethernet (LAN) for Internet connectivity and service
• 802.11 a/b/g/n built in WIFI Support
• Audio Video Sharing

Accessories Included

• Remote Control
• Batteries: 2 x AAA
• Instruction Book

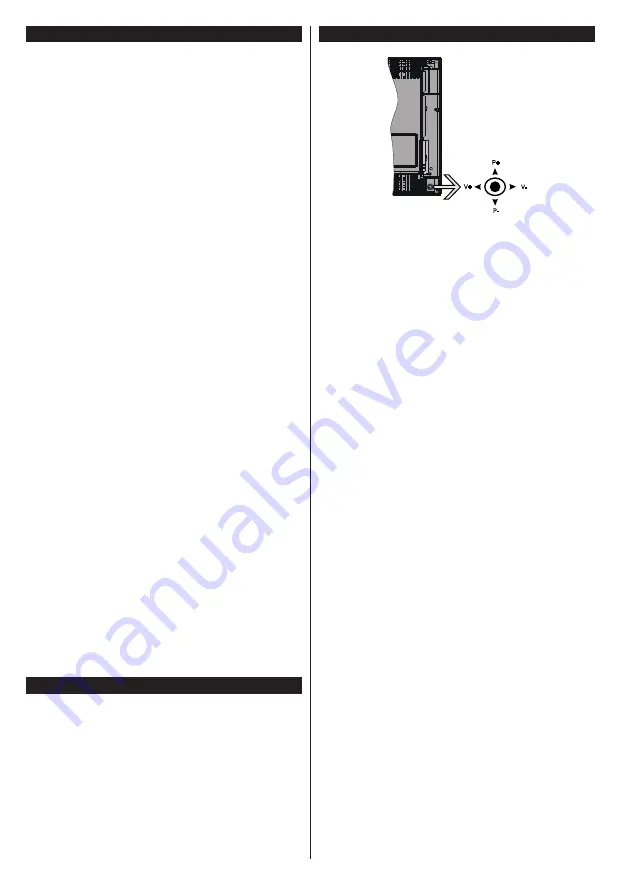
TV Control & Operation

P+

V+

V-

P-

The joystick allows you to control the Volume / 

Programme / Source and Standby-On functions of 

the TV.

Note: 

The position of the joystick may differ depending on 

the model.

To change volume:

 Increase the volume by pushing 

the joystick right. Decrease the volume by pushing 

the joystick left.

To change channel:

 Scroll through the stored 

channels by pushing the joystick up or down.

To change source:

 Press the centre of the joystick 

in, the sources list will appear on the screen. Scroll 

through the available sources by pushing the joystick 

up or down.

To turn the TV off:

 Press the centre of the joystick in 

and hold it down for a few seconds, the TV will turn 

into standby mode.

To turn on the TV:

 Press the centre of the joystick 

in, the TV will turn on.

Note: 

Main menu OSD cannot be displayed via control button.

Operation with the Remote Control

Press  the 

Menu

 button on your remote control to 

display main menu screen. Use the directional buttons 

to select a menu tab and press 

OK

 to enter. Use the 

directional buttons again to select or set an item. Press 

Return/Back 

or 

Menu

 button to quit a menu screen.

Input Selection

Once you have connected external systems to your 

TV, you can switch to different input sources. Press the 

Source

 button on your remote control consecutively 

to select the different sources.

Changing Channels and Volume

You can change the channel and adjust the volume 

by using the 

/-

 and 

Programme


+/-

 buttons 

on the remote. 

Summary of Contents for 49U5663DB

Page 1: ...OPERATING INSTRUCTIONS 49U5663DB COLOUR TELEVISION WITH REMOTE CONTROL ...

Page 2: ...s Included 6 TV Control Operation 6 Inserting the Batteries into the Remote 7 Connect Power 7 Antenna Connection 7 Notification 7 Remote Control 8 Switching On Off 9 First Time Installation 9 Using SatcoDX Feature 10 E Manual if available 10 Teletext Services 10 Connectivity 11 Freeview Play Platform 14 ...

Page 3: ...g on shelves above the unit Do not expose the TV to direct sunlight or do not place open flames such as lit candles on the top of or near the TV Do not place any heat sources such as electric heaters radiators etc near the TV set Do not place the TV on the floor and inclined surfaces To avoid danger of suffocation keep plastic bags out of the reach of the babies children and domestic animals Caref...

Page 4: ...pport Not standing the television set on cloth or other materials placed between the television and supporting furniture Educating children about the dangers of climbing on furniture to reach the television set or its controls If your existing television set is being retained and relocated the same considerations as above should be applied i CLASS 1 LASER PRODUCT WALL MOUNTING WARNINGS Read the in...

Page 5: ...country please contact your local city office or the shop where you purchased the product Disposal of batteries and or accumulators The crossed out wheeled dust bin symboI indicates that batteries and or accumulators must be collected and disposed of separately from household waste If the battery or accumulator contains more than the specified values of lead Pb mercury Hg and or cadmium Cd defined...

Page 6: ...formity Statement This product is carrying the CE Mark in accordance with the related European Directives Responsible for CE Marking is Vestel UK Langley Berkshire SL3 6EZ This product is labeled with the CE Mark in accordance with the related European Directives notably RoHS Directive 2011 65 EU Furthermore the product complies with the Ecodesign Directive 2005 32 EC EuP and 2009 125 EC ErP and i...

Page 7: ...ontrol the Volume Programme Source and Standby On functions of the TV Note The position of the joystick may differ depending on the model To change volume Increase the volume by pushing the joystick right Decrease the volume by pushing the joystick left To change channel Scroll through the stored channels by pushing the joystick up or down To change source Press the centre of the joystick in the s...

Page 8: ...hts Reserved For DTS patents see http patents dts com Manufactured under license from DTS Licensing Limited DTS the Symbol DTS and the Symbol together are registered trademarks and DTS 2 0 Digital Out is a trademark of DTS Inc DTS Inc All Rights Reserved For DTS patents see http patents dts com Manufactured under license from DTS Licensing Limited DTS DTS HD the Symbol DTS or DTS HD and the Symbol...

Page 9: ...15 Rapid reverse Moves frames backwards in media such as movies 16 Record Records programmes 17 Pause Pauses the media being played starts timeshift recording 18 Play Starts to play selected media 19 Subtitles Turns subtitles on and off where available 20 Stop Stops the media being played 21 Rapid advance Moves frames forward in media such as movies 22 Screen Changes the aspect ratio of the screen...

Page 10: ...ngle Satellite Cable or DiSEqC switch by using or buttons Direct If you have a single receiver and a direct satellite dish select this antenna type Press OK to continue Select an available satellite on the next screen and press OK to scan for services Single Satellite Cable If you have multiple receivers and a single satellite cable system select this antenna type Press OK to continue Configure se...

Page 11: ...d make changes if necessary An error message stating No Signal may be displayed if the antenna settings are not configured properly E Manual if available You can find instructions for your TV s features in the E Manual To use E Manual press to the Info button while main menu is displayed on the screen or press Quick Menu button select Information Booklet and press OK By using the directional butto...

Page 12: ...t Select this as Wired Device if you are connecting via an ethernet cable Internet Speed Test Highlight Internet Speed Test and press the OK but ton TV will check the internet connection bandwidth and display the result when complete Advanced Settings Highlight Advanced Settings and press the OK button On the next screen you can change the IP and DNS settings of the TV Highlight the desired one an...

Page 13: ...ional and numeric buttons to set Press the OK button to save settings when complete Other Information The status of the connection will be displayed as Connected or Not Connected and the current IP address if a connection is established Connecting to your mobile device via WiFi IfyourmobiledevicehasWiFifeature youcanconnect it to your TV via a router in order to access the content in your device F...

Page 14: ...r any other Wi Fi compatible devices Try changing the active channel on the WLAN router Internet Connection NotAvailable Audio Video Sharing Not Working If the MAC address a unique identifier number of your PC or modem has been permanently registered it is possible that your TV might not connect to the internet In such a case the MAC address is authenticated each time when you connect to the inter...

Page 15: ...isplayed first The installation wizard checks the availability of required third party software on your PC If applications are missing they are listed and must be installed before continuing installation 5 Click the Install button The integrated serial will be displayed Please do not change the displayed serial 6 Click the Next button The License Conditions EULA screen will be displayed Please rea...

Page 16: ...g to the terms and conditions of Freeview Play Note Freeview Play platform usage will count towards any monthly broadband data allowance Only selected channels provide 7 day catch up Find out all you need to know about the latest trend setting TV technology on our website www toshiba tv com You can review your TV user manual online or download as you like ...

Page 17: ...WANDMONTAGE METINGEN Grootte booropening mm Schroefgroote Lengte X Draad Y Suomi VESA SEINÄASENNUKSEN MITAT Reikäkuvion koot mm Ruuvinkoot Pituus x Kierre Y Norsk VESA VEGGMONTERINGSMÅL Hullmønster størrelser mm Skruestørrelser Lengde x Tråd Y Dansk VESA VÆGMONTERINGS MÅL Hulmønster størrelser mm Skruestørrelser Længde X Tråd Y Русский РАЗМЕРЫ НАСТЕННОГО КРЕПЛЕНИЯ VESA Размеры системы отверстий Ра...

Page 18: ......

Reviews: