background image

Intr

oduction

Connecting

y

our T

V

Using the

Remote Contr

ol

Setting up

y

our T

V

Using the T

V’s

F

eatur

es

Appendix

Index

8

(E) 46/52/62HMX85

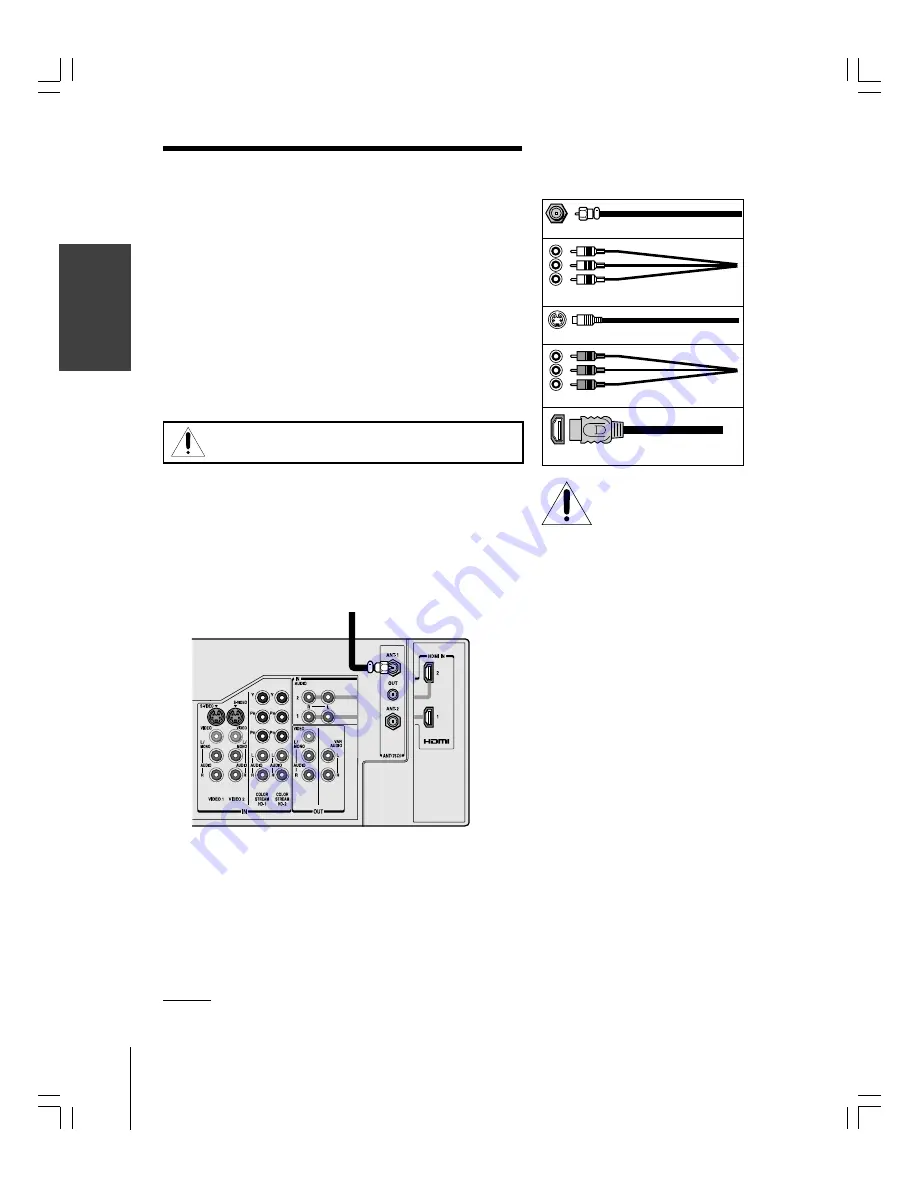
Component video cables

Coaxial (antenna) cable

Standard A/V cables (red/white/yellow)

S-video cable

CAUTION:  RISK OF
EQUIPMENT DAMAGE!

Never plug in any power cords

until you have finished connecting all
equipment.

HDMI cable

From Antenna or Cable

TV

Connecting your TV

Note: 

Cables are not supplied with your TV.

Coaxial cable


is the cable that comes in from your antenna, cable TV

service, or cable converter box. Coaxial cable uses “F” connectors.

Standard A/V (audio/video) cables usually come in sets of three, and
are typically color-coded according to use: yellow for video, red for
stereo right audio, and white for stereo left (or mono) audio.
On your TV’s back panel, the standard A/V inputs are color-coded in
the same manner as the cables.

S-video cable is for use with video equipment that has S-video output.

Component video cables come in sets of three, and are for use with
video equipment that has component video output. (ColorStream

®

 is

Toshiba’s brand of component video.)

HDMI cable is for use with video equipment that has an HDMI
output (type A connector) (see page 15).

Connecting an antenna or cable TV

This connection allows you to watch TV programs or basic cable
channels.

NOTE:

  NEVER CONNECT THIS TV TO A PERSONAL COMPUTER

(PC). 

THIS TV IS NOT INTENDED FOR USE WITH A PC.

Model 46HMX85 is equipped with one HDMI input terminal and one set of AUDIO IN
jacks.

#01E08-16_46/52/62HMX85

5/10/05, 12:39 PM

8

Black

Summary of Contents for 46HMX85

Page 1: ...of your TV Record these numbers in the spaces below Refer to these numbers whenever you communicate with your Toshiba dealer about this TV Model Serial No Introduction Connecting your TV Using the remote control Setting up your TV Using the TV s Features Appendix Index YC N 23566642 46HMX85 52HMX85 62HMX85 01E01_46 52 62HMX85 5 10 05 12 39 PM 1 Black ...

Page 2: ...hases however they are not always supported on the proper TV stands Sometimes TVs are improperly secured or inappropriately situated on dressers bookcases shelves desks audio speakers chests or carts As a result TVs may fall over causing unnecessary injury Toshiba Cares The consumer electronics industry is committed to making home entertainment enjoyable and safe The Consumer Electronics Associati...

Page 3: ...r other apparatus including amplifiers that produce heat 9 Do not defeat the safety purpose of the polarized or grounding type plug A polarized plug has two blades with one wider than the other A grounding type plug has two blades and a third grounding prong The wide blade or the third prong are provided for your safety If the provided plug does not fit into your outlet consult an electrician for ...

Page 4: ...ion of your TV from lightning and power surges always unplug the power cord and disconnect the antenna from the TV if you leave the TV unattended or unused for long periods of time 34 During normal use the TV may make occasional snapping or popping sounds This is normal especially when the unit is being turned on or off If these sounds become frequent or continuous unplug the power cord and contac...

Page 5: ...els are not visible when the picture is viewed from a normal viewing distance see item 29 on page 4 5 Depending on the media you are viewing it is possible although unlikely that a limited number of viewers may see a rainbow effect on the screen which can in rare instances result in eye fatigue This is a rare occurrence related to technology of this type and is not a sign of TV malfunction 6 Alway...

Page 6: ...ty 68 Index 69 Important Safety Information 2 5 Introduction 7 Welcome to Toshiba 7 Exploring your new TV 7 Connecting your TV 8 Connecting an antenna or cable TV 8 Connecting a VCR 9 Connecting a cable converter box 9 Connecting a cable converter box and VCR 10 Connecting a DVD player or satellite receiver and a VCR 11 Connecting a DVD player with ColorStream component video and a VCR 12 Connecti...

Page 7: ...cting other equipment to your TV See Connecting your TV on page 8 Model 52HMX85 is used in this manual for illustration purposes 1 2 3 4 5 6 7 8 9 100 0 ENT TV CABLE SAT VCR POWER 10 DVD AUDIO1 AUDIO2 ACTION MODE PIC SIZE MENU LIGHT SLEEP ENTER FAV CH TV VCR VOL EXIT DISC CH RTN DVD RTN DVD CLEAR SLOW DIR PAUSE STEP AM FM SKIP SEARCH PLAY REW FF STOP POP DIRECT CH FREEZE SPLIT CH SCAN SOURCE SWAP ...

Page 8: ... according to use yellow for video red for stereo right audio and white for stereo left or mono audio On your TV s back panel the standard A V inputs are color coded in the same manner as the cables S video cable is for use with video equipment that has S video output Component video cables come in sets of three and are for use with video equipment that has component video output ColorStream is To...

Page 9: ...will need three coaxial cables IN OUT Cable converter box Note When you use a converter box with your TV the remote control may not operate some features such as programming your favorite channels labeling channels and locking channels Note If you have a mono VCR connect L Mono to VCR Audio OUT using only one audio cable If you have a VCR with S video use an S video cable in the S video jacks inst...

Page 10: ...CR Audio OUT using only one audio cable If you have a VCR with S video use an S video cable in the S video jacks instead of a standard video cable Do not connect a standard video cable and an S video cable to VIDEO 1 or VIDEO 2 at the same time or the picture performance will be unacceptable When you use a converter box with your TV the remote control may not operate some features such as programm...

Page 11: ...er or satellite receiver without component video or HDMI use an S video cable If your DVD player has component video see page 12 If your DVD player or satellite receiver has HDMI or DVI see page 15 Do not connect both an S video cable and a standard video cable between the TV and DVD player satellite receiver at the same time or the picture performance will be unacceptable Do not connect the DVD p...

Page 12: ...26 You will need two coaxial cables one set of standard A V cables one pair of standard audio cables one set of component video cables DVD player with component video Stereo VCR From Antenna The unauthorized recording use distribution or revision of television programs videotapes DVDs and other materials is prohibited under Copyright Law and may subject you to civil and criminal liability Note For...

Page 13: ...program tune the VCR to the channel to record and tune the TV to the channel to watch The VCR should be in TV mode You will need three coaxial cables two sets of standard A V cables one pair of standard audio cables one set of component video cables Note For the highest possible picture quality use component video cables or an HDMI cable between the TV and DTV receiver set top box You can connect ...

Page 14: ...time or the picture performance will be unacceptable Do not connect the same VCR to the output and input jacks on the TV at the same time To dub or edit VCR 2 must select Line IN and the TV must select VIDEO 1 see Selecting the antenna input on page 26 The VIDEO OUT jack does not output the POP picture The AUDIO OUT jacks can output the sound of either the Main or POP picture see Selecting the AUD...

Page 15: ...w these procedures When turning on your electronic components turn on the TV first and then the HDMI or DVI device When turning off your electronic components turn off the HDMI or DVI device first and then the TV The HDMI 1 inputs on your TV receive digital audio and uncompressed digital video from an HDMI device or uncompressed digital video from a DVI 2 device These inputs are designed to accept...

Page 16: ... turn off the built in speakers see Turning off the built in speakers on page 58 You will need one pair of standard audio cables Note To hear sound when using an external audio amplifier the volume of both the TV and the amplifier must be set above 0 zero For example if the volume of the TV is set to 0 you will not be able to hear any sound even if the volume of the amplifier is at its highest lev...

Page 17: ...ol 2 Install two AA size alkaline batteries Match the and signs on the batteries to the signs on the battery compartment 3 Slide the battery cover back on to the remote control until the lock snaps Remote control effective range Note Be sure to use AA size batteries Dispose of batteries in a designated disposal area Batteries should always be disposed of with the environment in mind Always dispose...

Page 18: ...it 9 Aux Digit 9 Digit 9 ACTION Action Menu Menu 100 100 100 10 0 Digit 0 Digit 0 Digit 0 Digit 0 Digit 0 Digit 0 Digit 0 10 Digit 0 ENT CH Enter CH Enter GUIDE SETUP Guide DVD setup INFO TITLE INFO TITLE Top menu FAVORITE Favorites Favorites Subtitle SUBTITLE THEATERLINK Audio AUDIO MENU Menu Action Menu ACTION Menu yz FAV yz Menu select Menu select Menu select FAV yz x Menu select Menu select Me...

Page 19: ...ZE Still picture TV TV TV TV TV TV TV SWAP POP Swap TV TV TV TV TV TV TV CH SCAN Ch scan TV TV TV TV TV TV TV SOURCE POP Source TV TV TV TV TV TV TV Notes will send nothing TV will jump to TV VCR will jump to last active VCR or DVD Active VCR DVD is defined as the mode that remains for a minimum of 5 seconds or if a key is pressed in that mode The VOLUME and MUTE will jump to TV by default When th...

Page 20: ...ogram mode To cycle through each available device code and sample its functions 1 Press MODE to select the mode you want to set up 2 While holding down the RECALL button press 8 5 0 0 The remote control will enter program mode 3 Point the remote control at the target device and press POWER or other function buttons that are available to be sampled 4 If the device responds to the remote control Pre...

Page 21: ...BL SAT CBL SAT CBL SAT AUD1 AUD2 VCR VCR VCR VCR VCR AUD1 AUD2 DVD DVD DVD DVD DVD AUD1 AUD2 AUD1 AUD1 AUD1 AUD1 AUD1 AUD1 AUD1 AUD2 AUD2 AUD2 AUD2 AUD2 AUD2 AUD2 To reset the volume controls to the original device code 1 While holding down the RECALL button press 8 0 0 0 2 Press VOL z The Mode indicator will blink four times unlocked Operational feature reset 8900 This feature clears all setup fe...

Page 22: ... 0101 0102 0170 0172 0174 0176 0183 REALISTIC 0124 0105 0136 0109 0140 0127 SAMSUNG 0137 0102 0104 0133 SAMTRON 0163 SANSUI 0139 0126 0120 0152 SANYO 0105 0109 0113 SCOTT 0101 0102 0104 0109 0138 0140 0147 0148 0126 SEARS 0105 0106 0107 0108 0100 SHARP 0135 0136 0167 0162 SHINTOM 0117 SIGNATURE 2000 0127 0135 SINGER 0117 SONY 0128 0129 0130 0153 0154 0155 SV2000 0127 SYLVANIA 0131 0123 0124 0127 0...

Page 23: ...IWA 7123 7124 7125 DENON 7131 FISHER 7103 JENSEN 7114 JVC 7129 7130 7132 7133 KENWOOD 7100 7107 MARANTZ 7102 NAKAMICHI 7105 ONKYO 7108 7109 7113 PANASONIC 7116 7118 PHILIPS 7122 7121 PIONEER 7104 7106 RCA 7126 7127 7128 7134 7135 SANSUI 7105 7110 7112 SHARP 7131 SONY 7119 7120 TEAC 7110 7111 7115 TECHNICS 7116 7118 7117 YAMAHA 7101 7102 Laser Disc setup codes Brand Code DENON 5114 HITACHI 5100 KEN...

Page 24: ...PIC SIZE cycles through the five pictures sizes Natural TheaterWide 1 TheaterWide 2 TheaterWide 3 and Full page 32 FAVORITE accesses the favorite channel search function page 39 MENU accesses on screen menu system page 25 ENTER activates the menu function settings page 25 yz x arrow buttons select or adjust programming menus page 25 FAV y and FAV z cycle through channels you programmed as favorite...

Page 25: ... I I SETT NGS COLOR TEMPERATURE PREFERENCE COOL OFF RESET DONE C a b l e C l e a r D N R P I CTURE MENU ANTENNA SELECT END E X I T MTS AUDIO AUDIO SETTINGS STEREO WOW SRS 3D ON OFF H I GH FOCUS T r u B a s s D o l b y V i r t u a l SELECT MOVE ENTER STABLE SOUND AUDIO SPEAKERS ON MA I N AUD I O OUT OFF MOVE ADJUST BASS AUD I O I SETT NGS TREBLE BALANCE RESET SAVE RESET AUD I O MENU 0 5 0 5 0 SELEC...

Page 26: ...NT 2 I DEO HD1 ColorStream HD2 3 SELECT I ON TO SELECT TV V I DEO To select the antenna input using the menu system 1 Press MENU and then press x or until the SET UP menu appears 2 Press y or z to highlight ANT 1 2 and then press ENTER to display the pull down menu LANGUAGE SET UP CLOCK SET ANT1 ANT2 ANT 1 2 TV CABLE CH PROGRAM ADD ERASE SELECT SET ENTER 3 Press y or z to highlight either ANT 1 or...

Page 27: ...ght CABLE LANGUAGE SET UP CLOCK SET TV CABLE ANT 1 2 TV CABLE CH PROGRAM ADD ERASE SELECT SET ENTER 4 Press ENTER 5 Press z to select CH PROGRAM LANGUAGE SET UP CLOCK SET 0 0 0 0 ENGLISH ANT 1 2 ANT1 TV CABLE CABLE ADD CH PROGRAM ADD ERASE MOVE START ENTER 6 Press ENTER to start channel programming The TV will automatically cycle through all the TV or Cable channels depending on which you selected...

Page 28: ...higher press the 100 button and then the next two numbers For example to select channel 125 press 100 2 5 To change to the next programmed channel Press Channel y or z on the TV or remote control Selecting the Quick Restart With the Quick Restart feature set to ON the TV stays in the standby mode for several minutes after the TV is turned off If the TV is turned on from the standby mode the full p...

Page 29: ...ching between two channels using SurfLock The SurfLock feature temporarily stores one channel in the CH RTN button so you can return to that channel quickly from any other channel by pressing CH RTN To store a channel in the CH RTN button 1 Tune the TV to the channel you want to store in the CH RTN button 2 Press and hold CH RTN for about 2 seconds until the message Channel Memorized appears on th...

Page 30: ...AVORITE CH menu CH INPUT will be highlighted SELECT SET ENTER 0 9 CH I NPUT FAVOR I TE CH CLEAR ALL TV CABLE CUSTOM MENU 4 Use the Channel Number buttons to enter the number of one of your favorite channels 5 Press ENTER 6 Repeat steps 4 and 5 for your other favorite channels To select your favorite channels Press FAV z or FAV y To quickly scan through your favorite channels in a twelve picture mu...

Page 31: ...s to select a channel you want to label 5 Press z to highlight LABEL 6 Press x or repeatedly to select a character for the first space and then press ENTER SELECT SET ENTER 0 9 CH I NPUT CH LABEL I NG 06 LABEL CLEAR CUSTOM MENU SELECT SET ENTER CH I NPUT CH LABEL I NG 0 6 LABEL A CLEAR CUSTOM MENU 7 Repeat step 6 to enter the rest of the characters If you would like a blank space in the label name...

Page 32: ... 480i 480p and 1080i signals only You can view 480i 480p and 1080i format programs in a variety of picture sizes Natural TheaterWide 1 TheaterWide 2 TheaterWide 3 and Full The Full picture size is not selectable for 1080i format programs The way the image displays in any of the picture sizes will vary depending on the format of the program you are viewing Select the picture size that displays the ...

Page 33: ...en To view the hidden areas such as subtitles or captions see Scrolling the TheaterWide picture on page 34 Full picture size For 16 9 format programs If you are receiving a 4 3 format program the picture is stretched wider to fill the width of the screen but not stretched taller None of the picture is hidden Note To select the picture size press PIC SIZE on the remote control or select PICTURE SIZ...

Page 34: ...aterWide 2 10 to 20 TheaterWide 3 10 to 20 Scrolling the TheaterWide picture TheaterWide 2 and 3 only 1 Press PIC SIZE to select the TheaterWide 2 or 3 mode 2 Press MENU and then press x or until the PICTURE menu appears 3 Press y or z to highlight PICTURE SCROLL MOVE START ENTER MODE P CTURE I P I CTURE SETT I NGS SPORTS V I DEO ON H I BR I GHT C I NEMA MODE LAMP MODE P I CTURE S I ZE AUTO ASPECT...

Page 35: ...ze is automatically selected as described in the following table If the signal does not include aspect information the picture size you selected on pages 32 33 is displayed To turn on the AUTO ASPECT feature 1 Press MENU and then press x or until the PICTURE menu appears SELECT END EX I T MODE P CTURE I P I CTURE SETT I NGS SPORTS V I DEO ON H I BR I GHT C I NEMA MODE LAMP MODE P I CTURE S I ZE AU...

Page 36: ...The POP picture out picture feature splits the screen into a double window that allows you to watch two programs at the same time The POP program can come from a TV broadcast or an external source such as a VCR To display a TV broadcast in the POP window 1 Press SPLIT to display the POP window ANT 1 POP 12 MAIN 6 2 Select POP channels in the following two ways To change to a specific channel press...

Page 37: ...rmat it will not display in the main window when you press SWAP The SAP channel will not be decoded when the speaker source is switched to POP Even if SAP is selected in the menu page 54 the main audio channel will be heard when the speaker sound is switched to POP The VARIABLE AUDIO OUT jacks will switch with the speaker sound however the source of the regular AUDIO OUT jacks is determined by the...

Page 38: ... the programmed channel search function You can use the programmed channel search function to quickly scan the channels you programmed into the TV s memory page 27 1 Press CH SCAN The TV automatically enters multi window mode and begins a twelve picture scan of your programmed channels in the multi window Press CH SCAN again to return to a normal picture 10 2 3 4 5 6 7 8 9 10 11 12 13 2 Press the ...

Page 39: ...s ENTER to display the channel you selected in step 2 as a normal picture with normal sound based on your MTS setting see page 54 2 3 4 5 6 7 8 9 10 11 12 13 Automatic favorite channel search feature If you try to tune a locked channel page 43 after 4 seconds the TV will automatically start the favorite channel search function 2 3 4 5 6 7 8 10 11 13 9 X 12 X Moving picture 1 2 3 4 5 6 7 8 9 100 0 ...

Page 40: ...tored Use the Number buttons 0 9 to enter your existing 4 digit PIN code SELECT SET ENTER 0 9 BLOCK I NG RESET LOCKS P I N CODE 1 1 1 0 BLOCK I NG ACT I VE LOCKS P I N CODE 1 2 3 4 SELECT SET ENTER 0 9 If the wrong PIN code is entered the message Incorrect appears Enter the code again and then press ENTER If you cannot remember your PIN code To reset the PIN code 1 While the PIN code entering scre...

Page 41: ...le for children under 17 L Crude or indecent language S Explicit sexual activity V Graphic violence 14 Parents Strongly Cautioned This program contains some material that many parents would find unsuitable for children under 14 years of age D Intensely suggestive dialog L Strong coarse language S Intense sexual situations V Intense violence PG Parental Guidance Suggested This program contains mate...

Page 42: ... menu appears 2 Press y or z to select an item as described below MPAA UNRATED 1 Highlight MPAA UNRATED and then press ENTER 2 Press y or z to select ON Lock or OFF Unlock for unrated programs in the MPAA rating system and then press ENTER ENABLE BLOCK I NG ON V CH I P TV RAT I NG MPAA RAT I NG BLOCK I NG OPT I ON LOCKS MENU MOVE START ENTER MPAA UNRATED ON OFF BLOCK I NG OPT I ON TV NONE RAT I NG...

Page 43: ...when the TV is turned on again Locking channels With the CH LOCK feature you can lock specific channels You will not be able to tune locked channels with the Channel y z buttons or Channel Number buttons unless you clear the setting You can lock a maximum of nine channels To lock channels 1 From the LOCKS menu press y or z to highlight CH LOCK and then press ENTER The CH LOCK menu appears and CH I...

Page 44: ...ECT CLEAR ENTER CH I NPUT 12 18 CH LOCK CLEAR ALL TV CABLE LOCKS MENU 33 SELECT CLEAR ENTER 3 Repeat step 2 for other channels To unlock all locked channels at once Press y or z to highlight CLEAR ALL and then press ENTER MOVE START ENTER CH I NPUT CH LOCK CLEAR ALL TV CABLE LOCKS MENU TV CABLE SAT VCR DVD AUDIO1 AUDIO2 1 2 3 4 5 6 7 8 9 100 0 ENT POWER 10 ACTION MODE PIC SIZE MENU LIGHT SLEEP ENT...

Page 45: ...r 4 OFF Unlocks all video input sources SET ENTER V CH I P LOCKS CH LOCK V I DEO LOCK V I DEO V I DEO OFF NEW P I N CODE SELECT 3 Press ENTER Changing the PIN code 1 From the LOCKS menu page 40 press y or z to highlight NEW PIN CODE 2 Press the Number buttons 0 9 to enter a new 4 digit code The numbers you enter will replace the dashes in the display SELECT SET ENTER 0 9 V CH I P LOCKS CH LOCK V I...

Page 46: ... picture factory setting Standard Standard picture setting factory setting Movie Movie like picture setting factory setting Preference Your personal preferences Note If you select one of the factory set picture modes SPORTS STANDARD or MOVIE and then change a picture quality setting for example increase the contrast the picture mode automatically changes to PREFERENCE in the PICTURE menu To save y...

Page 47: ...ecially a Cable channel or playing a video cassette or disc damaged by repeated use To turn on CableClear DNR 1 Press MENU and then press x or until the PICTURE menu appears 2 Press y or z to highlight PICTURE SETTINGS and then press ENTER The PICTURE SETTINGS menu appears 3 Press y or z to highlight CableClear DNR and then press ENTER MOVE SELECT ENTER MODE P CTURE I I SETT NGS COLOR TEMPERATURE ...

Page 48: ...e a r D N R P I CTURE MENU ANTENNA Resetting your picture setting adjustments The RESET function adjusts the picture settings to the following factory settings Tint center 0 Sharpness center 50 Color temperature cool CableClear DNR auto To reset your picture setting adjustments 1 Press MENU and then press x or until the PICTURE menu appears 2 Press y or z to highlight PICTURE SETTINGS and then pre...

Page 49: ...ODE to FILM 1 Press MENU and then press x or until the PICTURE menu appears 2 Press y or z to highlight CINEMA MODE and then press ENTER 3 Press y or z to select FILM To turn off the CINEMA MODE Press y or z to select VIDEO in step 3 above SELECT SET ENTER P I CTURE H I BR I GHT RESET SAVE LOW POWER MODE P I CTURE SETT I NGS C I NEMA MODE LAMP MODE P I CTURE S I ZE AUTO ASPECT P I CTURE SCROLL SEL...

Page 50: ...bove you would see the word VCR instead of VIDEO 1 6 Finish labeling the other video input sources as desired To return to the previous menu press y or z to highlight CUSTOM MENU and then press ENTER 7 To exit the menu press EXIT Note When HDMI 1 or HDMI 2 ColorStream HD1 or ColorStream HD2 is selected the VIDEO OUT jack does not output a signal To output a VIDEO OUT signal use a standard video or...

Page 51: ...text highlight T1 T2 T3 or T4 Note If text is not available in your area a black rectangle may appear on your screen If this happens set the Closed Caption feature to OFF WORLD WEATHER Temps Current F C Weather LONDON 51 11 MOSCOW PARIS ROME TOKYO 57 14 53 12 66 19 65 18 Cloudy Clear Cloudy Rain Clear To turn off the Closed Caption feature Highlight OFF in step 4 TV CABLE SAT VCR DVD AUDIO1 AUDIO2...

Page 52: ...gth of time you set in the ON Timer Setting the sleep timer You can set the sleep timer to turn off the TV automatically To set the sleep timer using the remote control Press SLEEP to set the length of time until the TV turns off T I MER 0 h 00m Each time you press SLEEP the time display will increase by 10 minutes to a maximum of 3 hours 0h00m 0h10m 0h20m 2h50m 3h00m 0h00m To set the sleep timer ...

Page 53: ...wer source is interrupted the power cord is unplugged or a power failure occurs the clock must be reset ENTER Number Setting the clock To set the clock 1 Press MENU and then press x or until the SET UP menu appears 2 Press y or z to highlight CLOCK SET and then press ENTER 3 Press the Number buttons 0 9 to enter the correct time The clock operates on a 24 hour cycle e g 1 00 p m equals 13 00 5 00 ...

Page 54: ...e closed caption feature is automatically activated To deactivate this feature deactivate MUTE See Using the closed caption feature on page 51 for more information Selecting stereo SAP broadcasts The multi channel TV sound MTS feature allows you to listen to high fidelity stereo sound while watching TV MTS can also transmit a second audio program SAP containing a second language music or other aud...

Page 55: ... AUDIO menu appears 3 Press y or z to highlight the desired WOW feature you want to adjust then press ENTER SRS 3D To turn on or off the surround sound effect FOCUS To turn on or off the vocal emphasis effect TruBass To select your desired bass expansion level HIGH LOW or OFF MTS AUDIO AUDIO SETTINGS WOW SRS 3D FOCUS T r u B a s s ON OFF SELECT SET ENTER D o l b y V i r t u a l 4 Press y or z to s...

Page 56: ... and then press x or until the AUDIO menu appears 2 Press y or z to highlight Dolby Virtual and then press ENTER 3 Press y or z to highlight ON and then press ENTER MTS AUDIO AUDIO SETTINGS WOW SRS 3D FOCUS T r u B a s s ON OFF SELECT SET ENTER D o l b y V i r t u a l To turn off the Dolby Virtual surround sound feature Note The Dolby Virtual surround sound feature and the WOW SRS 3D feature page ...

Page 57: ...NTER The AUDIO SETTINGS menu appears 3 Press y or z to highlight RESET and then press ENTER BASS AUD I O I SETT NGS TREBLE BALANCE RESET SAVE RESET AUD I O MENU 0 5 0 5 0 MOVE START ENTER Using the StableSound feature When the signal source is changed the StableSound feature limits the highest volume level to prevent extreme changes in volume for example to prevent the sudden increase in volume th...

Page 58: ...re through the TV s speakers To select the AUDIO OUT sound 1 Press MENU and then press x or until the AUDIO menu appears 2 Press y or z to highlight AUDIO OUT and then press ENTER 3 Press y or z to select MAIN or POP and then press ENTER SET SELECT ENTER STABLE SOUND AUDIO SPEAKERS MA I N POP AUD I O OUT MAIN Outputs the sound of the main left window program to the AUDIO OUT terminals POP Outputs ...

Page 59: ...6 7 8 9 10 11 12 13 14 15 16 17 18 33 34 35 33 34 35 ANT ABCD FULL H I GH BR I GHT LAMP STEREO SAP TV ON T I MER 10h34m SLEEP T I MER 1h23m D L S V PG CABLE 1 6 1 2 3 4 5 6 7 8 9 10 11 12 13 14 15 16 17 18 33 34 35 33 34 35 HD1 DVD THEATER W I DE 1 TV D L S V PG ColorStream ON T I MER 10h34m SLEEP T I MER 1h23m Understanding the auto power off feature The TV will automatically turn itself off afte...

Page 60: ...picture darkens and or colors fade if the screen lamp does not light LED Indication 3 page 64 or if you hear a loud noise and the picture goes black which may indicate a lamp rupture LED Indication 3 page 64 See LED indications on page 64 To obtain a replacement lamp unit Locate a Toshiba parts distributor by directing your web browser to www toshiba ca Click Home Entertainment and then click Supp...

Page 61: ...mp unit door detail WARNING RISK OF ELECTRIC SHOCK TO REDUCE THE RISK OF ELECTRIC SHOCK NEVER REMOVE TV COVERS EXCEPT AS SPECIFIED HEREIN REFER ALL SERVICING NOT SPECIFIED IN THIS MANUAL TO QUALIFIED SERVICE PERSONNEL Failure to follow this WARNING may result in death or serious injury CAUTION HOT SURFACE The temperature of the lamp immediately after use exceeds 392 F 200 C Touching the lamp befor...

Page 62: ...he two lamp unit screws Note Hand tighten only Never use an electric screwdriver CAUTION NEVER clean a hot lamp with any type of flammable liquid or aerosol cleaning agent Many ordinary cleaning agents such as glass cleaners contain chemicals that may be flammable at certain temperatures If the lamp unit is not allowed to cool for at least one 1 hour such chemicals may ignite Lamp unit screws use ...

Page 63: ...he TV should operate normally If any of the following conditions exist turn off the TV unplug the power cord and repeat steps 1 9 to ensure that the lamp unit and lamp unit door are installed correctly No picture Dark picture TV will not turn on If after repeating steps 1 9 the problem still exists Locate the nearest Toshiba authorized service depot by directing your web browser to www toshiba ca ...

Page 64: ...nks at 0 5 second intervals 2 Green blinks at 0 3 second intervals Red lights solid 3 Green and Red blink at 1 second intervals 4 Green is off Red blinks 5 Green and Red blink three times The lamp unit door is not seated properly The lamp is not working properly The lamp is not working properly after the eighth automatic restart see item 2 For service personnel only An abnormal temperature increas...

Page 65: ...ons Note This model complies with the specifications listed below Design and specifications are subject to change without notice This model may not be compatible with features and or specifications that may be added in the future Dimensions 46HMX85 Width 53 1 8 inches 1 349 mm Height 31 13 16 inches 808 mm Depth 15 1 4 inches 387 mm 52HMX85 Width 58 3 8 inches 1 483 mm Height 35 1 16 inches 890 mm...

Page 66: ...ions If you are using a VCR make sure the TV VCR button on the remote control is set correctly Cannot receive above channel 13 Make sure the TV CABLE switch on the remote control is set to the mode that corresponds with the signal source type cable company or outside antenna Black box appears on the screen The closed caption feature may be set to one of the Text modes T1 T2 T3 or T4 Turn closed ca...

Page 67: ...ous factors including without limitation video processing within the TV video processing in an attached gaming system and video processing different compression rates used by broadcasters in their programming You may want to try one or more of the following suggestions which may help to reduce the effect of this phenomenon If the TV is connected to an A V receiver that has a programmable audio del...

Page 68: ...al bill of sale or provide other proof of purchase 2 All warranty servicing of this DLP Television must be performed by an Authorized TCL Service Depot 3 The warranties from TCL are effective only if this DLP Television is purchased in Canada from an authorized TCL dealer and operated in Canada 4 Labor service charges for set installation setup adjustment of customer controls and installation or r...

Page 69: ... Lamp unit replacement 60 64 Language selection 26 Last mode memory 59 Locking channels 43 Locking video inputs 45 Locks menu 40 Menu system 25 MTS feature 54 MUTE button 54 O P ON timer 52 Picture adjustments COLOR TEMPERATURE 47 Picture mode 46 Picture quality 46 Picture out picture POP CH SCAN button 38 POP CH yz buttons 36 POP DIRECT CH button 36 SOURCE button 36 SPLIT button 36 SWAP button 37...

Page 70: ...Introduction Connecting your TV Using the Remote Control Setting up your TV Using the TV s Features Appendix Index 70 E 46 52 62HMX85 Notes 01E70 71_46 52 62HMX85 5 10 05 12 40 PM 70 Black ...

Page 71: ...Introduction Connecting your TV Using the Remote Control Setting up your TV Using the TV s Features Appendix Index 71 E 46 52 62HMX85 Notes 01E70 71_46 52 62HMX85 5 10 05 12 40 PM 71 Black ...

Page 72: ...400 MONTREAL 18050 TRANS CANADA KIRKLAND QUEBEC H9J 4A1 CANADA TEL 514 390 7766 VANCOUVER 22171 FRASERWOOD WAY RICHMOND B C V6W 1J5 CANADA TEL 604 303 2500 MANUFACTURED BY CableClear ColorStream StableSound and TheaterWide are registered trademarks of Toshiba America Consumer Products L L C SurfLock is a trademark of Toshiba America Consumer Products L L C 01E72_46 52 62HMX85 5 10 05 12 40 PM 72 B...

Reviews: