background image

22

Using the TV’s features (General)

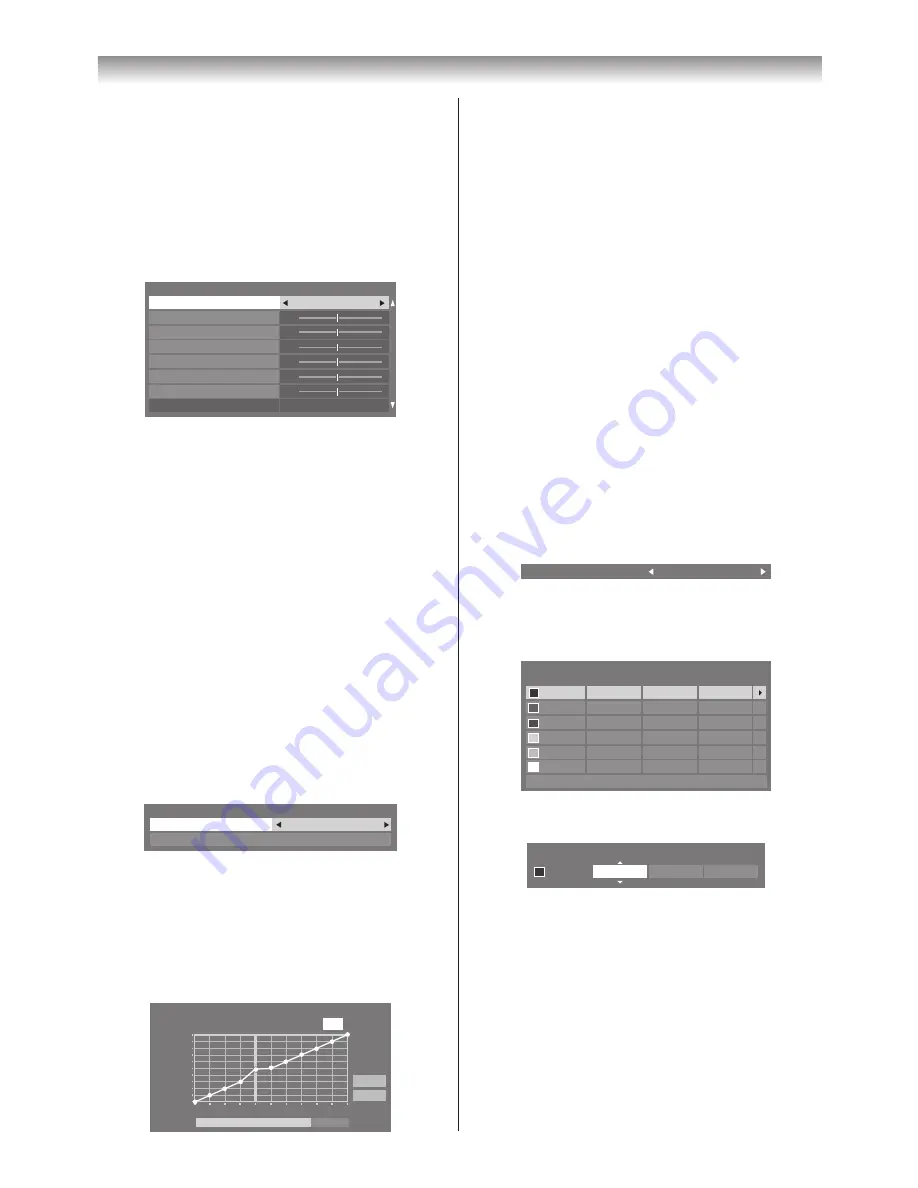
Adjusting the Colour Temperature

Colour Temperature

 increases the ‘warmth’ or 

‘coolness’ of the picture by increasing the red or blue tint.

1

  From the 

Advanced Picture Settings

 menu, press 

s

 or 

r

 to select 

Colour Temperature

, and then 

press 

Q

.

2

  Press 

v

 or 

w

 to select the 

Colour Temperature


setting (0 (warm) - 10 (cool)).

0

0

0

0

0

0

Colour Temperature

Red - Offset

Colour Temperature

5

Blue - Offset
Red - Gain

Green - Offset

Green - Gain

Reset

Blue - Gain

3

  Press 

s

 or 

r

 to select the option you want to adjust, 

then press 

v

 or 

w

 to adjust the setting.

4

  Press 

Q

 to return to the previous menu.

To return the colour temperature settings to the factory 

defaults, select 

Reset

 and press 

Q

.

Note: 

If 

Picture


Mode

 is set to 

AutoView

, you can only 

adjust 

Colour Temperature

.

Adjusting the Auto Brightness Sensor

When the 

Auto Brightness Sensor

 is activated, it 

will automatically optimise the backlighting levels to suit 

ambient light conditions.

1

  From the 

Advanced Picture Settings

 menu, press 

s

 to select 

Auto Brightness Sensor Settings

and then press 

Q

.

2

  Press 

v

 or 

w

 to select 

On

 and press 

Q

.

Auto Brightness Sensor Settings

Backlight Adjustment Pro

Auto Brightness Sensor

On

3

  Press 

s

 to select 

Backlight Adjustment Pro

, and 

then press 

Q

.

4

  The 

Backlight Adjustment Pro

 window will appear. 

Press 

Q

 again to display the adjustment window.

5

  Press 

v

 or 

w

 to select a point and press 

s

 or 

r

 to 

adjust the level.

48

100

0

Backlight Adjustment Pro

Backlight Control Level

Control

Level

Ambient Light

Cancel

Reset

6

  Press 

Q

 to confirm the adjustment.

To cancel the adjustment when selecting a point, select 

Cancel

 and press 

Q

To return the settings of all points to the factory 

defaults, select 

Reset

, and then press 

Q

.

Using the Active Backlight Control

In order to improve screen visibility, the active backlight 

control sets the screen brightness automatically during 

dark scenes.

1

  From the 

Advanced Picture Settings

 menu, press 

s

 or 

r

 to select 

Active Backlight Control

.

2

  Press 

v

 or 

w

 to select 

On

 or 

Off

.

Adjusting 3D Colour Management

You can adjust picture colour quality by selecting from 6 

base


colour adjustments : 

Red

Green

Blue

Yellow

Magenta

 and 

Cyan

.

1

  From the 

Advanced


Picture Settings

 menu, press 

s

 or 

r

 to select 

3D Colour Management

, and 

then press 

v

 or 

w

 to select 

On

.

3D Colour Management

On

2

  Press 

s

 or 

r

 to select 

Base Colour Adjustment

.

3

  Press 

Q

, and then press 

s

 or 

r

 to select the item 

you want to adjust.

Hue

Saturation

Reset

Brightness

0

Red

Green
Blue
Yellow
Magenta
Cyan

0

0

0

0

0

0

0

0

0

0

0

0

0

0

0

0

0

Base Colour Adjustment

4

  Press 

w

, and then press 

s

 or 

r

 to select 

Hue

Saturation

 or 

Brightness

.

Hue

Saturation

Brightness

0

Red

0

0

5

  Press 

s

 or 

r

 to adjust the settings as required.

Note:

If you set 

3D Colour Management

 to 

Off

Base 

Colour Adjustment

 will not be available.

Resetting Base Colour Adjustment

The reset function returns base colour adjustment to the 

factory settings.

1

  From the 

Base Colour Adjustment

 menu, press 

s

 or 

r

 to select 

Reset

.

2

  Press 

Q

.

Summary of Contents for 42RV600A

Page 1: ...Owner s Record Y TV o ow v TOSHIB g VX1A00143900 Integrated Digital LCDTV OWNER S MANUAL TOSHIBA CORPORATION 2009 All Rights Reserved TD J 42XV600A 46XV600A 52XV600A ...

Page 2: ... the TV 27 Channel List 27 Selecting the video input source 27 Setting the Manual Settings 28 Using REGZA LINK 28 Teletext 30 Subtitles 31 Other Digital TV features and settings 32 Using the EPG Electronic Programme Guide 32 Digital settings Channel Options 33 Digital settings PIN Setting 33 Using the System Information 34 Local Time Settings 34 Viewing the Software Licences 34 Digital Output Form...

Page 3: ...manufacturer Only use furniture that can safely support the TV Ensure that the TV is not hanging over the edge of the supporting furniture Never place the TV on tall furniture for example cupboards or bookcases without anchoring both the furniture and the TV to a suitable support The TV may drop or fall off which may cause an injury or damage 4 Never block or cover the slots and openings in the ca...

Page 4: ...o prevent injury use the exclusive optional stand or wall hanging bracket to install this TV on the floor or wall securely in accordance with a qualified technician Top view Sturdy tie as short as possible Clip Clip Clip Side view 9 Precautions for moving the TV When moving the TV be sure to remove the plug from the wall outlet and disconnect the aerial cable and audio video cables any steady ties F...

Page 5: ...ly and contact a service technician Be especially careful that children do not insert objects in the TV Clip 4 Never stand or climb on the TV Educate children about the dangers of climbing on furniture to reach the TV or its controls Be especially careful in households with children to prevent them through climbing on top of the TV It may move fall over break become damaged or cause an injury 5 Wh...

Page 6: ...oken turn off the TV and remove the power plug from the outlet immediately If the TV is still power used in this condition it may cause a fire or an electric shock If the cabinet is broken be careful when handling the TV to prevent an injury Contact a service technician for inspection and repair 4 When the TV reaches the end of its useful life ask a qualified service technician to properly dispose ...

Page 7: ...tc acts by third parties accidents owner s misuse or uses in other improper conditions Toshiba is not liable for incidental damages such as profit loss or interruption in business modification or erasure of record data etc caused by use or inability to use product Toshiba is not liable for any damage caused by neglect of the instructions described in the owner s manual Toshiba is not liable for an...

Page 8: ...order Back of TV Exploring your new TV Installing the remote control batteries Remove the battery cover Insert two R03 AAA batteries matching the polarities of the battery to the marks inside the battery compartment Cautions Dispose of batteries in a designated disposal area Batteries must not be exposed to excessive heat such as sunshine fire or the like Attention should be drawn to the environme...

Page 9: ...When no menu is on screen this button selects the input source page 27 OK When a TV menu is on screen this button will make a selection or take you to the next available menu layer page 14 SD memory card input terminal 66 Insert your SD memory card here to view photos JPEG page 42 USB input terminal 77 Insert your USB storage device here to enjoy movies DivX photos JPEG and music MP3 page 42 o 88 ...

Page 10: ... service use only O 222 WOOFER output terminal For use when connecting a woofer system variable page 35 O 222 MONITOR output terminals Standard video and standard audio outputs page 35 No On Screen Display will output from these terminals o 222 1 Video 1 input terminals Standard composite video and standard analogue stereo audio inputs page 35 o 222 3 Video 3 input terminals High definition compon...

Page 11: ...o access the Quick Menu page 14 EXIT page 15 To return to the previous menu page 15 To display on screen information page 18 Initial index function for Teletext page 31 Stereo bilingual selection page 24 Subtitle on off page 31 Picture size page 19 MENU page 14 To switch between ATV Analogue TV and DTV DTV TV DTV RADIO DTV TEXT To display the Channel List page 33 Picture still page 20 When in TV m...

Page 12: ...return to previous menu accessed Press to EJECT Press to STOP Press to PLAY Press to PAUSE Press to SKIP BACK Press to REWIND Press to FAST FORWARD Press to SKIP FORWARD Getting started The REGZA LINK mode switch on the TV remote control allows control of the connected REGZA LINK device being watched page 29 Note These functions are dependent on the connected device Not all of the remote control b...

Page 13: ...tandby if they are connected and ensure that the aerial is connected To setup the TV use the buttons on the remote control as detailed on page 11 1 Press the button The Quick Setup screen will appear This screen will appear the first time that the TV is switched on and each time Reset TV page 27 is executed Quick Setup Time Zone New South Wales Menu Language English 2 Press v or w to select the me...

Page 14: ... display the next menu Displaying the menu chart PICTURE menu SOUND menu APPLICATIONS menu SETUP menu PREFERENCES menu SETUP DTV Settings AV Connection Picture Position Quick Setup Location System Information Software Licences Germany Antenna Reset TV English Home 0 0 0 0 0 0 60 100 PICTURE Backlight Contrast Brightness Colour Tint Advanced Picture Settings Sharpness Control Visualization 70 100 0...

Page 15: ...select the SETUP menu SETUP Menu Language Auto Tuning ATV Manual Tuning DTV Manual Tuning DTV Settings Picture Position AV Connection Germany Antenna Quick Setup English 2 Press s to select AutoTuning and then press Q A screen will appear warning that previous settings will be deleted Auto Tuning Previous settings will be lost Press EXIT for no change DTV and ATV Tuning Mode Start Scan 3 Use v or ...

Page 16: ...e a blank space in the label name you must choose a blank space from the list of characters Press Q to store your settings Sorting positions analogue only ATV channels may be moved and stored to the position of your choice 1 From the SETUP menu press s or r to select ATV Manual Tuning 2 With the list of channels now showing press s or r to select the channel you want to move and press Pos Station ...

Page 17: ...election Digital programmes After you have tuned the TV you have several ways to navigate through all programmes Press the Number buttons You may omit the leading zeroes which will be appended automatically Press PU Pu to view the previous or next position The channels are arranged in ascending order according to the channel number Press LIST to display the Channel List and then press or to select...

Page 18: ...ey stories of the day and a strong focus on health social and environmental issues News 31 min left HD 16 9 11 20 Tue 6 Dec English The information will disappear in 60 seconds On screen information contains the following information Current Channel Number Channel Name Skip if set 8 Lock if set Now and Next Programme Names Current date and time Video format of the current programme SD HD Teletext ...

Page 19: ...creen 4 3 Use this setting to view a true 4 3 broadcast Super Live This setting will enlarge a 4 3 image to fit the screen by stretching the image horizontally and vertically holding better proportions at the centre of the image Some distortion may occur Cinema When watching all sides panel format films video tapes this setting will eliminate or reduce the black bars on all sides of the screen by ...

Page 20: ...ening it may infringe upon copyrights protected by copyright laws Adjusting the Picture Position analogue only Adjustment to the position of the picture may be made to suit your viewing preferences 1 From the SETUP menu press or to select Picture Position SETUP Menu Language Auto Tuning ATV Manual Tuning DTV Manual Tuning DTV Settings Picture Position AV Connection Germany Antenna Quick Setup Engl...

Page 21: ...Mode This feature resets Picture Mode to the factory settings Note If no picture settings have been changed Reset is not available 1 From the PICTURE menu press s or r to select Reset and then press Q 2 A confirmation message will appear Press v or w to select Yes and then press Q Adjusting Black White Level Black White Level improves the definition of dark areas of the picture 1 From the PICTURE ...

Page 22: ... r to adjust the level 48 100 0 Backlight Adjustment Pro Backlight Control Level Control Level Ambient Light Cancel Reset 6 Press Q to confirm the adjustment To cancel the adjustment when selecting a point select Cancel and press Q To return the settings of all points to the factory defaults select Reset and then press Q Using the Active Backlight Control In order to improve screen visibility the ...

Page 23: ...t the level Notes This feature may not work properly depending on the content Adjustable range varies according to the Picture Mode you set Noise may appear on the image depending on the device connected to the TV e g a device with a specific enhancer function Using Expert Mode This feature allows you to turn the colours red green and blue on off individually in order to adjust each colour more ac...

Page 24: ...ood try setting MTS mode to Auto and then switch b to e Mono monaural Selecting Dual 1 or Dual 2 mode You can hear only Dual 1 or Dual 2 sound when bilingual programmes are received 1 From the SOUND menu press sor r to select Dual 2 Press v or w to select Dual 1 or Dual 2 Notes When the MTS setting is in Mono mode the Dual menu is not selectable The Dual menu setting status is stored even when the...

Page 25: ...his feature does not affect the audio signal output from the DIGITAL AUDIO OUT and MONITOR output terminals If you feel it is hard to listen to audio due to signal status turn off Dolby Volume Other feature settings Activating Blue Screen With the Blue Screen function On the screen will automatically turn blue and the sound will be muted when no signal is being received 1 From the PREFERENCES menu...

Page 26: ...gramme timer you set is not performed when the TV is turned off with the POWER switch On Timer The feature allows you to set the TV to turn on automatically to a preset channel or input at a certain time of day or after a certain length of time When OnTimer is set to On the green on timer indicator on the front of the TV is lit page 9 1 From the APPLICATIONS menu press to select On Timer and then ...

Page 27: ...r to highlight a channel or input and then press Q to watch Selecting the video input source 1 At any time by pressing on the remote control or TV a list will appear on screen showing all inputs and external equipment Inputs TV 1 2 3 4 HDMI 2 HDMI 1 PC HDMI 3 HDMI 4 Inputs DTV TV DTV RADIO DTV TEXT 1 2 3 4 HDMI 3 HDMI 2 ATV HDMI 4 PC HDMI 1 Pressing on the remote control Pressing o on the TV right...

Page 28: ...des Using REGZA LINK This feature uses CEC Consumer Electronics Controls technology and allows the control of Toshiba REGZA LINK compatible devices from the TV remote control via HDMI connection page 41 Note Not all Toshiba products currently support REGZA LINK REGZA LINK Setup 1 From the PREFERENCES menu press or to select REGZA LINK Setup 2 Press Q and then press or to select Enable REGZA LINK R...

Page 29: ...t to standby and then on again to output the sound from the TV speakers The proper function may not work when operating the AV amplifier Note The above functions are dependent on the connected device and TV setting REGZA LINK input source selection When devices that use CEC technology have been connected the REGZA LINK icon will be displayed in the input source list Inputs TV 1 2 3 4 HDMI 2 HDMI 1...

Page 30: ...containing sub pages the sub pages are automatically displayed in sequence To quit automatic sub page change press or Once selected the sub page you are viewing will be highlighted and as the TV loads any additional sub pages the colour of the numbers will change indicating that these pages have been loaded These sub pages will remain available to view until another page is chosen or in normal TV ...

Page 31: ... Press again to revert to the normal size D To select a page while viewing normal picture When in teletext mode if a page selection is made and then D is pressed normal picture will be displayed The TV will indicate when the page is present by displaying the title bar of the text page at the top of the screen Press i to view the page Note It will not be possible to change TV channels while in Tele...

Page 32: ... please refer to the owner s manual of the recording equipment 6 Press Pu to advance to the next page or press PU to go back to the previous page Using the Genre Colour Setup Search From the guide screen you can use the genre selection and search features 1 Press the R button from the guide screen 2 Press or to highlight Genre Colour Setup in the Quick Menu and then press Q MENU Genre Colour Setup...

Page 33: ...ls 4 Press S 5 From this point on when any of the channels in the Locked Channel list are selected the PIN must be entered before they can be viewed Digital settings PIN Setting In order to prevent unwanted access to certain menus and settings a security PIN code can be set Setting the PIN 1 From the DTV Settings menu press s or r to select PIN Setting and then press Q 2 Using the number buttons e...

Page 34: ...alia Tasmania Victoria Western Australia Australian Capital Territory Local Time Setting Time Zone Local Time New South Wales 11 29 4 Press to select Local Time and then press v or w to set as required Viewing the Software Licences The licences for the software used in this TV are available for viewing on screen 1 From the SETUP menu press or until Software Licences is selected 2 Press Q A screen ...

Page 35: ...l Receiver with a built in Dolby Digital decoder Connect the DIGITAL AUDIO output terminal to the OPTICAL input of a receiver or processor Refer to the owner s manual of the connected equipment as well When you connect the TV to other equipment be sure to turn off the power and unplug all of the equipment from the wall outlet before making any connections The output sound of the TV has a wide dyna...

Page 36: ...ight side of the TV o 2 Please always refer to the owner s manual of the equipment to be connected for full details Connection example Right side of the TV Video Games Camcorder Camcorder with S Video To select the side inputs press o to display the video input mode list press s or r to select o 2 page 27 and then press Q Before connecting any external equipment turn off all main power switches If...

Page 37: ... DVI Digital Video Interface HDCP High bandwidth Digital Content Protection CEA 861 D compliance covers the transmission of uncompressed digital video with high bandwidth digital content protection which is being standardized for reception of high definition video signals Because this is an evolving technology it is possible that some devices may not operate properly with the TV Acceptable PC sign...

Page 38: ...arly HDMI equipment may not work properly with your HDMI TV If you experience trouble unplug your HDMI cable first and then try setting the first two options to Off This should allow your early HDMI source to operate properly with your TV 1 From the AV Connection menu press s or r to select HDMI Settings and then press Q HDMI Settings INSTAPORTTM Lip Sync RGB Range On On Auto 2 Press s or r to sel...

Page 39: ... the edges of the picture are stretched re adjust the picture position adjustments in the PC Settings menu Depending on the specification of the PC you are using the DVD Video playing and the DVD s title some scenes may be skipped or you may not be able to pause during multi angle scenes The PC signal may not be detected correctly for certain PC models Signal names for mini D sub 15 pin connector ...

Page 40: ...ampling Clock Vertical Position Clock Phase 4 Press s or r to select the option you want to adjust Press v or w to adjust the settings as desired Horizontal Position 0 Adjusting the clock phase of the picture If the clock phase which synchronizes the PC signal and LCD display is not optimized the picture will blur This function allows you to adjust clock phase and display a clear picture 1 From th...

Page 41: ...ed devices must also be set For details see the owner s manual for each device Notes If several devices are connected the REGZA LINK feature may not operate properly The REGZA LINK function uses CEC technology as regulated by the HDMI standard For proper operation it is recommended that you use HDMI cables with the HDMI Logo This function is limited to models incorporating Toshiba s REGZA LINK How...

Page 42: ...ress or to select On 4 Insert a USB device into the USB terminal or an SD memory card into the SD card slot on the right side of the TV 5 A confirmation message will appear Highlight Yes and then press Q 6 Press or to select Photo Movie or Music and then press Q The thumbnail view for Photo or list of files for Movie and Music will appear 7 Press or to select the USB device or SD memory card if th...

Page 43: ...he desired file d Playback starts from the beginning of the current file When you press twice quickly playback starts from the beginning of the preceding file e To locate subsequent files Note If the previous or next file is not compatible it will be skipped automatically To select a language Press h repeatedly to select your preferred subtitle language Press AUDIO repeatedly to select your prefer...

Page 44: ...where playback was stopped when you press PLAY the next time To start playback from the beginning regardless of the location where playback was stopped press Q Depending on the file size it may take some time to start playback 2 Press f to stop playback If playback finishes before f is pressed the next file will start playing automatically To pause playback Press g during playback To resume normal...

Page 45: ... item Interval Time or Repeat 3 Press or to adjust the setting 4 Press R or T to return to Slide Show mode Item Description Interval Time To set a time interval to view photos 3sec 5sec 10sec 15sec 30sec 60sec or 90sec Repeat To display photos in the same directory repeatedly On Off To rotate the image While viewing the image in Single View mode press to rotate the image 90 degrees clockwise press...

Page 46: ...o Select Photo Edit Settings Start Back Enter 3 Press to select Start and then press Q to open Photo Frame Open from Quick Menu 1 Press R to open the QUICK Menu 2 Press or to select Photo Frame and then press Q to open Photo Frame To close Photo Frame 1 Press S Setting the features In the preview screen you can set various settings for Photo Frame Photo Select 1 From the Photo Frame Setup menu pre...

Page 47: ...c o l C Left Off Position Auto Power Off Back Enter 3 Set the following items as desired Clock Press or to select Off Digital Clock Analogue Clock or Analogue Digital Position Press or to select Left or Right Auto Power Off Press or to select Off 00 30 01 00 02 00 04 00 06 00 or 12 00 If Photo Frame is started and left active the TV will automatically turn off after the set length of time maximum ...

Page 48: ...to use this TV flickering may occur on the screen In this case switch the TV off and then on again to resolve this issue The cold cathode fluorescent lamp used for the backlight on this TV has a certain lifespan When the brightness of the screen decreases flicker occurs on the screen or some parts of the screen do not light up it may have reached the end of its life Contact a service technician No...

Page 49: ...is block until PIN entered Block All Transmitted rating hex code 0 x 00 0 x 01 0 x 02 0 x 03 0 x 04 0 x 05 0 x 06 0 x 07 0 x 08 0 x 09 0 x 0A 0 x 0B 0 x 0C 0 x 0D 0 x 0E 0 x 0F Australian parental guide code Not Classified P Pre school C Children s G General PG Parental Guidance Recommended M Mature Audience 15 R Restricted 18 MA Mature Adult Audience 15 AV Adult Audience Strong violence 15 On Scr...

Page 50: ... 6 7 8 MHz Demodulator COFDM FFT Mode 2K 8K Constellation QPSK 16QAM 64 QAM Guard Interval 1 4 1 8 1 16 1 32 Inner Coding Rate 1 2 2 3 3 4 5 6 7 8 COMPONENT VIDEO INPUT terminals the signal format 480i 480p 576i 576p 720p 50 60 Hz 1080i 50 60 Hz These signal formats are converted to match the number of pixels of the LCD panel Colour system analogue TV system PAL SECAM NTSC 3 58 4 43 Aspect ratio 1...

Page 51: ...plied accessories Owner s manual 1 Remote control 1 Batteries 2 Clip 1 Cleaning cloth 1 This is used to fix the TV to a wall pillar etc page 4 Design and specifications are subject to change without notice Never service or remodel the TV by yourself It may expose you to a fire hazard or dangerous voltages ...

Page 52: ......

Reviews: