background image

FOR YOUR GUIDANCE

26

Make sure you have connected the VTR to the TV
using a 

Scart lead

and then select the correct 

input using the 

B

button.

Q

uestions 

and  

A

nswers

If you experience what seem like problems operating your TV, we recommend you 
read through these simple checks. 

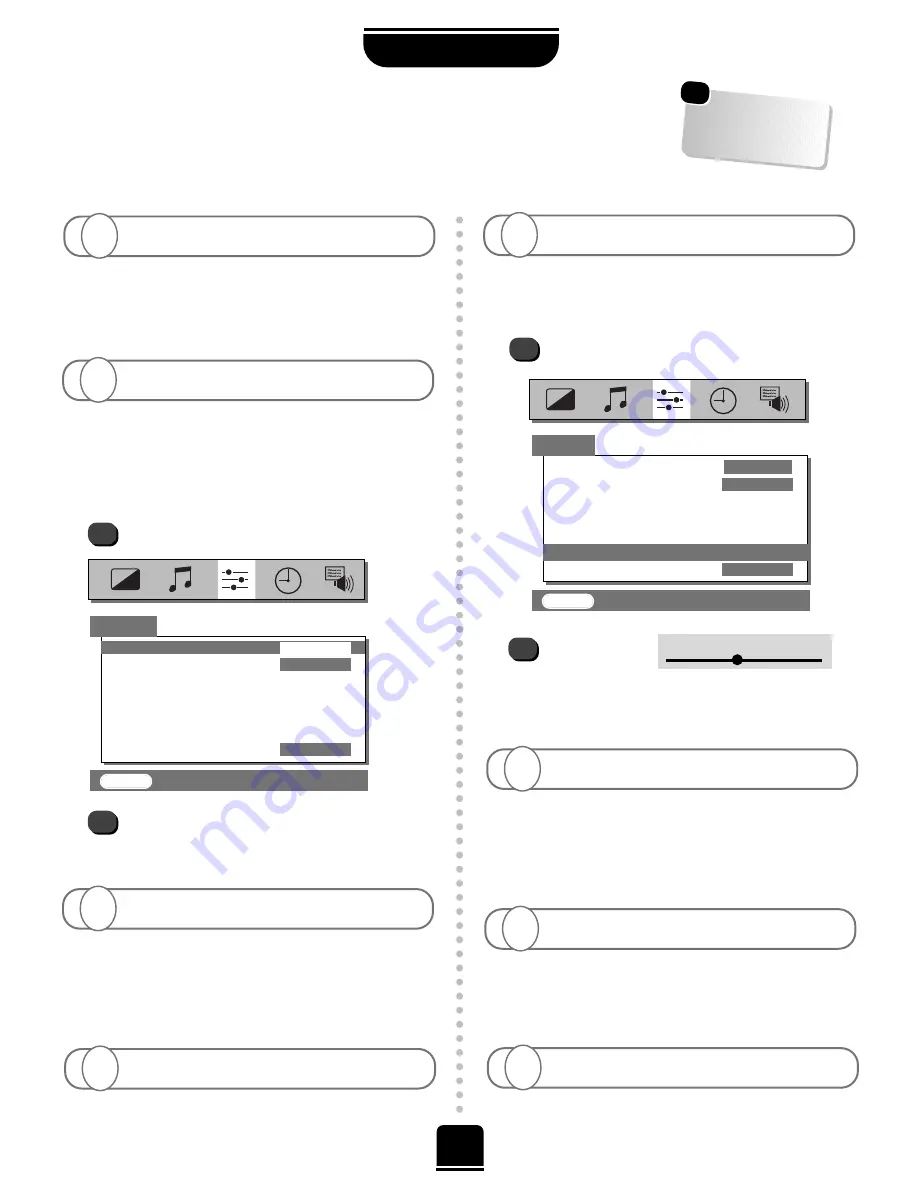
The television is factory set to 

AUTO

in the 

SET

UP

menu and usually chooses the best colour

system. If the picture source is of poor quality, the 

AUTO

function may not work. In which case you can view the
colour options available…

From the 

SET UP

menu select 

Colour

.

With the 

S

or

R

button, choose between 

AUTO,

PAL

SECAM, NTSC 4. 43

or 

3. 58

.

A

Q

There IS a picture, but why is there little or no colour?

(CONTINENTAL EUROPE ONLY)

t

t

t

t

t

t

t

t

EXIT   

: To exit

t

These are often caused by magnetic field
interference. Turn off the TV by the ON/OFF button

on the front of the TV for ten minutes and then turn it on
again. If there are any speakers nearby, reposition them
away from the TV before turning the TV off.

A

Q

Why are there coloured patches on the screen?

Q

Why is there no sound or picture?

Yes, interference or a weak signal. Try a different TV
station to check.

Manual fine tuning

may help:

Select 

Manual fine tuning

from the 

SET UP

menu.

A

Can anything else cause a poor picture?

1

2

With the 

S

or

R

button adjust 
to optimise the picture.

Manual fine tuning

Q

A

Why can’t I see the video tape I am playing?

Q

The 

input 

socket maybe set to 

S-Video

in the

AV CONNECTION

menu.

A

Why is the video recorder picture in black and white?

Q

…Check Scart lead connection.
…Check 

Digital Input

OFF

. See 

AV connections

.

A

Why is the video picture good but there is no sound?

Q

1

2

Press the volume button 

+

j

or the sound

mute  

k

button.

A

I have a picture, but why have I no sound?

Q

Check that the mains switch is on and check all the
connections. Press the Standby button 

i

on the

remote control to make sure that the TV is not in Standby
mode. 

A

t

t

t

t

t

t

t

t

t

Colour

AUTO

System

I

Auto tune
Manual tune
Programme swap
Manual fine tuning
Programme skip

OFF

EXIT   

:  To exit

t

t

SET UP

*

*

Continental Europe only

For quick

reference to topics,

see the INDEX at the

back of this manual.

*

SET UP

Colour

AUTO

System

I

Auto tune
Manual tune
Programme swap

Manual fine tuning

Programme skip

OFF

t

Summary of Contents for 32ZP18P, 36ZP18P

Page 1: ...owner s manual colour television 32ZP18P 36ZP18P TOSHIBA The power to open people s eyes ...

Page 2: ...ustments picture size position WSS Widescreen Signalling 13 Picture adjustments picture preferences scan mode digital noise reduction picture still blue screen 14 Dolby Digital 15 Dolby Pro Logic Surround Test Mode 16 Digital Surround Processor Surround Sound Features 17 Teletext setting up 18 Teletext Auto and List modes 19 Teletext control buttons 20 The timer and time display informing the TV t...

Page 3: ...ains plug and consult your dealer ABOVE ALL NEVER let anyone especially children push anything into holes slots or any other openings in the case this could result in a fatal electric shock NEVER guess or take chances with electrical equipment of any kind it is better to be safe than sorry Leave at least 10cm clearance around the television to allow adequate ventilation This will prevent the TV fr...

Page 4: ... To bring up on screen information and for the teletext initial index function To select input from external sources Stereo bilingual reception On screen Menus Widescreen mode selection 1 or 2 digit programme selection Number buttons The batteries and the effective range of the remote Your new television s remote control Simple at a glance reference of your remote control s buttons For On Standby ...

Page 5: ...ns only Place your speakers to suit and adjust the balance as necessary Main Speaker Main Speaker Surround Speaker Surround Speaker Don t forget to set the switch to EXT WARNING do not attempt to share external speakers with your Hi Fi as serious damage may occur To connect extension front speakers simply press the connector and insert the cable You must now set the switch to EXT as shown Always m...

Page 6: ...and not to leave it in Standby unless the timer has been set Connect the aerial to the socket on the rear of the television If you use a Set Top Box and or a video recorder it is essential that the aerial cable is connected through the Set Top Box and or through the video recorder to the television DO NOT CONNECT SCART LEADS UNTIL THE TELEVISION IS FULLY TUNED the back of your TV AERIAL VIDEO RECO...

Page 7: ...em I Auto tune Manual tune Programme swap Manual fine tuning t Press the Q button to highlight Auto tune while you are in the SET UP menu Press the R button You will be informed that all previous settings will be lost Press the ENTER button on the remote control to begin the search for available stations x x x x x will flash and each station found will appear in succession on the screen Allow the ...

Page 8: ...ll the programme positions you wish to store including the Set Top Box If you wish to leave a programme position free for use in the future store an unwanted channel on it Press the EXIT button when you have finished and press the number buttons to view a channel of your choice e g 01 To tune any stations on different SYSTEMS use the Manual tune facility from the SET UP menu as described on page 9...

Page 9: ... a Station name if required Press ENTER if you wish to store the broadcast displayed To repeat the process highlight Search and press the R button to look for the next station Press EXIT when you have finished Press the R button twice to start the search 1 2 RRR Search will flash and the television will show the channel numbers whilst the search is progressing On finding a station it will show on ...

Page 10: ...y way of storing each channel on the programme position of your choice Program skip stops the viewing of certain channels With the Q or P buttons again move through the list to your preferred position Press ENTER again You will see that the programme positions have now been swapped To prevent certain programmes from being viewed for example a certain film by your children whilst your are out for t...

Page 11: ...oofer on and off Press the S or R button to adjust the effect Sound control Bass treble and balance adjustments Enter the desired programme position number using the numbered buttons on the remote control For programme positions below 10 press the button to select on the screen then enter the desired programme position number For programme positions above 9 press the button to select then enter th...

Page 12: ...n by zooming in and selecting the image without distortion WIDE SUBTITLE SUBTITLE SUBTITLE WIDE When subtitles are included on a letterbox format broadcast this setting will raise the picture to ensure that all the text is displayed Use this setting when watching a widescreen DVD widescreen video tape or a 16 9 broadcast when available Due to the range of widescreen formats 16 9 14 9 20 9 etc you ...

Page 13: ...ighted 1 2 3 4 5 FEATURE MENU Press the R button to view the options available for the picture format you have selected With the P and Q buttons highlight an option and with the R button select Now use the Sor R buttons to adjust the settings as required and press EXIT when you have finished In SUPER LIVE t t t AV connection Picture size position Teletext Surround set up Language ENGLISH Panel loc...

Page 14: ... 1 Picture preferences Within this PICTUREmenuyou have the options to adjust the Contrast Brightness Colour Tint and Sharpness Using the S or R button alter to suit your taste The Tint can only be adjusted on a signal from an NTSC video recorder or DVD player when the television is in AUTO colour mode Picture Still Scan Mode 1 2 Select Scan mode from the PICTURE menu With the S or R button select ...

Page 15: ...ton 1 1 2 3 4 2 From the FEATURE MENU select Surround set up With Delay time highlighted use the S or R button to change the setting to a value that suits you Press EXIT when you have finished 1 2 3 3 4 Dolby Digital 1 0 Centre speaker only 2 0 Front Left and Front Right only 2 1 Front Left and Front Right Rear Left and Rear Right combined 2 2 Front Left and Front Right Independent Rear Left and I...

Page 16: ... speaker channels front left centre front right and two rear If external front speakers are not connected these channels will be delivered through the speakers in the TV 1 2 The TEST will play a white noise through each speaker in turn The display will show you which speaker is in play adjustments may be made whilst it is highlighted EXIT To exit Left Centre Right Rear right Rear left t t 61 t t 6...

Page 17: ...full of music that it seems to engulf the listener An ideal sound mode for listening to pop videos Surround Sound Stadium To reproduce the surround effects similar to those experienced in a large football or baseball stadium packed for a live game Surround Sound Pseudo To create a synthetic sound effect for movies and TV shows recorded in mono Surround Sound Off Uses only the front left and right ...

Page 18: ...t press the TEXT TV button to access the text service the first page you see will be the initial page In Auto mode this displays the main subjects available and their relevant page numbers In List mode you will see your chosen INITIAL page explained on the next page To access any teletext page enter the 3 digit page number using the numbered buttons on the remote control e g 430 To advance to the ...

Page 19: ...be displayed on pressing the RED button again On programme positions 0 9 you can pre programme an INITIAL page Select the INITIAL function by pressing the YELLOW button P will appear in the top left corner of the screen Enter the required 3 digit page number As you key in the desired INITIAL page for example page 220 the numbers will replace the Whenever text is first selected on this programme po...

Page 20: ... functions you must press the F button at the same time 4 5 6 To display an index initial page In AUTO mode Press the T button to access index pages The one displayed is dependant on the broadcaster In LIST mode Press the T button to return to your INITIAL page To hold a wanted page and At times it is convenient to hold a page of teletext Press the F and the qbuttons and the word HOLD will appear ...

Page 21: ...s not in stereo the word Mono will appear ADDITIONAL FEATURES The timer time display panel lock and stereo bilingual transmissions The time display facility allows you to see the current time on the TV screen If you press the F button and the tbutton on the remote control whilst watching a normal TV broadcast you will see a time display from the broadcaster It will remain on the screen for about 5...

Page 22: ...igital audio inputs DA 1 and DA 2 so that for example a DVD player and a games console can stay permanently connected Having connected the video signal from your DVD to say COMPONENT VIDEO INPUT EXT4 and from your games console to Scart 3 EXT3 you will now need to connect the audio cables to the inputs on the back of the set then match the two up This feature enables you to select the source to ou...

Page 23: ...LBY DIGITAL GAMES CONSOLE If connecting S VIDEO equipment set the INPUT for EXT2 or EXT3 accordingly See page 22 Before connecting any external equipment turn off all main power switches If your TV automatically switches over to monitor the connected equipment you can return to normal TV simply by pressing the desired programme position button To recall the connected equipment press the Bbutton re...

Page 24: ...Please note Inserting the headphone jack will mute the sound from all speakers Whilst all the necessary adjustments and controls for your new TV are made using the remote control the buttons on the front of the TV may be used for some functions CAMCORDER HEADPHONES Front connections 24 DIGITAL CAMERA For example to alter the volume press the j buttons and to alter the programme position press the ...

Page 25: ...ressing the SorR button its respective options will appear below To use the options press the Q button on the remote control to move you down through them EXIT To exit SET UP t Colour AUTO t SET UP PICTURE t t t t t EXIT To exit Contrast 75 Brightness 50 Colour 50 Tint 00 Sharpness 00 Scan mode 100Hz DNR AUTO t t t When watching a TV broadcast EXIT To exit t t t t AV connection Picture size positi...

Page 26: ...the screen Q Why is there no sound or picture Yes interference or a weak signal Try a different TV station to check Manual fine tuning may help Select Manual fine tuning from the SET UP menu A Can anything else cause a poor picture 1 2 With the Sor R button adjust to optimise the picture Manual fine tuning Q A Why can t I see the video tape I am playing Q The input socket maybe set to S Video in t...

Page 27: ...television off before changing the position of the switch A Check the speaker switch has been set to EXT A Why is there no Dolby Digital Q Why is there no sound from the external left and right speakers Q If you are unable to obtain surround sound effects from the rear speakers whilst playing a Dolby Surround video tape check that the video recorder is a stereo unit and is connected by a scart lea...

Page 28: ..._________________11 Programme Skip________________________________________________10 Programme Swap _____________________________________________10 Questions and Answers ______________________________________26 Remote Control __________________________________________________4 Scart________________________________________________________________22 Sharpness ________________________________________...

Reviews: