English
- 9 -
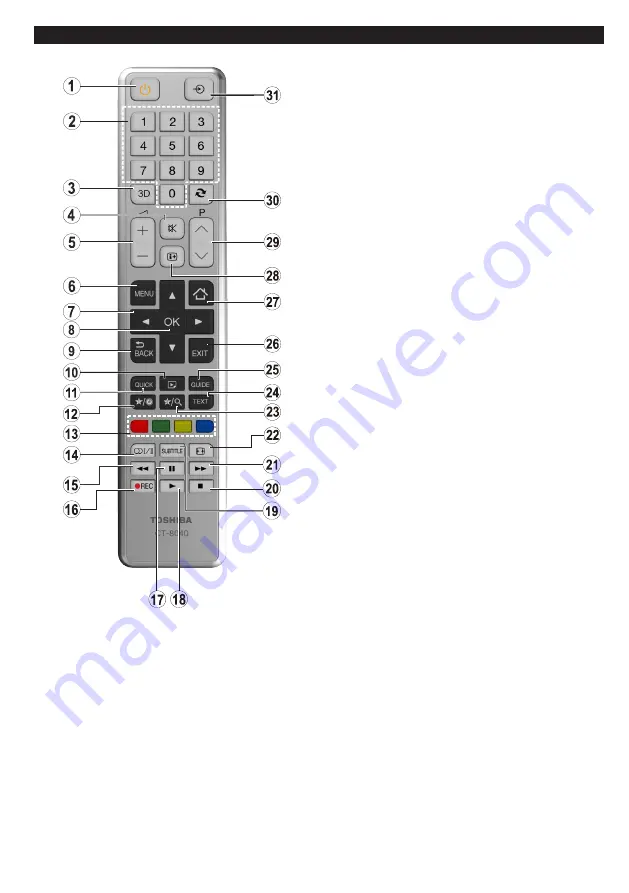
Remote Control (Depending on the model)
1. Standby:
Switches On / Off the TV
2. Numeric buttons:
Switches the channel, enters a
number or a letter in the text box on the screen.
3. Favourites:
Displays favourite lists menu / Switches
between favourite lists
4. Mute:
Completely turns off the volume of the TV
5. /-
6. Menu:
Displays TV menu
7. Navigation buttons:
Helps navigate menus, content
etc. and displays the subpages in TXT mode when
pressed Right or Left
8. OK:
Confirms user selections, holds the page (in TXT
mode), views channel list (DTV mode)
9. Back/Return:
Returns to previous screen, opens index
page (in TXT mode)
10. Media browser:
Opens the media browsing screen
11. Quick Menu:
Displays a list of menus for quick access
12. My button 1 (*)
13. Coloured Buttons:
Follow the on-screen instructions
for coloured button functions
14. Language:
Switches between sound modes (analogue
TV), displays and changes audio/subtitle language
(digital TV, where available)
15. Rapid reverse:
Moves frames backwards in media
such as movies
16. Record:
Records programmes
17. Pause:
Pauses the media being played, starts timeshift
recording
18. Play:
Starts to play selected media
19. Subtitles:
Turns subtitles on and off (where available)
20. Stop:
Stops the media being played
21. Rapid advance:
Moves frames forward in media such
as movies
22. Screen:
Changes the aspect ratio of the screen
23. My button 2 (*)
24. Text:
Displays teletext (where available), press again
to superimpose the teletext over a normal broadcast
picture (mix)
25. EPG (Electronic programme guide):
Displays the
electronic programme guide
26. Exit:
Closes and exits from displayed menus or returns
to previous screen
27.
No function
28. Info:
Displays information about on-screen content,
shows hidden information (reveal - in TXT mode)
29. Pro/-
30. Swap:
Quickly cycles between previous and current
channels or sources
31. Source:
Shows all available broadcast and content
sources
(*) MY BUTTON 1 & MY BUTTON 2:
These buttons may have default functions depending on
the model. However you can set a special function to these
buttons by pressing on them for five seconds when on a
desired source or channel. A confirmation message will be
displayed on the screen. Now the selected MY BUTTON is
associated with the selected function.
Note that if you perform
First Time Installation
, MY BUTTON
1&2 will return to their default function.


