


Setting Hotel Mode
Enter to service mode and select Hotel Mode menu by pressing P
or P
.
After selecting Hotel Mode, press
+ to enter details setting in Hotel Mode.
To select menu, press P
or P
and press OK to enter the adjustment menu of table bellow.
To move the cursor in the adjustment, press
+ or
-.
1. By pressing P
or P
, OPT2 setting will change the value either 1 or 0 on selected
items as follows;
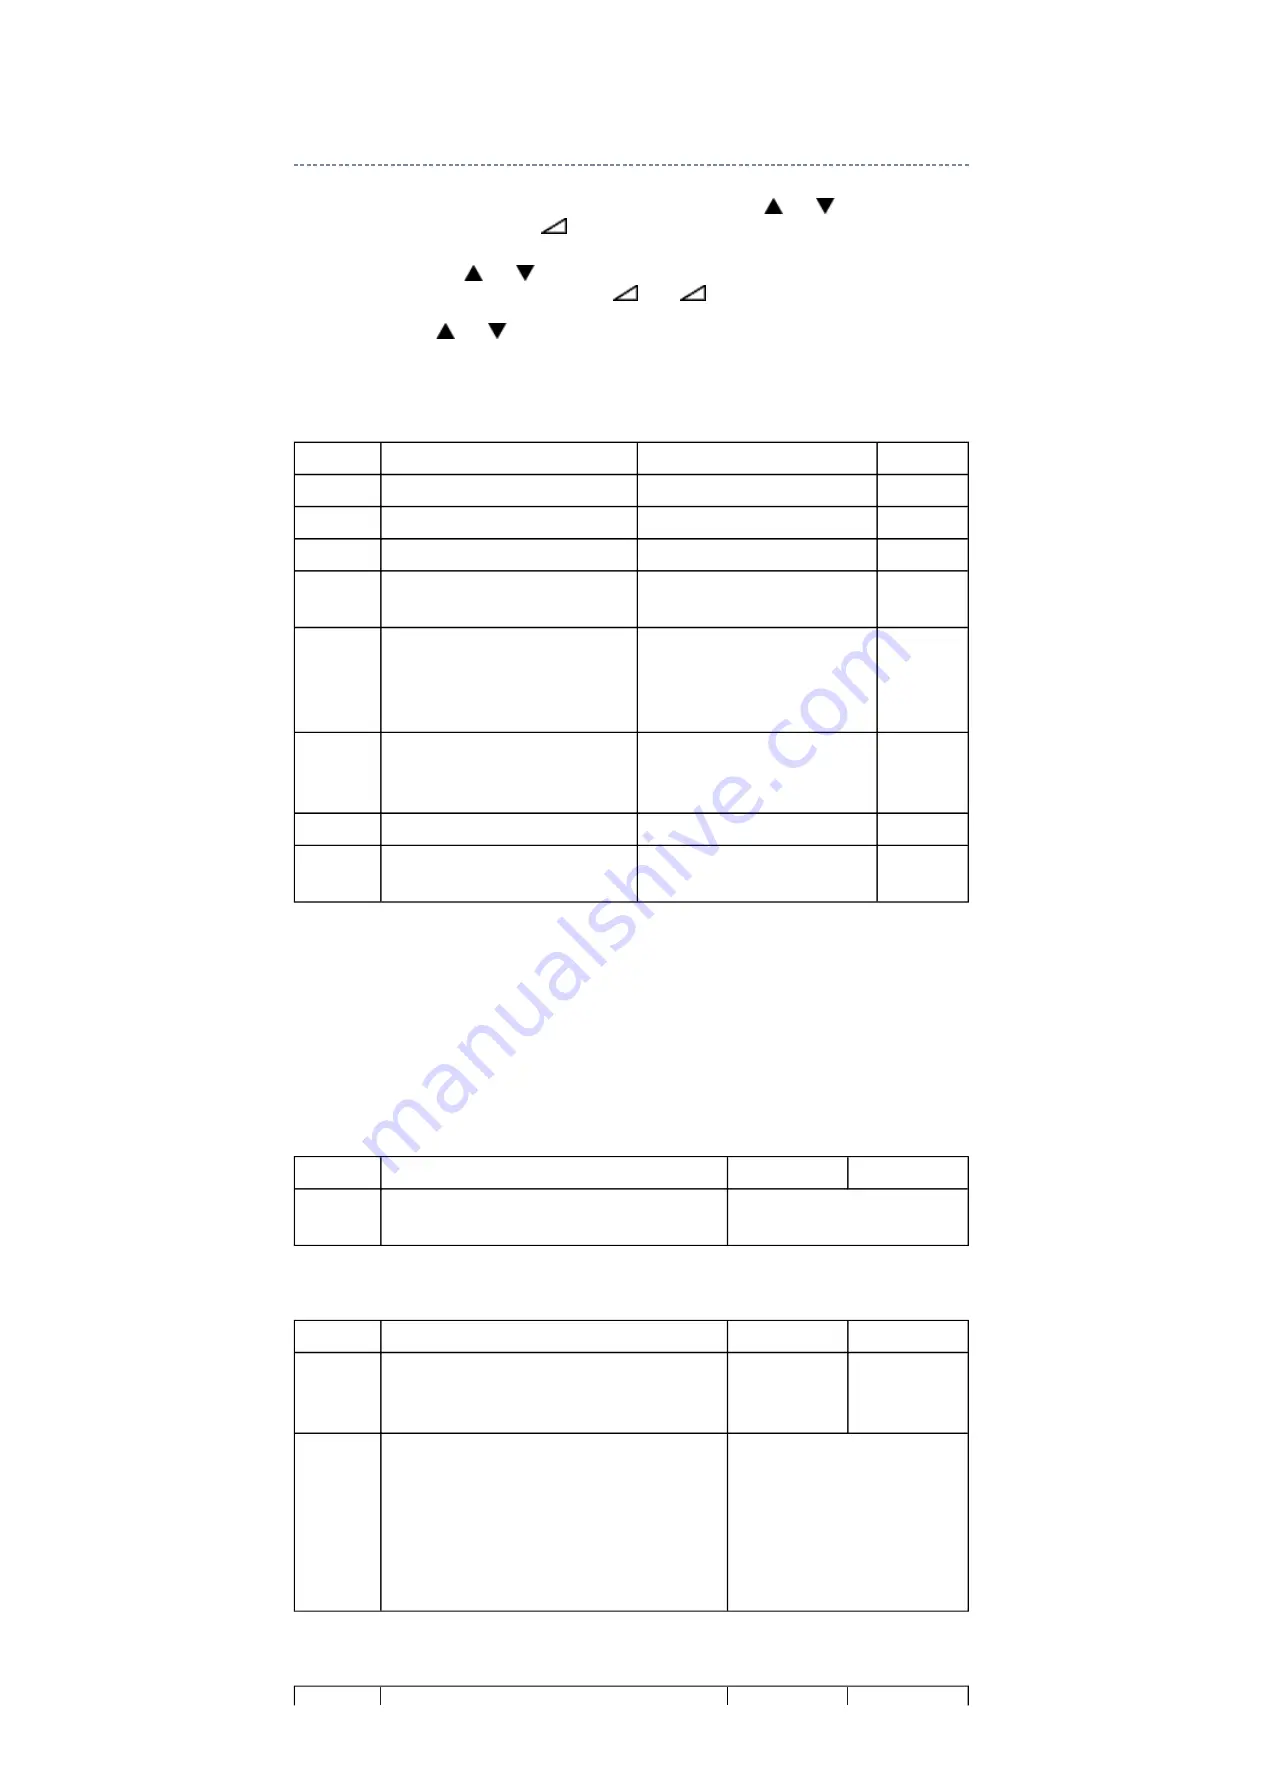
OP2
VOLUX
Set VOLUX as following.
1) Set speaker volume to 100. (Any value is OK, but 100 is better to check sound level.)
2) Down value of VOLUX until finding suitable sound volume level.
OP6
OP7
OPT2
FUNCTION DESCRIPTION
1
0 (Normal)
D7 (bit7)
- (no use)
-
-
D6 (bit6)
- (no use)
-
-
D5 (bit5)
FRONT Key
Disable
Enable
D4 (bit4)
All keys except input selector key
(Video/TV)
Disable
Enable
D3 (bit3)
User remote control operation
Disable
(Service mode and Supere
User mode may possible to
setting only)
Enable
D2 (bit2)
Disable SET UP MENU except
language.
(tuning SETUP MENU)
Disable
(Display the language only)
Enable
D1 (bit1)
Disable SETUP MENU
Disable
Enable
D0 (bit0)
HOTEL Mode
On (Enable the setting of D1
from to D7)
Off
(Normal)
VOLUX
FUNCTION DESCRIPTION
1
0 (Normal)
D7 (bit7) ~
D0 (bit0)
Max Limiter of Volume Control
0x00 ~ 0x7F (Normal: 0x7C)
OPT6
FUNCTION DESCRIPTION
1
0 (Normal)
D7 (bit7)
Enable mode that POS or VIDEO program
number will be appeared in forced when turn
ON the main power
Enable
Disable
D6 (bit6) ~
D0 (bit0)
POS or VIDEO program number
0 ~ 127 [decimal] (Normal: 0)
POS number: 0 ~ 99
VIDEO number: 100 ~ 127
(DTV = 100, VIDEO = 101,
VIDEO = 102..)
100 is used as ATV when
DTV option is disable.
Summary of Contents for 32R3500P
Page 4: ...for Internet Explorer 7 for Windows Vista ...
Page 21: ......
Page 22: ......
Page 23: ......
Page 24: ......
Page 25: ......
Page 26: ......
Page 27: ......
Page 28: ......
Page 29: ......
Page 30: ......
Page 31: ......
Page 32: ......
Page 33: ......
Page 34: ......
Page 35: ......
Page 36: ......
Page 37: ......
Page 38: ......
Page 39: ......
Page 40: ......
Page 41: ......
Page 42: ......
Page 43: ......
Page 44: ......
Page 45: ......
Page 46: ......
Page 47: ......
Page 48: ......
Page 49: ......
Page 50: ......
Page 51: ......
Page 52: ......
Page 53: ......
Page 54: ......
Page 55: ......
Page 56: ......
Page 57: ......
Page 58: ......
Page 59: ......
Page 60: ......
Page 61: ......
Page 62: ......
Page 63: ......
Page 64: ......
Page 65: ......
Page 66: ......
Page 67: ......
Page 68: ......
Page 69: ......
Page 70: ......
Page 71: ......
Page 72: ......
Page 73: ......
Page 74: ......
Page 75: ......
Page 76: ......
Page 77: ......
Page 78: ......
Page 79: ......
Page 80: ......
Page 81: ......
Page 82: ......
Page 83: ......
Page 84: ......
Page 85: ......
Page 86: ......
Page 87: ......
Page 88: ......
Page 89: ......
Page 90: ......
Page 104: ...TECHNICAL BULLETIN File Name Title issuing date ...
Page 105: ......
Page 108: ...PARTS LIST Block 6 Select Location Search Page 1 1 Jump Jump Parts No Search ...
Page 109: ...PARTS LIST Block 6 All Block Loading ...
Page 121: ...PARTS LIST Block 6 U01A POWER PE0391 ...
Page 125: ...PARTS LIST Block 6 U02A LOW_B PE0392 ...
Page 128: ...PARTS LIST Block 6 U03A AV_TERM PE0424 ...
Page 139: ...PARTS LIST Block 6 U04AS SIGNAL PE0465 ...
Page 150: ...PARTS LIST Block 6 U05A REM100 PE0464 ...
Page 158: ...CABINET Stand Exploded View A425 A426 A427 A428 A429 ...
Page 160: ...FUNCTION AND OPERATION The Remote Control Simple at a glance reference of your remote control ...
Page 162: ......
Page 164: ......
Page 166: ......
Page 167: ...FUNCTION AND OPERATION Auto Tune Using Auto Tuning ...
Page 168: ...SPECIFICATION ...


