– 6 –
GENERAL ADJUSTMENTS
SPECIFIC INFORMATIONS
WARNING
: BEFORE SERVICING THIS CHASSIS, READ THE “X-RAY RADIATION PRECAUTION”, “SAFETY PRECAU-
TION” AND “PRODUCT SAFETY NOTICE” ON PAGE 3 OF SERVICE MANUAL.
(SET-UP ADJUSTMENT FOR FLAT TUBE)
■
The following adjustments should be made when a complete realignment is required or a new picture tube is installed.
Perform the adjustments in order as follows :
1. Color Purity
2. Convergence
3. White Balance
Note:
The PURITY/CONVERGENCE MAGNET assembly and rubber wedges need mechanical positioning.
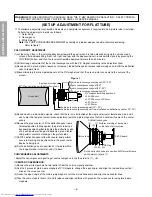
Refer to figure 1.
COLOR PURITY ADUSTMENT
(1)Let the screen face in the installing direction or toward the east (when it is to be moved), bring up the service mode
screen after demagnetizing (front, left, right, and top) with the degaussing coil, receive white signals by pressing the
[TV/VIDEO] button, and then the receiver should be operated for more than 40 minutes.
(2)Perform rough adjustment of the central convergence with the P/C magnet according to the adjustment item.
(3)Receive built-in green signals, loosen set screws on the deflection yoke, remove rubber wedges, and shift the deflection
yoke to toward front.
(4)Move alternately the two 2-pole magnets of the P/C magnets so that the green raster can come to the center of the
screen.
Figure 1.
(5)Receive built-in red and blue signals, check that there is no inclination of the single color raster toward one side, and if
each color tilts to a great extent, make adjustment with the 2-pole magnet so that the 3 colors will come to the center
evenly.
(6)Receive the green raster, shift the deflection yoke from a
foremost position (hitting against the picture tube) to a
backward position horizontally, stop the deflection yoke
at a position where it begins to become a green raster,
and perform accurate marking on the picture tube.
(7)Shift the deflection yoke further backward, and perform
accurate marking at a position where the green raster
begins to being luck.
(8)Fix the deflection yoke at a position 60% forward within
the range marked in items (6) and (7) above.
CONVERGENCE ADJUSTMENTS
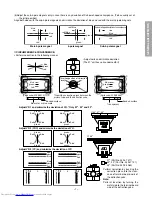
* Adjust the convergence magnet to get vest convergence in the the order to (1) ~ (5).
■
CENTER CONVERGENCE:
(1)Receive the white crosshatch or dot pattern from the service signal generator.
(2)Use the 2 pieces of main 4-pole magnets of P/C magnets, change the open angle, and align the red and blue vertical
lines on the screen center.
(3)Freeze the open angle of the main 4-pole magnets, turn them simultaneously, and align the horizontal lines.
(4)Take the same steps for items (2) and (3) above and align red/blue with green on the screen center using two 6-pole
magnets.
A
P/C magnet installing position A
• 30"=26.5 mm
• 32"=30.5 mm or 32.5 mm
• 34"=37 mm
• 34"=39 mm
Green Belt
2-pole purity magnet
(27": Magnet is fixed with deflection yoke.)
Main 4-pole convergence magnet (30" : 32")
6-pole convergence magnet (34")
Sub-4-pole convergence magnet (32" : 34")
Sub-4-pole convergence magnet (to be installed on deflection yoke for 30", 32”)
6-pole convergence magnet (30" : 32")
Main 4-pole convergence magnet (34")
Fix the deflection yoke at a position 60% forward from a
point between (6) and (7)
Picture tube
Shift deflection yoke
(6)
(8)
(7) Perform marking of each point
on the tape of picture tube
CRT-D board
P/C Mag
100 60 0%
Summary of Contents for 32HFX71
Page 43: ... 43 44 SIGNAL BOARD PD0162 BOTTOM FOIL SIDE ...
Page 44: ... 45 46 POWER DEF BOARD PD0159 BOTTOM FOIL SIDE ...
Page 45: ... 47 CRT D VM BOARD PD0164 BOTTOM FOIL SIDE ...
Page 46: ... 48 LOW B BOARD PB9567 BOTTOM FOIL SIDE AC IN BOARD PD0161 BOTTOM FOIL SIDE ...
Page 47: ... 49 CONTROL 1 BOARD PB9570 BOTTOM FOIL SIDE ...
Page 48: ... 50 CONTROL 2 BOARD PB9571 BOTTOM FOIL SIDE ...
Page 49: ... 51 WOW BOARD PD0220 BOTTOM FOIL SIDE ...
Page 50: ... 52 NEXT HYPER BOARD PD0264 BOTTOM FOIL SIDE ...
Page 52: ... 54 SPECIFIC INFORMATIONS MEMO ...
Page 54: ...TOSHIBA CORPORATION 1 1 SHIBAURA 1 CHOME MINATO KU TOKYO 105 8001 JAPAN ...


