background image

7

Ref

er

ence

W

elcome to

Toshiba

Connecting

y

our T

V

Using the

Remote Contr

ol

Setting up

y

our T

V

Using the T

V

’s

F

eatur

es

Appendix

Index

Using the remote control

Preparing the remote control for use

With the remote control, you can operate your TV, most VCR
models, and cable TV converters together, even if they are different
brands. If you will be using your TV with a Toshiba VCR, your
remote control is already programmed and ready to use. If you own
different brands of VCRs and/or converters, you first have to program
your remote control. (See “Programming the remote control for use
with a VCR or a cable TV converter” on page 8.)

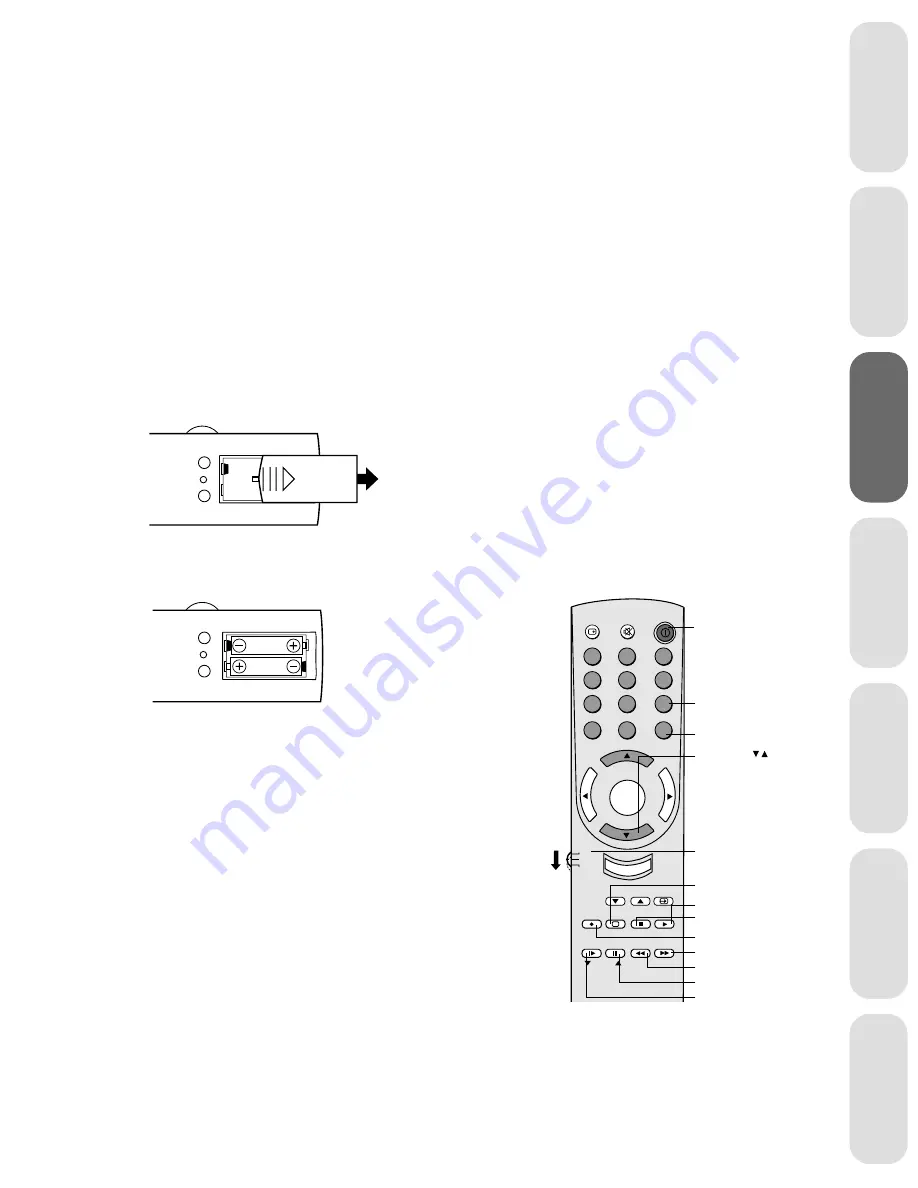
Installing the remote control batteries

To install the batteries:

1. Slide the battery cover off of the back of the remote control.

2. Install two “AA” size batteries. Match the + and - signs on the

batteries to the signs on the battery compartment.

3. Slide the battery cover back on to the remote control until the

lock snaps.

Using the remote control with a VCR or a cable
TV converter

To control a Toshiba VCR:

Set the TV/CABLE/VCR switch to the VCR position. The
buttons shown to the right will then control the VCR. The
rest of the buttons will operate the TV as usual.

To control a cable TV converter:

Program the remote control to recognize the brand of your
converter (see “Programming the remote control for use with a
VCR or cable TV converter,” page 8). The shaded buttons shown
on the right will control the cable TV converter.
Set the TV/CABLE/VCR switch to the CABLE position.

Note:

This remote control’s functions may or may
not operate your VCR or cable TV converter.
Refer to the owner’s manuals supplied with
the equipment to see which features are
available. In addition, the original controllers
may have features not available on this
remote control. If you would like to continue
to use these features, you may want to use
the original remote control.

Caution:

• Dispose of your batteries in a designated

disposal area. Do not throw your batteries
into a fire.

• Do not mix battery types or combine used

batteries with new ones.

• Remove dead batteries immediately to

prevent battery acid from leaking into the
battery compartment.

• If you do not intend to use the remote

control for a long time, remove the
batteries.

CH RTN

CH

VOL

VOL

CH

EXIT

MUTE

RECALL

POWER

Channel
Number

POWER

ENT

TV/VIDEO

REC

STILL SOURCE

PIP

PIP CH

LOCATE SWAP

TV/VCR STOP

PLAY

SLOW PAUSE

REW

FF

FAV CH

1

4

7

2

5

8

3

6

9

0

100

TV/Cable/VCR

Channel

TV

CABLE

VCR

MENU/

ENTER

Record

Stop

Fast Forward
Rewind
Pause
Slow

Play

TV/VCR

Enter

Note:

Some cable/TV converters may require the
ENT key to be pressed after pressing channel
numbers. (i.e. 0 – 2 – ENT)

Summary of Contents for 27A60

Page 1: ...levision TOSHIBA CORPORATION 2000 27A60 32A60 36A60 OWNER S MANUAL TM Reference Reference Welcome to Toshiba Connecting your TV Using the Remote Control Setting up your TV Using the TV s Features Appendix Index ...

Page 2: ...IS SECTION FOR REFERENCE PRECAUCIÓN LEA Y TENGA EN CUENTA TODAS LAS ADVERTENCIAS E INSTRUCCIONES QUE SE ENCUENTRAN EN ESTE PANFLETO Y LAS DE LOS APARATOS DE TELEVISIÓN MANTENGA ESTE PANFLETO PARA FUTURAS REFERENCIAS Electrical energy can perform many useful functions This TV set has been engineered and manufactured to assure your personal safety However improper use can result in potential electri...

Page 3: ... will fit into the power outlet only one way If you are unable to insert the plug into the outlet try reversing the plug Un enchufe de línea de corriente alterna polarizado posee una cuchilla más ancha que la otra Este enchufe entrará en la toma de la red de una sola forma Si no puede inertar el enchufe en la toma de la red trate de invertirlo Alternate Warnings A three wire grounding type plug a ...

Page 4: ...ios descargas eléctricas u otros peligros Safety Check Upon completion of any service or repairs to the TV set ask the service technician to perform routine safety checks as specified by the manufacturer to determine that the TV set is in safe operating condition and to so certify Comprobación de seguridad Al finalizar cualquier reparación de este televisor solicite al técnico de reparación que re...

Page 5: ...or a cable TV converter 7 Programming the remote control for use with a VCR or a cable TV converter 8 VCR code table 9 Cable TV converter code table 9 Location of controls 11 Setting up your TV 12 Changing the on screen display language 12 Selecting the antenna input 12 Using the TV VIDEO button 12 Adding channels to the TV s memory 13 Programming channels automatically 13 Adding and erasing chann...

Page 6: ...icture preferences 27 Watching video input 27 Displaying on screen information 27 Setting the off timer 27 Auto power off 28 Using the closed caption feature 28 Adjusting the sound 29 Muting the sound 29 Selecting stereo SAP broadcasts 29 Adjusting the sound quality 30 Using the surround sound feature 31 Viewing the demonstration mode 31 Understanding the last mode memory feature 31 Appendix 32 Cl...

Page 7: ...quipment See Connecting your TV on page 2 for more information Please read all the safety and operating instructions carefully before you begin This manual applies to models 27A60 32A60 and 36A60 and there are slight differences among them The 36A60 is the model used for illustration purposes Instructions in this manual are based on using the Remote Control Check the model of your TV before using ...

Page 8: ...t picture performance ColorStream cables can only be used with ColorStream compatible components ANTENNA Coaxial Cable AUDIO Cable VIDEO Cable ColorStream Cable S Video Cable Connecting a VCR This connection allows you to watch local channels and video pro grams play or record on the VCR while watching TV and to record from one channel while watching another channel You will need one coaxial cable...

Page 9: ...n allows you to watch and record basic and premium cable channels as well as watch videotapes Change the TV to video mode Tune the VCR to channel 3 or 4 the same channel as the cable box output switch Use the cable convertor box to change channels The PIP source should be set to TV mode see page 24 You will need three coaxial cables one pair of audio cables only one cable for a mono VCR one video ...

Page 10: ...lite IN To Antenna VIDEO Connecting a DVD with ColorStream and a VCR This connection allows you to watch DVD video or TV programs and to record DVD or TV programs You can record from one source and watch a program from another source Your TV is capable of using ColorStream color difference Connecting your TV to a ColorStream compatible DVD such as a Toshiba DVD can greatly enhance picture quality ...

Page 11: ...atching another channel You will need one coaxial cable two pairs of audio cables only two cables for mono VCRs two video cables Stereo VCR Playback VIDEO AUDIO OUT IN from ANT CH 3 CH 4 OUT to TV L R IN Stereo VCR Recording VIDEO AUDIO OUT IN from ANT CH 3 CH 4 OUT to TV L R IN ANT 1 OUT ANT 75Ω ANT 2 IN OUT DVD IN VIDEO COLOR STREAM INPUT VIDEO 2 VIDEO 1 MONO L MONO S VIDEO L R AUDIO L R AUDIO R...

Page 12: ...u to use an audio amplifier to adjust the audio level This also allows you to use external speakers To control the audio turn on the TV and the stereo amplifier You will need one pair of audio cables ANT 1 OUT ANT 75Ω ANT 2 IN OUT DVD IN VIDEO COLOR STREAM INPUT VIDEO 2 VIDEO 1 MONO L MONO S VIDEO L R AUDIO L R AUDIO R AUDIO Y Cb Cr TV Audio Amplifier To Cable Cable Box or Antenna AUDIO L R IN OUT...

Page 13: ...ter Program the remote control to recognize the brand of your converter see Programming the remote control for use with a VCR or cable TV converter page 8 The shaded buttons shown on the right will control the cable TV converter Set the TV CABLE VCR switch to the CABLE position Note This remote control s functions may or may not operate your VCR or cable TV converter Refer to the owner s manuals s...

Page 14: ...he TV CABLE VCR switch on the remote control to CABLE 3 Hold down the RECALL button while using the Number buttons to enter the three digit code number of your brand of VCR or converter 4 Point the remote control at the VCR or converter and press POWER to test the code number If the VCR or converter turns on you have entered the right number If the VCR or converter does not respond to the remote c...

Page 15: ...ola 054 067 MTC 019 259 Multitech 019 091 NAD 077 NEC 057 059 060 069 086 Nikko 056 Noblex 259 Olympus 054 Optimus 056 067 077 123 Optonica 081 Orion 498 Panasonic 054 096 181 244 473 Penney 054 056 057 059 061 073 259 Pentax 061 084 124 Philco 054 Philips 054 081 100 129 Pilot 056 Pioneer 077 086 Portland 039 Protec 091 Pulsar 058 Quarter 065 Quartz 065 Quasar 054 096 Radio Shack 019 056 344 Radi...

Page 16: ...r 042 163 552 Popular Mechanics 419 Pulsar 019 RCA 040 Regal 039 278 292 Recoton 419 Regency 021 Rembrandt 030 089 Runco 019 Samsung 059 163 Scientific Atlanta 025 027 036 296 Signal 034 059 Signature 030 SL Marx 059 Sprucer 040 Standard Components 174 Starcom 022 034 066 Stargate 034 059 Starquest 034 Sylvania 020 Teleview 059 Texscan 020 Tocom 031 032 078 Toshiba 019 Tusa 034 Unika 041 172 Unite...

Page 17: ... the dark Only the buttons that are used to operate the TV set are described here TV VIDEO 12 VOLUME T S POWER 8 28 Remote sensor POWER indicator T S t s 14 MENU 12 TV VIDEO 12 VOLUME T S CHANNEL s t 14 POWER 8 28 Remote sensor POWER indicator Channel 14 Volume CH RTN CH VOL VOL CH EXIT MUTE RECALL POWER ENT TV VIDEO REC STILL SOURCE PIP PIP CH LOCATE SWAP TV VCR STOP PLAY SLOW PAUSE REW FF FAV CH...

Page 18: ... TV CABLE PROGRAMME CAN MORE BOUGER CHOISIR ENGLISH FRANCAIS ESPANOL ANT1 ANT2 TV CABLE ADD EFF ADD EFF AUDIO PREFER S E T U P C CAPT P I C T U R E LANGUAGE 2 Press y or z to highlight LANGUAGE 3 Press x or to highlight your desired language Selecting the antenna input You can connect to two different signal sources by choosing the antenna input ANT 1 or ANT 2 To select the antenna input 1 Press M...

Page 19: ...s stored the channels in its memory you can erase channels or add your favorite channels If you use both ANT 1 and ANT 2 terminals you must program channels for each input source To add channels 1 Press MENU then press x or to highlight the SET UP menu 2 Press y or z until the TV CABLE selection is highlighted 3 Press x or to highlight either TV or CABLE depending on which you use LANGUAGE ANT1 2 ...

Page 20: ... I C T U R E 4 Press x or to select ADD or ERASE whichever function you want to perform 5 Repeat steps 1 4 for other channels you want to add or erase Changing channels To change the channel you can change the programmed channels using the remote control select a channel directly using the remote control scan the channels using the TV buttons To change to the next programmed channel Press Channel ...

Page 21: ...els 1 Select a channel you want to program 2 Press MENU then press x or to highlight the SET UP menu 3 Press y or z to highlight FAVORITE CH FAVORITE CH V CHIP CONTROL CH LABEL TIMER DEMO MORE START STOP AUDIO PREFER S E T U P C CAPT MOVE START P I C T U R E VIDEO LABEL 0 MIN 4 Press x or to display the FAVORITE CH menu SET CLEAR will be highlighted SET FAVORITE CH TV CYAN CABLE BLUE SET CLEAR 2 7...

Page 22: ...the V Chip You can prevent others from viewing certain programs or channels by using the V Chip feature Selecting a PIN code Before you can block programs and channels though you must select a personal identification number PIN code The PIN code you select prevents others from changing the rating limits you set To select your PIN code and access the V Chip menus 1 Press MENU then press x or to hig...

Page 23: ...highlight V CHIP CONTROL 3 Press x or to display the V CHIP menu 4 Use the Channel Number buttons 0 9 to enter your PIN code If you are accessing the V Chip menus for the first time select a four digit number to be your PIN code Wait 2 seconds for the BLOCKING menu to appear 5 Press y or z to highlight NEW PIN CODE and press x or to display the NEW PIN CODE menu 6 Use the Channel Number buttons 0 ...

Page 24: ...audience only This program is specifically designed to be viewed by adults and therefore may be unsuitable for children under 17 Language Crude or indecent language Sex Explicit sexual activity Violence Graphic violence 14 Parents strongly cautioned This program contains some material that many parents would find unsuitable for children under 14 years of age Dialog Intensely suggestive dialog Lang...

Page 25: ...H T V R A T I N G AUDIO PREFER S E T U P C CAPT P I C T U R E X N C 1 7 R P G 1 3 P G G T V R A T I N G Y 7 F V Y 7 Y M P A A R A T I N G LANGUAGE SEX AUDIO PREFER S E T U P C CAPT P I C T U R E VIOLENCE TV RATING MA 14 PG G NO DLVS DIALOG BACK TO V CHIP MENU 7 Press y or z to highlight MPAA Rating Youth TV Rating or individual TV Ratings 8 Press x or to select the ratings which will be blocked Bl...

Page 26: ...an also choose to block individual channels These channels will not be seen regardless of the ratings of their programming You can choose to block up to four TV channels and four cable channels To block channels 1 Use the Channel Number Buttons 0 9 to display the television channel you wish to block 2 Press MENU then press x or to highlight the SET UP menu 3 Press y or z to highlight V CHIP and th...

Page 27: ...low the user to lock out the input sources Video 1 Video 2 ColorStream and channels 3 and 4 The possible options are listed below Video This option blocks out Video 1 Video 2 and ColorStream Video This option blocks out Video 1 Video 2 ColorStream channels 3 and 4 Off Disables the video lock feature Note In normal TV viewing if you cannot access the input sources Video 1 Video 2 Video 3 ColorStrea...

Page 28: ...s 1 Select a channel you want to label 2 Press MENU then press x or until the SET UP menu appears 3 Press y or z to highlight CH LABEL FAVORITE CH V CHIP CONTROL CH LABEL TIMER DEMO MORE START STOP AUDIO PREFER S E T U P C CAPT MOVE START P I C T U R E VIDEO LABEL 0 MIN 4 Press x or to display the CH LABEL menu SET CLEAR will be highlighted 5 Press x or to highlight SET C H L A B E L L A B E L S E...

Page 29: ...teps 1 through 6 to erase other channel labels Video Label This feature allows you to rename the input sources for your TV The available video label names include VCR DVD DTV SAT and CBL where the symbol denotes the following uses the default label name VCR Video Cassette Recorder DVD Digital Video Disc or Digital Versatile Disc SAT Satellite box DTV Digital TV Set Top Box CBL Cable box To setup y...

Page 30: ...ecting your TV on page 2 2 Turn on the TV and select the program you want to watch 3 Press the PIP button once to display a small picture A window 1 9 the size of the screen will appear Press PIP a second time to display a 1 16 size window 4 Press SOURCE repeatedly to select the input source VIDEO 1 or VIDEO 2 for the small picture The selected source will be displayed in purple ColorStream cannot...

Page 31: ...ture will become a still picture To return to the moving picture press STILL again Still Watching multi window PIP Multi window PIP appears as six small boxes across the bottom of the screen You must program channels first see page 13 Programming channels automatically The TV cycles through all of the programmed channels and shows a few seconds of each channel s programming then freezes the image ...

Page 32: ... AUDIO PREFER S E T U P C CAPT CONTRAST BRIGHTNESS SHARPNESS COLOR TINT RESET 2 Press y or z until the item you want to adjust is highlighted 3 Press x or to adjust the level The PICTURE items you have adjusted will be stored in the TV s memory automatically You can keep these settings or choose preset options under the PREFERENCES menu See Selecting the color temperature and Adjusting the picture...

Page 33: ...of the different preferences Mode Picture Quality sports bright and dynamic picture factory setting standard standard picture setting movie movie like picture setting memory your personal preference see Adjusting the picture quality on page 26 Watching video input You can use the TV VIDEO button on the remote control or the TV VIDEO button on the TV to view a signal coming from other devices such ...

Page 34: ...ram that appears on half of the TV screen To view captions or text 1 Select the desired program The captioned programs are usually marked in your local TV listing by CC 2 Press MENU then press x or until the C CAPT menu appears C CAPT C1 C2 C3 C4 T1 T2 T3 T4 OFF SELECT AUDIO PREFER S E T U P C CAPT P I C T U R E 3 Press y or z to highlight C CAPT C C A P T C 1 C 2 C 3 C 4 T 1 T 2 T 3 T 4 O F F S E...

Page 35: ...ly activate the closed caption feature To deactivate this feature press the MUTE button again This feature only works when the closed caption mode is set to off See Using the closed captioned feature on page 28 for more information Selecting stereo SAP broadcasts You can enjoy watching TV while you listen to high fidelity stereo sound with the Multi channel TV Sound MTS feature MTS can also transm...

Page 36: ...m the left and right speakers Adjusting the sound quality You can change the sound quality of your TV by adjusting the bass treble and balance To adjust the sound quality 1 Press MENU then press x or until the AUDIO menu appears MTS BASS TREBLE BALANCE SURROUND SELECT STR SAP MONO ON OFF AUDIO PREFER S E T U P C CAPT P I C T U R E 2 Press y or z to highlight the item you want to adjust 3 Press x o...

Page 37: ...UDIO PREFER S E T U P C CAPT P I C T U R E To turn off the surround sound feature Choose OFF in step 4 above In general you should leave your TV set to SURROUND so it can automatically produce surround stereo or monaural sound depending on the broadcast type Viewing the demonstration mode The demonstration mode DEMO is an option available on the SET UP menu If you select this mode the TV will demo...

Page 38: ...ions Problem Solution TV will not turn on Make sure the power cord is plugged in then press POWER The remote control batteries may be dead Replace the batteries No picture no sound Check the antenna cable connections No sound picture OK The sound may be muted Press VOLUME The station may have broadcast difficulties Try another channel Poor sound picture OK The station may have broadcast difficulti...

Page 39: ...age VHF 2 through 13 UHF 14 through 69 Cable TV mid band A 8 through A 1 A through 1 super band J through W hyper band AA through ZZ AAA BBB ultra band 65 through 94 100 through 125 Power source 120 AC 60 Hz Power consumption 27A60 93 W 32A60 104 W 36A60 104 W Audio power 5 W 5 W Speaker type 2 3 8 x 4 3 4 inches 60 x 120 mm Video Audio terminals S VIDEO INPUT Y INPUT 1 V p p 75 ohm negative sync ...

Page 40: ...all parts labor and picture tube Owner s manual and registration card You should read this owner s manual thoroughly before operating this product You should complete and mail the enclosed registration card within ten days after you or the person who has given you this product as a gift purchased this product This is one way to enable TACP THI to provide you with better customer service and improv...

Page 41: ...ts In no event shall TACP or THI be liable for consequential or incidental damages No person agent distributor dealer or company is authorized to change modify or extend the terms of these warranties in any manner whatsoever The time within which action must be commenced to enforce any obliga tion of TACP or THI arising under this warranty or under any statute or law of the United States or any st...

Page 42: ...g 21 programming automatically 13 switching between two 15 cleaning and care of your TV 31 closed caption feature using 27 code table cable TV converter 9 VCR 9 color temperature adjusting 25 connecting audio amplifier 6 cable converter box 3 cable converter box and a VCR 3 camcorder 6 DVD with ColorStream and a VCR 4 DVD satellite receiver and a VCR 4 TV 2 VCR 2 VCRs two 5 D demonstration mode vi...

Page 43: ... TV converter 8 using 7 using with a VCR or cable TV converter 7 S SAP selecting 28 satellite receiver DVD and a VCR connecting 4 sound adjusting 28 muting 28 stereo SAP broadcasts selecting 28 surround using 29 specifications 32 stereo sound selecting 28 surround sound using 29 switching between two channels 15 switching the main and small pictures PIP 23 T troubleshooting 31 TV connecting 2 loca...

Page 44: ...a Ltd Manufactured by Toshiba America Consumer Products Inc PRINTED IN USA 00 06 B 23563915A Head Office 191 McNabb Street Markham Ontario L3R 8H2 Canada Service Centers Toronto 191 McNabb Street Markham Ontario L3R 8H2 Canada Tel 905 470 5400 Montreal 1643 North Service Road Trans Canada Highway Dorval Quebec H9P 1J1 Canada Tel 514 856 4100 Vancouver 22171 Fraserwood Way Richmond British Columbia...

Reviews: