background image

54

English

PC Settings

• 

Most of the picture controls and functions are available. However features not available will be 

greyed out.

• 

In the PC input mode, the 

Manual Setting

 is not displayed.

• 

First press   until the video input mode list appears on the screen, then press 

▲ or ▼

 and   in 

order to select the PC input mode.

• 

This function may not be available for some signal or if no signal is received.

• 

The optimum points of the clock phase and sampling clock adjustments may be incomprehensible 

according to the input signals.

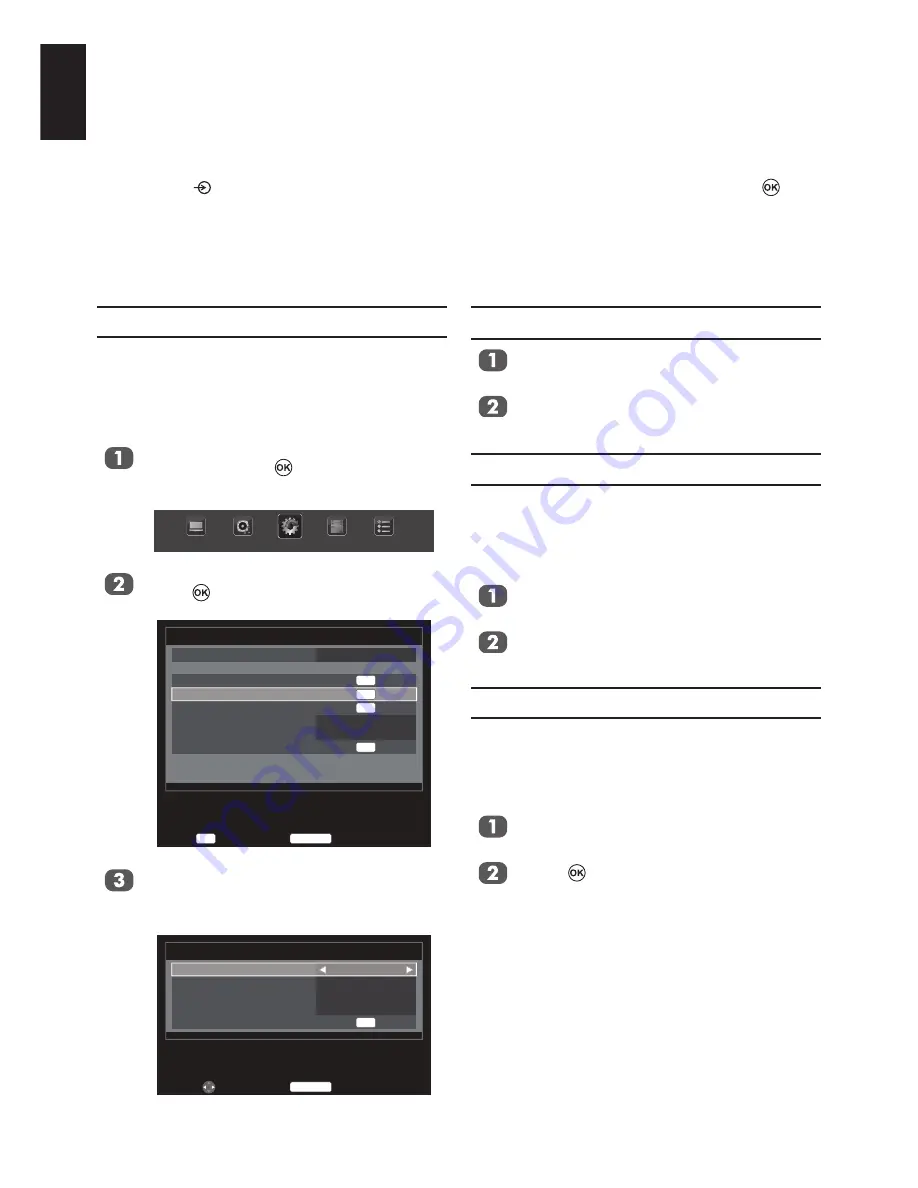
Horizontal and Vertical Position

Connect the PC (as shown in the “Connecting 

a Computer” section) and ensure that a picture 

is showing on the television screen. The picture 

position may now be adjusted to suit personal 

preference.

Press 

MENU

. Press ◄ or ► to select

SETUP

 and press   to enter  the sub-

menu.

PICTURE

SOUND

SETUP

APPLICATIONS

PREFERENCES

Press 

▲ or ▼

 to select 

PC Setting

, and 

press   to enter the submenu.

Enter

OK

Back

RETURN

SETUP

Language

Country

AV connection
PC Setting
Auto Adjust
Automatic Power Down
Location
Software Upgrade

English

Germany

Off

Home

OK

OK

OK

OK

Press 

▲ or ▼

 to select 

Horizontal Posi-

tion

 or 

Vertical Position

 and press 

◄ or 

 to adjust the settings as required.

PC Setting

OK

Horizontal position
Vertical position
Horizontal width
Clock phase
Reset

0
0
0
0

Edit

Back

RETURN

Horizontal Width

In the 

PC Setting 

menu, press 

▲ or ▼


to select 

Horizontal width

.

Press 

◄ or ►

 to adjust the settings as 

required.

Clock Phase

The 

Clock phase

 matches the PC signal with the 

LCD display. 
Adjusting this can clear horizontal stripes and 

picture blur.

In the 

PC Setting 

menu, press 

▲ or ▼


to select 

Clock phase

.

Press 

◄ or ►

 to obtain a clear picture.

Reset

This feature resets all PC settings to the fac-

tory settings.

Note:

 If any PC settings have not been 

changed, 

Reset

 is not available.

In the 

PC Setting 

menu, press 

▲ or ▼


to select 

Reset

.

Press  .

NOTE:


• 

When a PC is connected using HDMI 

none of these functions will be avail-

able.

• 

The screen is disrupted momentarily 

when adjusting PC setting. This is not 

a sign of malfunction.

• 

The default settings and adjustment 

ranges may vary depending on the 

input signal format.

Summary of Contents for 26EL833G

Page 1: ...32AV83 G 32 40LV83 G 26 32EL83 G 32 42HL83 G DIGITAL Series ...

Page 2: ...Acceptable PC signals through HDMI terminals 18 Using the Controls 19 Switching On 20 Using the Remote Control 20 Using the Side Key Controls 20 Tuning the Television 21 Quick Setup 21 Setting the Channels 23 Auto Tuning 23 Manual Tuning 24 Automatic Power Down 26 Reset TV 26 DTV Settings 27 Channels 27 Channel Options 28 Subtitle and Audio 29 Password 29 Parental 29 Common Interface 29 Digital On...

Page 3: ...g the Play List 40 Photo Info 40 Enjoy Music through USB Port 41 Play Music Files 41 Repeat Settings 42 Using the Play List 42 Music Info 42 Enjoy Videos through USB Port 43 Play Video Files 44 Repeat Settings 45 Set 45 Slow Forward 45 Step Forward 45 Using the Play List 45 Video Info 45 Goto Time 45 HDMI LINK Controls 46 Equipment Control 46 Input Source Selection 46 HDMI LINK Menus 47 One Touch ...

Page 4: ...ng LIST 53 Control Buttons 53 PC Settings 54 Horizontal and Vertical Position 54 Horizontal Width 54 Clock Phase 54 Reset 54 Input Selection and AV Connections 55 HDMI1 Audio 55 Lip Sync Mode 55 Input Signal Selection 55 Frequently Asked Questions 56 Specifications and Accessories 58 ...

Page 5: ...equip ment are properly made and in accordance with the manufacturers instructions Switch off and withdraw the mains plug before making or changing connections DO consult your dealer if you are ever in doubt about the installation operation or safety of your equipment DO be careful with glass panels on equipment DO NOT REMOVE ANY FIXED COVERS AS THIS WILL EXPOSE DANGEROUS AND LIVE PARTS THE MAINS ...

Page 6: ...s possible Stand clip Fixing strap Fixing strap Sturdy tie as short as possible Stand clip Fixing strap Fixing strap Stand style is dependent on model When using a Wall Bracket Please use a wall bracket appropriate for the size and weight of the LCD TV Two people are required for installation Never use the four screws attached to the TV To install a wall mount from another manufacturer use the SPA...

Page 7: ...fit interruption of business the loss of recorded data whether caused during normal operation or misuse of the product If stationary images generated by 4 3 broadcasts text services channel identification logos computer displays video games on screen menus etc are left on the television screen for any length of time they could become conspicuous it is always advisable to reduce both the brightness...

Page 8: ...t or fire The performance of the remote control will deteriorate beyond a distance of five metres or outside an angle of 30 degrees from the centre of the television If the operating range becomes reduced the batteries may need replacing Remove the back cover to reveal the battery compartment and make sure the batteries are inserted the right way round Suitable battery types for this remote are AA...

Page 9: ... switches If there is no switch remove the mains plug from the wall socket Connect the power cord into the AC IN socket found at the back of the TV HDMI 1 INPUT SOCKET RGB PC AC IN HDMI 2 INPUT SOCKET For 26 32EL83 G 32 42HL83 G HDMI 1 INPUT SOCKET RGB PC HDMI 2 INPUT SOCKET AC IN For 32AV83 G 32 40LV83 G ...

Page 10: ...t and display 480i 480p 576i 576p 720p and 1080p HDMI1 also support VGA SVGA XGA WXGA and SXGA NOTE Although this television is able to connect to HDMI equipment it is possible that some equip ment may not operate correctly A wide variety of external equipment can be connected to the back of the television therefore the relevant owners manuals for all additional equipment must be referred to If th...

Page 11: ...e control if a HDMI LINK compatible device is connected The back of your television AV amplifier HDMI out Playback equipment HDMI out HDMI in Playback equipment HDMI out For 26 32EL83 G 32 42HL83 G The back of your television AV amplifier HDMI out Playback equipment HDMI out HDMI in Playback equipment HDMI out For 32AV83 G 32 40LV83 G ...

Page 12: ...me early HDMI equipment may not work properly with your latest HDMI TV due to the adoption of a new standard Supported Audio format Linear PCM sampling rate 32 44 1 48kHz To connect an HDMI device Connect an HDMI cable type A connector from the device to the HDMI terminal For proper operation it is recommended that you use an HDMI cable with the HDMI Logo If your HDMI connection is capable of 1080...

Page 13: ...13 English HDMI cable HDMI device HDMI out not supplied For 32AV83 G 32 40LV83 G To view the HDMI device video press the button to select HDMI 1 or HDMI 2 mode ...

Page 14: ...DMI1 AUDIO socket see illustration The recommended HDMI to DVI adapter cable length is 6 6ft 2m An HDMI to DVI adapter cable transfers video only Separate analogue audio cables are required for audio receivers DVI device HDMI to DVI adapter cable not supplied Audio cable for HDMI to television connection not supplied For 26 32EL83 G 32 42HL83 G ...

Page 15: ...f your electronic components turn off the HDMI or DVI device first and then the television 1 EIA CEA 861 D compliance covers the transmission of uncompressed digital video with high bandwidth digital content protection which is being standardized for reception of high definition video signals Because this is an evolving technology it is possible that some devices may not operate properly with the ...

Page 16: ...terminal When connecting a PC to the HDMI terminal on the television use an HDMI to DVI adapter cable and an analogue audio cable If connecting a PC with an HDMI terminal use an HDMI cable type A connector A separate ana logue cable is not necessary the back of your television HDMI to DVI adapter cable not supplied 2 Computer Audio cable for PC to television connection not supplied For 26 32EL83 G...

Page 17: ...uter Audio cable for PC to television connection not supplied For 32AV83 G 32 40LV83 G For acceptable PC and video signal formats see page 18 NOTE The edges of the images may be hidden If connecting a certain PC model with a unique PC signal the PC signal may not be detected correctly ...

Page 18: ...gative 800 525 640 x 480 37 861 72 809 31 500 Negative Negative 832 520 640 x 480 37 500 75 000 31 500 Negative Negative 840 500 800 x 600 35 160 56 250 36 000 Positive Positive 1024 625 800 x 600 37 879 60 317 40 000 Positive Positive 1056 628 800 x 600 48 077 72 188 50 000 Positive Positive 1040 666 800 x 600 46 875 75 000 49 500 Positive Positive 1056 625 1024 x 768 48 363 60 004 65 000 Negativ...

Page 19: ...remote control the buttons on the television may be used for some functions HDMI 2 INPUT SOCKET Common Interface USB RED LED Standby GREEN LED Power on GREEN LED On Timer For 26 32EL83 G 32 42HL83 G HDMI 2 INPUT SOCKET Common Interface USB RED LED Standby GREEN LED Power on GREEN LED On Timer For 32AV83 G 32 40LV83 G ...

Page 20: ...on the remote control its respective options will appear right side To use the options press to enter the sub menu Then press or on the navigation ring to move up and down through them and use or to select the required choice Follow the on screen instructions The functions of each menu are described in detail throughout the manual Using the Side Key Controls To change the volume press To alter the...

Page 21: ...ital Subtitle Language and then press or to select your preferred language Press or to select Digital Subtitle Language 2nd and then press or to select your preferred language Press or to select Audio Lan guage and then press or to select your preferred language Press or to select Audio Lan guage 2nd and then press or to select your preferred language Press or to select Country and then press or t...

Page 22: ...g Mode and then press or to select ATV DTV or ATV and DTV Press or to select Start Scan and press Auto tuning ATV DTV Stop EXIT Progress 1 0 Channel C3 Station Found 0 0 The search will begin for all available stations The slide bar will move along the line as the search progresses You must allow the television to complete the search When the search is complete the television will automatically se...

Page 23: ...ect Tuning Mode and press or to select ATV DTV or ATV and DTV Auto tuning Tuning Mode Start Scan ATV and DTV OK Back RETURN Previous settings will be lost Press EXIT for no change Enter OK Press or to select Start Scan and press to start Auto Tuning Auto tuning ATV DTV Stop EXIT Progress 2 0 Channel C4 Station Found 0 0 Tuner Mode Cable Switching between tuner modes will change the features availa...

Page 24: ...to select Start Scan and press to start tuning NOTE The information should be given by your cable provider Network ID is only available for Quick Scan Manual Tuning There are two TV modes ATV and DTV that can be tuned in manually using Manual Tun ing ATV mode Antenna Cable Press MENU Press or to select SETUP and press to enter the sub menu Press or to select ATV Manual Tun ing and press to enter t...

Page 25: ...y the breakdown menu Press t or u to select an item then press p or q to select the item as shown below ATV Manual Tuning Manual fine tuning 1 BG P C 69 0 Back RETURN Select Change Save OK A B C D E F G H I A Position The number to be pressed on the remote control B System Specific to certain areas C Colour system Factory set to Auto should only be changed if problems are experienced i e NTSC inpu...

Page 26: ...URN Edit Input 0 9 Press or to select Start Scan and press to start tuning Automatic Power Down The TV will automatically turn itself off standby within 4 hours if you do not touch the control buttons on the remote control or on the TV control panel It will also automatically turn off if no input signal is detected after approximately 15 minutes In the SETUP menu press or to select Automatic Power...

Page 27: ...lect OK Press or to select Channels Channels TV Back RETURN Re number Skip Position 803 804 805 806 807 273 Name Rossia 1 Rossia 24 NTV TRK 5 kamal Bibigon Service Information Radio Three Sort OK Re number Press the button on the remote to renumber the highlighted channel Edit the channel number using the number keys on the remote and press Channels TV Back RETURN Position 804 805 806 807 273 Name...

Page 28: ...hannel Options list are selected the password must be entered before they can be accessed Sort Press p or q to select the desired channel and then press A tick icon appears Channels TV Back RETURN Store OK Position 803 804 805 806 807 273 Name Rossia 1 Rossia 24 NTV TRK 5 kamal Bibigon Service Information Radio Three Press p or q to select the channel you wish to swap with the one selected in Step...

Page 29: ...ks channels or programmes that you do not want to or that you do not want your children to watch A password is required to access this function The factory default password is 0000 NOTE When Parental Control is activated you will need to enter the 4 digit password before you enter the DTV Settings submenu under the SETUP menu After auto tuning all the channel blocks will be cleared In the DTV Sett...

Page 30: ...The guide screen will appear highlighting details of the channel and programme currently being viewed This may take a few moments to appear Press or for information on other pro grammes scheduled for the channel selected For details of other programmes cur rently available press and to scroll up and down the channel list NOTE In order for the recording operation to work properly the media recorder...

Page 31: ...ike to change Quick access Picture Size Picture Mode Sleep Timer System Information Normal Standard 00 00 OK NOTE Quick access items are different depending on the current mode Subtitles If Subtitles are available for your current pro gramme pressing the SUBTITLE button will toggle Subtitles on or off Picture Still This feature is used to hold a still image on the screen Press to hold an image on ...

Page 32: ...ress to enter the submenu Press or to select Bass Treble or Balance and press or to change the setting Stable Sound The Stable Sound feature limits high volume levels in order to prevent the extreme changes in volume that can occur when channels are changed or a programme switches to a commercial Press MENU Press or to select SOUND and press to enter the submenu Press or to select Stable Sound and...

Page 33: ...o select SOUND and press to enter the submenu Press or to select Audio Descrip tion and press to enter the submenu Press or to select Audio Descrip tion and press or to select On or Off Audio Description Audio Description Mixing Level On 20 Edit Back RETURN Press or to select Mixing Level and press or to change the setting Note Mixing Level can only be ad justed when Au dio Description is On NOTE ...

Page 34: ...tom of the screen by zooming in and selecting the image without distortion Subtitle When subtitles are included on a letterbox format broadcast this setting will raise the picture to ensure that all the text is displayed 14 9 Use this setting when watching a 14 9 broadcast Native When using a PC connected via HDMI this setting will show the picture without over scan i e WYSIWYG This option is only...

Page 35: ...tle 14 9 Native Normal Dot by Dot ATV o o o o o o x x x DTV SD o o o o o o x x x HD o o o o x o o x x Scart o o o o o o x x x CVBS o o o o o o x x x YPbPr SD o o o o o o x x x HD o o o o x x x x x HDMI SD o o o o o o o x x HD o o o o x x o x x D SUB o x x x x x x o o DVI o x x x x x x o o ...

Page 36: ...de based on the programme category Press MENU Press or to select PICTURE and press to enter the submenu PICTURE SOUND SETUP APPLICATIONS PREFERENCES Press or to select Picture Settings and press to enter the submenu Picture Settings OK Picture Mode Back Light Contrast Brightness Colour Tint Sharpness Black White Level Cinema Mode Colour Temperature Static Gamma Reset Standard 70 95 50 50 0 50 Midd...

Page 37: ...reen Level Medium 0 0 0 Press or to select Red Level Blue Level or Green Level and press or to adjust the settings as required Static Gamma The static gamma feature allows you to adjust the levels of black in the picture In the Picture Settings menu press or to select Static Gamma Press or to select the number of Static Gamma 5 5 Reset This feature resets all picture settings to the factory settin...

Page 38: ...lect Hue Saturation or Brightness Base Colour Adjustment Brightness Hue Saturation 0 Red Press or to adjust the settings as required NOTE In the PC Input mode this function is not available Digital Noise Reduction DNR Digital Noise Reduction enables you to soften the screen representation of a weak signal to reduce the noise effect In the PICTURE menu press or to select DNR Press or to select Off ...

Page 39: ... Resolution is a reference design limited only by DRAM Dynamic Random Access Memory size and performance The larger the resolution the more memory required The smaller the resolution the less performance required decrease the time required to display a picture A JPEG decoder is a hardware decoder with a max resolution of 15360 x 8704 A PNG BMP decoder is a software decoder running on a co processo...

Page 40: ... select and press to turn On or Off Set Interval Time Press MENU to change the settings when viewing a photo Press or to select and press to select the desired interval time 3 5 10 15 30 60 90 Sec NOTE If Repeat is On Slide Show starts photo viewing from the first photo in the folder after reaching the final photo Using the Play List Press MENU to change the settings when viewing a photo Press or ...

Page 41: ...t OK EXIT EXIT Press or to select the folder you wish to play and press to enter Press P or P to page up or down MOVE Select OK USB Return Music Photo Video Page P 1 1 Music EXIT EXIT Press or to select the desired music and press to play USB Music Return Up Folder 001 MP3 002 wma 003 avi Return 1 1 MOVE Select OK Page P EXIT EXIT When listening music press or to Play or pause the selected music R...

Page 42: ...f Play List 001 MP3 002 wma 003 avi 001 MP3 1 1 MOVE Select OK Page P EXIT EXIT Music Info Info display file status information content number music title Bit Rate Artist Sampling Year and size Press or to select and press 00001 00003 001 MP3 00 00 02 00 02 42 16 Off Info 001 MP3 Album Title Bit Rate Artist Sampling Year Size Music 01 320K Singer 44K 2010 6366 KBytes MOVE Select OK EXIT EXIT The i...

Page 43: ...EG2 PS MPEG2 1080P 30fps 20 MPEG2 MP HL mp4 AVI MP4 MPEG4 Xvid 1 00 Xvid 1 01 Xvid 1 02 Xvid 1 03 Xvid 1 10 beta1 2 H 264 1080P 30fps 20 H264 Main Profile and High Profile Level 4 0 MPEG4 Simple Profile and Advanced Simple Profile Level 5 mkv MKV H 264 MPEG1 2 4 1080P 30fps 20 H264 Main Profile and High Profile Level 4 0 MPEG4 Simple Profile and Advanced Simple Profile Level 5 avi AVI 1 0 2 0 DMF0...

Page 44: ...eat and Start Set B B Set Repeat and repeat from A to B Show play list Video information Slow forward the selected video Step forward the selected video Allows you to input a search time and press to confirm the setting Play Video Files Insert a USB storage device and press on the remote Use or to select MEDIA and press TV 1 2 3C HDMI1 HDMI2 MEDIA PC Inputs Press or to select MOVIE and press to en...

Page 45: ...0 0 OK MOVE Select OK EXIT EXIT Repeat Settings Press MENU to change the settings when playing a video Press or to select and press to select Off One or Folder Set Press MENU to change the settings when playing a video Press or to select and press to select Set A Set B or None Slow Forward The feature changes forward speeds Press MENU to change the settings when playing a video Press or to select ...

Page 46: ...or each piece of equipment connected NOTE The television features that can be con trolled by the connected equipment are Standby Volume and Sound Mute HDMI LINK Controls This feature uses CEC Consumer Electronics Control technology and allows the control of Toshiba HDMI LINK compatible equipment from the television s remote control Note Not all Toshiba products currently support HDMI LINK Input So...

Page 47: ... is switched on its input source changed or the volume adjusted the sound will be output from the AV Amplifier s speakers even if TV Speakers has been selected Turn the television off then on again to output the sound from the TV s speakers The full function may not work and is depend ent on the Amplifier being used Enable HDMI LINK When the Enable HDMI LINK is set to On it allows the other functi...

Page 48: ...lifier Control Press or to select On or Off Speaker Preference This feature allows the audio output preference to be set to the TV speakers or AV amplifier speakers The AV Amplifier option lets the televisions remote control adjust or mute the volume of the audio In the HDMI LINK Setup menu press or to select Speaker Preference when Amplifier Control is On Press or to select TV Speakers or Amplifi...

Page 49: ...press or or use the number key pad on the remote to enter the time Press or to select Repeat and press or to select ONCE DAILY Mon Fri Mon Sat or Sat Sun Press or to select Input and press or to select ATV EXT 1 EXT 2 EXT 3 HDMI 1 HDMI 2 PC or DTV For DTV press or to select Chan nel and press or to change the channel number For ATV press or to select Chan nel and press or to change the channel num...

Page 50: ...eejay Tg Deejay News Beat Deejay News Beat 27 Aug 08 54 17 Fri 27 Aug 4 4 5 6 7 8 9 10 11 Rossia K Radio Rossia NTV Rossia 2 TRK 5 Kanal Bibigon Service Information Service Information SIT 5 Back RETURN Save OK Edit Programme Timers 4 Rossia K Deejay Chiama Italia 09 04 10 58 27 Aug 2010 ONCE Off Repeat Subtitle 07 42 12 Fri 27 Aug Press or to select Repeat or Subtitle and press or to adjust the s...

Page 51: ...t System Information and press to display the model information and firmware version System Information Back RETURN TOSHIBA 2010 Dec 8 2010 11 03 37 FW v0 08 ER Panel Lock Panel Lock disables the buttons on the televi sion All buttons on the remote control can still be used Press MENU Press or to select PREFERENCES and press to enter the submenu PICTURE SOUND SETUP APPLICATIONS PREFERENCES Press o...

Page 52: ...press to enter the submenu Press or to select Auto Upgrade and press or to select On or Off Software Upgrade Auto Upgrade USB Upgrade Off Edit Back RETURN OK Insert a USB storage device Press or to select USB Upgrade and press to start upgrading the firmware USB Upgrade 0 Back RETURN Enter OK NOTE Firmware upgrading is suggested to be done by the professional service personnel ...

Page 53: ... channels Setting the Modes In the PREFERENCES menu press or to select Teletext PREFERENCES Back RETURN PREFERENCES HDMI LINK Setup Teletext Panel Lock Auto Format 4 3 Stretch Blue Screen Side Panel Auto Off On Off On 1 OK Edit Press or to select Auto or LIST Navigating Pages using Auto If Fastext is available four coloured titles will appear at the base of the screen To access one of the four giv...

Page 54: ...Country AV connection PC Setting Auto Adjust Automatic Power Down Location Software Upgrade English Germany Off Home OK OK OK OK Press or to select Horizontal Posi tion or Vertical Position and press or to adjust the settings as required PC Setting OK Horizontal position Vertical position Horizontal width Clock phase Reset 0 0 0 0 Edit Back RETURN Horizontal Width In the PC Setting menu press or t...

Page 55: ...onventional HDMI DVI cables may not work properly with this mode Input Signal Selection You can select source of AV or S VIDEO from this function In the AV connection menu press or to select EXT1 input Press or to select AV or S VIDEO AV connection HDMI1 audio Lip Sync EXT1 input Auto On AV Edit Back RETURN HDMI1 Audio If the connected HDMI source does not support digital audio plug the audio cabl...

Page 56: ... that the sound has not been muted Q What else can cause a poor picture A Interference or a weak signal Try a different television station Manual fine tuning may help Select the ATV DTV Manual Tuning in the SETUP menu Highlight the station and press then press or to select Manual fine tuning ATV Manual Tuning Manual fine tuning 1 BG P C 69 0 Back RETURN Select Change Save OK Using or to adjust to ...

Page 57: ... A Use the universal password 1276 then change to a new number of your choice Q Why don t the devices connected via HDMI operate properly A Make sure to use cables with the HDMI logo Some early HDMI equipment may not work properly with the latest HDMI TV products due to adoption of new standards Q Why is the VCR DVD picture in black and white A Check the correct input has been chosen S VIDEO or AV...

Page 58: ... 392 25 32HL83 G 698 40 x 392 85 40LV83 G 885 60 x 498 15 42HL83 G 930 24 x 523 26 Display 16 9 Sound Output At 10 Distortion Model 26 5W 5W 32 5W 5W 40 7W 7W 42 7W 7W Power Consumption 26EL83 G Annual power consumption approx 59 7kWh On mode power consumption approx 40 9W Standby power consumption approx 0 3W Off mode power consumption approx 0 3W 32AV83 G Annual power consumption approx 100 0kWh...

Page 59: ...into standby mode will reduce energy consumption but will still draw some power reducing the brightness of the screen will reduce energy use Dimensions H x W x D mm approx Model 26EL83 G 467 x 643 x 181 32AV83 G 558 x 786 x 233 32LV83 G 32EL83 G 542 x 770 x 201 32HL83 G 40LV83 G 679 x 977 x 274 42HL83 G 677 x 1007 x 238 Weight approx Model 26EL83 G 6 5kg 32AV83 G 10 0kg 32LV83 G 32EL83 G 32HL83 G ...

Page 60: ...be collected and disposed of separately from household waste If the battery or accumulator contains more than the specified values of lead Pb mercury Hg and or cadmium Cd defined in the Battery Directive 2006 66 EC then the chemical symbols for lead Pb mercury Hg and or cadmium Cd will appear below the crossed out wheeled dust bin symbol By participating in separate collection of batteries you wil...

Reviews: