background image

B1-1

1. REMOVAL OF ANODE CAP

Read the following NOTED items before starting work.

After turning the power off there might still be a potential
voltage that is very dangerous. When removing the
Anode Cap, make sure to discharge the Anode Cap's
potential voltage.
Do not use pliers to loosen or tighten the Anode Cap
terminal, this may cause the spring to be damaged.

*

*

REMOVAL

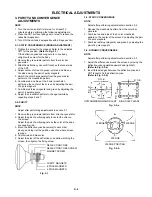
1. Follow the steps as follows to discharge the Anode Cap.

(Refer to Fig. 1-1.)
Connect one end of an Alligator Clip to the metal part of a
flat-blade screwdriver and the other end to ground.
While holding the plastic part of the insulated Screwdriver,
touch the support of the Anode with the tip of the
Screwdriver.
A cracking noise will be heard as the voltage is discharged.

Flip up the sides of the Rubber Cap in the direction of the
arrow and remove one side of the support.
(Refer to Fig. 1-2.)

2.

DISASSEMBLY INSTRUCTIONS

GND on the CRT

Screwdriver

Alligator Clip

Support

CRT

GND on the CRT

Rubber Cap

CRT

Support

Fig. 1-1

Fig. 1-2

3. After one side is removed, pull in the opposite direction to

remove the other.

NOTE

Take care not to damage the Rubber Cap.

INSTALLATION

1. Clean the spot where the cap was located with a small

amount of alcohol. (Refer to Fig. 1-3.)

Location of Anode Cap

Fig. 1-3

NOTE

Confirm that there is no dirt, dust, etc. at the spot where
the cap was located.

2.

3.

Arrange the wire of the Anode Cap and make sure the
wire is not twisted.
Turn over the Rubber Cap. (Refer to Fig. 1-4.)

Fig. 1-4

4. Insert one end of the Anode Support into the anode button,

then the other as shown in Fig. 1-5.

5.
6.

Confirm that the Support is securely connected.
Put on the Rubber Cap without moving any parts.

CRT

Support

Fig. 1-5

Summary of Contents for 20A45C

Page 1: ...SERVICE MANUAL COLOR TELEVISION DOCUMENT CREATED IN JAPAN April 2005 20A45C FILE NO 050 200519 MFR S VERSION A ...

Page 2: ...which has the same character Especially as to the important parts for safety which is indicated in the circuit diagram or the table of parts as a mark the designated parts must be used 4 PUT PARTS AND WIRES IN THE ORIGINAL POSITION AFTER ASSEMBLING OR WIRING There are parts which use the insulation material such as a tube or tape for safety or which are assembled in the condition that these do not...

Page 3: ...ure soldering iron please be carefull not to heat too long Pb free solder will tend to splash when heated too high about 1100 F 600 C All products with the printed circuit board with PbF printing must be serviced with lead free solder When soldering or unsoldering completely remove all of the solder from the pins or solder area and be sure to heat the soldering points with the lead free solder unt...

Page 4: ...IRMATION OF HOURS USED WHEN REPLACING EEPROM MEMORY IC ELECTRICAL ADJUSTMENTS BLOCK DIAGRAMS PRINTED CIRCUIT BOARDS MAIN CRT SCHEMATIC DIAGRAMS MICON CHROMA TUNER DEFLECTION CRT POWER SOUND AV WAVEFORMS MECHANICAL EXPLODED VIEWS MECHANICAL REPLACEMENT PARTS LIST ELECTRICAL REPLACEMENT PARTS LIST A1 1 A1 1 A1 1 A1 2 A2 1 A3 1 A3 5 B1 1 B2 1 B2 2 C1 1 C1 1 C1 1 D 1 D 5 E 1 E 2 F 1 F 4 G 1 G 2 G 3 G ...

Page 5: ... 1Tuner Receive CH Destination USA W CABLE 2 69 4A A 5 A 1 CH Coverage A I J W W 1 W 84 Intermediate Picture FP 45 75MHz Frequency Sound FS 41 25MHz FP FS 4 50MHz Preset CH No Stereo Dual TV Sound Yes Tuner Sound Muting Yes G 3 Power Power Source AC 120V AC 60Hz DC Power Consumption at AC 90 W at AC 120 V 60 Hz Stand by at AC 5 W at AC 120 V 60 Hz Per Year kWh Year Protector Power Fuse Yes G 4 Reg...

Page 6: ...s On Timer Yes Language Yes V chip No CH Label No Favorite CH No Color Stream DVD DTV No Control Level Yes Volume Yes Brightness Yes Contrast Yes Color Yes Tint Yes Sharpness Yes Tuning No Bass No Treble No Balance No Stereo Audio Output SAP Yes Video Yes Color Stream No Channel TV Cable Yes CH Label No Game Timer Yes Sleep Timer Yes Sound Mute Yes V chip Rating No 16 9 No G 8 OSD Language English...

Page 7: ... 4 Yes 5 Yes 6 Yes 7 Yes 8 Yes 9 Yes 0 Yes 100 No CH Up Yes CH Down Yes Volume Up Yes Volume Down Yes TV Caption Text Yes CH1 CH2 Yes TV Video TV AV Yes CH RTN CH ENT Quick View Yes Sleep Yes RE Call Call Yes Reset Yes Menu Yes Enter Yes Mute Yes Exit No MTS Audio Select Yes Set Yes Set Yes 16 9 No Multi Brand Keys CH Up VCR No CH Down VCR No Pause Still No TV VCR VCR No Code No FF No Rew No Rec N...

Page 8: ... Yes Game Timer Yes Energy Star No Favorite CH No Surround No 16 9 Mode No G 12 Accessories Owner s Manual Language English French W Warranty Yes Remote Control Unit Yes Rod Antenna No Poles Terminal Loop Antenna No Terminal U V Mixer No DC Car Cord Center No Guarantee Card No Warning Sheet No Circuit Diagram No Antenna Change Plug No Service Facility List No Important Safety Instruction No Dew AH...

Page 9: ... Speaker No DC Jack 12V Center No VHF UHF Antenna Input F Type AC Outlet No G 14 Set Size Approx W x D x H mm 590 x 492 x 446 5 G 15 Weight Net Approx 21 0kg 46 3 lbs Gross Approx 23 8kg 52 5 lbs G 16 Carton Master Carton No Content Sets Material Dimensions W x D x H mm x x Description of Origin No Gift Box Material Double Brown Dimensions W x D x H mm 658 x 575 x 529 Design As per Buyer s Descrip...

Page 10: ...ed Flip up the sides of the Rubber Cap in the direction of the arrow and remove one side of the support Refer to Fig 1 2 2 DISASSEMBLY INSTRUCTIONS GND on the CRT Screwdriver Alligator Clip Support CRT GND on the CRT Rubber Cap CRT Support Fig 1 1 Fig 1 2 3 After one side is removed pull in the opposite direction to remove the other NOTE Take care not to damage the Rubber Cap INSTALLATION 1 Clean ...

Page 11: ... the IC leads using a blower type IC desoldering machine Refer to Fig 2 2 2 Fig 2 2 NOTE Do not rotate or move the IC back and forth until IC can move back and forth easily after desoldering the leads completely When IC starts moving back and forth easily after desoldering completely pickup the corner of the IC using a tweezers and remove the IC by moving with the IC desoldering machine Refer to F...

Page 12: ...2 8 Thin tip Soldering Iron NOTE When the IC leads are bent during soldering and or repairing do not repair the bending of leads If the bending of leads are repaired the pattern may be damaged So always be sure to replace the IC in this case Finally confirm the soldering status on four sides of the IC using a magnifying glass Confirm that no abnormality is found on the soldering position and insta...

Page 13: ...tton on the set and Channel button 6 on the remote control for more than 2 seconds After the confirmation of using hours turn off the power ADDRESS DATA INIT 00 50 CRT ON 0010 FIG 1 Initial setting content of MEMORY IC POWER ON total hours 16 x 16 x 16 x thousands digit value 16 x 16 x hundreds digit value 16 x tens digit value ones digit value Table 1 1 2 3 4 5 6 7 8 9 10 11 Enter DATA SET mode b...

Page 14: ...in AV MODE without signal Using the remote control set the brightness and contrast to normal position Activate the adjustment mode display of Fig 1 1 and press the channel button 01 on the remote control to select CUT OFF Adjust the Screen Volume until a dim raster is obtained FUNCTION OSD H CUT OFF H VCO H PHASE V SIZE V SHIFT R DRIVE B DRIVE R BIAS G BIAS B BIAS BRIGHT CENT BRIGHT MAX BRIGHT MIN...

Page 15: ...until the SHIFT quantity of the OVER SCAN on upside and downside becomes minimum 1 2 3 1 2 3 4 5 6 7 8 9 10 2 10 CONTRAST MAX Receive the color bar pattern RF Input Using the remote control set the brightness and contrast to normal position Activate the adjustment mode display of Fig 1 1 and press the channel button 17 on the remote control to select CONT MAX Press the VOL UP DOWN button on the re...

Page 16: ...ote control until the section A becomes as straight line Refer to Fig 2 4 Receive the video color bar pattern Audio Video Input Set to the AV mode Then perform the above adjustments 2 5 Fig 2 4 Please check if the fixed values of the each adjustment items are set correctly referring below 2 16 Confirmation of Fixed Value step No NO 04 07 14 15 16 18 20 21 23 24 28 29 30 FUNCTION H VCO V SHIFT BRIG...

Page 17: ...performing adjustments in section 3 1 1 2 3 4 5 Receive the green raster pattern from color bar generator Adjust the pair of purity magnets to center the color on the screen Adjust the pair of purity magnets so the color at the ends are equally wide Move the deflection yoke backward to neck side slowly and stop it at the position when the whole screen is green Confirm red and blue color Adjust the...

Page 18: ...GUIDE WIRING CONNECTION CRT PCB VR502 TP401 W001 J1001 J712 J711 J710 CP803A MAIN PCB TU001 CP601 J701 FB401 CRT DY CP401 VR402 VR401 CP502 L503 OS101 S501B S501A CP1001 SPEAKER TP024 TP022 CP803B W883 W881 CP806 CP801 CRT J801 CP802B CP802A CD501 DEGAUSS COIL D 5 ...

Page 19: ...201 201 201 201 105 105 105 120 120 120 PCB110 CRT PCB ASS Y 102A 102 102B 202 104 203 110 102B 202 202 202 202 202 202 206 205 103 204 204 206 205 106 PCB010 MAIN PCB ASS Y 205 101B 101C 101A 101 101F 101F 204 204 101D 101E 101E 101D 109 108 ...

Page 20: ...MECHANICAL EXPLODED VIEW PACKING DIAGRAM I 2 118 119 TM101 115 113 112 111 116 113 114 114 ...

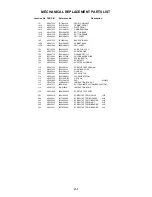
Page 21: ...ING EARTH 108 AE006242 722000A266 SHEET HWC 109 AE006166 722000A267 SHEET CSA WARNING 110 AE007333 726000A106 SHEET CRT SERVICEMAN 111 AE007334 723000C904 SHEET BAR CODE 112 AE005914 791WHAA114 FILM BAG 113 AD301461 792WHA0360 PACKAGE TOP 114 AD301462 792WHA0361 PACKAGE BOTTOM 115 AE007335 793WCDC722 GIFT BOX 116 AE000663 795WCAA139 PAD 635x550 117 AE007336 A3M9149975 INSTRUCTION BOOK KIT 118 AE00...

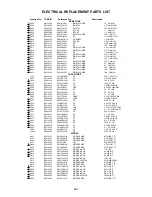
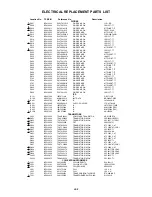
Page 22: ... UF 250V C449 BZ110174 P4J7F3334J CMPP 0 33 UF 250V PMS C453 AD302292 P4N8FJ912H CMPP 0 0091UF 1 25KV C501 AE000602 E0ELF2222M CE 2200 UF 16V C502 BZ110247 C0JBB0713K CC 0 001 UF 2KV B C503 BZ110247 C0JBB0713K CC 0 001 UF 2KV B C505 AE003965 P2122B334M CMP 0 33 UF 275V ECQUL C506 BZ110035 P2122B104M CMP 0 1 UF 275V ECQUL C507 AD301635 E51CGC331M CE 330 UF 200V C513 AE000467 E02LU54R7M CE 4 7 UF 50...

Page 23: ...ICON 1SS133T 77 ICS IC101 AE007340 I56F07116B IC OEC7116B IC199 AE007341 A3M9149015 INIT DATA BR24L04F WE2 IC401 AE002783 I03TD804N0 IC LA78040N E IC501 BZ410088 0002E00610 PHOTO COUPLER LTV 817M VB IC901 AE007342 I03FF27000 IC LA72700V TLM E IC902 BZ611139 I0QF02534V IC NJM2534V TE2 IC903 BZ611139 I0QF02534V IC NJM2534V TE2 IC1001 AE007343 I0FSP7822A IC AN17822A TRANSISTORS Q105 BZ510090 TPAAB050...

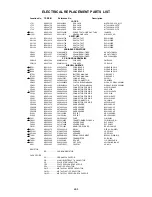
Page 24: ...K 320MM CP401 BZ614303 069S450089 CONNECTOR PCB SIDE A1561WV2 A5P CP402 BZ614016 069W01001A CONNECTOR PCB SIDE 003P 2100 CP502 AE006748 069S420099 CONNECTOR PCB SIDE A1561WV2 2PK CP503 BZ614016 069W01001A CONNECTOR PCB SIDE 003P 2100 CP601 AE001188 069S270639 CONNECTOR PCB SIDE A2001WR2 7P CP801 BZ614269 069S320010 CONNECTOR PCB SIDE A2361WV2 2P CD1001 AD301449 06CH14411A CORD CONNECTOR CH14411A C...

Page 25: ...TOSHIBA CORPORATION 1 1 SHIBAURA 1 CHOME MINATO KU TOKYO 105 8001 JAPAN ...

Reviews: