background image

64

To rotate an image

, press 

ANGLE

 repeatedly until the 

preferred angle is obtained. The image angle is 
adjusted in 90° increments.

      The current angle setting is shown on-screen: “90°”, 

“180°”, “270°”, or “No rotation”.

To magnify an image

, press 

ZOOM

repeatedly until 

the image is displayed in the preferred scale. 

      The current zoom setting is indicated by the following 

icons: 

1 (× 1.3), 

2 (× 1.5) and 

3 (× 2.0). To 

return to normal view, press 

ZOOM

 repeatedly until 

 Off” appears.

ANGLE

INPUT
ZOOM

CD

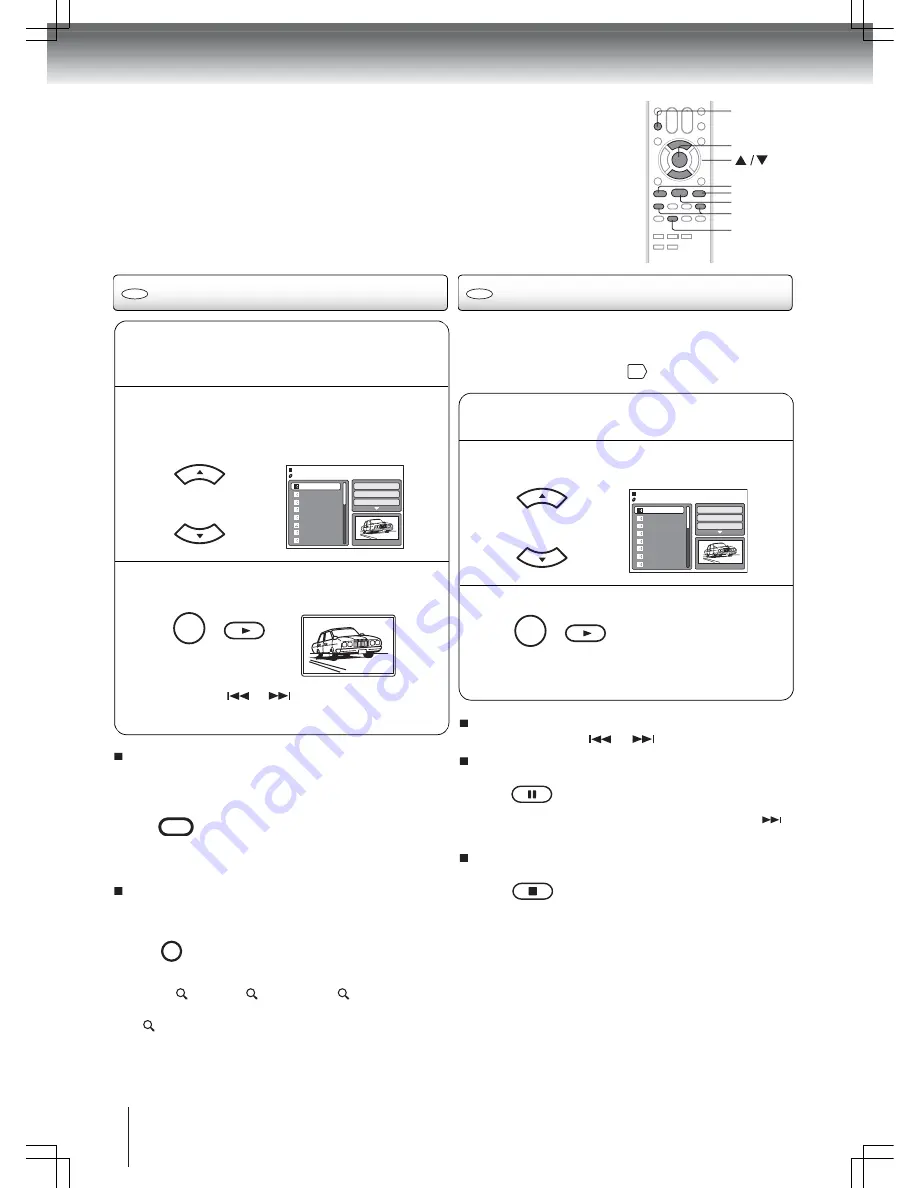
Viewing a JPEG file

N

Load a disc containing JPEG files in the disc 

slot. 

The file browser appears.

CD

Viewing a slide show

O

Press

S

 or 

T

to select an image file for 

viewing.

A preview of the selected file is displayed in the 
Preview panel.

JPEG Preview

W: 2048  H: 1536

/Picture-01.JPG

Picture-01

Picture-02

Picture-03

Picture-04

Picture-05

Picture-06

Picture-07

Picture-08

Select files

Repeat

:Off

Mode

:Normal

P

Press ENTER or PLAY. 

The selected image is displayed in fullscreen mode.

Press 

SKIP 

 or 

 to view the previous or next 

image file in the current directory. 

ENTER

PLAY

N

Open the file folder containing the JPEG files 

you want to include in the slide show.

O

Press 

S

 or 

T

to select the file you want to be 

the starting image for the slide show.

JPEG Preview

W: 2048  H: 1536

/Picture-01.JPG

Picture-01

Picture-02

Picture-03

Picture-04

Picture-05

Picture-06

Picture-07

Picture-08

Select files

Repeat

:Off

Mode

:Normal

P

Press ENTER or PLAY. 


When the slide show is completed, the file browser    

appears.

ENTER

PLAY

To view the previous or next image in the slide 
show

, press 

SKIP 

 or 

To temporarily stop the slide show

, press 

PAUSE

.

     “ ” appears briefly on-screen. Press 

PLAY 

or 

SKIP

to resume the slide show. 

To stop the slide show

, press 

STOP

.

      The file browser appears. 

Notes:

• The Rotate and Zoom modes are available in regular 

JPEG viewing and slide show modes.

• The Jump and A-B repeat modes are not available 

when viewing JPEG images. 

• During a slide show, the interval time between images 

may increase if the file size is too big.

• When an image exceeds 5760 × 3840 pixels, the image 

display can appear cropped. This applies when viewing 
the image in the Preview panel of the file browser; or 
when in the thumbnail, fullscreen, or slide show modes.  

PAUSE

❙❙

STOP

If there are multiple JPEG files in the selected directory, 
you can view them in a slide show. For instructions on how 
to enable the slide show feature and set the interval period 
between pictures, go to page 

.

71

ZOOM

ENTER

PAUSE

STOP

PLAY

SKIP
ANGLE

Advanced playback

Summary of Contents for 19LV610U-T

Page 1: ...L 2009 Toshiba Corporation Before operating the unit please read this manual thoroughly Screen size is approximate Owner s Record The model and serial numbers are on the back of your TV DVD Record these numbers in the spaces below Refer to these numbers whenever you communicate with your Toshiba dealer about this TV DVD Model number _________________ Serial number _________________ 2 14 27 32 52 5...

Page 2: ...e point of cable entry as practical For additional antenna grounding information see item 29 on page 5 WARNING Handling the cord on this product or cords associated with accessories sold with this product will expose you to lead a chemical known to the State of California to cause birth defects or other reproductive harm Wash hands after handling CHILD SAFETY It Makes A Difference How and Where Yo...

Page 3: ... to radio or television reception which can be determined by removing and applying power to the equipment the user is encouraged to try to correct the interference by one or more of the following measures Reorient or relocate the receiving antenna Increase the separation between the equipment and the receiver Connect the equipment into an outlet on a circuit different from that to which the receiv...

Page 4: ...these instructions 2 Keep these instructions 3 Heed all warnings 4 Follow all instructions 5 Do not use this apparatus near water 6 Clean only with dry cloth 7 Do not block any ventilation openings Install in accordance with the manufacturer s instructions 8 Do not install near any heat sources such as radiators heat registers stoves or other apparatus including amplifiers that produce heat 9 The ...

Page 5: ... by the manufacturer Upon completion of service ask the service technician to perform routine safety checks to determine that the TV is in safe operating condition 44 When the TV reaches the end of its useful life ask a qualified service technician to properly dispose of the TV Installation continued from previous page 27 Never overload wall outlets and extension cords 28 Always operate the TV wit...

Page 6: ... 2 Remove the three screws shown in the diagram below This will allow removal of the pedestal stand 3 Once you have removed the three screws holding the pedestal stand in place slide the pedestal stand away from the TV Slide the lever to the left Rear side of the pedestal stand Three screws Precautions Choosing a location for your LCD TV Important notes about your LCD TV The following symptoms are...

Page 7: ...utlet will help prevent moisture condensation in the unit Example of moisture condensation Normally DVD video discs are divided into titles and the titles are sub divided into chapters Video CDs and Audio CDs are divided into tracks DVD Video CD Audio CD Each title chapter or track is assigned a number which is called title number chapter number or track number respectively There may be discs that...

Page 8: ...oshiba cannot assure that the DVD player contained in this TV will successfully play every disc bearing the DVD and CD logos If you happen to experience any difficulty playing a DVD or CD on the DVD player contained in this TV please contact Toshiba Customer Service is a trademark of DVD Format Logo Licensing Corporation Disc mark Contents Disc size Maximum playback time DVD Video disc Audio Video...

Page 9: ...al audio language selection 47 HDMI audio input source selection 47 Aspect feature 48 Built in speakers status 49 DTV signal strength 49 Logo light 50 Auto Shut Off 50 Settings reset 51 Contents Basic playback Disc playback 52 Playback navigation 54 Advanced playback Zoom function 55 Scene navigation 55 Scene bookmark 56 Repeat playback 57 A B repeat 57 Programmed playback 58 Random playback 58 Sc...

Page 10: ...l angle Hold the base of the TV while adjusting the screen Identification of controls See the page number enclosed in for details Unless otherwise indicated figures are based on the 26 inch model EJECT button VOLUME buttons PLAY CHANNEL button STOP CHANNEL button MENU button INPUT ENTER button POWER button 53 32 52 32 52 32 28 16 32 Applicable to the following models only 19LV610U T 22LV610U T 22L...

Page 11: ...ck S VIDEO GAME jack 25 25 16 18 16 19 14 15 33 20 22 18 COLORSTREAM HD IN jacks AC INPUT jack HDMI jack 19 26 24 26LV610U T model HDMI 1 PC AUDIO IN jack PC MONITOR IN jack ANALOG AUDIO OUT L R jacks VIDEO IN GAME jacks AUDIO IN L R jacks Antenna jack COAXIAL DIGITAL AUDIO OUT jack S VIDEO GAME jack HDMI 1 and 2 jacks 25 25 23 16 18 16 19 14 15 20 22 18 24 COLORSTREAM HD IN jacks AC INPUT jack 19...

Page 12: ...UP button PAUSE button Channel Return SKIP button REWIND and FAST FORWARD buttons SLOW button TOP MENU button RETURN button GAME button 53 32 52 33 61 32 60 16 55 64 57 52 28 68 52 54 33 54 54 54 59 63 68 17 Direct channel selection Number buttons 0 9 32 POWER button SLEEP button JUMP button AUDIO SELECT button VOL button MUTE button DVD MENU button ENTER button Direction buttons EXIT CANCEL butto...

Page 13: ...e control does not operate correctly or if the operating range becomes reduced replace batteries with new ones When replacing the remote control batteries always replace both batteries with new ones Never mix battery types or use new and used batteries in combination Always remove batteries from remote control if they are already drained or if the remote control is not to be use for an extended pe...

Page 14: ...ot supplied 3 Attach the transformer to the combiner then attach the combiner to the antenna jack on the back of the TV DVD Antenna jack UHF 300 twin lead wire not supplied 300 75 matching transformer not supplied VHF 300 twin lead wire not supplied Combiner not supplied Separate VHF UHF antennas 75 VHF cable and 300 UHF twin lead wires 1 Connect the VHF 75 cable and UHF 300 twin lead wire to the ...

Page 15: ...escrambler box to the antenna jack on the TV DVD Follow the connections shown below Set the TV DVD to the output channel of the converter descrambler box usually channel 3 or 4 and use the converter descrambler box to select channels Incoming 75 cable TV Converter descrambler 75 cable to TV DVD Antenna jack For subscribers to unscrambled basic cable TV service with scrambled premium channels If yo...

Page 16: ...ress the Number buttons 0 5 for the 19 and 22 inch models 0 7 for the 26 inch model Optional equipment connection reminders All input terminals are located on the rear side of the TV When you connect an equipment to your TV be sure to turn off the power and unplug the equipment from the wall outlet before making any connections Placing the TV near a tuner or radio can distort the radio broadcast s...

Page 17: ...udio Video cable not supplied To Audio Video OUT Audio Video cable not supplied To Audio Video IN yellow white red 26 inch model 19 and 22 inch models To Audio Video IN yellow white red Connecting to a camcorder Connect the camcorder to the TV DVD as shown Select Video by pressing INPUT repeatedly To Audio Video OUT Audio Video cable not supplied To Audio Video OUT Audio Video cable not supplied T...

Page 18: ... When the S Video cable and the standard video cable are connected at the same time the S Video cable takes precedence To S Video OUT S Video cable not supplied To Audio L R OUT Audio cable not supplied To S Video IN To Audio L R IN white red To S Video OUT S Video cable not supplied To Audio L R OUT Audio cable not supplied To Audio L R IN red white To S Video IN 26 inch model 19 and 22 inch mode...

Page 19: ...at output 480i 1080i interlaced signals and 480p 720p progressive signals To Audio L R OUT Audio cable not supplied To Component Video OUT Component video cable not supplied To ColorStream HD Y Pb Pr IN To ColorStream HD Audio L R IN white red To Audio L R OUT To Component Video OUT 19 and 22 inch models To ColorStream HD Audio L R IN white red Component video cable not supplied 26 inch model To C...

Page 20: ...fier is set to a reasonable listening level Connecting to an amplifier equipped with a Dolby Digital decoder Dolby Digital Dolby Digital is the surround sound technology used in movie theaters This technology is now readily available for home entertainment You can enjoy motion picture and live concert DVD encoded via the Dolby Digital recording system by connecting your TV to a 6 channel amplifier...

Page 21: ...and audio CDs 75 coaxial cable not supplied To Coaxial Type Digital Audio IN To Coaxial Digital Audio OUT To Coaxial Type Digital Audio IN To Coaxial Digital Audio OUT 75 coaxial cable not supplied 19 and 22 inch models 26 inch model Manufactured under license under U S Patent 5 451 942 other U S and worldwide patents issued pending DTS and DTS Digital Out are registered trademarks and the DTS log...

Page 22: ...ital Audio OUT 75 coaxial cable not supplied 19 and 22 inch models 26 inch model To Coaxial Type Digital Audio IN 2 channel digital stereo You can enjoy the dynamic sound of 2 channel digital stereo by connecting an amplifier equipped with a digital audio input and speaker system right and left front speakers Note that PCM audio is limited to DVD and CD playback 75 coaxial cable not supplied To Co...

Page 23: ... 2 Turn off the TV s built in speakers Refer to the Turning off the built in speakers section on page Note When using an external audio amplifier make sure the volume on both the TV and the amplifier is set to a reasonable listening level 49 RCA line out cable not supplied To Audio IN To Analog Audio OUT white red Connecting an analog audio amplifier 26LV610U T model only ...

Page 24: ...inders The HDMI to DVI adapter cable only transfers the video signal You need separate analog leads to transfer the audio signal You must select the corresponding audio input source HDMI or DVI Otherwise you will only see the image There will be no audio Refer to the Selecting the HDMI audio input source section on page For the 26LV610U T model only The HDMI 2 jack has no analog audio input If you...

Page 25: ...ble is no longer required Switch on the computer Select PC by pressing INPUT repeatedly If you used an HDMI cable select HDMI To return to normal mode press INPUT again Notes The on screen display will have a different appearance in PC mode than in TV mode If there is flickering in the display or if the display appears distorted or misaligned adjust the PC settings See Adjusting the picture in PC ...

Page 26: ...upplied power cord only If you cause a static discharge when touching the unit and the unit fails to function simply unplug the unit from the AC outlet and plug it back in The unit should return to normal operation If the AC cord plug is plugged in for the first time wait for approximately five 5 seconds before pressing POWER 120 V 60 Hz AC outlet AC cord supplied AC input jack Connecting to a pow...

Page 27: ...first TV channel detected appears on the screen P Press S or T to select Signal Type then press W or X to select Air or Cable Q Press S or T to select Automatic Search then press X or ENTER Notes The Auto Setup function is only available the first time you turn on the TV DVD The Automatic Search process may take 15 to 30 minutes to complete depending on your regional cable service O The Auto Setup...

Page 28: ...eed with the other menu options Setting the language POWER ENTER EXIT CANCEL N Press POWER on the unit or on the remote control The POWER indicator on the front of the unit changes to green It may take approximately 10 seconds for a picture to appear on screen POWER POWER R Press EXIT CANCEL to return to the normal screen EXIT CANCEL P Press S or T to select Language Q Press W or X to select the p...

Page 29: ...turn to the normal screen EXIT CANCEL P Press S or T to select Signal Type Q Press W or X to select Air or Cable O Press S or T to select Auto Ch Memory then press X or ENTER MENU Performing an automatic search N In TV mode press MENU to display the Main Menu screen Press S or T to select Channel then press X or ENTER MENU SETUP P Press S or T to select Automatic Search then press X or ENTER The T...

Page 30: ... Press W or X to select Add or Delete whichever action you want to perform P Press S or T to select Add Delete then press X or ENTER Q Press S or T to select a channel O Press S or T to select Add Delete then press X or ENTER MENU S Repeat steps 4 5 for other channels you want to add or delete T Press EXIT CANCEL to return to the normal screen EXIT CANCEL Channel memory continued ...

Page 31: ... added into the channel memory O Press MENU to display the Main Menu screen Press S or T to select Channel then press X or ENTER MENU SETUP MENU Removing all channels N In TV mode press MENU to display the Main Menu screen Press S or T to select Channel then press X or ENTER MENU SETUP P Press S or T to select Clear All then press X or ENTER O Press S or T to select Add Delete then press X or ENTE...

Page 32: ...en press ENTER POWER CH ENTER VOL Digital channel selection Press the first 3 digits then press followed by the remaining number For example to select channel 015 001 press 0 1 5 0 0 1 If the channel selected has only audio content the message Audio only will appear on screen If the digital channel selected has a weak signal the message Digital channel signal strength is low will appear on screen ...

Page 33: ...rmation will appear When the TV DVD receives a analog signal the analog information will appear CH RTN SKIP TV operation continued Basic operations continued SLEEP MUTE CH RTN VOL DISPLAY Sleep function Press SLEEP to set the TV DVD to turn off after a preset amount of time The clock will count up 10 minutes for each press of the SLEEP button Off 0h 10m 0h 20m 2h 0m After the sleep setting is prog...

Page 34: ...he label name you must choose the empty space from the list of characters The label can consists of any four characters SPACE O Press S or T to select Ch Label then press X or ENTER MENU S When you finish inputting the label s press EXIT CANCEL to return to the normal screen EXIT CANCEL Channel labels Channel labels appear with the channel number display each time you turn on the TV DVD select a c...

Page 35: ...ress X or ENTER MENU Video input labels The Video Label feature allows you to label each video input source This is convenient when there are several optional equipment connected to your TV DVD TV operation Q Press W or X select the label you want for the selected video input source Use the default label name VCR Video cassette recorder DVD DVD player DTV Digital TV set top box SAT Satellite box C...

Page 36: ...ER N Press MENU to display the Main Menu screen Press S or T to select Lock then press X or ENTER MENU SETUP P Enter the same password again to confirm then press ENTER ENTER O Key in a new 4 digit password using the Number buttons 0 9 then press ENTER ENTER MENU Changing a password DISPLAY N Press MENU to display the Main Menu screen Press S or T to select Lock then press X or ENTER MENU SETUP P ...

Page 37: ...up continued ENTER MENU Note The V Chip function is only activated when the TV program or movie has a rating signal Q Press S or T to select V Chip Set then press X or ENTER S Press W X S T to select the desired rating then press ENTER For TV programs the rating level is based on viewer s age or video content Age TV Y Suitable for young children TV 7 7 years old and above TV G Suitable for all aud...

Page 38: ...ther the content restriction will be reactivated N Press MENU to display the Main Menu screen Press S or T to select Lock then press X or ENTER MENU SETUP P Press S or T to select V Chip Clear then press X or ENTER O Key in your 4 digit password using the Number buttons 0 9 then press ENTER ENTER Q Key in your 4 digit password again then press ENTER This will clear all content restrictions and res...

Page 39: ... an additional rating system if such a system becomes available in the future Notes You can only download an additional V Chip rating system when the TV is receiving a digital signal The availability content and format of a downloaded V Chip rating system may vary This system is not determined nor controlled by your TV Q Press S or T to select V Chip Set DTV then press X or ENTER S Once download i...

Page 40: ...ENU SETUP O Press S or T to select Closed Caption then press X or ENTER Q Press S or T to select Analog Caption or Digital Caption depending on your TV signal then press W or X to select the preferred closed caption content When you select Analog Caption you can choose C1 C2 C3 C4 T1 T2 T3 or T4 When you select Digital Caption you can choose CS1 CS2 CS3 CS4 CS5 or CS6 R Press S or T to select CC P...

Page 41: ...e3 Style4 Style5 Style6 Style7 Text Edge Auto None Raised Depressed Uniform Left Shadow Right Shadow Text Color Auto Black White Red Green Blue Yellow Magenta Cyan Text Opacity Auto Solid Transparent Translucent Flashing Background Color Auto Black White Red Green Blue Yellow Magenta Cyan Background Opacity Auto Solid Transparent Translucent Flashing P Press S or T to select Digital CC Preset then...

Page 42: ...ttings EXIT CANCEL N Press MENU to display the Main Menu screen Press S or T to select Picture then press X or ENTER O Press S or T to select Picture Setting then press X or ENTER Q Press EXIT CANCEL to return to the normal screen EXIT CANCEL P Press S or T to select an item to change then press W or X to adjust it Press ENTER to confirm the new setting Q After completing the adjustment press EXIT...

Page 43: ...m six picture formats to view programs EXIT CANCEL Theater Wide 3 for letter box programs with subtitles To fill the width of the screen it is extended horizontally It is only slightly extended at the top and the bottom The top and bottom edges of the picture may be hidden Full picture size for 16 9 source programs The picture will be displayed at the maximum size Native in PC mode HDMI mode with ...

Page 44: ... noise from video signals This improves the picture quality Disabling film mode ENTER N Press MENU to display the Main Menu screen Press S or T to select Picture then press X or ENTER MENU SETUP P Press W or X to set the feature to Off O Press S or T to select Film Mode MENU Disabling digital noise reduction EXIT CANCEL N Press MENU to display the Main Menu screen Press S or T to select Picture th...

Page 45: ...s ENTER to confirm the new setting Notes When using a computer via the HDMI input you can only adjust the Hor Position and Ver Position items When individual adjustment of PC settings results to rough edges or flickering in the picture display select Auto Adjust and press ENTER to improve picture quality Hor Position Adjust the image position horizontally Ver Position Adjust the image position ver...

Page 46: ...o depth for a more enjoyable listening experience Off Normal audio 19 and 22 inch models 26 inch model MENU Selecting the audio stream format EXIT CANCEL N Press MENU in TV mode Press S or T to select Audio then press X or ENTER MENU SETUP P After completing the adjustment press EXIT CANCEL to return to the normal screen EXIT CANCEL P Press EXIT CANCEL to return to the normal screen EXIT CANCEL O ...

Page 47: ...22 inch models 26 inch model Selecting the HDMI audio input source N Press INPUT and select the HDMI mode corresponding to the HDMI jack currently in use INPUT ZOOM Q Press EXIT CANCEL to return to the normal screen EXIT CANCEL Q Press EXIT CANCEL to return to the normal screen EXIT CANCEL P Press S T or the corresponding Number button 0 6 to select the preferred audio language Note Available lang...

Page 48: ...ode Press S or T to select Setup then press X or ENTER MENU SETUP P After your desired setting press EXIT CANCEL to return to the normal screen EXIT CANCEL O Press S or T to select Aspect then press W or X to select Off Aspect ratio of signal source Automatic aspect size when Aspect is On 4 3 Normal Natural 16 9 Full Full 4 3 Letter box Theater Wide 2 Not defined User set mode MENU EXIT CANCEL TV ...

Page 49: ...r analog channels The Signal Meter screen will automatically close after about four minutes Built in speakers status DTV signal strength For the 26LV610U T model only you can choose to turn off the built in TV speakers when an external audio amplifier is connected When in digital TV mode you can view the digital signal strength and adjust the antenna accordingly N Press MENU in the TV mode Press S...

Page 50: ...ting Disabling the TOSHIBA logo light ENTER MENU Enabling Auto Shut Off EXIT CANCEL N Press MENU in the TV mode Press S or T to select Setup then press X or ENTER MENU SETUP O Press S or T to select TOSHIBA Logo Light then press W or X to select Off P Press EXIT CANCEL to return to the normal screen EXIT CANCEL N Press MENU in the TV mode Press S or T to select Setup then press X or ENTER MENU SET...

Page 51: ...aused unexpected results Settings for the following menus will revert to their factory default values Picture menu Picture Setting Brightness center 25 Contrast max 50 Sharpness center 25 Color center 25 Tint center 0 Color Temperature Cool Backlight 15 Picture Preference Sports Film Mode On PC Settings Hor Position center 25 Ver Position center 25 Clock center 0 Phase center 25 DNR On Audio menu ...

Page 52: ...ind of disc that can employ the function described under that heading You can use this function with DVDs You can use this function with video CDs You can use this function with audio CDs and CD R RW discs To adjust playback volume press VOL To temporarily suspend disc playback still mode press PAUSE To continue playback from still mode press PLAY To stop playback press STOP Playback resume functi...

Page 53: ...k When you load a disc with the playback side facing backward Reading appears on screen but it will be replaced by Incorrect Disc Eject the disc and load it again making sure the playback side is now facing forward The playback resume function may not work on some discs Some DVDs may have fixed playback operations designed by the DVD manufacturer Your TV DVD follows this fixed playback design In s...

Page 54: ...back SLOW Slow forward playback Each time you press the SLOW buttons the slow motion speed changes SLOW SLOW To resume normal playback press PLAY Notes The sound is muted during slow motion playback You can use forward slow motion playback for DivX CD but reverse slow motion playback will not work PLAY Press SKIP or repeatedly to display the chapter or track number you want to play To locate succe...

Page 55: ...t apply to some discs N Press JUMP during playback still or stop mode gìãé qáíäÉ Ü éíÉê qáãÉ JUMP O Press S or T to select a navigation option gìãé qáíäÉ Ü éíÉê qáãÉ DISPLAY ZOOM P Use the Number buttons 0 9 to key in a value for the navigation option you selected If you input a wrong number press EXIT CANCEL Refer to the disc package to check the correct number 12 gìãé qáíäÉ Ü éíÉê qáãÉ Q Press P...

Page 56: ...T to select a blank marker then press ENTER to bookmark the selected scene Marker1 Marker2 Marker3 MARKER DVD VCD Viewing a scene bookmark EXIT CANCEL P Press MARKER to close the Bookmark window MARKER Notes In some cases subtitles for the marked scene may not display Bookmarking a scene may not apply to some discs ENTER N Press MARKER during playback mode MARKER Marker1 Marker2 Marker3 O Press S ...

Page 57: ...ress REPEAT A B again This sets your B point The section between points A and B will be played repeatedly in a loop until you turn off the Repeat A B mode A B REPEAT A B O DVD Press ENTER repeatedly to select a repeat mode It can either be by chapter or by title VCD Press T to select Repeat then press ENTER repeatedly to select a repeat mode It can either be Track or All Note If you set the repeat...

Page 58: ...ep If you input a wrong number press EXIT CANCEL Q Press W or X to return to the left column then press S or T to select Program Playback and press ENTER Track playback will follow the sequence you set in step 3 1 9 2 3 3 11 ENTER mä ó jçÇÉ jçÇÉ W mêçÖê ã oÉéÉ í W lÑÑ mêçÖê ã mä óÄ Åâ To resume normal playback in step 2 set Mode to Normal To change the program 1 Set Mode to Program 2 Press S or T ...

Page 59: ...layback PLAY Some DVDs contain two or more titles If this is the case you can select a particular title for playback O Press S T W X to select a DVD menu item then ENTER to access it Use the same keys to enable an option for the selected item Repeat this step to configure other menu options DVD menu N Press DVD MENU during playback DVD MENU Note Depending on the DVD you may not be able to resume p...

Page 60: ...igital audio out jack To view subtitles press SUBTITLE repeatedly during playback until the preferred language is selected The Subtitle prompt will disappear after a few seconds To disable subtitles press SUBTITLE until Off appears SUBTITLE 1 5 Eng SUBTITLE Off You can select the soundtrack language when you play a multilingual DVD When playing back a disc recorded with subtitles you can select th...

Page 61: ...r When enabled PBC allows interactive VCD playback using the remote control P Press PLAY MODE again to close the screen PLAY MODE ENTER DISPLAY PLAY MODE Press DISPLAY during playback DVD mode VCD mode To close the display panel press DISPLAY DISPLAY Elapsed remaining time for current title Title no Elapsed remaining time for current chapter Audio type Subtitle status if on will show language Bit ...

Page 62: ...displayed up to 15 characters Longer file names will be condensed Music recorded based on the Joliet Recording Specification can be played back the filename is displayed within 15 letters on the screen Long file names will be condensed This unit does not support data disc burned using the Apple Mac OS Hierarchical File System HFS format MP3 WMA JPEG DivX CDs cannot be used for recording purpose Fi...

Page 63: ...WMA 11 WMA 12 Picture 1 Picture 2 Movie 1 Movie 2 Select files Repeat Off Mode Normal Music Playing DVD MENU TOP MENU MP3 WMA JPEG DivX and Audio CD operation continued N Load an MP3 WMA Audio CD in the disc slot The file browser appears on screen The first audio file in the list automatically plays Folder 1 Folder 2 MP3 1 MP3 2 MP3 3 WMA 1 WMA 2 WMA 3 Select files Repeat Off Mode Normal JPEG Prev...

Page 64: ...s S or T to select the file you want to be the starting image for the slide show JPEG Preview W 2048 H 1536 Picture 01 JPG Picture 01 Picture 02 Picture 03 Picture 04 Picture 05 Picture 06 Picture 07 Picture 08 Select files Repeat Off Mode Normal P Press ENTER or PLAY When the slide show is completed the file browser appears ENTER PLAY To view the previous or next image in the slide show press SKI...

Page 65: ...is DivX Certified device must be registered in order to play DivX Video in Demand VOD content To generate the registration code locate the DivX VOD section in the device setup menu Go to vod divx com with this code to complete the registration process and learn more about DivX VOD Go to page for instructions If an incorrect DRM file is loaded the message Authorization Error This player is not auth...

Page 66: ...sion Once you eject the disc or turn off the TV DVD these modes will be disabled Pressing the SKIP or buttons during playback will also cancel these modes PLAY SKIP ENTER CD Enabling repeat playback CD Enabling random playback N During stop mode in the Option panel of the file browser press S or T to select Mode Folder 1 Folder 2 MP3 1 MP3 2 MP3 3 Select files Repeat Off Mode Normal O Press ENTER ...

Page 67: ...e R Press S or T to select Program View then press ENTER In Program view only the files you added in step 3 are displayed MP3 1 MP3 2 MP3 3 WMA 3 Edit Mode Browser View Clear Program JPEG Preview Program View Folder 1 Folder 2 MP3 1 MP3 2 MP3 3 WMA 1 WMA 2 WMA 3 Edit Mode Program View Add To Program JPEG Preview Browser View S In the programmed file list press S or T to select a file then press PL...

Page 68: ...lace DivX R VOD DRC Off QSound On Menu English Subtitle English Audio English TV Screen 16 9 Display On Picture Mode Auto JPEG Interval Off TV DVD SETUP T To close the Setup screen press SETUP or RETURN MENU SETUP RETURN Q Press X or ENTER to display a list of available option settings Parental Off Set Password Output Interlace DivX R VOD DRC Off QSound On Menu English Subtitle English Audio Engli...

Page 69: ...lay Choose whether to show a status display whenever a button is pressed Picture Mode Select the DVD source content 71 JPEG Interval Select the interval time between images in a slide show Night Mode Toggle the night mode on or off 71 Digital Out Select the format for the digital audio output corresponding to your audio connection Parental Set the restriction level for allowable disc content 72 Pa...

Page 70: ...RC Off QSound On Menu English Subtitle English Audio English TV Screen 16 9 Display On Picture Mode Auto JPEG Interval Off Menu and OSD Select the language for the DVD and Setup menu display Options include English Français and Español Subtitle and Audio Select the language for the subtitle display and audio track output during disc playback Note If the selected language is not available the defau...

Page 71: ...nction allows for automatic volume level adjustment for audio that may be too low e g whispered dialogues or too high e g a thunderstorm scene Note The Night Mode feature is only applicable to Dolby Digital featured DVDs The adjusted sound level depends on the DVD encoding Digital Out Select the sound format of the digital output depending on the enabled signal connection Note MPEG audio will alwa...

Page 72: ...al Off Password Change DivX R VOD Display DivX Deregistration Display EJECT ENTER 0 9 RETURN Password Select this option to change the access password for the parental control setting 1 Press S or T to select Password then press ENTER 2 Use the Number buttons 0 9 to input the current password then press ENTER If the password has not been set yet key in 0000 This is the factory default password 3 U...

Page 73: ...he station or cable TV may have problems Try another station The station signal may be weak reorient the antenna Check for sources of possible interference 32 14 75 Poor color or no color The station or cable TV may have problems Try another station Make sure channels are saved in the unit s memory Check the Picture settings Check the antenna connections if necessary reorient the antenna Check for...

Page 74: ...unit keys or the remote control is not functioning Turn off the unit and unplug the AC power cord for several minutes then replug it 26 Playback does not start when the title is selected The disc may not be compliant with the Parental setting 72 The audio soundtrack and or subtitle language cannot be changed The disc has no multilanguage option encoded on it 60 No subtitle The disc has no subtitle...

Page 75: ...the reception Snow If the TV DVD is located far from the TV station in a fringe reception area where the signal is weak small dots may appear in the picture If the signal is extremely weak the installation of a larger external antenna may be necessary Radio frequency interference RFI RFI is caused by two way radios This type of interference produces moving ripples or diagonal streaks in the pictur...

Page 76: ...m 1 lens 2 beams Input Output S Video input Y 1 0 V p p 75 negative sync 4 pin mini DIN 1 C 1 0 V p p 75 ColorStream video input Y 1 0 V p p 75 negative sync pin jack 1 PB PR 0 7 V p p 75 pin jack 2 Video input 1 0 V p p 75 negative sync pin jack 1 1 0 V p p 75 negative sync pin jack 2 Audio input 10 7 dBm 47 k pin jack L R 2 Audio output 10 7 dBm 47 k pin jack L R 2 HDMI input HDMI compliant type...

Page 77: ...D Combination Complete and mail the enclosed product registration card or register your LCD TV DVD Combination online at www tacp toshiba com service as soon as possible By registering your LCD TV DVD Combination you will enable TACP to bring you new products specifically designed to meet your needs and help us to contact you in the unlikely event a safety notification is required under the U S Co...

Page 78: ...THE FOREGOING WARRANTY IS EXCLUSIVE AND IN LIEU OF ALL OTHER WARRANTIES GUARANTEES AGREEMENTS AND SIMILAR OBLIGATIONS OF TACP WITH RESPECT TO THE REPAIR OR REPLACEMENT OF ANY PARTS IN NO EVENT SHALL TACP BE LIABLE FOR CONSEQUENTIAL OR INCIDENTAL DAMAGES INCLUDING BUT NOT LIMITED TO LOST PROFITS BUSINESS INTERRUPTION OR MODIFICATION OR ERASURE OF RECORDED DATA CAUSED BY USE MISUSE OR INABILITY TO U...

Page 79: ......

Page 80: ...ColorStream and TheaterWide are registered trademarks of Toshiba America Consumer Products L L C Printed in China 49 76A01 002 ...

Reviews: