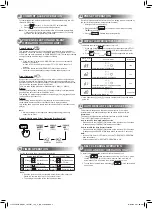
COMFORT SLEEP OPERATION
11
For comfortable sleep, automatically control air fl ow and automatically turn OFF
(Except in DRY mode).
1. Press
: Select 1, 3, 5 or 9 hrs for OFF timer operation.
2. Press
to cancel the comfort sleep operation.
Note:
The cooling operation, the set temperature will increase automatically
1 degree/hour for 2 hours (maximum 2 degrees increase). For heating
operation, the set temperature will decrease.
POWER-SELECTION AND SILENT
OPERATION (OUTDOOR UNIT)
12
Power-Selection
This function is used when the circuit breaker is shared with other electrical
appliances. It limits the maximum current and power consumption to 100%, 75%,
or 50% and can be implemented by POWER-SELECTION. The lower percentage,
the higher saving and also longer compressor lifetime.
Note:
●
When the level is selected, POWER-SEL level fl ashes on remote LCD
display for 3 seconds.
In case of 75% and 50% level, number “75” or “50” also fl ashes for 2
seconds.
●
Due to the reason that POWER-SELECTION function limits the
maximum current, inadequate cooling or heating capacity may occur.
Silent Operation
Keep outdoor unit operating silently to ensure either yourself or neighborhood
will have a tight sleep in nighttime. By this feature, the heating capacity will be
optimized to deliver such silent experience. The silent operation can be selected
from one of two purposes (Silent 1 and Silent 2).
There are three setting parameters: Standard level > Silent 1 > Silent 2
Silent 1:
Though operating silently, the Heating (or Cooling) capacity is still prioritized to
ensure having suffi cient comfort inside the room.
This setting is a perfect balance between the Heating (or Cooling) capacity and
the Sound level of outdoor unit.
Silent 2:
Compromising the Heating (or Cooling) capacity to the Sound level in any
circumstance where the outdoor unit’s sound level is highly prioritized.
This setting has a purpose to reduce the maximum sound level of outdoor unit by
4 dB(A).
Note:
●
While activating of Silent operation, inadequate heating (or cooling)
capacity may occur.
Power-Selection and Silent Operation (Outdoor Unit)
[100%]
[75%] [50%]
SILENT#2 SILENT#1
TIMER OPERATION
13
Set the timer when the air conditioner is operating.
Setting the ON Timer
Setting the OFF Timer
1
Press
: Set the desired
ON timer.
Press
: Set the desired
OFF timer.
2
Press
: Set the timer.
Press
: Set the timer.
3
Press
: Cancel the timer.
Press
: Cancel the timer.
Note:
●
Keep the remote control in accessible transmission to the indoor unit;
otherwise, the time lag of up to 15 minutes will occur.
●
The setting will be saved for the next same operation.
PRESET OPERATION
14
Set your preferred operation for future use. The setting will be memorized by
the unit for future operation (except airflow direction).
1. Select your preferred operation.
2. Press and hold
for 3 seconds to memorize the setting.
The
mark displays.
3. Press
: Operate the preset operation.
DISPLAY LAMP BRIGHTNESS ADJUSTMENT
15
To decrease the display lamp brightness or turn it off.
1. Press and hold
for 3 seconds until brightness level (
, ,
or
) is shown on remote control LCD then release the button.
2. Press
Rise
or
Decrease
to adjust brightness in 4 levels.
Remote control
LCD
Operation display
Brightness
Lamp illuminates full brightness.
100%
Lamp illuminates 50% brightness.
50%
Lamp illuminates 50% brightness and the
operation lamp is turned off.
50%
All lamps are turned off.
All turned off
●
In the examples of
and
, the lamp illuminates for 5 seconds before
going off.
SELF CLEANING OPERATION
(COOL AND DRY OPERATION ONLY)
17
To protect bad smell caused by the humidity in the indoor unit.
1. If the
button is pressed once during “Cool” or “Dry” mode,
the fan will continue to run for other 30 minutes, then it will turn off
automatically. This will reduce the moisture in the indoor unit.
2. To stop the unit immediately, press the
more 2 times within
30 seconds.
AUTO RESTART FUNCTION SETTING
16
This product is designed so that, after a power failure, it can restart
automatically in the same operating mode as before the power failure.
Information
The product is shipped with Auto Restart function in the ON position.
Turn it OFF if this function is not required.
How to turn OFF the Auto Restart Function
• Press and hold the [OPERATION] button on the indoor unit for 3 seconds
(3 beep sounds but OPERATION lamp does not blink).
How to turn ON the Auto Restart Function
• Press and hold the [OPERATION] button on the indoor unit for 3 seconds
(3 beep sounds and OPERATION lamp blink 5 time/sec for 5 seconds).
Note:
• In case of ON timer or OFF timer are set, AUTO RESTART OPERATION
does not activate.
• Default setting of AUTO RESTART OPERATION is ON.
1122350218-00_S01_182x257_12p_S_p70_210303.indd 5
21/03/03 9:21:00 AM
Summary of Contents for 18E2AVG-A
Page 8: ...1122350218 00_S01_182x257_12p_S_p70_210303 indd 8 21 03 03 9 21 15 AM ...
Page 9: ...1122350218 00_S01_182x257_12p_S_p70_210303 indd 9 21 03 03 9 21 15 AM ...
Page 10: ...1122350218 00_S01_182x257_12p_S_p70_210303 indd 10 21 03 03 9 21 15 AM ...
Page 11: ...1122350218 00_S01_182x257_12p_S_p70_210303 indd 11 21 03 03 9 21 15 AM ...
Page 12: ...1122350218 1122350218 00_S01_182x257_12p_S_p70_210303 indd 12 21 03 03 9 21 15 AM ...

