background image

ENGLISH

 -9-

Please note

• Do not use Video RCA and S-Video connections at the same time, otherwise they will effect the

picture.

• RGB inputs from scart will give you better picture quality.
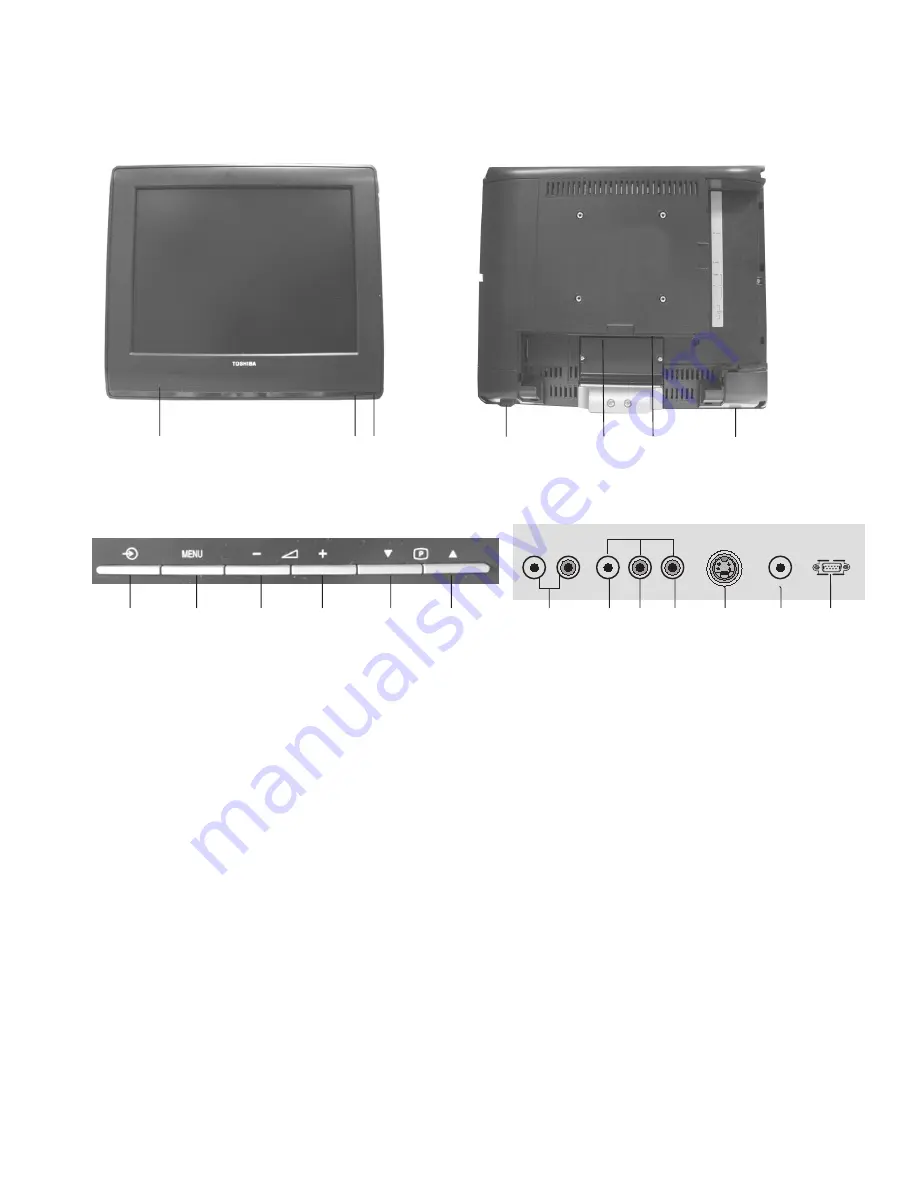
Control Unit

15VL63

1.
2.
3.
4.
5.
6.
7.

Speaker
Stand-by
Remote control

Stand-by switch

Scart
Antenna input
Headphone

8.
9.

10.
11.
12.
13.
14.

Audio out (R,L)
Audio RCA (L)
Audio RCA (R)
Video input PHONO connector
S-VHS
DC 12V
VGA

15.
16.
17.
18.
19.
20.

Volume down
Volume up
Menu button
Program down
Program up
Source Select

Top control units

10

9

11

12

8

14

AUDIO OUT

AV3

L          R      VIDEO

L           R

S-VHS

VGA

15

16

17

18

19

20

DC 12V

13

2

1

3

4

5

6

7

Summary of Contents for 15VL63 Series

Page 1: ...15VL63 Series ...

Page 2: ...ing 8 Control unit 9 Front and rear panel 9 External connections table 9 Remote control 10 Using the TV 11 Tuning the TV 12 Automatic tuning 12 Manual tuning 13 Program organising 14 TV setup 15 Sound menu 15 Sound Features 15 16 Picture menu 16 Features Menu 17 Using teletext 18 19 Connecting external equipment 20 25 Help and service tips 26 Technical specifications table 27 ...

Page 3: ...ssociated equipment Furthermore under no circumstances shall Toshiba be liable for any consequential loss and or damage including but not limited to the following loss of profit interruption of business the loss of recorded data whether caused during normal operation or misuse of the product If stationary images generated by teletext channel identification logos computer displays video games on sc...

Page 4: ... Graphic equalizer On screen viewing of all control commands program numbers and additional features Manual Fine Tuning 100 Program memory Infrared Remote Control Child Lock Television Thank you for buying this television which is designed to give you many years of satisfactory service you may already be familiar with using a television but do please take time to read these instructions They are d...

Page 5: ...tween pieces of equipment are properly made and in accordance with the manufacturers instructions Switch off and withdraw the mains plug before making or changing connections DO consult your dealer if you are ever in doubt about the installation operation or safety of your equipment DO be careful with glass panels or doors on equipment Do not DON T remove any fixed cover as this may expose dangero...

Page 6: ...a sturdy tie using the hook that is on stand or secured to the platform The LCD display panels are manufactured using an extremely high level of precision technology however sometimes some parts of the screen may be missing picture elements or have luminous spots This is not a sign of a malfunction Make sure the television is located in a position where it cannot be pushed or hit by objects as pre...

Page 7: ...ion To connect an aerial plug the aerial lead into the aerial socket on the rear of the TV You can use an outdoor or indoor aerial However if you use an indoor aerial the quality of the reception may be reduced and adjustment of the aerial may be required when changing programs Please note If you live in a poor reception area or use an indoor aerial you may experience loss or corruption of teletex...

Page 8: ...63 1 2 3 4 5 6 7 Speaker Stand by Remote control Stand by switch Scart Antenna input Headphone 8 9 10 11 12 13 14 Audio out R L Audio RCA L Audio RCA R Video input PHONO connector S VHS DC 12V VGA 15 16 17 18 19 20 Volume down Volume up Menu button Program down Program up Source Select Top control units 10 9 11 12 8 14 AUDIO OUT AV3 L R VIDEO L R S VHS VGA 15 16 17 18 19 20 DC 12V 13 2 1 3 4 5 6 7...

Page 9: ...Stand by On Off button 19 External Input AV select button 20 Picture Format choice button 21 Exit button 22 OK button 23 Right button Menu Volume Up button 24 Blue Teletext Button 25 Yellow teletext Button 26 Sound Smart control button 27 Mute button 28 Teletext index button 29 Teletext subpage button 30 Teletext enlarge button Double size 31 Teletext time Update button ENGLISH 10 Note The switch ...

Page 10: ...program 12 press the numeric buttons 1 and 2 one after another Mute To temporarily mute the sound of your television press the button Where the SOUND MUTE on screen display will appear on screen as an indication of the application When you press the same button again the sound will return During mute when you press the button the volume will decrease and automatically get out of the mute function ...

Page 11: ...on has one SCART socket Every time you press the AV button your default settings will change according to the socket connection below External Device ENGLISH 12 Program tuning and saving into memory You can either tune the programs automatically or manually storing them in your television As a result of your television s Automatic Tuning System ATS the programs found are automatically ordered in a...

Page 12: ...n on your remote control highlight the Manual Tuning bar in yellow and press or button The Manual Tuning menu will appear on the screen Please select your desired program using the and buttons Press the button Access the System bar using the right button Here your TV can be set to one system you can also select for other systems option Select the Channel Band bar pressing three times the right but...

Page 13: ... program you wish to another program number in the same way Programme Sorting Teletext Select the teletext bar using the or down button in the setup menu If you select auto with the right button the txt broadcast and Fastext or Toptext option features of the existing channels When list is selected if the current channel does not broadcast Fastext or Toptext you can store the teletext page numbers ...

Page 14: ...menu on your television screen and press Using the up down movement buttons you can choose the features that you require The setup of your television Setting up the Sound Menu Equalizer Selecting the Equalizer mark press or button The equalizer setting function will be displayed Using the up down movement buttons you choose between a series of preset settings for different types of sound output su...

Page 15: ...urthermore you can select one of the non adjustable default settings in the memory Picture Mode by pressing the button on your remote control Picture Mode 1 2 and 3 are preset values Picture Mode M is the value you store in the memory ENGLISH 16 Picture Set up TINT When the NTSC video is connected from the SCART you can adjust the colour tint setting If you do not connect this type of video then t...

Page 16: ... time If any of the Timers is activated the green colour light on the bottom of your TV will illuminate Please note If you turn your television off from the main power supply switch then the sleep timer modes selected will be reset and cancelled On Programme You can insert the program number of the channel that your television will automatically open or switch to from the watched channel using the...

Page 17: ...will be displayed To move to the next page of text press the button To move to the previous page press the button To return to the index page press the button TV text mix To view a TV programme whilst in text mode press the button The text will be superimposed over the TV programme Press the button again to return to the text page Page search whilst watching TV In Text mode press the button The TV...

Page 18: ...ng the Numeric buttons in the format S0001 for sub page 1 The teletext will search for the sub page This may take some time To return to the TV whilst the teletext is searching press the button When the page number is found it will appear in the top left hand corner of the screen Press the button again to view the text page To reveal information Press the button to reveal concealed information qui...

Page 19: ... Please note You can connect RGB external equipment via Scart It is necessary to you use a full Scart cable for this purpose Select the video output of the external device by using its menu and set to RGB Via RCA lead optional Make sure the TV and video recorder are both switched off Plug one end of the RCA lead into the video and audio out sockets on the back of the video recorder and plug the ot...

Page 20: ...ocket on the TV Switch on the video recorder and the TV If your video recorder has a test signal switch it on Refer to the video recorder user guide See Tuning the TV and carry out the tuning procedure for the video recorder test signal Select a programme number 0 Via RCA lead and S Video socket You can also connect it through the S Video socket of the TV Plug the S Video plug into the S Video soc...

Page 21: ...e the TV and DVD player are both switched off Plug one end of the RCA lead into the video and audio out sockets on the back of the DVD player and plug the other end into the video and audio in sockets of the TV Via RCA lead and S Video socket You can also connect it through the S Video socket of the TV Plug the S Video plug into the S Video socket and the audio leads into the audio sockets 15VL63 ...

Page 22: ...uilt in Plug one end of the RCA lead into the video and audio out sockets on the back of the decoder and plug the other end into the video and audio in sockets on the TV AV Outputs You can connect any device which is proper to Phono inputs via Phono Video and Audio Outs at the back of your TV set using proper AV cable not available with the set Any programme or AV input which is seen on the main s...

Page 23: ...n order for the LCD TV to switch to the monitor PC mode you can use the PC button on your remote control In order to switch from the monitor mode back to the TV mode use the TV button on your remote control Warning Messages 1 NO SIGNAL There is no VGA connection Under these circumstances the on screen display will be NO SIGNAL The message will be on screen for 15 seconds and if a suitable VGA atta...

Page 24: ...onnecting TV with video and satellite digital receiver Connecting TV with camcorder Connecting TV games and computer 15VL63 AUDIO OUT AV3 L R VIDEO L R S VHS VGA DC 12V AUDIO OUT AV3 L R VIDEO L R S VHS VGA DC 12V ...

Page 25: ...d on Poor picture Is the aerial plugged in If you are using a set top aerial is it properly aligned for the best signal Try changing the direction of the outdoor aerial High buildings can cause ghost pictures or double images The picture quality may be reduced by connecting two external sources at once Disconnect one of the sources Adjust the fine tuning No picture Is the aerial plugged in properl...

Page 26: ...he use of the symbol indicates that this product may not be treated as household waste By ensuring this product is disposed of correctly you will help prevent potential negative consequences for the environment and human health which could otherwise be caused by inappropriate waste handling of this product For more detailed information about recycling of this product please contact your local city...

Page 27: ...AAX 801 ...

Reviews: