background image

11

VIDEO  LOCK

〈 

+ / – / ENTER / MENU 


OFF
VIDEO
VIDEO+

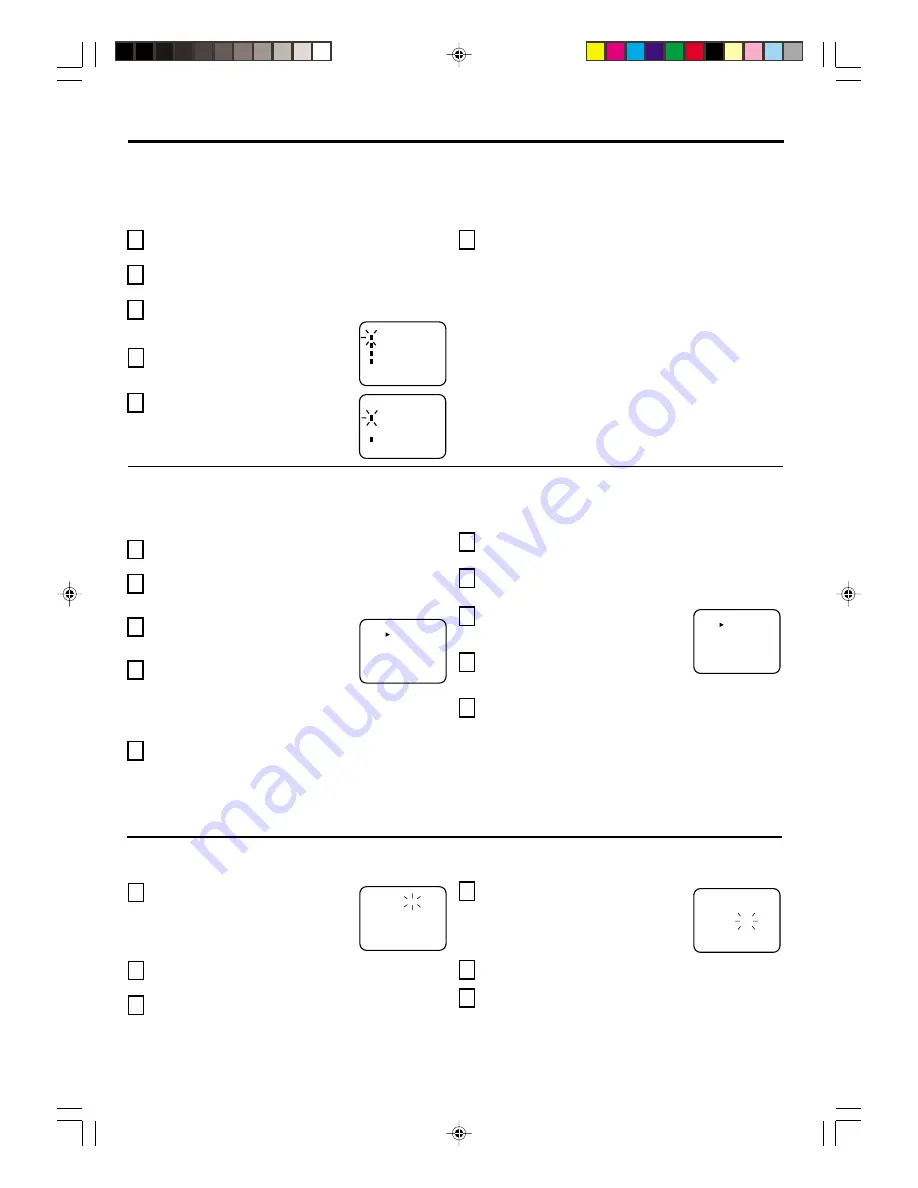
LOCKING VIDEO INPUT

With the VIDEO LOCK feature, you can lock out the input
source (VIDEO) and channels 3 and 4.
You will not be able to select the input sources with the 

TV/

VIDEO

 button or Channel buttons unless you clear the setting.

1

2

3

4

5

GAME TIMER

〈 

+ / Ð / ENTER / MENU

OFF
30
60
90
120

Press 

MENU

, then press 

SET +

 or 

 until the indicator

next to “LOCK” begins to flash, then press 

ENTER

.

Use the Channel Number buttons (0–9) to enter your
password, then press 

ENTER

. The LOCK menu appears.

Press 

SET +

 or 

– 

until the indicator

next to “VIDEO LOCK” begins to flash,
then press 

ENTER

.

Press 

SET +

 or 

 to select:

 OFF: Unlocks all video input sources.

 VIDEO: Locks VIDEO.

1

2

3

4

5

USING THE LOCK MENU

LOCK

〈 

+ / – / ENTER / MENU 


GAME TIMER

CH  LOCK
VIDEO  LOCK

CHANGE PASSWORD

1

2

3

4

6

The LOCK menu includes the CH LOCK, VIDEO LOCK, GAMETIMER and CHANGE PASSWORD functions.
You can use these functions after entering the correct PASSWORD. (This password is the same one selected under “SETTING THE
V-CHIP” on page 10.)

5

LOCKING CHANNELS

With the CH LOCK feature, you can lock specific channels. You will not be able to tune locked channels unless you clear the
setting. You can choose to lock up to nine TV channels and nine cable channels.

Use the Channel Number buttons (0–9) to display the
television channel you wish to lock.

Press 

MENU

, then press 

SET +

 or 

  until the indicator

next to “LOCK” begins to flash. Then press 

ENTER

.

Use the Channel Number buttons (0–9) to enter your
password, then press 

ENTER

.

The LOCK menu appears.

Press 

SET +

 or 

 until the indicator next

to “CH LOCK” begins to flash, then
press 

ENTER

.

Press 

SET +

 or 

 to select:

 INPUT to select the channel as one to

  be locked. Then press 

 ENTER

.

 ALL CLEAR to clear all channels from

  the list of locked channels. Then press

  ENTER

.

Repeat steps 1 through 5 to lock other channels. When you
are finished locking channels, press 

MENU

 repeatedly until

the menu screen is cleared.

NOTES:

• If you are accessing the LOCK menus or V-chip menus for the

first time, choose a four-digit number to be your password.

• After programming CH LOCK, change channels before turning

off the television.

• If you want to unlock channels, select ALL CLEAR in step 5,

then press 

ENTER

.

CH  LOCK

〈 

+ / – / ENTER / MENU 


CABLE
INPUT

ALL CLEAR

---   ---   ---

---   ---   ---

---   ---   ---

If you try to tune a locked channel, the TV will not display it, but
will display the nearest unlocked channel.

 VIDEO +: Locks VIDEO, channel 3 and channel 4.

  This option should be used if you use the antenna
  to play a video tape.

Press 

MENU

 repeatedly until the menu screen is cleared.

SETTING THE GameTimer

TM

With the GameTimer

TM

 feature, you can automatically activate

the VIDEO LOCK feature (VIDEO setting) to set a time limit for
playing a TV game (30, 60, 90, or 120  minutes).

Press 

MENU

, then press 

SET +

 or 

 until the indicator next to

“LOCK” begins to flash, then press 

ENTER

.

Use the Channel Number buttons (0–9) to enter your pass-
word, then press 

ENTER

. The LOCK menu appears.

Press 

SET +

  or  

 until the indicator next to

“GAMETIMER” begins to flash, then press

ENTER

.

Press 

SET +

 or 

 to select a time limit

(30 minutes, 60 minutes, 90 minutes, 120
minutes or OFF).

Press 

MENU

 repeatedly until the menu screen is cleared.

After the GAMETIMER is programmed, the display will
appear briefly every ten minutes to remind you that the
GAMETIMER is operating.  When the programmed end
time is reached, the display will change the channel
automatically.

TO SET THE ON TIMER

1

2

3

4

5

This feature allows you to program the TV to turn on automatically at a set time and channel.

NOTE

: After a power failure or disconnection of the power, the timer setting will be lost.

Press 

MENU

, then press 

SET +

 or 

  until

the indicator next to “ON TIMER” begins
to flash. Then press 

ENTER

.

The ON TIMER menu appears.

Press 

SET +

 or 

 to set the desired hour (0–12), then

press 

ENTER

.

Press 

SET +

 or 

 to set the desired minute

(00, 05, 10, ...55), then press 

ENTER

.

NOTE:

To cancel the ON TIMER, select CANCEL in step 4 above. Press
MENU repeatedly until the menu screen is cleared.

Press 

SET +

 or 

 to set the desired

channel, then press 

ENTER

.

Press 

SET +

 or 

 to select the SET mode, then press

ENTER

.

ON TIMER

〈 

+ / — / ENTER / MENU 


HOUR
MINUTE
CH 002

00h
00m
CANCEL

ON TIMER

〈 

+ / — / ENTER / MENU 


HOUR
MINUTE
CH 125

08h
15m
SET

Press 

MENU

 repeatedly until the menu screen is cleared.

6

NOTE:

After programming VIDEO LOCK, change channels or activate
the TV/VIDEO key before turning off the television.

J3M13121A(E)_P08-12

01/12/2004, 12:35 PM

11

Summary of Contents for 13A25

Page 1: ...13A25 J3M13121A E _COVER 01 12 2004 12 34 PM 1 ...

Page 2: ...r entertainment experience is a growing trend and larger TVs are popular purchases however they are not always supported on the proper TV stands Sometimes TVs are improperly secured or inappropriately situated on dressers bookcases shelves desks audio speakers chests or carts As a result TVs may fall over causing unnecessary injury Toshiba Cares The consumer electronics industry is committed to ma...

Page 3: ...s been exposed to rain or moisture does not operate normally or has been dropped 15 CAUTION To reduce the risk of electric shock do not use the polarized plug with an extension cord receptacle or other outlet unless the blades can be inserted completely to prevent blade exposure Wide plug Installation Care and Service Installation Follow these recommendations and precautions and heed all warnings ...

Page 4: ...ded If this happens turn off the TV for 6 to 7 hours to allow the condensation to evaporate 31 For added protection of your TV from lightning and power surges always unplug the power cord and disconnect the antenna from the TV if you leave the TV unattended or unused for long periods of time 32 During normal use the TV may make occasional snapping or popping sounds This is normal especially when t...

Page 5: ...der Displays closed captions or text on screen when available Lock feature This feature has three functions LOCKING CHANNELS LOCKING VIDEO INPUT and SETTING THE GameTimerTM Programmable ON Timer Allows you to program the TV to automatically turn on the TV at a set time FRONT BACK 1 3 4 6 8 5 1 PHONE Earphone Jack Plug an earphone or monaural headphones with a 1 8 miniplug into this jack for privat...

Page 6: ...ss the button to change to a lower numbered channel set into memory 13 ENTER Button Press to enter or select information for On screen operations 14 1 2 Button Switches between channel 1 and channel 2 in the closed caption mode 15 CAP TEXT Button Press to switch between normal TV and the two closed caption modes captions or text when available REMOTE CONTROL 1 Open the battery compartment cover 2 ...

Page 7: ... cable with scrambled premium channels If you subscribe to a cable service in which basic cable channels are unscrambled and premium channels require the use of a converter descrambler box you may wish to use a two set signal splitter sometimes called a two set coupler and an A B switch box from the cable installer or an electronics supply store Follow the connections shown left With the switch in...

Page 8: ...Example to select channel 12 press 012 Press the 2 digits in order Example to select channel 36 press 36 Press the 3 digits in order Example to select channel 120 press 120 1 2 3 4 CH CHANNEL and buttons Press and release CH CHANNEL or The channel automatically stops at the next channel programmed into the TV s memory Press and hold the button down to change channels more quickly For proper operat...

Page 9: ... a channel is added and the channel will be memorized If a memorized channel was selected step 4 the chan nel indication will be green To delete the channel from Press MENU repeatedly until the menu screen is cleared 6 memory press ENTER repeatedly until DEL appears on screen The channel indicator will change from green to red when a channel is deleted Repeat steps 4 and 5 for each channel to be a...

Page 10: ...ess than 13 years old CLOSED CAPTION WHAT IS CLOSED CAPTIONING This television has the capability to decode and display closed captioned television programs When available closed captioning will display text on the screen for hearing impaired viewers or it will translate and display text in another language TO VIEW CLOSED CAPTIONS Press CAP TEXT on the remote control to switch between normal TV an...

Page 11: ...ls before turning off the television If you want to unlock channels select ALL CLEAR in step 5 then press ENTER CH LOCK ENTER MENU CABLE INPUT ALL CLEAR If you try to tune a locked channel the TV will not display it but will display the nearest unlocked channel VIDEO Locks VIDEO channel 3 and channel 4 This option should be used if you use the antenna to play a video tape Press MENU repeatedly unt...

Page 12: ...nal bars on screen No reception above channel 13 No Cable TV reception Batteries are weak dead or inserted incorrectly Remote is out of range move closer to TV within 15 feet Make sure Remote is aimed at sensor Confirm there are no obstructions between the Remote and the TV Make sure the power cord is plugged in Make sure TV CABLE menu option is in the appropriate mode If using antenna check UHF a...

Page 13: ...e and return the product registration card does not diminish your warranty rights Your Responsibility THE ABOVE WARRANTIES ARE SUBJECT TO THE FOLLOWING CONDITIONS 1 You must provide your bill of sale or other proof of purchase 2 All warranty servicing of this television must be made by an Authorized TACP Service Station 3 Warranties from TACP are effective only if the television is purchased and o...

Page 14: ...meTimer is a trademark of Toshiba America Consumer Products L L C FST PURE is a registered trademark of Toshiba America Consumer Products L L C PRINTED IN THAILAND K J3M13121A E _P13 BACK 01 12 2004 12 35 PM 14 ...

Reviews: