
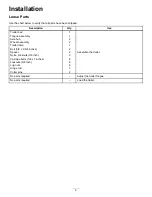


Assembling the Trailer
1.
Mount the tongue assembly to the mounting
bracket on the underside of the trailer bed with
2 bolts (3/8 x 2-3/4 inches), 2 spacers and 2
locknuts. For most applications, use the front
set of mounting holes in the tongue and bracket
(
).
g012162
Figure 1
1.
Tongue assembly
3.
Wheel rod
2.
Trailer bed
4.
Stop
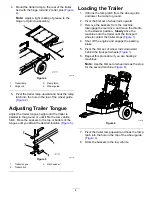
2.
Using the 4 carriage bolts and 4 locknuts, mount
an axle to the bottom side of the mounting
brackets on each side of the trailer bed. Position
the axle, carriage bolts, and nuts as shown in
g216502
Figure 2
1.
Mounting bracket
4.
Carriage bolt
2.
Axle
5.
Locknut
3.
Wheel assembly
3.
Mount a wheel assembly to each axle hub with
4 lug nuts (
). Tighten the nuts to 80 ft-lb
(108.47 N·m). Inflate the tires to 5 psi (34 kPa).
Note:
To prevent premature wear of the tires,
the wheels should have 0 to 3 (0 to 1/8 inch)
toe-in when they are pointed straight ahead. To
check the toe-in, scribe a line around the center
of each tire. Measure the center-to-center
distance (
), at the wheel hub height,
in front and back of the tires. Adjust the axle
mounting brackets so that the measurement at
the front of the tire is within 3 mm (1/8 inch) less
than the measurement at the back of the tire.
g012164
Figure 3
1.
Front center-to-center
distance
2.
Rear center-to-center
distance
Important:
Higher tire pressure may
damage the machine.
3
Summary of Contents for Trans Pro 100
Page 6: ...Notes ...
Page 7: ...Notes ...


