


Converting to Side
Discharge
The mower deck and mower blades shipped with the
machine were designed for optimum mulching and
side-discharge performance.
Install the fasteners into the same holes in the deck
from where they were originally removed. This
ensures that no holes are left open when operating
the mower deck.
WARNING
Open holes in the machine expose you and
others to thrown debris that can cause severe
injury.
•
Never operate the machine without
hardware mounted in all holes in the
machine housing.
•
Install the hardware in the mounting holes
when you remove the mulching baffle.
Machines with 122 cm (48-inch)
Mower Decks
1.
Park the machine on a level surface, disengage
the blade-control switch, and engage the parking
brake.
2.
Shut off the engine, remove the key, and wait
for all moving parts to stop before leaving the
operating position.
3.
Remove the mower deck; refer to
Mower Deck (page 46)
.
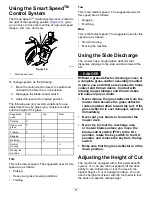
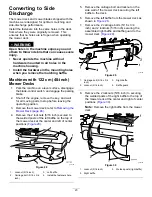
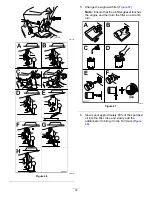
4.
Remove the 2 locknuts (5/16 inch) secured to
the welded posts of the left baffle on the top of
the mower deck at the center and left of center
positions (
g011149
Figure 28
1.
Locknut (5/16 inch)
3.
Left baffle
2.
Carriage bolt (5/16 x 3/4
inch)
4.
Install the fasteners here.
5.
Remove the carriage bolt and locknut on the
side wall of the mower deck securing the left
baffle to the deck.
6.
Remove the left baffle from the mower deck as
shown in
.
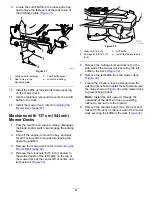
7.
Remove the 2 carriage bolts (5/16 x 3/4
inch) and 2 locknuts (5/16 inch) securing the
assembled right baffle and baffle guard to the
mower deck (
).
g191136
Figure 29
1.
Carriage bolt (5/16 x 3/4
inch)
3.
Right baffle
2.
Locknut (5/16 inch)
4.
Baffle guard
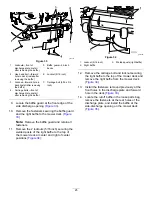
8.
Remove the 2 locknuts (5/16 inch) to securing
the welded posts of the right baffle to the top of
the mower deck at the center and right of center
positions (
Note:
Remove the right baffle from the mower
deck.
g010704
Figure 30
1.
Locknut (5/16 inch)
3.
Welded posts (right baffle)
2.
Right baffle
23
Summary of Contents for TimeCutter HD X4850
Page 54: ...Schematics g203461 Electrical Diagram Rev A 54 ...
Page 55: ...Notes ...


