


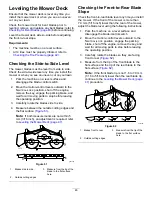


Replacing the Grass
Deflector
Service Interval:
Before each use or daily—Inspect
the grass deflector for damage.
WARNING
An uncovered discharge opening could allow
the lawn mower to throw objects at you or
bystanders and result in serious injury. Also,
contact with the blade could occur.
Never operate the lawn mower unless you
install a mulch plate, discharge deflector, or
grass collection system.
Inspect the grass deflector for damage before each
use. Replace any damaged parts before use.
1.
Disengage the spring from the notch in the
deflector bracket and slide the rod out of the
welded deck brackets, spring, and discharge
deflector (
).
g197127
Figure 67
1.
Rod
4.
Deck brackets
2.
Deflector
5.
Spring installed over the
rod
3.
Spring
2.
Remove the damaged or worn discharge
deflector.
3.
Position the new discharge deflector with the
bracket ends between the welded brackets on
the deck as shown in
.
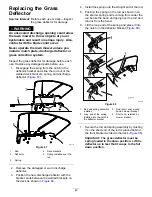
4.
Install the spring onto the straight end of the rod.
5.
Position the spring on the rod as shown in so
the shorter spring end is coming from under the
rod before the bend and going over the rod as it
returns from the bend.
6.
Lift the loop end of the spring and place it into
the notch on the deflector bracket (
).
g017618
1
3
4
2
g017618
Figure 68
1.
Rod and spring assembly
installed
3.
Rod (short end) moved
behind mower bracket
2.
Loop end of the spring
installed into the notch in
the deflector bracket
4.
Short end, retained by
mower bracket.
7.
Secure the rod and spring assembly by twisting
it so the short end of the rod is placed behind
the front bracket welded to the deck (
).
Important:
The grass deflector must be
spring loaded in the down position. Lift the
deflector up to test that it snaps to the full
down position.
49


