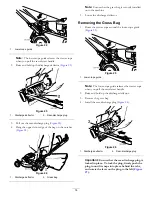
Figure 42
Note:
Your machine comes with a spare fuse in the
battery compartment.
4.
Install the battery cover.
Lubricating the Wheel Gears
Service Interval:
Every 25 hours
1.
Wipe the grease fittings just inside the rear wheels with
a clean rag (
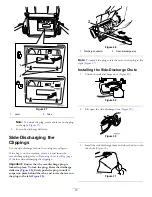
Figure 43
1.
Grease fitting
2.
Install a grease gun onto each fitting and gently apply 2
or 3 pumps of #2 multi-purpose, lithium-base grease.
Replacing the Blade
Service Interval:
Before each use or daily
Every 25 hours—Replace the blade or have it
sharpened (more frequently if the edge dulls quickly).
Important:
You will need a torque wrench to install the
blade properly. If you do not have a torque wrench or
are uncomfortable performing this procedure, contact
an Authorized Service Dealer.
Examine the blade whenever you run out of gasoline. If the
blade is damaged or cracked, replace it immediately. If the
blade edge is dull or nicked, have it sharpened or replace it.
WARNING
The blade is sharp; contacting the blade can result
in serious personal injury.
Wear gloves when servicing the blade.
1.
Refer to
Preparing for Maintenance (page 19)
.
2.
Tip the machine onto its side with the air filter up.
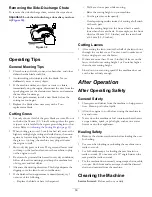
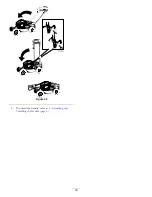
3.
Use a block a wood to hold the blade steady (
).
Figure 44
4.
Remove the blade, saving all mounting hardware.
5.
Install the new blade and all mounting hardware.
Important:
Position the curved ends of the blade
to point toward the machine housing.
6.
Use a torque wrench to tighten the blade bolt to
82 N∙m (60 ft-lb).
Important:
A bolt torqued to 82 N∙m (60 ft-lb) is
very tight. While holding the blade with a block
of wood, put your weight behind the ratchet or
wrench and tighten the bolt securely. This bolt is
very difficult to overtighten.
22

