

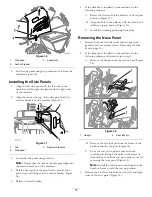


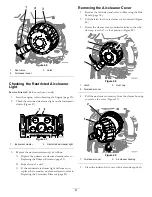

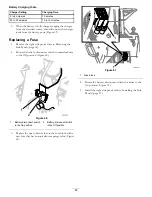

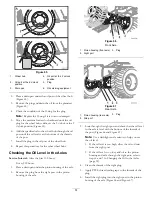


Installing the Air-cleaner Cover
1.
Align the dust cap on the air-cleaner cover to the 7
o’clock position.
2.
Align the air-cleaner cover onto the cleaner housing
(Figure 49).
3.
Rotate the air-cleaner cover clockwise so that the dust
cap is at the 8 o’clock position (Figure 46).
4.
Push the latch for the air-cleaner cover inward until the
cover is fully seated (Figure 46).
5.
Install the left side panel; refer to Installing the Side
Panels (page 37).
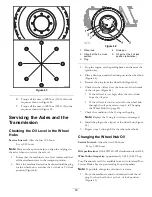
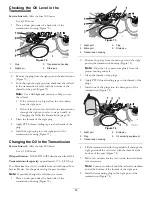
Replacing the Primary Element
Important:
Replace the primary air-cleaner element
when the restricted air-cleaner light comes on.
1.
Remove the air-cleaner cover; refer to Removing the
Air-cleaner Cover (page 41).
2.
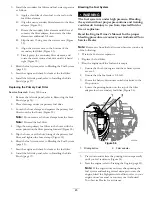
Pull the primary air-cleaner element outward and
remove it from the air-cleaner housing (Figure 50).
Figure 50
1.
Primary air-cleaner element
Note:
Discard the old air-cleaner element.
3.
Use a clean damp cloth to clean the inside of the
cleaner housing (Figure 49).
4.
Use a light to inspect the new element for damage; if
the element is damaged, replace it.
Note:
Check the date of manufacture on the end of
the new air-cleaner element. Do not install an element
that is more than 5 years old.
5.
Write the current date and the engine hours on the end
of the element with a permanent marking pen.
6.
Insert the new primary air-cleaner element into the
air-cleaner housing (Figure 50).
Note:
Ensure that the air-cleaner element is fully
seated in the housing.
7.
Install the air-cleaner cover; refer to Installing the
Air-cleaner Cover (page 42).
8.
Check the restricted air-cleaner light; refer to Checking
the Restricted Air-cleaner Light (page 41).
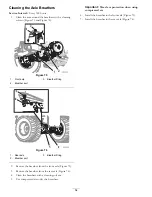
Replacing the Secondary Element
Note:
Replace the secondary air-cleaner element after you
have replaced the primary air-cleaner element 3 times or if
the air-cleaner restriction light comes on while the engine is
running and you have already replaced primary air-cleaner
element.
Important:
Do not clean either the primary element
or the secondary element.
1.
Remove the air-cleaner cover; refer to Removing the
Air-cleaner Cover (page 41).
2.
Pull the primary air-cleaner element outward and
remove it from the air-cleaner housing; refer to
Replacing the Primary Element (page 42).
Pull the secondary air-cleaner element outward and
remove it from the air-cleaner housing. (Figure 51).
Figure 51
1.
Secondary air-cleaner element
Note:
Discard the old air-cleaner element.
3.
Clean the inside of the cleaner housing with a clean,
damp cloth (Figure 49).
4.
Insert the new secondary air-cleaner element into the
air-cleaner housing (Figure 51).
42
Summary of Contents for RT600
Page 71: ...Notes 71...


