background image

International Distributor List

Distributor:

Country:

Phone Number:

Distributor:

Country:

Phone Number:

Atlantis Su ve Sulama Sisstemleri Lt Turkey

90 216 344 86 74

Jean Heybroek b.v.

Netherlands

31 30 639 4611

Balama Prima Engineering Equip.

Hong Kong

852 2155 2163

Maquiver S.A.

Colombia

57 1 236 4079

B-Ray Corporation

Korea

82 32 551 2076

Maruyama Mfg. Co. Inc.

Japan

81 3 3252 2285

Casco Sales Company

Puerto Rico

787 788 8383

Agrolanc Kft

Hungary

36 27 539 640

Ceres S.A.

Costa Rica

506 239 1138

Mountfield a.s.

Czech Republic 420 255 704 220

CSSC Turf Equipment (pvt) Ltd.

Sri Lanka

94 11 2746100

Munditol S.A.

Argentina

54 11 4 821 9999

Cyril Johnston & Co.

Northern Ireland

44 2890 813 121

Oslinger Turf Equipment SA

Ecuador

593 4 239 6970

Equiver

Mexico

52 55 539 95444

Oy Hako Ground and Garden Ab Finland

358 987 00733

Femco S.A.

Guatemala

502 442 3277

Parkland Products Ltd.

New Zealand

64 3 34 93760

G.Y.K. Company Ltd.

Japan

81 726 325 861

Prochaska & Cie

Austria

43 1 278 5100

Geomechaniki of Athens

Greece

30 10 935 0054

RT Cohen 2004 Ltd.

Israel

972 986 17979

Guandong Golden Star

China

86 20 876 51338

Riversa

Spain

34 9 52 83 7500

Hako Ground and Garden

Sweden

46 35 10 0000

Sc Svend Carlsen A/S

Denmark

45 66 109 200

Hako Ground and Garden

Norway

47 22 90 7760

Solvert S.A.S.

France

33 1 30 81 77 00

Hayter Limited (U.K.)

United Kingdom

44 1279 723 444

Spypros Stavrinides Limited

Cyprus

357 22 434131

Hydroturf Int. Co Dubai

United Arab Emirates 97 14 347 9479

Surge Systems India Limited

India

91 1 292299901

Hydroturf Egypt LLC

Egypt

202 519 4308

T-Markt Logistics Ltd.

Hungary

36 26 525 500

Ibea S.P.A.

Italy

39 0331 853611

Toro Australia

Australia

61 3 9580 7355

Irriamc

Portugal

351 21 238 8260

Toro Europe NV

Belgium

32 14 562 960

Irrigation Products Int'l Pvt Ltd.

India

86 22 83960789

European Privacy Notice

The Information Toro Collects
Toro Warranty Company (Toro) respects your privacy. In order to process your warranty claim and contact you in the event of a product recall, we ask you
to share certain personal information with us, either directly or through your local Toro company or dealer.

The Toro warranty system is hosted on servers located within the United States where privacy law may not provide the same protection as applies
in your country.

BY SHARING YOUR PERSONAL INFORMATION WITH US, YOU ARE CONSENTING TO THE PROCESSING OF YOUR PERSONAL INFORMATION
AS DESCRIBED IN THIS PRIVACY NOTICE.

The Way Toro Uses Information
Toro may use your personal information to process warranty claims, to contact you in the event of a product recall and for any other purpose which we tell
you about. Toro may share your information with Toro's affiliates, dealers or other business partners in connection with any of these activities. We will not
sell your personal information to any other company. We reserve the right to disclose personal information in order to comply with applicable laws and
with requests by the appropriate authorities, to operate our systems properly or for our own protection or that of other users.

Retention of your Personal Information
We will keep your personal information as long as we need it for the purposes for which it was originally collected or for other legitimate purposes
(such as regulatory compliance), or as required by applicable law.

Toro's Commitment to Security of Your Personal Information
We take reasonable precautions in order to protect the security of your personal information. We also take steps to maintain the accuracy and current
status of personal information.

Access and Correction of your Personal Information
If you would like to review or correct your personal information, please contact us by email at [email protected].

Australian Consumer Law

Australian customers will find details relating to the Australian Consumer Law either inside the box or at your local Toro Dealer.

374-0269 Rev E

Summary of Contents for Recycler 20990

Page 1: ...mportant calls attention to special mechanical information and Note emphasizes general information worthy of special attention Safety Read and understand the contents of this manual before you start the engine The safety alert symbol Figure 2 is used to alert you to potential personal injury hazards Obey all safety messages that follow this symbol to avoid possible injury or death Improperly using...

Page 2: ...accident Do not mow near drop offs ditches or embankments You could lose your footing or balance Children Tragic accidents can occur if the operator is not alert to the presence of children Children are often attracted to the machine and the mowing activity Never assume that children will remain where you last saw them Keep children out of the mowing area and under the watchful care of a responsib...

Page 3: ... manufacturer s recommended parts when necessary Mower blades are sharp Wrap the blades or wear gloves and use extra caution when servicing them Do not change the engine governor setting or overspeed the engine Maintain or replace safety and instruction labels as necessary Safety and Instructional Decals Important Safety and instruction decals are located near areas of potential danger Replace dam...

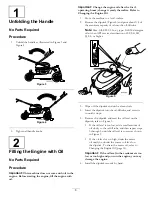
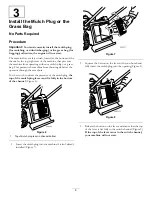
Page 4: ...ag in place do not operate the mower without the side discharge cover or deflector in place 6 Cutting dismemberment hazard of hand or foot mower blade do not operate up and down slopes operate side to side on slopes stop the engine before leaving the operating position and look behind you when backing up Setup Loose Parts Use the chart below to verify that all parts have been shipped Procedure Des...

Page 5: ... Max fill 0 59 l 20 oz type SAE 30 detergent oil with an API service classification of SF SG SH SJ SL or higher Figure 5 3 Wipe off the dipstick end with a clean cloth 4 Insert the dipstick into the oil fill tube and screw it in until it stops 5 Remove the dipstick and read the oil level on the dipstick refer to Figure 5 If the oil level is too low add a small amount of oil slowly to the oil fill ...

Page 6: ...debris at the operator through the rear chute For the switch to detect the presence of the mulch plug the top of the mulch plug lever must lie fully in the bottom of the channel Figure 6 Figure 6 1 Top of mulch plug lever in channel bottom 1 Insert the mulch plug into the machine if it isn t already installed Figure 7 Figure 7 2 Squeeze the button on the lever with your thumb and fully insert the ...

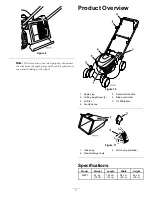
Page 7: ...tunnel Product Overview G019305 Figure 10 1 Spark plug 5 Recoil start handle 2 Cutting height lever 4 6 Blade control bar 3 Air filter 7 Oil fill Dipstick 4 Fuel tank cap Figure 11 1 Grass bag 3 Mulch plug installed 2 Side discharge chute Specifications Model Weight Length Width Height 20990 33 kg 72 lb 145 cm 57 in 56 cm 22 in 99 cm 39 in 7 ...

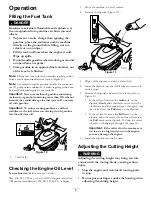
Page 8: ...2 1 1 cm 1 2 in Checking the Engine Oil Level Service Interval Before each use or daily Max fill 0 59 l 20 oz type SAE 30 detergent oil with an API service classification of SF SG SH SJ SL or higher 1 Move the machine to a level surface 2 Remove the dipstick Figure 13 Figure 13 3 Wipe off the dipstick end with a clean cloth 4 Insert the dipstick into the oil fill tube and screw it in until it stop...

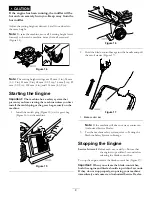
Page 9: ...s bag securely on the machine 1 Install the mulch plug Figure 15 or the grass bag Figure 16 on the machine Figure 15 Figure 16 2 Hold the blade control bar against the handle and pull the recoil starter Figure 17 G019308 Figure 17 1 Blade control bar Note If the machine still does not start contact an Authorized Service Dealer 3 Test the machine safety system refer to Testing the Machine Safety Sy...

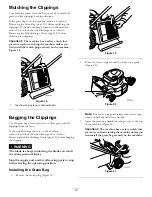
Page 10: ...t to collect grass and leaf clippings from the lawn If the side discharge chute is on the machine remove it and lock the side discharge door refer to Removing the Side discharge Chute page 12 before bagging the clippings WARNING The blade is sharp contacting the blade can result in serious personal injury Stop the engine and wait for all moving parts to stop before leaving the operating position I...

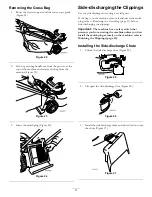
Page 11: ...bag is on the machine remove it and insert the mulch plug refer to Removing the Grass Bag page 11 before side discharging the clippings Important The machine has a safety switch that prevents you from starting the machine unless you first install the mulch plug securely on the machine refer to Mulching the Clippings page 10 Installing the Side discharge Chute 1 Unlock the side discharge door Figur...

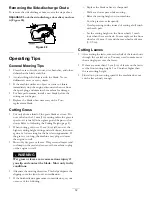
Page 12: ... If the grass is too long the machine may plug and cause the engine to stall Mow only dry grass or leaves Wet grass and leaves tend to clump on the yard and can cause the machine to plug or the engine to stall WARNING Wet grass or leaves can cause serious injury if you slip and contact the blade Mow only in dry conditions Alternate the mowing direction This helps disperse the clippings over the la...

Page 13: ...intenance procedures Preparing for Maintenance 1 Stop the engine and wait for all moving parts to stop 2 Disconnect the spark plug wire from the spark plug Figure 29 before performing any maintenance procedure Figure 29 3 After performing the maintenance procedure s connect the spark plug wire to the spark plug Important Before tipping the machine to change the oil or replace the blade allow the f...

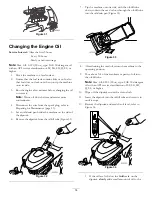
Page 14: ...e the machine on the side of the dipstick 6 Remove the dipstick from the oil fill tube Figure 32 Figure 32 7 Tip the machine onto its side with the oil fill tube down to drain the used oil out through the oil fill tube into the oil drain pan Figure 33 G019342 Figure 33 8 After draining the used oil return the machine to the operating position 9 Pour about 3 4 of the crankcase capacity of oil into ...

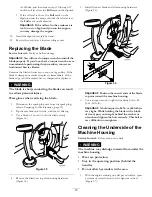
Page 15: ...onal injury Wear gloves when servicing the blade 1 Disconnect the spark plug wire from the spark plug refer to Preparing for Maintenance page 13 2 Tip the machine onto its side with the air filter up 3 Use a block of wood to hold the blade steady Figure 35 Figure 35 4 Remove the blade saving all mounting hardware Figure 35 5 Install the new blade and all mounting hardware Figure 36 Figure 36 Impor...

Page 16: ...stops When you can no longer start the engine it is sufficiently dry 5 Disconnect the wire from the spark plug 6 Remove the spark plug add 30 ml 1 oz of oil through the spark plug hole and pull the starter rope slowly several times to distribute oil throughout the cylinder to prevent cylinder corrosion during the off season 7 Loosely install the spark plug 8 Tighten all nuts bolts and screws 9 Cha...

Page 17: ...bag is not attached to the machine remove the discharge plug and install the grass bag 4 Start the engine 5 While the engine is running lift up the upper right rear corner of the grass bag until the wire bag frame at the upper right front of the grass bag is completely out of the right hand slot Figure 40 The engine should stop Note The right hand slot houses a safety interlock switch Important Do...

Page 18: ...Notes 18 ...

Page 19: ...ion Toro Collects Toro Warranty Company Toro respects your privacy In order to process your warranty claim and contact you in the event of a product recall we ask you to share certain personal information with us either directly or through your local Toro company or dealer The Toro warranty system is hosted on servers located within the United States where privacy law may not provide the same prot...

Page 20: ...use or abuse and failure or repair required due to rust or corrosion are not covered This warranty includes the cost of parts and labor but you must pay transportation costs Warranty may be denied if the hour meter is disconnected altered or shows signs of being tampered with Owner Responsibilities You must maintain your Toro Product by following the maintenance procedures described in the Operato...

Reviews: