background image

Set Active Day Watering Schedules

The active watering days for each program can be chosen using a Calendar schedule or an Interval
schedule. The Calendar schedule enables active days to be selected within a 14-day (two week) cycle. The
Interval Schedule enables active days to be selected by a specific interval, such as every day, every-other
day, every-third day and so on – up to every twenty-ninth day.

Select the active watering days for each program using either a Calendar schedule (below) or an Interval
schedule (on page 8). 

Note the following programming characteristics:

• Only one watering day schedule (Calendar or Interval) can be utilized for each program.

• To prevent automatic operation of any program, all days in a Calendar Schedule can be deleted or

Interval Day can be set to Off.

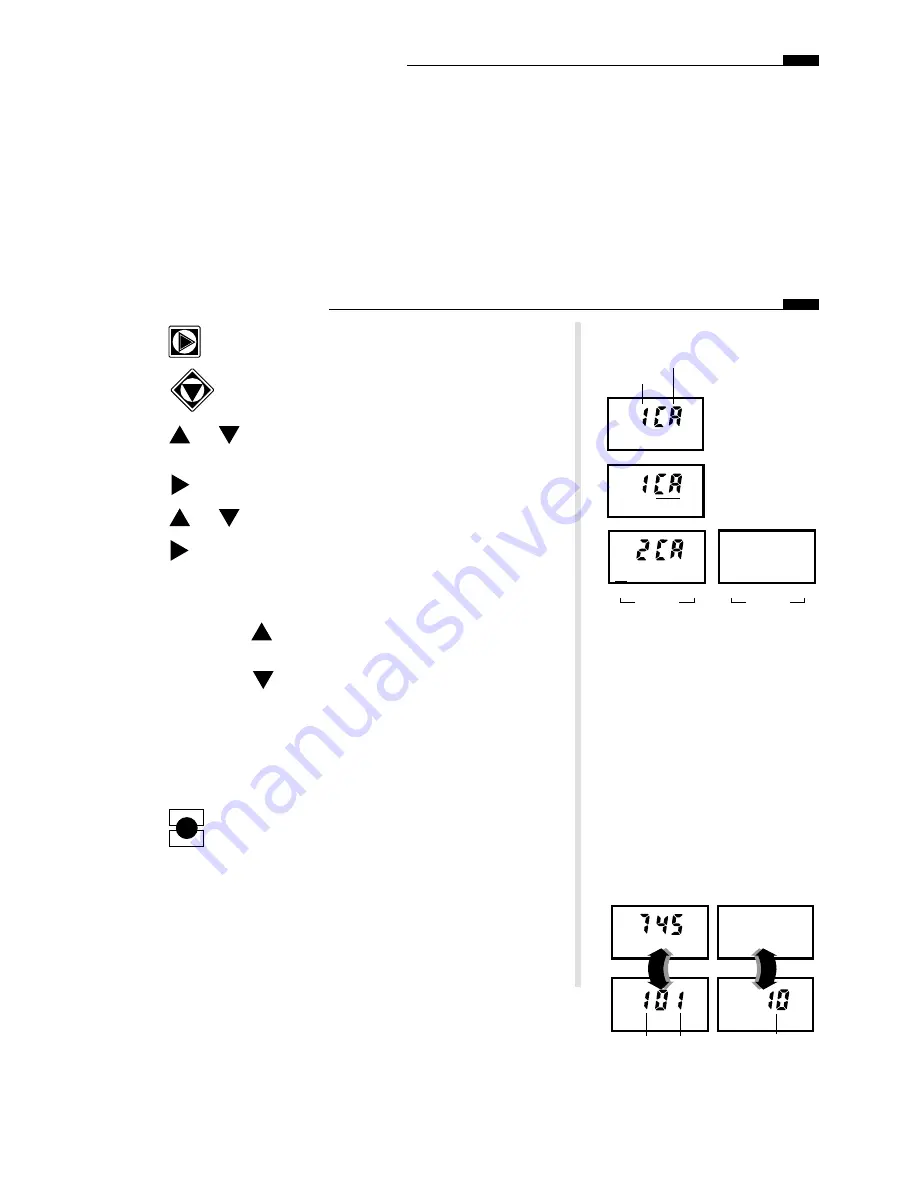
To Set a Calendar schedule: 

1. Press 

as needed to select the Program indicator.

2. Press 

to select the Active Days indicator.

3. Press 

or 

until the desired program number (1 – 16) is

flashing.

4. Press 

– The schedule type will begin flashing.

5. Press or until 

CA (Calendar) is flashing.

6. Press 

– The current Calendar schedule is displayed and

Sunday (Su) of week 1 is flashing.

7. Choose to select or delete the indicated (flashing) day.

• To select: Press 

– The day stops flashing and remains

displayed and the next day starts flashing.

• To delete: Press 

– The day disappears and next day starts 

flashing.

8. Repeat step to set the 14-day watering schedule.

Note: To prevent automatic operation of the program, delete all 14
days or, as an alternate method, select Interval “Off”. See page 8 for
this procedure.

9. Press 

to enter the information into controller memory.

10. Repeat steps – for all programs requiring a Calendar

schedule.

Note: If an Interval watering schedule is not required, programming
for automatic operation is now complete. When an automatic program
starts, the displays will alternate between the time/day and program
status. If two or more programs are operating concurrently, the display
will alternate to show status of each program.

ENTER

START

7

:

:

8  9 10 11 12 13 14

Week 2

Mo

We

  1  2  3  4  5  6  7

Week 1

Su

Fr

Fr

We

Mo

:

Program No.

Schedule Type

(Calendar)

:

Fr

:

:

AM

Sta #

Sta Run Time 

Pgm #

Summary of Contents for Network LTC Plus Series Satellite

Page 1: ...A Hardware Features Plastic or Painted Stainless Steel Cabinetry Front Back and Top Locking Covers Removable Station Output and Common Pump Modules Modular Station Output 16 to 64 stations in 8 station increments Fuses and Circuit Breakers Power Supply 1 5A On Off Switch Circuit Breaker Main Power Input 3 2A Fuse Slow Blow Field Output 4A Circuit Breaker Control Functions Communication Modem optio...

Page 2: ...ol Switch 6 Optional Station Output Control Switches 7 Optional Station Output Surge Protection Module 8 Optional Communication Pump Common Surge Protection Module Optional 9 Optional Communications Modem 10 Power Indicator Lamp 28V Station Output 11 Field Common Engage Push Button Switch 12 Field Common Indicator Lamp 13 Standard 8 Station Terminal Block 14 Main Power On Off Switch 1 5A Circuit B...

Page 3: ...00 00 23 59 Switch 4 ON Pump output activates at the same time as station output Option Switch 4 OFF Pump output starts 5 seconds prior to station output Enables pump to reach pressure prior to station operation Switch 5 ON Active day change occurs at midnight 12 00 a m 00 00 Option Switch 5 OFF Day change occurs at 6 00 a m 06 00 Note This change requires initialization to activate See page 14 fo...

Page 4: ...e central during the power failure will be ignored In regions with fre quent power interruptions an optional lithium battery can be installed which will sustain real time and cur rently active program information for approximately 90 days of continuous duty See Battery Installation on page 16 for more information Set Satellite Operating Mode Selecting one of three operating modes determines how th...

Page 5: ...left display and the station run time will be shown in the right display 2 Press or to select the desired program number 1 16 Note If the station run time has been adjusted to a value other than 100 using the Adjust feature the right display will alternate between the programmed run time and the adjusted run time The Adjust LED will light momentarily when the adjusted run time is displayed Example...

Page 6: ...ess or to select the desired program number 1 16 4 Press Start time 01 will begin flashing and current start time will be shown 5 Press or to select desired start time number 1 12 6 Press Hours digit s or OFF will begin flashing 7 Press or to adjust hours digits up or down Observe for correct a m p m time Note If no start time is desired select OFF located between 11 p m and 12 a m 23 00 and 00 00...

Page 7: ...ress The schedule type will begin flashing 5 Press or until CA Calendar is flashing 6 Press The current Calendar schedule is displayed and Sunday Su of week 1 is flashing 7 Choose to select or delete the indicated flashing day To select Press The day stops flashing and remains displayed and the next day starts flashing To delete Press The day disappears and next day starts flashing 8 Repeat step 7...

Page 8: ...day will be active At the end of the active day the Interval Day number will reset to 06 indicating six days until the next scheduled watering Note The Interval Day number cannot be greater than the interval reference number If attempted the Interval Day number will automatically be reduced to equal the the Interval Reference number when the Enter Start key is pressed To set an Interval schedule 1...

Page 9: ...play will begin flashing 6 Press or to display desired number of repeats 0 3 7 Press The digits right of colon will begin flashing 8 Press or to select a soak time 0 59 minutes Example Shown Program 1 2 repeat cycles with a 10 minute soak time between cycles 9 Press to enter information into controller memory 10 Press The Program number will begin flashing 11 Repeat steps 2 10 for all programs as ...

Page 10: ...10 99 Multi Manual mode to provide simultaneous operation of up to 6 stations Cycle Mode This mode enables you to start and run all or part of any automatic watering program Full Cycle runs a complete cycle of any program selected Partial Cycle starts the program cycle at any selected station and runs only the stations with programmed run time which follow in the program cycle Note During a manual...

Page 11: ...lays will alternate between the time day and the program status Note Only the stations with a programmed run time in the program selected will operate during the syringe operation To syringe from 10 99 of station run time 1 Repeat steps 1 and 2 above 2 Press The left display shows a symbol A 25 adjusted run time value is automatically selected and shown in the right display To change the value con...

Page 12: ...hing in the left display The right display will show 00 run time 2 Press or as needed to select the desired station 3 Press The Run Time digits will begin flashing 4 Press or as needed to select desired Run Time 01 59 5 Press Selected station will start 6 Repeat steps 2 5 to start up to five additional Stations If the same run time is desired skip steps 3 and 4 Note Any additional stations entered...

Page 13: ...lied to individual programs and or globally to all programs Note the following Percent Adjust characteristics Adjustable from 10 to 250 100 is neutral position Adjusted station run time is displayed during program operation and while setting station run times See Note on page 5 regarding adjusted run time display adjust values will be reset to 100 when operated in the Central control mode Global a...

Page 14: ...olding key down for 5 seconds then release During the first portion of the test the displays will momentarily show the following information Software version installed i e version 1 0 1 0 Number of stations installed i e 16 stations 16 STA Diagnostic code i e 00 000 Memory chip number i e EE1 Note If the memory chip or timer chip is not functioning properly EE1 Err or CLK Err will be displayed The...

Page 15: ...nk Monitor Link Monitor enables any satellite communicating with the central to review the communications link status of all satellites within the network During Link Monitor operation the central continuously polls the network satellites in numerical sequence and rapidly displays the addresses accompanied by an audible beep If a satellite does not respond to the central during the polling process...

Page 16: ...o controller at power supply switch 16 WARNING TO AVOID ELECTRICAL SHOCK HAZARD ASSURE POWER SOURCE IS OFF BEFORE ATTEMPTING ANY CONTROLLER REPAIR ALL REPAIRS SHOULD BE PERFORMED BY A QUALIFIED TECHNICIAN Problem Probable Cause Remedy Controller inactive no display Controller on valve s not operating Pump does not operate Limited number of programs can be operated at a time a m or p m designation ...

Page 17: ...ad when manually activating multiple field outputs Power Indicator Lamps Two indicator lamps as shown in the illustration at right are provided to verify the presence of power to the control and field output circuits In normal operating conditions both lamps will be On If both lamps are Off no power is present Ensure the power supply circuit breaker switch is On Also check the main power source ci...

Page 18: ...a 3 ___ hrs ___ min Sta 19 ___ hrs ___ min Sta 35 ___ hrs ___ min Sta 51 ___ hrs ___ min Sta 4 ___ hrs ___ min Sta 20 ___ hrs ___ min Sta 36 ___ hrs ___ min Sta 52 ___ hrs ___ min Sta 5 ___ hrs ___ min Sta 21 ___ hrs ___ min Sta 37 ___ hrs ___ min Sta 53 ___ hrs ___ min Sta 6 ___ hrs ___ min Sta 22 ___ hrs ___ min Sta 38 ___ hrs ___ min Sta 54 ___ hrs ___ min Sta 7 ___ hrs ___ min Sta 23 ___ hrs _...

Page 19: ...U s e r s G u i d e Network LTC TM Plus Series Satellite TM R ...

Reviews: