background image

21

Spray Pro

 Monitor

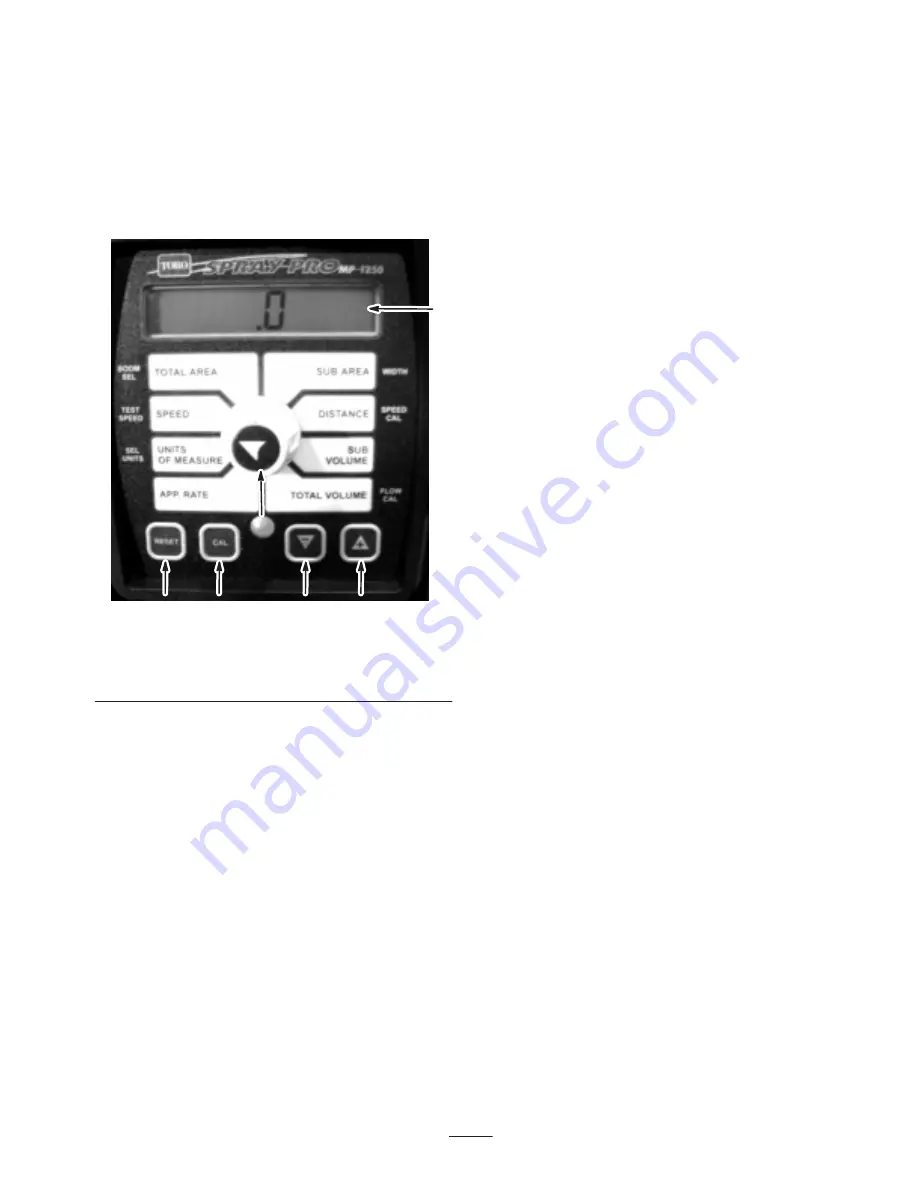
The Spray Pro monitor displays and monitors various
system performance data such as vehicle speed and
application rates.  It does not control the application rate.

The monitor has an LCD screen that displays the data you
select, a selection dial, and 4 buttons for calibrating the
monitor (Fig. 25).

1

2

3

3

3

3

Figure 25

1.

LCD screen

2.

Selection dial

3.

Calibration buttons

Selection Dial

The selection dial contains the following positions:

Speed

Displays the ground speed in miles per hour (if the
Units of Measure is set to US or TURF) or kilometers
per hour (if the Units of Measure is set to SI).

Units of Measure

Displays the current measurement unit selection as
follows:

US (United States measuring system)

SI (metric system)

TURF (as US but the volumes are in US gallons per
1000 sq ft instead of US gallons per acre)

App. Rate

Displays the application rate in US gallons per acre
(US), liters pre hectare (SI), or US gallons per 1000 sq
ft (TURF).

Total Volume

Displays the total volume in US gallons (US and
TURF) or liters (SI) that you have applied since you last
pressed the [RESET] button for this setting.

Sub Volume

Displays the total volume in US gallons (US and
TURF) or liters (SI) that you have applied since you last
pressed the [RESET] button for this setting, without
affecting the Total Volume display.  If you press
[RESET], the Sub Area also resets.

Distance

Displays the distance you have traveled in feet (US and
TURF) or meters (SI) since you last pressed the
[RESET] button for this setting.

Total area

Displays the total acres (US), hectares (SI), or sq feet
(TURF) that you have covered since you last pressed
the [RESET] button for this setting.

Sub Area

Displays the total acres (US), hectares (SI), or sq feet
(TURF) that you have covered since you last pressed
the [RESET] button for this setting, without affecting
the Total Area display.  If you press [RESET], the Sub
Volume also resets.

Buttons

The monitor has the following buttons:

[RESET]

Resets the Total Volume, Sub Volume, Distance, Total
Area, and Sub Area display settings to 0.

[CAL]

Used to enter and exit the calibration mode.

[–]

Reduces values displayed on the screen during
calibration.

[+]

Increases values displayed on the screen during
calibration.

Summary of Contents for Multi-Pro 1250

Page 1: ...Operator s Manual Original Instructions EN GB Form No 3328 296 Rev A Multi Pro 1250 Turf Sprayer Model No 41106 Serial No 230000001 and Up...

Page 2: ...3 Adding Fuel 13 Checking the Air Intake Screen 14 Checking the Brake Fluid 14 Checking the Transaxle Hydraulic Fluid 14 Filling the Fresh Water Tank 15 Page Operation 15 Think Safety First 15 Vehicle...

Page 3: ...echanical information and Note emphasizes general information worthy of special attention Safety Improper use or maintenance by the operator or owner can result in injury To reduce the potential for i...

Page 4: ...s are physically and mentally capable of operating the sprayer This sprayer is designed to carry only you the operator Never carry any passengers on the sprayer Never operate the sprayer when under th...

Page 5: ...other people know what you plan to do Obey all traffic rules and regulations The electrical and exhaust systems of the sprayer can produce sparks capable of igniting explosive materials Never operate...

Page 6: ...rough surfaces Shifting loads can cause the sprayer to tip over When operating with a heavy load reduce your speed and allow for sufficient braking distance Do not suddenly apply the brakes Use extra...

Page 7: ...d or lost 104 7634 1 Read the Operator s Manual 100 8458 1 Machine speed 2 To set the machine to a slow speed reduce pressure on the accelerator and pull up on the speed limiter 3 To set the machine t...

Page 8: ...1 Spray on 2 Spray off 100 8489 1 Left boom 2 Center boom 3 Right boom 4 Spray on 5 Spray off 6 Pump 7 On 8 Off 9 Continuous variable setting spray pressure 10 Increase 11 Decrease 12 Locked 13 Unloc...

Page 9: ...2 Air cleaner 13 Grease 14 Tire pressure 15 Read the instructions before servicing or performing maintenance 16 Pump 87 0570 1 Warning read the Operator s Manual 2 Electric shock hazard overhead power...

Page 10: ...571 5 kg Weight with standard spray system empty without operator 1630 lb 739 kg Weight with standard spray system full without operator 3100 lb 1406 kg Maximum gross vehicle weight GVW on level groun...

Page 11: ...ing bystanders or causing property damage Do not run the sprayer without a boom kit and nozzles installed Loose Parts Note Use the chart below to verify that all parts have been shipped Description Qt...

Page 12: ...adapter into place by swinging the levers toward the adapter and then secure them with the hairpin cotters Installing the Spray Pro Monitor 1 Install the monitor bracket on the dash Fig 3 using 2 flan...

Page 13: ...ne is extremely flammable and highly explosive A fire or explosion from gasoline can burn you and others and can damage property Fill the fuel tank outdoors in an open area when the engine is cold Wip...

Page 14: ...nk allows gasoline to expand Do not overfill 5 Install the fuel tank cap securely 6 Wipe up any fuel that may have spilled Checking the Air Intake Screen Check and clean as necessary the air intake sc...

Page 15: ...fore handling or mixing any chemicals 1 2 3 Figure 11 1 Filler cap 2 Fresh water tank 3 Spigot To open the fresh water tank spigot turn the lever on the spigot toward the front of the sprayer Operatio...

Page 16: ...ch the accelerator pedal then release the button Fig 14 3 To fine tune the setting turn the knob in or out as needed 4 Once you have it set you can lock it at that setting by turning the locking ring...

Page 17: ...amage Check all fluid levels and add the appropriate amount of specified fluids if any are found to be low Check the brake pedal operation Check to see that the lights are working Turn the steering wh...

Page 18: ...own points The rear tie down points are two steel loops under the back of the frame just in front of the adjustable boom frame Towing the Sprayer In case of an emergency the sprayer can be towed for a...

Page 19: ...20 controls the amount of fluid that is routed to the booms by directing fluid flow to the booms or the bypass hose to the tank You can control this valve in two ways the application rate switch or ma...

Page 20: ...he tank drain knob is located on top of the tank Fig 23 Turn the knob counterclockwise to drain the tank 1 Figure 23 1 Tank drain knob Tank Cover The tank cover is located in the center of the top of...

Page 21: ...in US gallons US and TURF or liters SI that you have applied since you last pressed the RESET button for this setting Sub Volume Displays the total volume in US gallons US and TURF or liters SI that...

Page 22: ...units of measure 6 Press CAL until the red light turns off You can also exit calibration mode by driving the sprayer Calibrating the Flowmeter The Spray Pro comes approximately calibrated for the flow...

Page 23: ...stance position press and hold CAL until the monitor displays CAL HOLD and the red light on the monitor illuminates The display will alternate between the speed calibration value and the distance valu...

Page 24: ...prayer on a level surface move the range selector to the Neutral position stop the engine and set the parking brake 2 Determine the amount of water needed to mix the amount of chemical you need as pre...

Page 25: ...et the parking brake place the range selector in the Neutral position and turn off the engine 2 Use the tank drain knob to drain any unused material from the tank and dispose of it according to local...

Page 26: ...bricate all grease fittings Replace the fuel filter Inspect the brakes Clean the engine rotating screen 2 Replace the paper cleaner element 2 Inspect the brake and parking brake Inspect the condition...

Page 27: ...nspect the air filter Inspect the engine cooling fins Check any unusual engine noises Check any unusual operating noises Check the tire pressure Check for fluid leaks Check the instrument operation Ch...

Page 28: ...cking point at the front of the sprayer is under the A arms Fig 27 1 1 Figure 27 1 Front jacking points The jacking point at the rear of the sprayer is on the rear frame support between the angle weld...

Page 29: ...in a clean cloth 4 Put one or two ounces of oil on the element Fig 30 Important Replace the foam element if it is torn or worn m 3247 2 1 Figure 30 1 Foam element 2 Oil 5 Squeeze the element to distr...

Page 30: ...e seat forward Components under the seat will be hot if the sprayer has been running If you touch hot components you may be burned Allow the sprayer to cool before performing maintenance or touching c...

Page 31: ...n additional 1 2 turn Fig 34 6 Fill the crankcase with the correct type of new oil refer to Changing Oil page 30 steps 8 through 10 7 Dispose of the used oil filter at a certified recycling center Gre...

Page 32: ...mp off the hose on either side of the fuel filter to prevent gas from pouring out of the hoses when you remove the filter 4 Place a drain pan under the filter 5 Squeeze the ends of the hose clamps tog...

Page 33: ...Dexron IIl ATF Important Use only the hydraulic fluids specified Other fluids could cause system damage 12 Start the engine and drive the sprayer to fill the hydraulic system Recheck the oil level an...

Page 34: ...component of the sprayer Inspect them as follows every 100 hours Inspect the brake shoes for wear or damage If the lining brake pad thickness is less than 1 16 inch 1 6 mm replace the brake shoes Ins...

Page 35: ...be the same length when you are finished 7 Tighten the tie rod jam nuts when the adjustment is correct 8 Ensure that there is full travel of the steering wheel in both directions Servicing the Drive B...

Page 36: ...er gauge to check and adjust the air gap Type Champion RC 12YC or equivalent Air Gap 0 030 inch 0 76 mm Removing the Spark Plug 1 Set the parking brake stop the pump stop the engine and remove the ign...

Page 37: ...mpounds chemicals known to the State of California to cause cancer and reproductive harm Wash hands after handling Warning Important Do not jump start the sprayer Always keep the battery clean and ful...

Page 38: ...hecking the Electrolyte Level Check the electrolyte level every 50 operating hours or if the machine is in storage every 30 days 1 Loosen the knobs on the sides of the battery box and remove the batte...

Page 39: ...Pull the strainer out of the hole 4 Clean the strainer with clean running water 5 Replace the strainer seating it fully into the hole 6 Connect the hose to the top of the tank and secure it with the r...

Page 40: ...system 5 minutes C Stop the engine allow it to cool and drain the fuel tank D Restart the engine and run it until it stops E Choke the engine F Start and run the engine until it will not start again...

Page 41: ...uel g 2 Dirt water or stale fuel is in the fuel system 2 Drain and flush the fuel system add fresh fuel 3 Clogged fuel line 3 Clean or replace 4 The spark plug lead is disconnected 4 Reconnect the spa...

Page 42: ...aged or broken 3 Replace the spark plug 4 Carburetor idle passages are plugged 4 Contact your Authorized Service Dealer 5 The idle speed adjusting screw is incorrectly set 5 Contact your Authorized Se...

Page 43: ...because the engine bogs down or stalls 1 The parking brake is set 1 Release the parking brake The sprayer will not operate in either direction 1 The range selector is in the Neutral position 1 Press t...

Page 44: ...s and replace any that appear damaged A boom valve is leaking 1 An O ring is deteriorated 1 Stop the spray system and pump and turn off the sprayer Disassemble the valve and replace the O rings A pres...

Page 45: ...librate the flowmeter 4 The flow meter is damaged 4 Contact your Authorized Service Dealer The Total Volume is inaccurate 1 The flow meter is dirty or clogged 1 Clean the flow meter 2 The flow meter i...

Page 46: ...46...

Page 47: ...47...

Page 48: ...ather storage practices contamination use of unapproved coolants lubricants additives or chemicals etc Normal wear and tear items Normal wear and tear includes but is not limited to damage to seats du...

Reviews: