Motor Installation (continued)
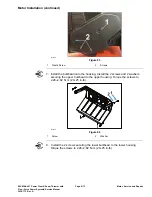
2. Install the 3 screws securing the motor to the LH frame plate. Torque the
screws to 8.5–11.3 N • m (75–100 in-lb).
g320288
Figure 81
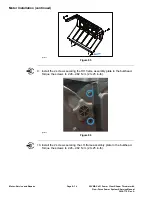
3. Install the rotor pulley assembly to the rotor shaft. Install the Belleville washer
and new screw securing the rotor pulley assembly to the rotor shaft. Torque
screw to 10–12.4 N • (90-110 in-lb).
g323087
Figure 82
4. Apply Loctite to the motor pulley threads.
5. Thread the new ribbed V-belt around the motor pulley and route the ribbed
V-belt around the rotor pulley assembly.
Note:
Install a new ribbed V-belt each time the ribbed V-belt is installed.
Failure to do so can result in impaired rotor function.
6. Install the belt cover to the housing. Install the plastic screw securing the belt
cover to the LH frame plate assembly. Install the 3 screws securing the belt
cover to the housing. Torque the screw to 1.7–2.3 N • m (15–20 in-lb).
Motor: Service and Repairs
Page 8–12
60V MAX e21 Power Clear® Snow Thrower with
Flex—Force Power System® Service Manual
3438-775 Rev A


