6
m–4372
2
1
2
3
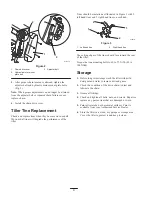
Figure 2
1.
Chain drive cover
2.
Hydraulic motor, mount
plate bolt
3.
Adjuster bolt
5. After proper chain tension is attained, tighten the
adjuster bolt and hydraulic motor mount plate bolts
(Fig, 2).
Note: When proper adjustment can no longer be attained
from the adjuster bolt or repeated chain failures occur,
replace chain.
6. Install the chain drive cover.
Tiller Tine Replacement
Check and replace tines when they become worn or dull.
Worn or dull tines will degrade the performance of the
tiller.
Tines should be installed as illustrated in Figure 3 with 2
left hand tines and 2 right hand tines on each hub.
m–4414
2
1
2
1
Figure 3
1.
Left hand tine
2.
Right hand tine
The cutting edges of the tines should face toward the rear
of the tiller.
Torque the tine mounting bolts to 63 to 77 ft.-lb. (85 to
104 N
⋅
m).
Storage
1. Before long term storage wash the tiller with mild
detergent and water to remove dirt and grime.
2. Check the condition of the drive chain. Adjust and
lubricate the chain.
3. Grease all fittings.
4. Check and tighten all bolts, nuts, and screws. Repair or
replace any part or tines that are damaged or worn.
5. Paint all scratched or bare metal surfaces. Paint is
available from your Authorized Service Dealer.
6. Store the tiller in a clean, dry garage or storage area.
Cover the tiller to protect it and keep it clean.
Summary of Contents for Dingo 22445
Page 8: ......


