background image

3. Remove the filter canister and clean the mounting

surface.

4. Lubricate the gasket on the filter canister with clean

oil.

5. Install the filter canister by hand until the gasket

contacts mounting surface, then rotate it an
additional 1/2 turn.

6. Tighten the drain plug on the bottom of the filter

canister.

Electrical System
Maintenance

Fuses

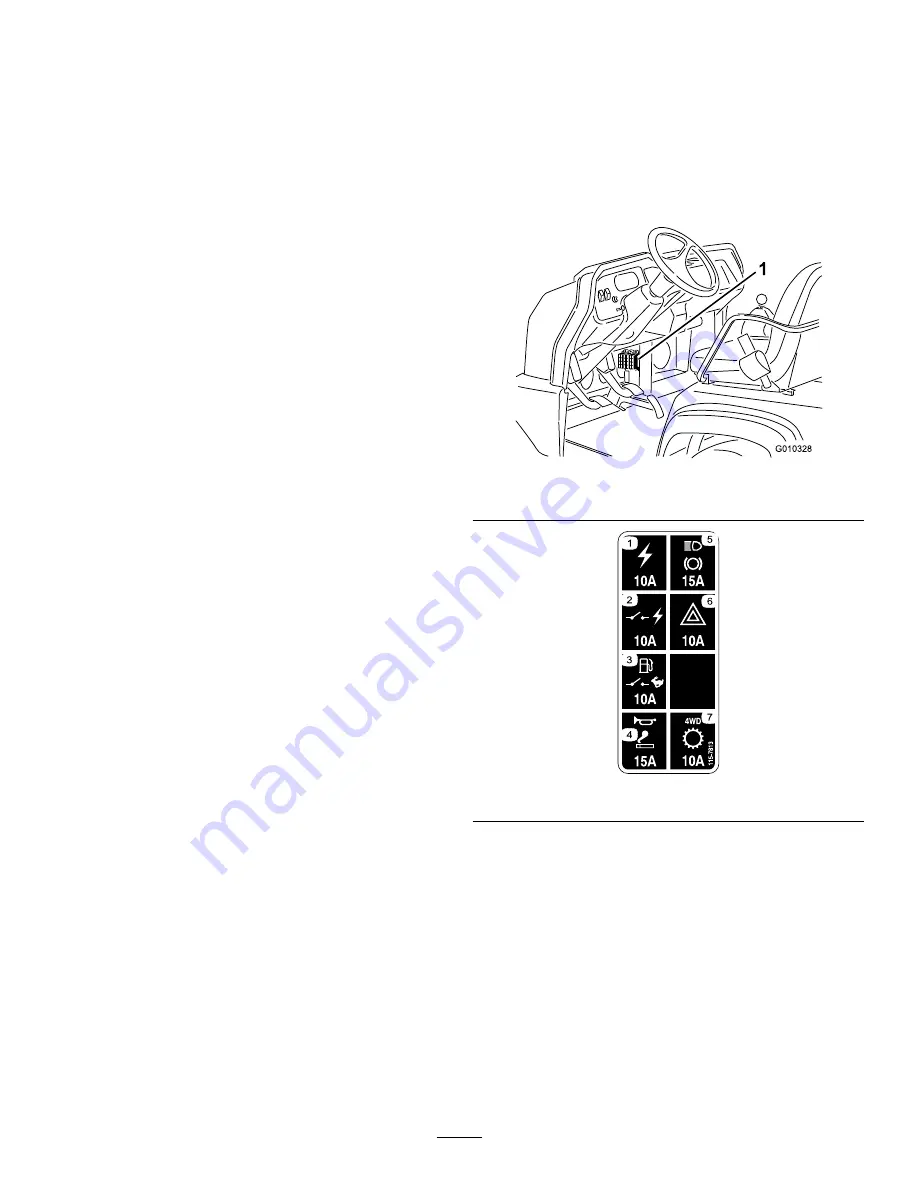
The fuses for the machine’s electrical system are
located under the center of the dash panel (Figure 42
Figure 43).

Figure 42

1.

Fuses

Figure 43

39

Summary of Contents for 7354

Page 1: ... Industrial Workman HDX D Utility Vehicle with Bed Model No 07354 Serial No 311000001 and Up To register your product or download an Operator s Manual or Parts Catalog at no charge go to www Toro com Original Instructions EN ...

Page 2: ...enuine Toro parts or additional information contact an Authorized Service Dealer or Toro Customer Service and have the model and serial numbers of your product ready Figure 1 identifies the location of the model and serial numbers on the product Write the numbers in the space provided Figure 1 1 Model and serial number location Model No Serial No This manual identifies potential hazards and has sa...

Page 3: ...ce Schedule s 30 Service Interval Chart 31 Heavy Duty Operation 32 Premaintenance Procedures 32 Removing the Full Bed 32 Installing the Full Bed 32 Jacking the Vehicle 33 Removing the Hood 33 Lubrication 34 Greasing Bearings and Bushings 34 Engine Maintenance 37 Servicing the Air Cleaner 37 Changing the Engine Oil And Filter 37 Fuel System Maintenance 38 Fuel Lines and Connections 38 Servicing the...

Page 4: ...the attachments that adapt to the Workman are covered in this manual See the specific Operator s Manual provided with each attachment for additional safety instructions Read these manuals To reduce the potential for injury or death comply with the following safety instructions Supervisor s Responsibilities Make sure operators are thoroughly trained and familiar with the Operator s Manual and all l...

Page 5: ...ents or exceed the vehicle maximum gross vehicle weight GVW When starting the engine Sit on operator s seat and ensure that the parking brake is engaged Disengage PTO if so equipped and return the hand throttle lever to the Off position if so equipped Move shift lever to Neutral and press the clutch pedal Keep your foot off of the accelerator pedal Turn ignition switch to the On position When the ...

Page 6: ...stem Keep your body and hands away from pin hole leaks or nozzles that eject hydraulic fluid under high pressure Use paper or cardboard not hands to search for leaks Hydraulic fluid escaping under pressure can have sufficient force to penetrate skin and do serious damage If fluid is injected into the skin it must be surgically removed within a few hours by a doctor familiar with this form of injur...

Page 7: ...ed in EN 1032 Whole Body Measured vibration level 0 3 m s2 Uncertainty Value K 0 5 m s2 Measured values were determined according to the procedures outlined in EN 1032 Sound Level Certification When tested per ITSDF B56 11 5 2005 the vehicle meets Alcoa 30 3 2 Section 4 1 2a for engine speeds up to 3650 without cab 80 dBA 2850 with cab 80 dBA 7 ...

Page 8: ...zard bystanders no riders on machine 115 2047 1 Warning do not touch the hot surface 93 9084 1 Lift point 2 Tie down point 115 7723 1 Warning the hydraulic oil pressure is 124 bar 1800 PSI 2 Coupler A 3 Coupler B 115 7740 1 Warning maximum trailer weight is 1500 lb 680 kg maximum tongue weight is 200 lb 90 kg 2 Warning trailer brakes are required when towing greater than 1500 lb 680 kg maximum tra...

Page 9: ...and turn gradually use caution and drive slowly when driving on slopes do not exceed 20 mph 32 kph and drive slowly over rough terrain or when carrying a full or heavy load 115 2282 1 Warning read the Operator s Manual 2 Warning stay away from moving parts keep all guards and shields in place 3 Crushing dismemberment hazard of bystanders keep bystanders a safe distance from the vehicle do not carr...

Page 10: ...tor s Manual before servicing transmission fluid 106 6755 1 Engine coolant under pressure 3 Warning do not touch the hot surface 2 Explosion hazard read the Operator s Manual 4 Warning read the Operator s Manual 93 9879 1 Stored energy hazard read the Operator s Manual 93 7814 1 Entanglement hazard belt stay away from moving parts 93 9868 1 Crushing hazard of hand read the Operator s Manual 10 ...

Page 11: ... power point 106 2355 1 Slow 3 Transmission third high no fast speed 2 Fast 106 7767 1 Warning read the Operator s Manual avoid tipping the machine wear the seat belt lean away from the direction the machine is tipping 93 9899 93 9899 1 Crushing hazard install the cylinder lock 115 7756 1 High flow hydraulics engaged 11 ...

Page 12: ...7 Disengage 14 Parking brake Battery Symbols Some or all of these symbols are on your battery 1 Explosion hazard 6 Keep bystandersa safe distance from the battery 2 No fire open flame or smoking 7 Wear eye protection explosive gases can cause blindness and other injuries 3 Caustic liquid chemical burn hazard 8 Battery acid can cause blindness or severe burns 4 Wear eye protection 9 Flush eyes imme...

Page 13: ...al 1 View before operating machine Note Determine the left and right side of the machine from the normal operating position 1 Checking the Fluid Levels No Parts Required Procedure 1 Check the engine oil level before and after the engine is first started refer to Checking the Engine Oil Level in Operation 2 Check the transaxle hydraulic fluid level before the engine is first started refer to Checki...

Page 14: ...pply service brakes to stop or slow vehicle CAUTION Worn or maladjusted brakes may result in personal injury If the brake pedal travels to within 1 1 2 inches 3 8 cm of the vehicle floor board the brakes must be adjusted or repaired Gear Shift Lever Fully press the clutch pedal and move the shift lever Figure 4 into the desired gear selection A diagram of the shift pattern is indicated below Figur...

Page 15: ...ockwise to the Off position Figure 6 1 High flow hydraulics switch Optional 8 Ignition switch 2 Horn 9 Power point 3 Tachometer 10 3rd high lockout switch 4 Hour meter 11 Oil pressure warning light 5 Speedometer 12 Glow plug indicator 6 Coolant temperature gauge and light 13 Charge indicator 7 Fuel gauge Hour Meter Indicates the total hours of machine operation The hour meter Figure 6 starts to fu...

Page 16: ...e this precaution may result in damage to the engine Check the operation of warning lights as follows Apply parking brake Turn the ignition key to the On Preheat position but do not start the engine The coolant temperature charge indicator and oil pressure lights should glow If any light does not function either a bulb is burned out or there is a malfunction in the system which must be repaired Fu...

Page 17: ... 200 lb operator 200 lb passenger and loaded attachment 3044 lb 1381 kg Maximum Gross Vehicle Weight 4 850 lb 2200 kg Tow Capacity Tongue weight 600 lb 272 kg Maximum trailer weight 3 500 lb 1587 kg Ground Clearance 7 inches 18 cm w no load Wheel Base 70 inches 118 cm Wheel Tread center line to center line Front 46 inches 117 cm Rear 47 7 inches 121 cm Height 75 inches 190 5 cm to top of ROPS Atta...

Page 18: ...een the Full and Add marks no additional oil is required The engine uses any high quality 10W 30 detergent oil having the American Petroleum Institute API service classification CF or higher Choose a viscosity according to the table in Figure 10 Figure 10 1 Position the machine on a level surface 2 Remove the dipstick and wipe it with a clean rag Insert the dipstick into the tube and make sure it ...

Page 19: ...m fuel can burn you and others and can cause property damage Before removing the fuel tank cap make sure the vehicle is positioned on a level surface Open fuel tank cap slowly Use a funnel and fill the fuel tank outdoors in an open area when the engine is off and is cold Wipe up any fuel that spills Do not fill the fuel tank completely full Add fuel to the fuel tank until the level is 1 in 25 mm b...

Page 20: ...ol enough to touch without burning your hand Use a rag when opening the radiator cap and open the cap slowly to allow steam to escape 2 Check the coolant level on the side of the reserve tank Figure 15 The coolant should be up to the Cold line when engine is cold Figure 15 1 Reserve tank 3 Cold line 2 Hot line 3 If coolant is low remove the reserve tank cap and add a 50 50 mixture of water and per...

Page 21: ...d cap onto the filler neck 5 Start the engine and turn on the attachment Let them run for about two minutes to purge air from the system Stop the engine and attachment and check for leaks Important The vehicle must be running before starting the high flow hydraulics WARNING Hydraulic fluid escaping under pressure can penetrate skin and cause injury Make sure all hydraulic fluid hoses and lines are...

Page 22: ...is an example of tire wear caused by under inflation Figure 19 1 Under inflated tire Figure 20 is an example of tire wear caused by over inflation Figure 20 1 Over inflated tire Checking the Brake Fluid Service Interval Before each use or daily Check the brake fluid level Every 1 000 hours Every 2 years whichever comes first Change the brake fluid The brake fluid reservoir is shipped from the fact...

Page 23: ...throttle lever to the Off position if so equipped 3 Move the shift lever to the Neutral position and press the clutch pedal 4 Keep your foot off of the accelerator pedal 5 Turn the ignition switch to the On position When the glow plug indicator light goes off the engine is ready to start 6 Rotate the ignition key switch to the Start position Release the key immediately when the engine starts and a...

Page 24: ...e brakes to rapidly stop the vehicle without locking up the tires Repeat this 10 times waiting 1 minute between stops to avoid overheating the brakes This is most effective if the vehicle is loaded with 1000 lb 454 kg Vary vehicle speeds during operation Avoid excessive idling Avoid fast starts and quick stops A break in oil for the engine is not required The original engine oil is the same type s...

Page 25: ...pervisor for assistance Many factors contribute to accidents You have control over several of the most important Your actions such as driving too fast for conditions braking too fast turning too sharp and combinations of these are frequent cause of accidents One of the major causes of accidents is fatigue Be sure to take occasional breaks It is very important that you stay alert at all times Never...

Page 26: ...ts make a vehicle harder to stop or turn The heavier the load the longer it takes to stop The braking characteristics also change with no bed or attachment on the vehicle Fast stops may cause the rear wheels to lock up before the front wheels lock up which may affect the control of the vehicle It is a good idea to decrease vehicle speed with no bed or attachment Turf and pavement are much slipperi...

Page 27: ...eat Loading and Dumping The weight and position of the cargo and passenger can change the vehicle center of gravity and vehicle handling To avoid loss of control resulting in personal injury follow these guidelines Do not carry loads which exceed the load limits described on the vehicle weight label The vehicle has several combinations of boxes platforms and attachments available These can be used...

Page 28: ... feature can be enough to get you into dangerous situations such as climbing slopes that are too steep to turn around Be careful when operating especially on steeper slopes Transporting the Vehicle For moving the vehicle long distances use a trailer Make sure the vehicle is secured to the trailer Refer to Figure 25 Figure 26 for the location of the tie down points Important Trailers weighing over ...

Page 29: ...This places approximately 10 600 lb 272 kg max of the Gross Trailer Weight GTW on the tow hitch of the vehicle Trailer brakes are required whenever you tow a trailer over 1500 lb 680 kg GTW is towed behind a Workman vehicle When hauling cargo or towing a trailer attachment do not overload your vehicle or trailer Overloading can cause poor performance or damage to the brakes axle engine transaxle s...

Page 30: ...adiator Clean more frequently in dirty conditions Every 50 hours Check the battery fluid level Every 30 days if in storage Check the battery cable connections Every 100 hours Check the level of front differential oil four wheel drive models only Grease all bearings and bushings Lubricate more frequently in heavy duty applications Check the condition of the tires Every 150 hours Change engine oil a...

Page 31: ... operating position DANGER Only qualified and authorized personnel shall be permitted to maintain repair adjust or inspect the vehicle Avoid fire hazards and have fire protection equipment present in the work area Do not use an open flame to check level or leakage of fuel battery electrolyte or coolant Do not use open pans of fuel or flammable cleaning fluids for cleaning parts CAUTION If you leav...

Page 32: ...bed mounting bracket to the frame bracket Figure 28 Figure 28 1 Bed mounting bracket 2 Remove the lynch pins and clevis pins securing the pivot brackets to the frame channels Figure 29 Figure 29 1 Left rear corner of bed 4 Clevis pin 2 Vehicle frame channel 5 Lynch pin 3 Pivot plate 3 Lift the bed off of the vehicle CAUTION The full bed weighs approximately 325 lb 147 5 kg so do not try to install...

Page 33: ...movement could cause the vehicle to slip off of the jack Do not work under the vehicle without jack stands supporting it The vehicle could slip off a jack injuring any one beneath it When jacking up the front of the vehicle always place a 2 x 4 block or similar material between the jack and the vehicle frame The jacking point at the front of the vehicle is under the front center frame support Figu...

Page 34: ...larly with No 2 General Purpose Lithium Base Grease The grease fitting locations and quantities are as follows Ball joints 4 tie rods 2 pivot mounts 2 and steering cylinder 2 Figure 33 Spring tower 2 Figure 34 Clutch 1 accelerator 1 brake qty 1 Figure 35 Accelerator arm 1 Figure 36 U joint 18 and 4 wheel drive shaft 3 Figure 37 Important When greasing the drive shaft universal shaft bearing crosse...

Page 35: ...Figure 34 Figure 35 Figure 36 35 ...

Page 36: ...Figure 37 36 ...

Page 37: ...ter is removed 3 Remove and replace the primary filter Note Cleaning of the used element is not recommended due to the possibility of damage to the filter media 4 Inspect the new filter for shipping damage checking the sealing end of the filter and the body Important Do not use a damaged element 5 Insert the new filter by applying pressure to the outer rim of the element to seat it in the canister...

Page 38: ...ions Servicing the Water Separator Fuel Filter Draining the Water Separator Service Interval Before each use or daily Drain water or other contaminants from the water separator 1 Place a clean container under the fuel filter Figure 41 2 Loosen the drain plug on the bottom of the filter canister Figure 41 1 Water separator filter canister 3 Tighten the drain plug on the bottom of the filter caniste...

Page 39: ...r canister by hand until the gasket contacts mounting surface then rotate it an additional 1 2 turn 6 Tighten the drain plug on the bottom of the filter canister Electrical System Maintenance Fuses The fuses for the machine s electrical system are located under the center of the dash panel Figure 42 Figure 43 Figure 42 1 Fuses Figure 43 39 ...

Page 40: ...st may be identified by a sign on top of the battery cover 3 Connect one end of the other jumper cable to the negative terminal of the battery in the other vehicle The negative terminal has NEG on the battery cover Do not connect the other end of the jumper cable to the negative post of the discharged battery Connect it to the engine or frame Do not connect the jumper cable to the fuel system Figu...

Page 41: ...bove the bottom of the fill ring inside each cell If you store the machine in a location where temperatures are extremely high the battery will run down more rapidly than if the machine is stored in a location where temperatures are cool Drive System Maintenance Changing the Front Differential Oil Four Wheel Drive Models Only Service Interval Every 800 hours 1 Position the vehicle on a level surfa...

Page 42: ...nspecting the Tires Service Interval Every 100 hours Operating accidents such as hitting curbs can damage a tire or rim and also disrupt wheel alignment so inspect tire condition after an accident Check the tire pressure frequently to ensure proper inflation If the tires are not inflated to the correct pressure the tires will wear pre maturely Figure 48 is an example of tire wear caused by under i...

Page 43: ...ot turn equally refer to the Workman Service Manual for the adjustment procedure Cooling System Maintenance Removing Debris from the Cooling System Service Interval Before each use or daily Clean more frequently in dirty conditions 1 Turn the engine off Clean the engine area thoroughly of all debris 2 Remove the 5 bolts securing radiator screen guard to the radiator The guard is not shown in the f...

Page 44: ...sconnect the lower radiator hose and allow coolant to flow into a drain pan When coolant stops connect the lower radiator hose 5 Open the bleed screw on top of the water pump Figure 56 Figure 56 1 Bleed screw 6 Remove the coolant drain plug from the engine and allow coolant to flow into a drain pan When coolant stops install the drain plug 7 Slowly fill the radiator with a 50 50 mixture of water a...

Page 45: ... Install the rubber grip onto the parking brake lever Adjusting the Brake Pedal Service Interval Every 200 hours Note Remove the front hood to ease the adjustment procedure 1 Remove the cotter pin and clevis pin securing the master cylinder yoke to the brake pedal pivot Figure 59 Figure 59 1 Master cylinder yoke 2 Brake pedal pivot 2 Lift up on the brake pedal Figure 60 until it contacts the frame...

Page 46: ...rnator belt 2 Alternator brace Using a bar rotate the alternator until the proper belt tension is attained then tighten the mounting bolts Controls System Maintenance Adjusting the Accelerator Pedal 1 Position the vehicle on a level surface stop the engine and engage the parking brake 2 Adjust the ball joint on the accelerator cable Figure 62 to allow 0 100 to 0 250 inch 2 54 to 6 35 mm of clearan...

Page 47: ...plate fingers 4 Tighten the jam nuts after the adjustment has been attained 5 Recheck the 3 75 0 12 inch 9 5 0 3 cm dimension after the jam nuts have been tightened to ensure proper adjustment Readjust if necessary 6 Connect the return spring to the clutch lever Important Ensure that the rod end is positioned squarely on the ball not twisted and remains parallel to the clutch pedal after the jam n...

Page 48: ...to air dry before installing Figure 68 1 Hydraulic strainer 5 Install the strainer 6 Install the hydraulic hose and 90 degree fitting to the strainer in the same orientation 7 Install and tighten the drain plug 8 Fill the reservoir with approximately 7 5 qt 7 l of Dexron III ATF Refer to Checking the Hydraulic Fluid Level 9 Start the engine and operate the vehicle to fill the hydraulic system Chec...

Page 49: ...sity ASTM D445 cSt 40ºC 44 to 48 cSt 100ºC 7 9 to 8 5 Viscosity Index ASTM D2270 140 to 152 Pour Point ASTM D97 35ºF to 46ºF FZG Fail stage 11 or better Water content new fluid 500 ppm maximum Industry Specifications Vickers I 286 S Vickers M 2950 S Denison HF 0 Vickers 35 VQ 25 Eaton ATS373 C Note Many hydraulic fluids are almost colorless making it difficult to spot leaks A red dye additive for ...

Page 50: ...0 Check the tire pressure refer to Checking the Tire Pressure 11 Check anti freeze protection and add a 50 50 solution of water and anti freeze as needed for expected minimum temperature in your area 12 Remove the battery from the chassis check the electrolyte level and charge it fully refer to Servicing the Battery Note Do not connect the battery cables to the battery posts during storage Importa...

Page 51: ...Schematics Hydraulic Schematic Rev A 51 ...

Page 52: ...High Flow Hydraulics Schematic Optional Rev A 52 ...

Page 53: ...Electrical Schematic Rev A 53 ...

Page 54: ...Notes 54 ...

Page 55: ...Notes 55 ...

Page 56: ...painted surfaces scratched decals or windows etc Parts Parts scheduled for replacement as required maintenance are warranted for the period of time up to the scheduled replacement time for that part Parts replaced under this warranty are covered for the duration of the original product warranty and become the property of Toro Toro will make the final decision whether to repair any existing part or...

Reviews: