background image

Set-Up Instructions

7

Checking the Wiring and
Fasteners

Inspect the tractor for any loose electrical
connections and secure them as required. Check
the wire routing to make sure moving parts do
not interfere with wires and cause a short.

Assure all fasteners are tight.

Burnishing the Clutch

The following break–in procedure must be performed
as part of predelivery service or when a new clutch is
installed.

Note:

There must be a PTO driven
attachment installed to provide a load
in order to burnish the clutch facings
properly.

1.

Run the engine at full throttle and engage the
clutch bringing the load to full speed. Then
disengage the clutch.

2.

Let the load come to a full stop, then engage
again.

3.

Repeat these procedures (1 and 2) 5 times.

Summary of Contents for 73470

Page 1: ...TY USE Seat Assembly Shoulder Bolt 5 16 Locknut 5 16 1 2 2 Installing the seat Steering Wheel Boot Washer Nut Lock Washer Trim Cover 1 1 1 1 1 Installing the steering wheel Bolt 1 4 20 x 75 Long Hex Nut 1 4 20 2 2 Attaching the battery cables Hitch Pin Hairpin Cotter Flat Washer 50 I D 1 1 2 Installing the drawbar hitch pin Key 1 Use in ignition switch Operator s Manual Riding Mower Safety Video 1...

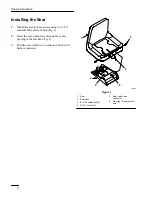
Page 2: ...lock nuts Fig 1 2 Insert the seat switch wire through the center opening in the seat base Fig 1 3 Push the seat switch wire connector into the wire harness connector 1 2 5 m 3453 3 4 6 Figure 1 1 Seat 2 Seat base 3 5 16 shoulder bolt 2 4 5 16 Locknut 4 5 Seat switch wire connector 6 Opening for seat switch wire ...

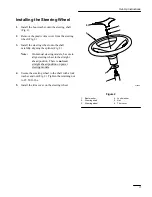
Page 3: ...nes Fig 2 Note On manual steering models be sure to align steering wheel in the straight ahead position There is no fixed straight ahead position on power steering models 4 Secure the steering wheel to the shaft with a lock washer and nut Fig 2 Tighten the retaining nut to 45 50 ft lbs 5 Install the trim cover on the steering wheel m 2482 1 3 2 4 5 6 Figure 2 1 Boot washer 2 Steering shaft 3 Steer...

Page 4: ...surface check to make sure the front wheel toe in is between 1 8 and 1 4 For instructions on adjusting toe in refer to the Maintenance section in Operator s Manual Checking Tire Pressure Check front and rear tire pressure The correct front and rear tire pressure is 12 psi 82 7 kPa ...

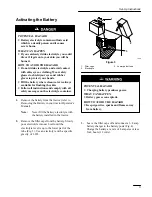
Page 5: ...e container 1 Remove the battery from the tractor refer to Removing the Battery in your tractor Operator s Manual Note Never fill the battery electrolyte with the battery installed in the tractor 2 Remove the filler caps from the battery Slowly pour electrolyte into each cell until the electrolyte level is up to the lower part of the tube Fig 3 Use an electrolyte with a specific gravity of 1 265 1...

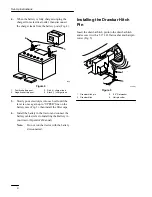
Page 6: ...evel is once again up to UPPER line on the battery case Fig 3 then install the filler caps 6 Install the battery in the tractor and connect the battery cables refer to Installing the Battery in your tractor Operator s Manual Note Do not run the tractor with the battery disconnected Installing the Drawbar Hitch Pin Insert the drawbar hitch pin into the drawbar hitch and secure it with a 50 I D flat...

Page 7: ...t Burnishing the Clutch The following break in procedure must be performed as part of predelivery service or when a new clutch is installed Note There must be a PTO driven attachment installed to provide a load in order to burnish the clutch facings properly 1 Run the engine at full throttle and engage the clutch bringing the load to full speed Then disengage the clutch 2 Let the load come to a fu...

Page 8: ...ake sure all lubrication points have been greased as shown in the Maintenance section of tractor Operator s Manual 4 Fill the tank with unleaded regular gasoline with an octane rating of at least 85 Open the fuel shutoff valve and check the fuel hose and fittings for leaks 5 As applicable check and test the operation of the following Engine choke and throttle controls Gauges Headlights and taillig...

Reviews: